As part of this color series I am doing, I’m realizing that there are some things even more fundamental that need to be explained so that everything else I am teaching here makes better sense. I have had several questions asking about what a shadow is and how to recognize them. I have also had several semesters worth of students who also have no idea how to see a shadow on the figures they are working from. This is in response to these questions in hopes that this will clear things up when I talk about shadows, indirect light, and when I use the word Notan and why. Here is a technical breakdown of what a shadow is, how to make them, and why they are important.
WHAT
The arts and astronomy focus on a more specific language regarding shadows while in the public, Youtube videos, educational books, and several articles I looked up on shadows focused primarily on the cast shadow, barely referencing the object projecting the shadow or that the object projecting the shadow also has a shadow side to it. The terms cast and form are not included in this dialog.
As an artist our focus is more upon the projector and less so on the projections. Therefore our language begins with form shadows as opposed to cast shadows.
This is the definition of shadow without preceding it with the words cast or form:
Shadow – a dark area or shape produced by a body coming between rays of light and a surface.
Here are a list of terms related to shadows, both cast and form, that you might want to copy paste into a document of your own for future reference.
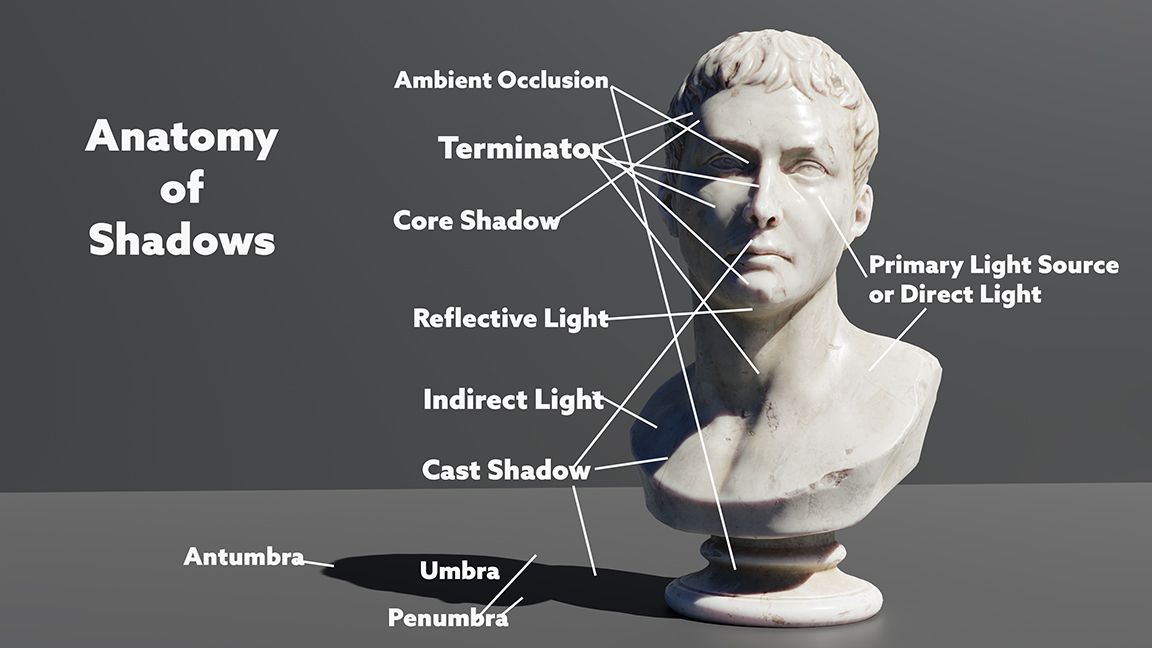
CAST SHADOW RELATED TERMS
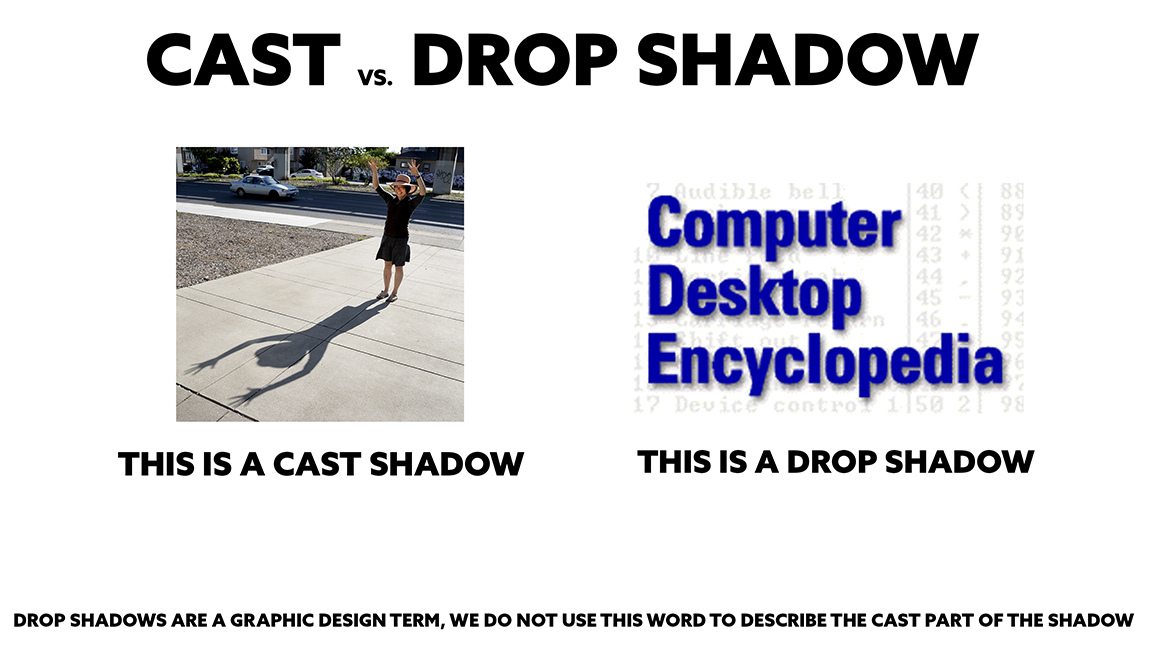
Cast Shadow – The Silhouetted Projection of an object illuminated by a source of light. Multiple projections will be cast if there is more than one light, and the projections will appear out of focus if the light is larger than the object receiving the light. DROP SHADOW is not the same as cast shadow even though you might see reference out there in the world with the cast mislabeled. Drop shadow comes from graphic design and is a floating shadow below a logo, frame, etc.
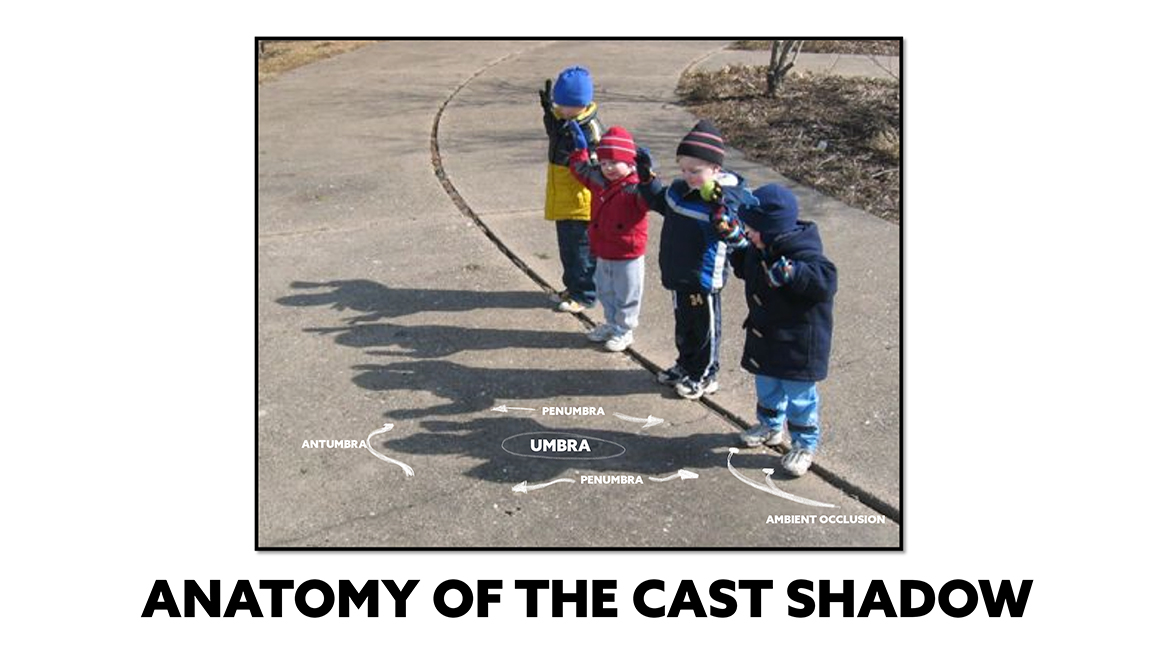
Umbra – core or center of the shadow, the darkest portion of it.
Penumbra – the gradated space between where the light and shadow meet each other in space
Antumbra – the end of the cast shadow, or the “front” “before” the shadow as the word suggests.
Ambient Occlusion – The absolute darkest part of the shadow, usually recessed , is called the ambient occlusion. You will see this term again below.
Indirect Light – Secondary light that illuminates the cast shadow. Outdoors this is the blue sky is the color of the cast shadow. It mixes with the local color sometimes making it hard to see the blue influence.
FORM SHADOW RELATED TERMS
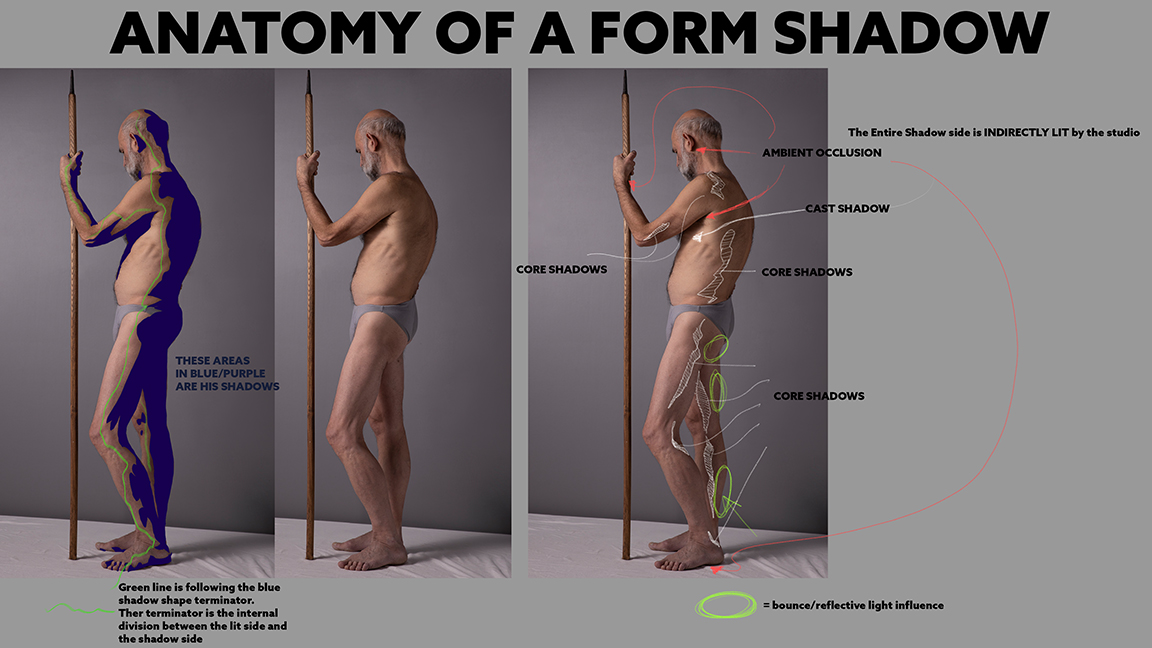
Form Shadow – The opposing side of an object unable to receive light rays from the “direct” source of illumination.
Terminator – also known as the bed bug line, or the edge along the form where the light and shadow meet each other. If the light is strong the terminator will end more abruptly. The softer the light gets, the more gradated the terminator becomes.
Core Shadow – another name for the terminator used when the shadow side of the terminator is illuminated with reflective light. The terminator line does not receive this reflected light and as a result appears to be the darkest part of the shadow space.
(Bed bug line comes from an old saying by art teacher Philip Leslie Hale warning his students to “Beware the bed bug line!” in reference to the line which defines the division between the world of light and the world of shade.)
Reflective Light – Unless we are talking celestial bodies, all shadows have some light within them due to other objects nearby also lit by the same light source bouncing light into the shadows. This light is also referred to as “bounce light” or “ambient light”.
Ambient Occlusion – The absolute darkest part of the shadow, usually recessed , is called the ambient occlusion.
Indirect Light – Secondary light that illuminates the shadow side of the form. Outdoors this is the blue sky which is directly influencing the shadow side of the form throughout the day although it might be hard to see as such during the middle of the day when shadows look “dark” rather than colorful like they do at the beginning and the end of the day. This is due to the sky being the dominant light source over the sun because of the sun’s elevation in the sky.
Light and shadow is measurable in contrast keys, high key of contrast, middle key, low key and any key between these. There is also the Major/Minor key structure of value control used and perfected in the film and animation industry.
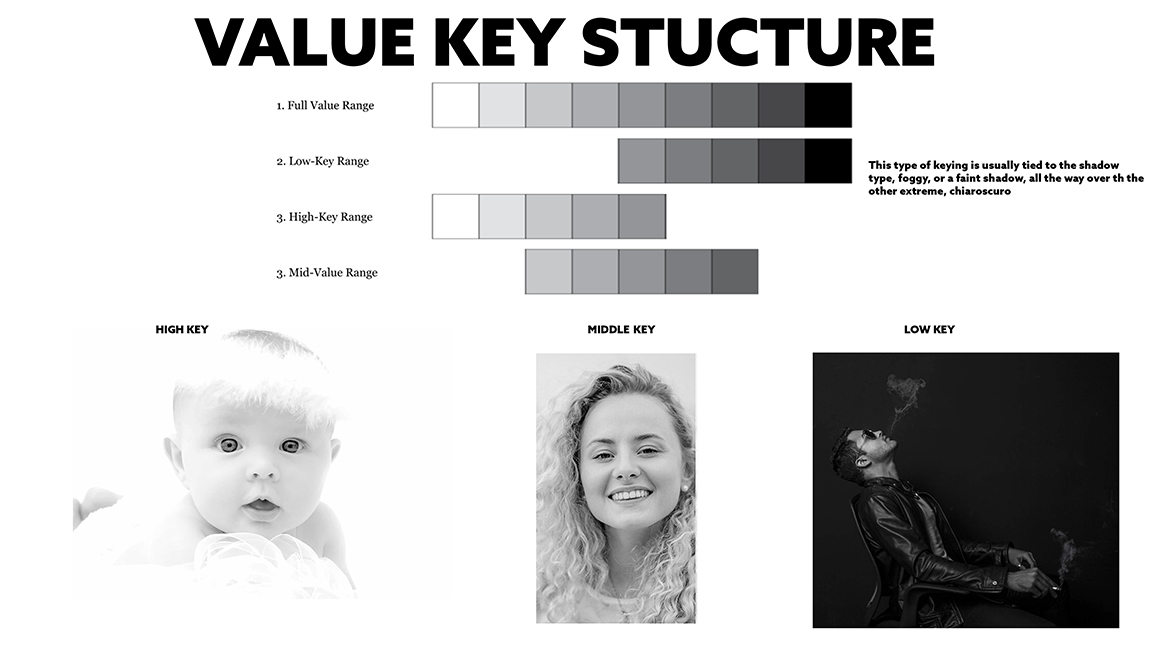
The Japanese word NOTAN is similar to contrast scales only less of a graph and more of an overall concept. NOTAN is the relationship between the lights and the darks or light/dark of an image. This predates the contrast keys we now use but is an appropriate word to use when describing the mapping of local values and shadow values, AND, how to control them or keep them organized. I have several other previous articles on this topic so I won’t go into much detail here.
Shadows will always be darker than the light side of the form, even when the shadows appear lighter or have a tremendous amount of color in them from bounce light. TO confirm this, squint your eyes when looking at your reference or subject matter if you are working from life. Squinting will cut down all the ambient light polluting your vision and make it easier to see the shadows for their true appearance, and surprisingly as colorful as they might appear in focus, when squinting almost all the color will disappear into the darkness of the actual value range.
Shadows are sharpest at their origin, where they are being cast from, and they blur or have a broader penumbra as they head out to the antumbra, where the shadow will be the blurriest. This is the part of the shadow that is the furthest from the source casting it.

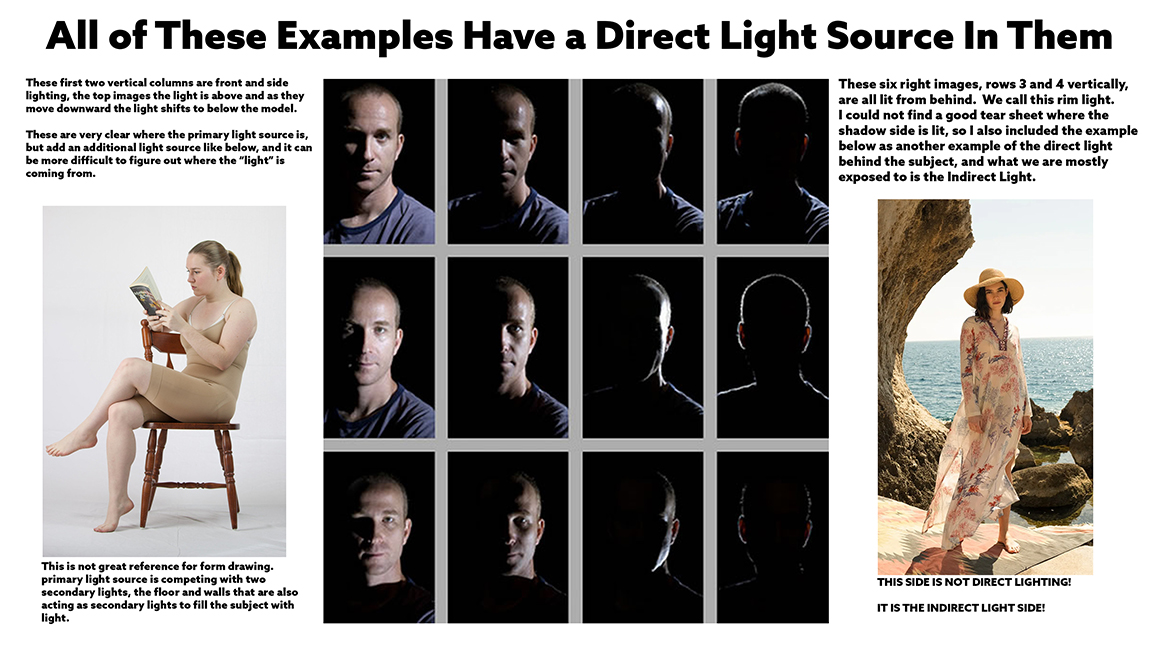
Here is a page of images directly lit with a spot light. I like this chart because it helps clarify the rim light that is happening when the primary light is behind the model, much like the example of the woman with the hat on. Many outdoor shots are backlit with the primary light source because it is so strong in the middle of the day that it blows out the lights and makes shadows really harsh looking. Photographers have solved the issue of shooting in powerful light by front lighting the model indirectly with reflectors, the ground, walls, anything that is bright and equally lit by the sun. I share this because many think that the woman in the hat and pictures lit similarly are directly lit from the front when they are not.
HOW
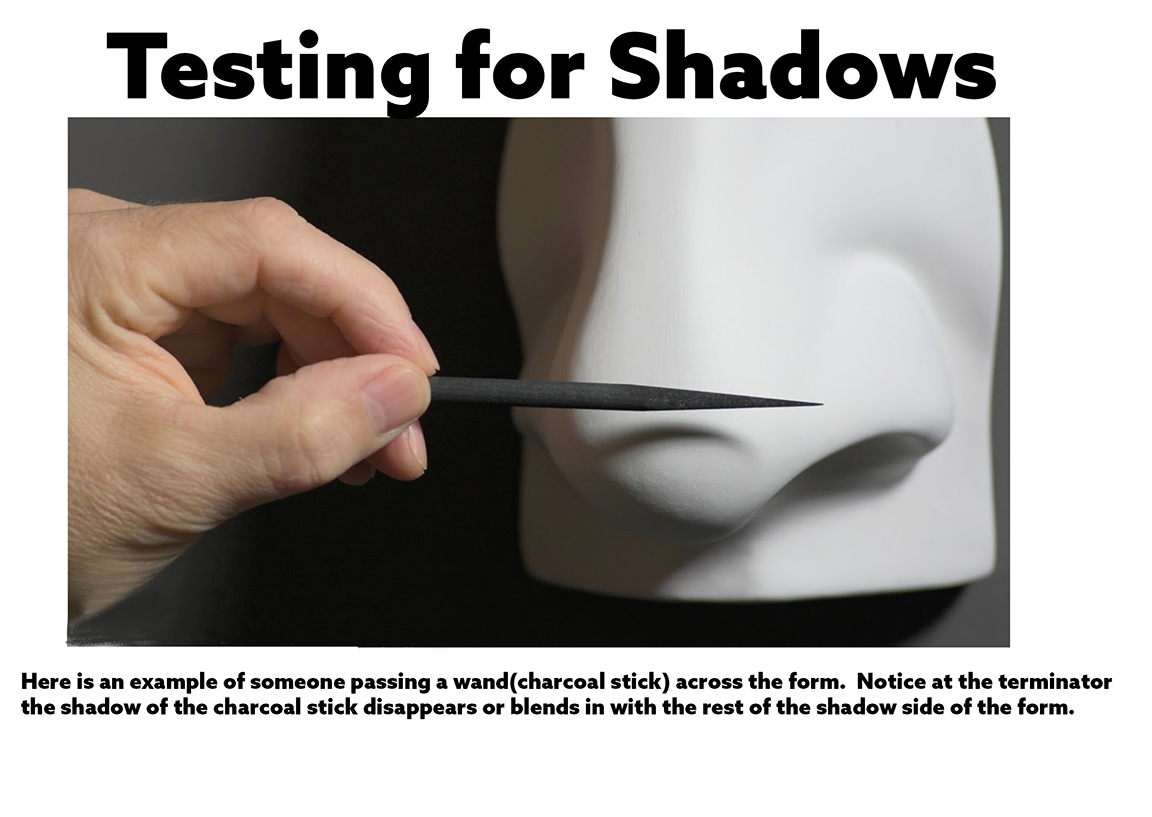
To best learn about shadows, life drawing of any kind is where you will make all the connections you need to understand them. There is a test you can do to test where the shadows are on the form. Wave a wand like object across the form with the length of the wand overlapping the entire form. Wave the wand in front of the subject allowing it to cast a shadow across the entirety of the subject. As you wave it, where the subject is directly lit the wand will appear and affect the form, but where it passes into the shadows, it disappears and has no influence on changing the appearance of the subjects surface.
Once the shadows have been identified, it is best to completely fill them in evenly from edge to edge avoiding the look of the outline, as the edge of the form is still the form and outlines are nothing more than guides that disappear into the finish. This will help to clarify the light(s) and how they impact the subject, as well as help with judging the overall readability of the piece from a distance or at a glance. This will take some time and patience to get used to staying consistent with the values you choose. The values that are chosen should be relative to the local values they are assigned to.
Start with the parts of the subject that are the easiest to identify, this will help identify to identify and assign how much contrast should be applied to the other varying local values.
Shadows can be blocked in formally one of two ways, uniformly throughout showing no influence of line direction, or they can be blocked in in a contour or cross contour approach. This was the method preferred by the French Academy back when Ingres was running it. Not only does the value express the darkness of the shadow, the lines express the turn of the form, a two for one if done with quality control.
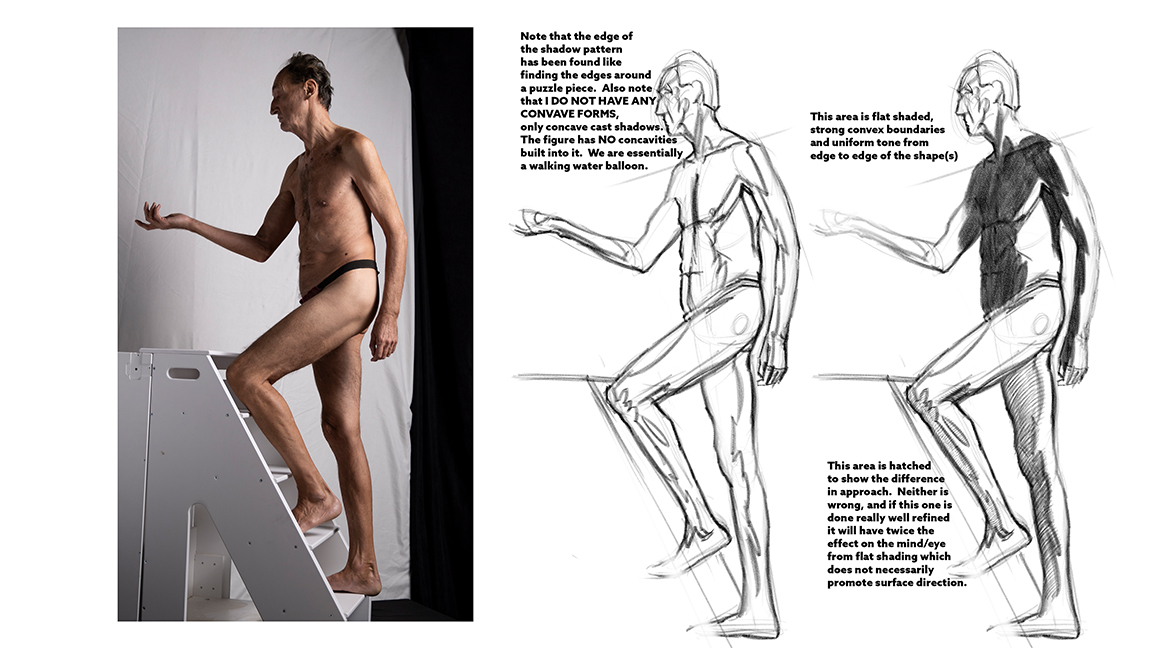
Shadows represent dimension and form. However, when we are blocking in the shadows, technically, it is easier to treat them like graphic shapes, and observe the “puzzle pieces” of darks and block them in this way to simplify and speed up the process.
When hatching or cross hatching these sections, the line direction should want to complement the direction and quality of the surface helping visually suggest whether the form is more cylindrical, spherical, planar, or textural.
Reflected light should be added back after the allover shadow patterns have been blocked in and value managed. Reflective light is an afterthought to the shadow the helps explain the strength of the light, not the actual shadow itself.
WHY
Shadows are how we are able to see things dimensionally. Without shadows everything would blur together in brightness, which is an interesting concept to play with, but bad for the realism and possibly the impact of the work.
Why place so much importance in learning shadows? Shadows help delineate where the light source is, they add depth to the scene and give form to the objects within, they ground (adhere) everything in their environment, graphically they add balance and rest to a composition, they add emotion, tension, and well designed shadows can drive our eye to the focal point.
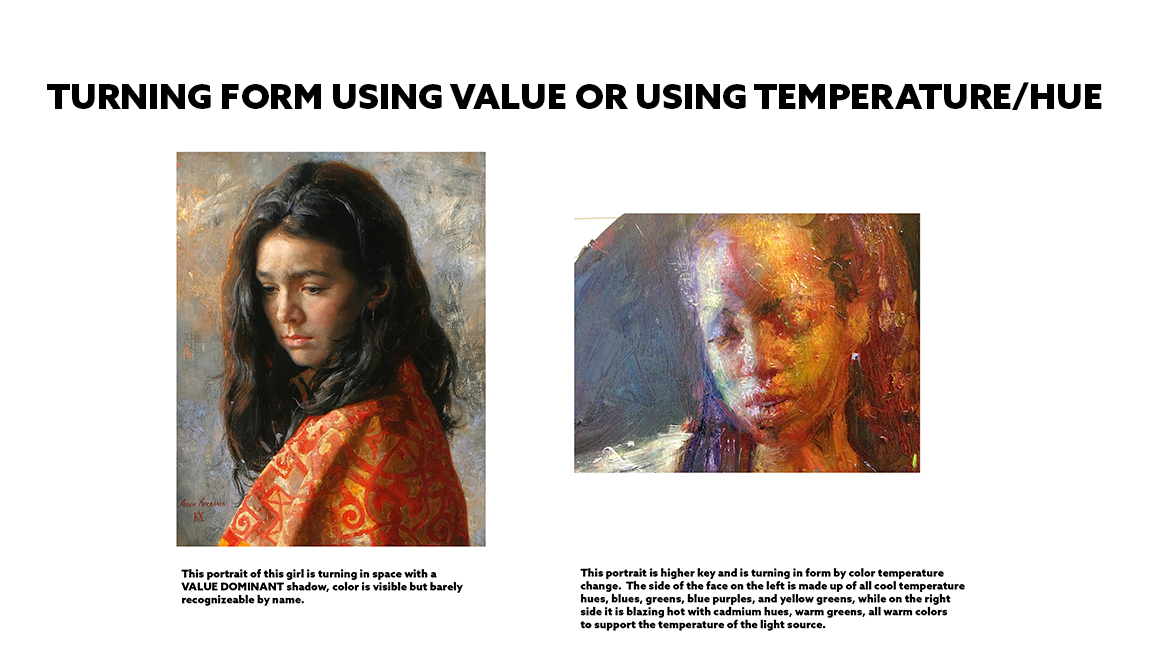
The shadows tell us about the quality of light impacting the subject. The darker they are the stronger the light source is, great for chiaroscuro work, and the weaker the light source is the lower the contrast will be, more appropriate for portrait painting, especially beautiful forms as the lower contrast produces softer turning forms. The key to controlling lighter shadows is to use temperature over value to separate the light from the shadow spaces.
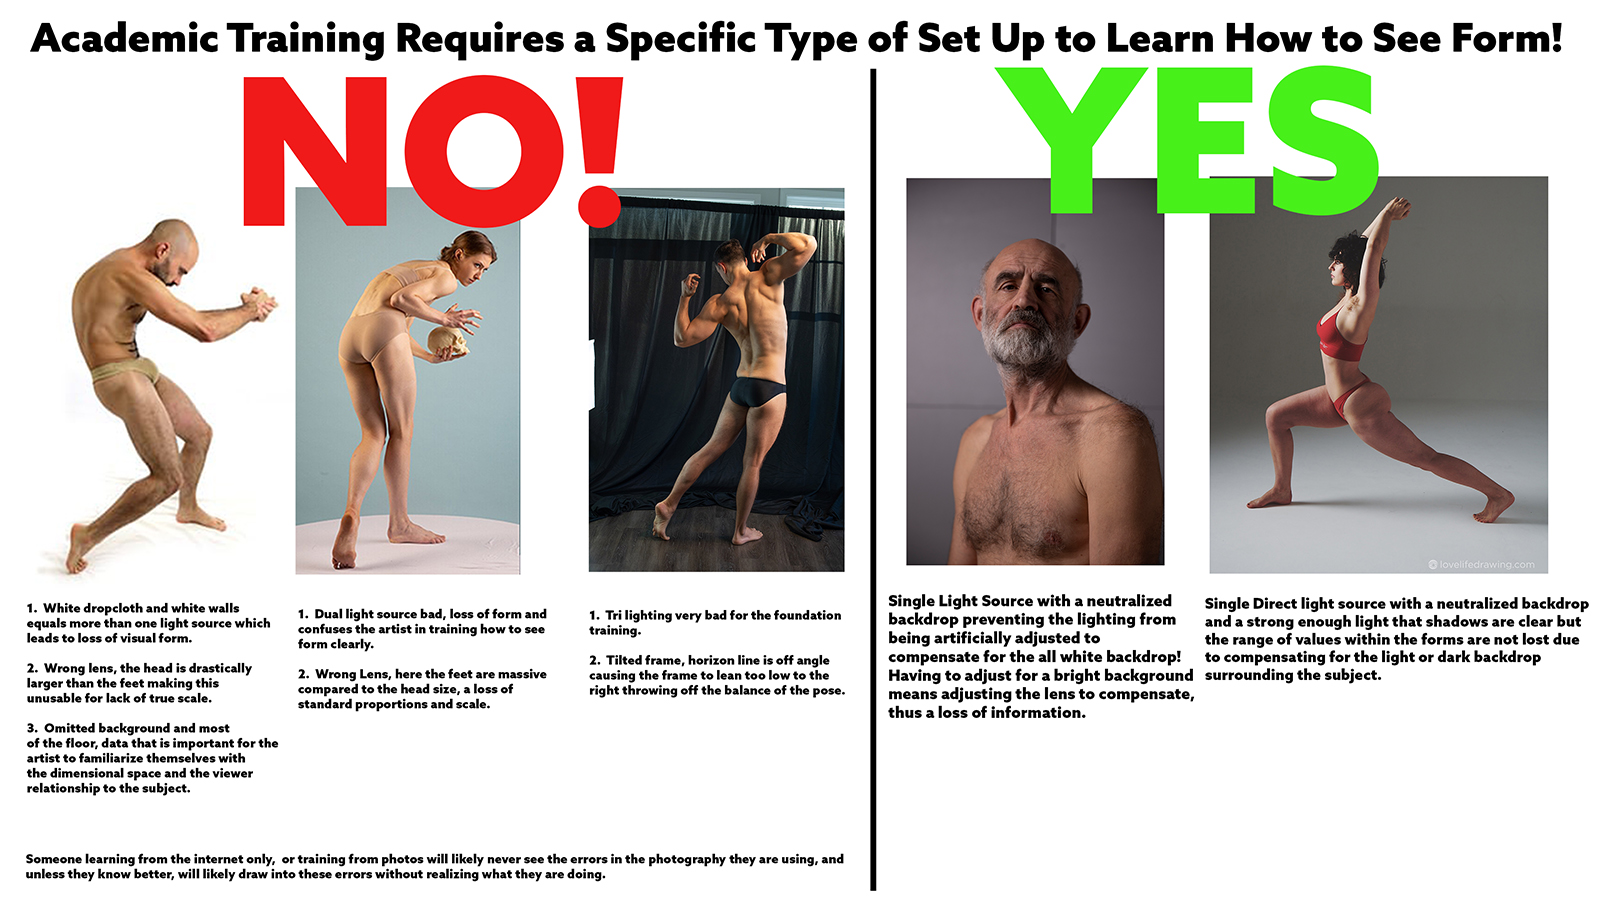
Pro Tip – Learn with subject matter that is lit by only one direct light source. Dual lighting or any kind of multi lit image will make it difficult to learn how to see form if the shadows are not true. In art school we light our subject matter with a spot light of sorts, and outdoors, the sun is the direct light, so powerful that rarely are the shadows difficult to spot. Here is a chart of some things to look out for both good and not so good.


Your article is great, thank you for sharing this useful information with me and everyone.
Hi, there’s a lot of great info here! But your writing style, your wording, is hard to understand… it’s… muddy! Hope you can see what I’m saying!
Realy great!!!
every word worth it
great article
really great
meth
AERO 3S T REX FOR SALE USA,, website:
Buy r134a Refrigerant gas for sale
MDA Powder for sale , Buy MDMA in USA
, Top dollar slot machine for sale
to Buy crack cocaine USA, Buy Amphetamine speed paste
crack
to Order ketamine near me , Order 4mmc online
website:
This is a really good site. I really like this site. Thank you for sharing this wonderful information.
I am positively thrilled by the contents of this post! The sheer magnitude of useful information it presents is absolutely remarkable. It’s like discovering a hidden oasis of knowledge in the vast desert of the internet.