The ear is one of my favorite body parts to sculpt. Like a fingerprint, every ear has its own character, qualities and quirks – not to mention defining peculi*ear*ities ;). They’re a bit like looking at the inside of a shell – all the shapes fit together in perfect harmony. With the complexity of the forms and beauty of how they interact, how could you not find yourself enthralled?
However, all those curves and the complicated topography can get a bit confusing. I have often seen students, immediately after having watched a demonstration, create a sort of random-ish swirl of bumps and depressions to represent the forms of the ear (maybe no one will notice?).
So today, we’re going to try to simplify the approach to sculpting the ear and chat about some things to try and some to avoid.
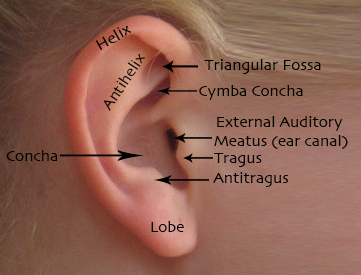
Before we get started on our quick ear sketch, a review of ear anatomy is in order (ohhhh noooo! Not anatomy!) Whether or not you can remember the names of these parts, identifying that all nine of them should be a part of every ear you sculpt is actually super helpful. You can kind of group them in your mind – the helix and antihelix work together to create the main “sticky-out” external forms, the concha and cymba concha work together to create the main recessed areas. The tragus and antitragus add interesting visual variation from the larger forms. The triangular fossa is just a little triangle shape that helps break up the antihelix, providing some visual interest and the “External Auditory Meatus” (ugh… just go with ear canal) helps a whole lot in figuring out where to place the darn things. The ear lobe is, of course, one of the major forms, but it is one that most of us are most familiar with, so shouldn’t cause any additional stress. That said, it is worth studying the variations in the topography of different earlobes (that sentence in itself…oh dear). Ear lobes come in all shapes and sizes – attached, detached, big, small, droopy, wrinkly. There are other anatomical features, but for this short demo, they won’t be necessary to know.
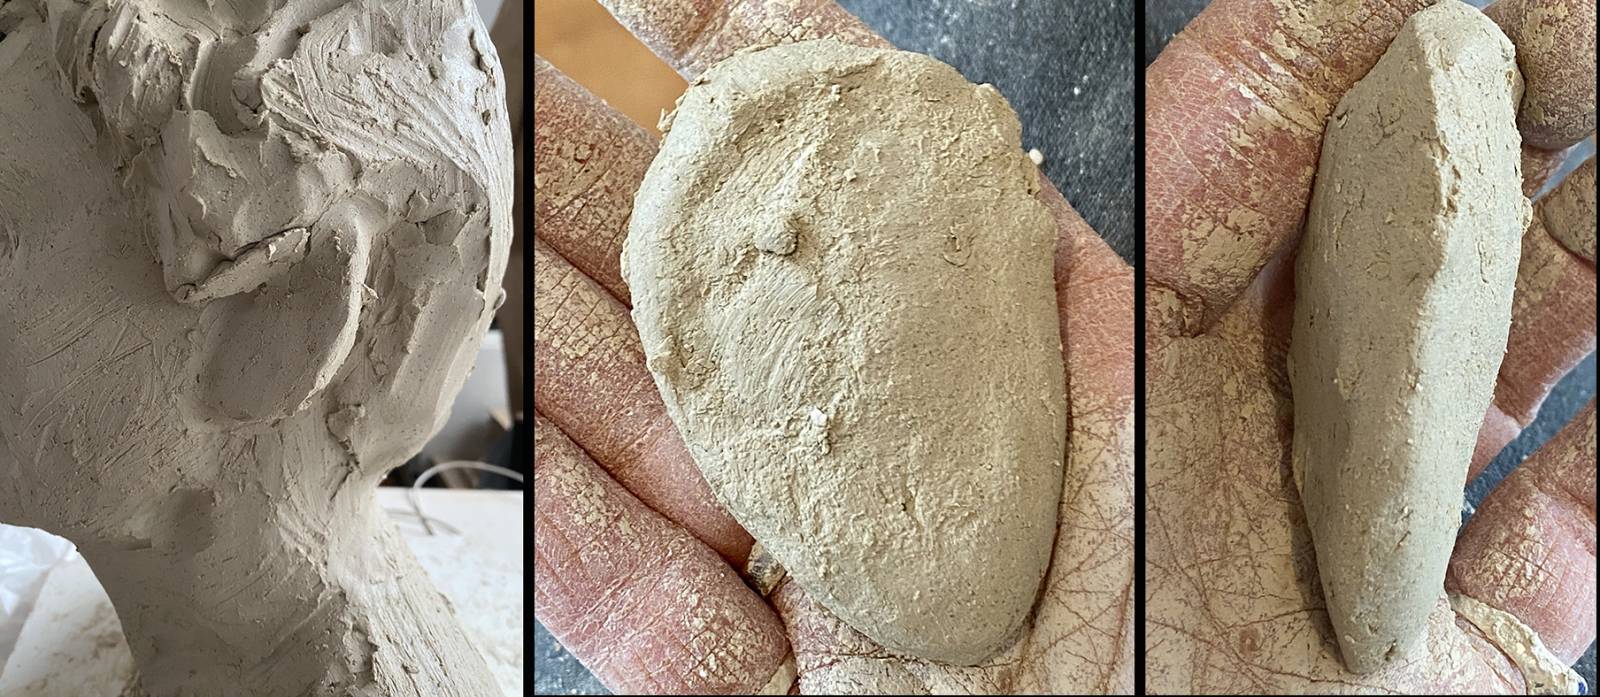
 For this demo, I did a quick rough sketch to help with discussing placement and angle. While I’m roughing in a bust, I usually have a wedge of clay in place to represent the mass of the ear. Having this simple marker helps my eye as I’m working on the features of the face. The ear wedge is roughly the size and contour of the ear. I taper the front edge so it can tuck in behind the jaw.
 On that note, here are a few thoughts on ear wedge placement.
1. The ear does not go on top of the jaw and cheekbone! This is very important and I’ve seen it incorrectly placed this way many more times than you’d imagine.
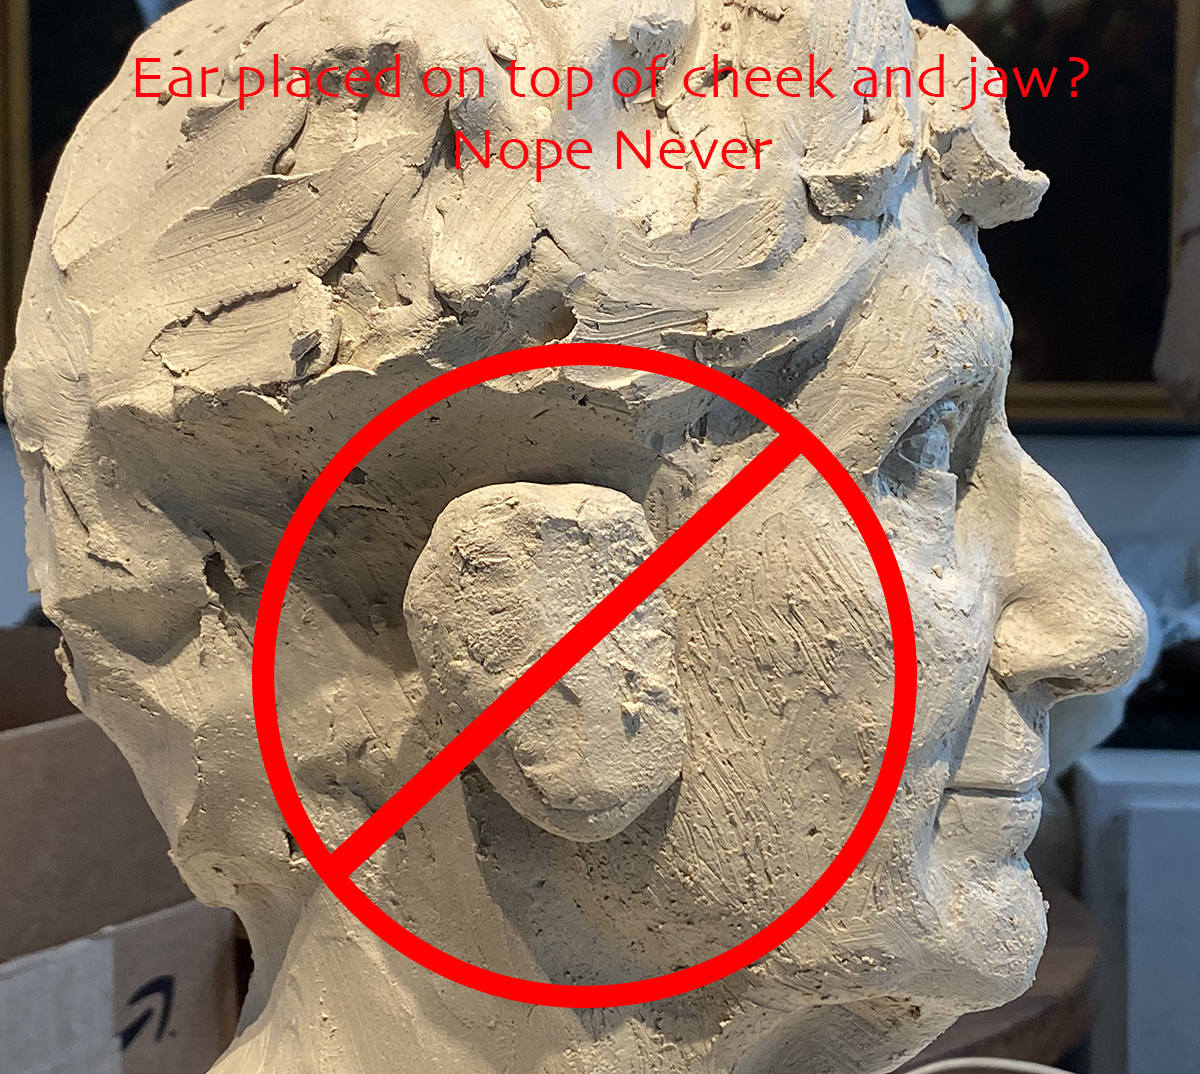 Remember that “External Auditory Meatus” thing – the ear canal? The hole you’re never supposed to stick a Q-tip into (even though Q-tips are the perfect size and shape to stick in there)? On the skull, it is located just behind the jaw bone and slightly under the cheekbone.
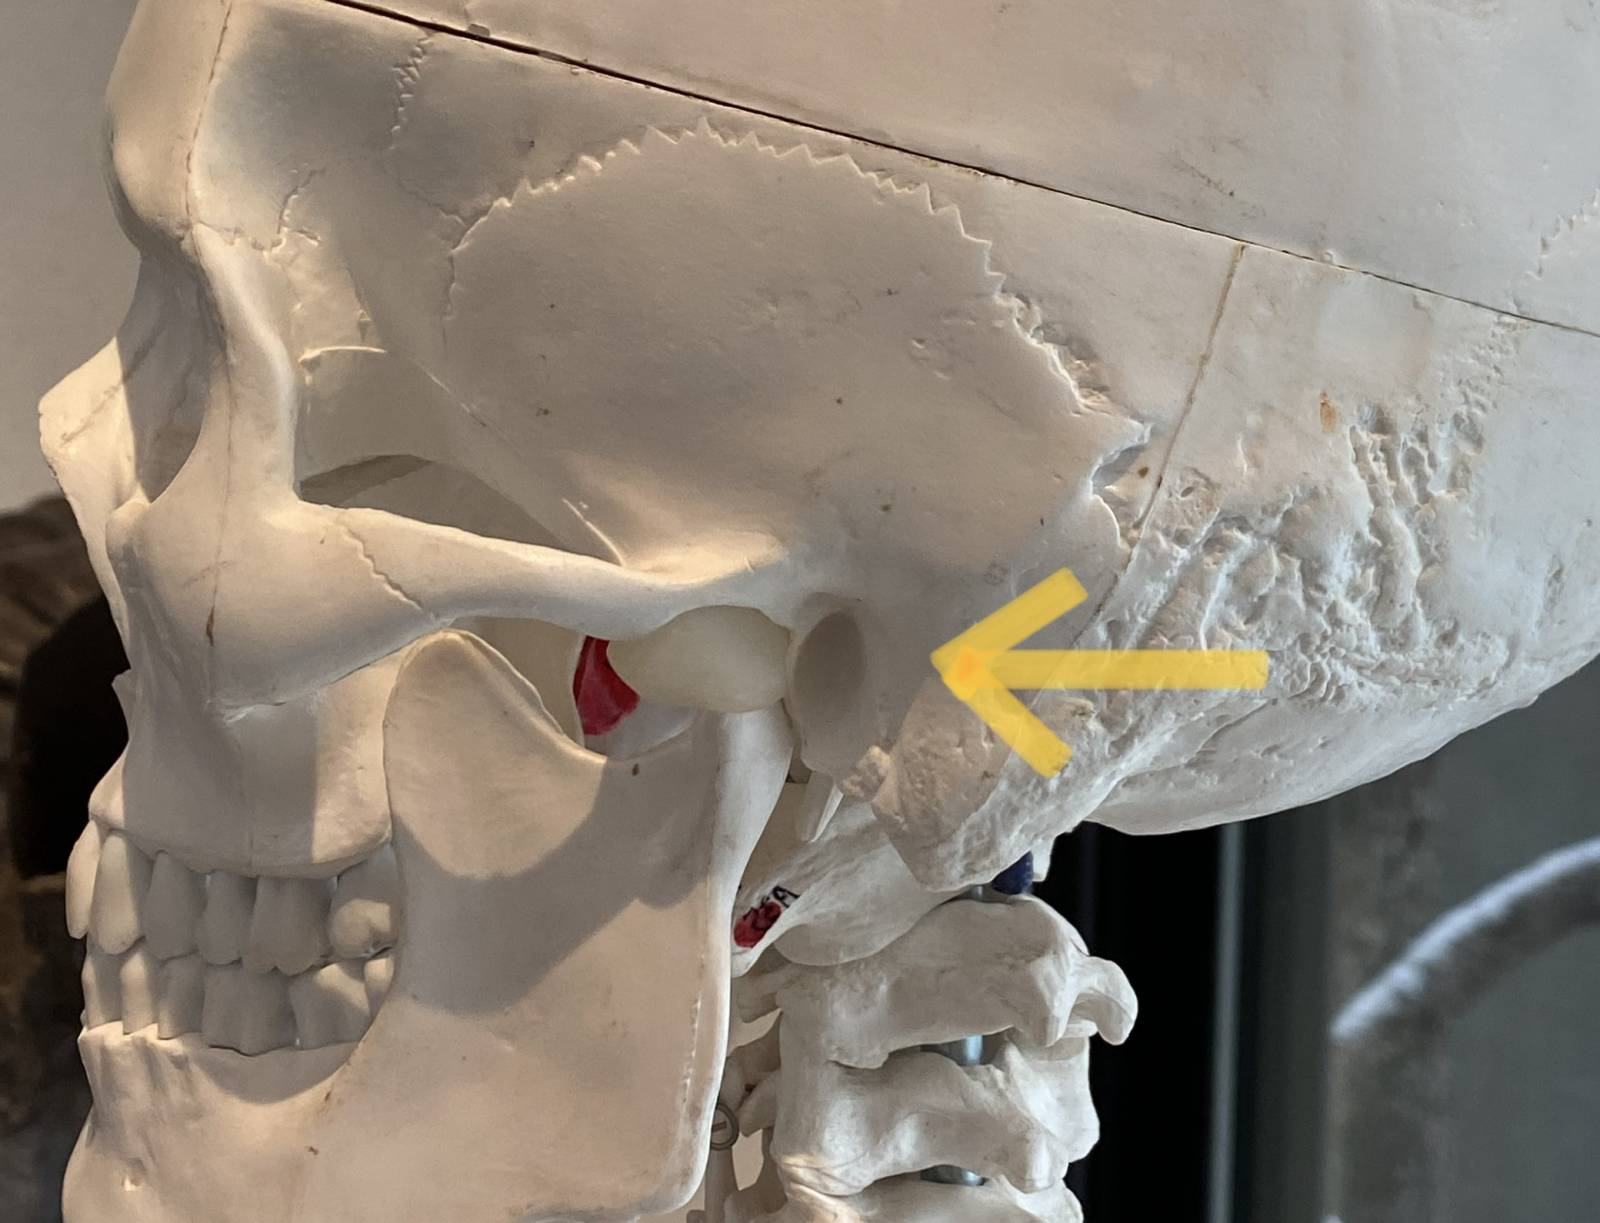 The rest of the ear has to be built around this very fundamental piece of information. If you remember where the ear canal is located relative to these major bones of the face, you’ll have a good start.
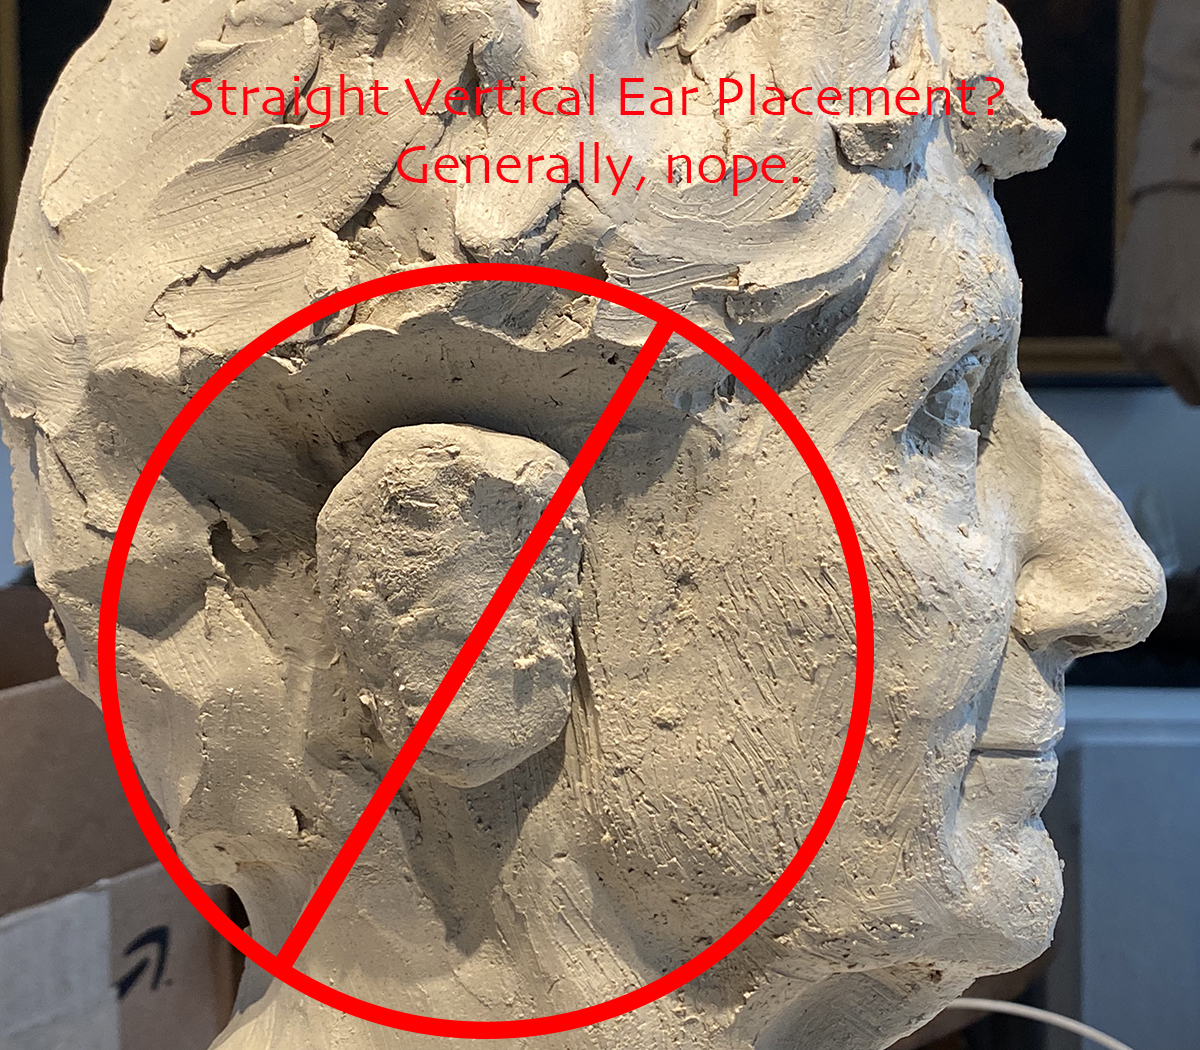
2. As a general rule, the ear is not completely vertical – it’s usually following a similar angle to the jaw. This can vary by individual of course, but if you’re sculpting a “general ear,” better to place it on an angle.
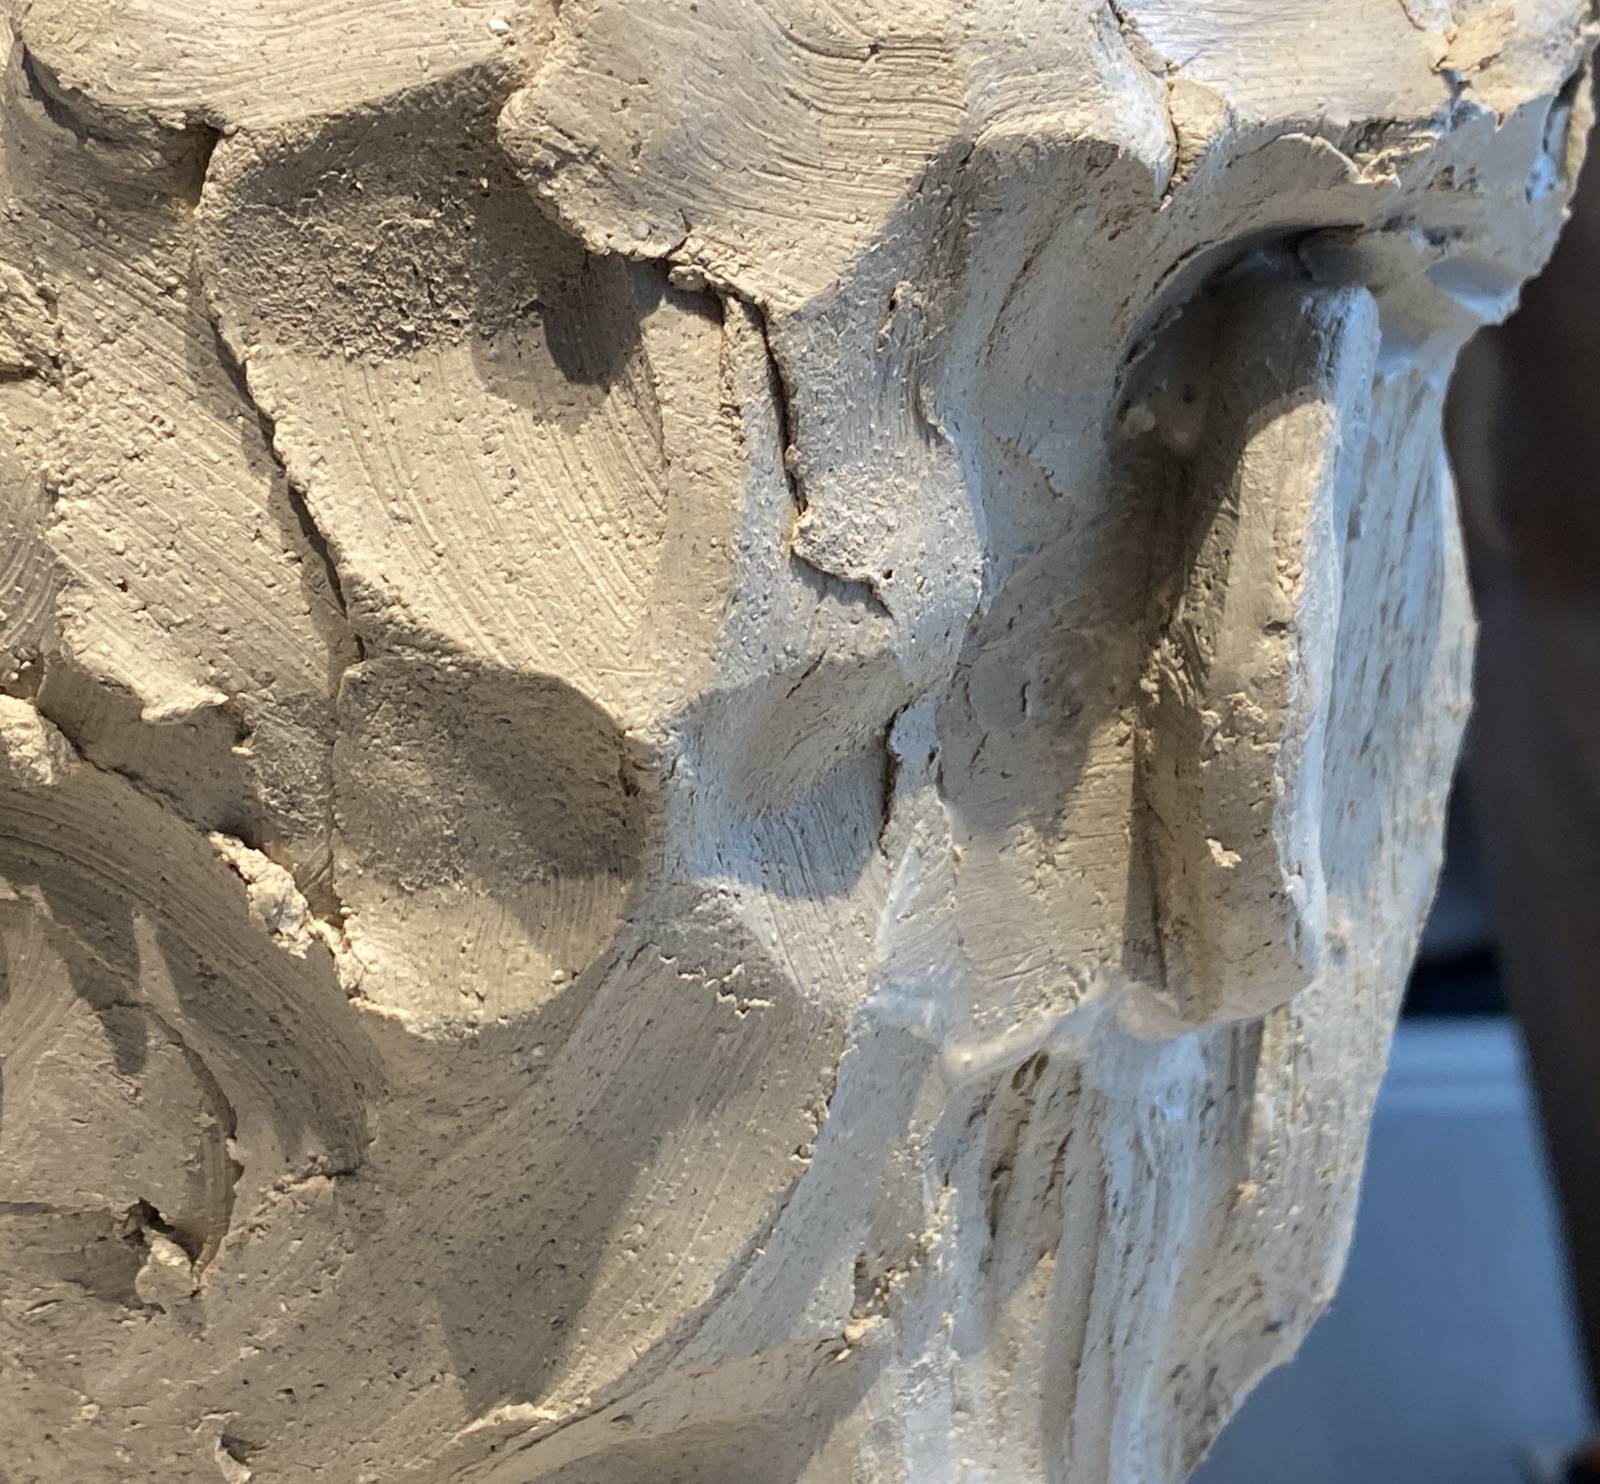
 3. I carve out a little depression behind the jaw/cheekbone for the ear wedge to fit into. Otherwise, the ear can end up being raised a bit too far above the surface of the surrounding forms.
4. As a generalization, the top and bottom of the ear are usually placed between the eyebrow and the bottom of the nose as you look at the side of the head on the horizontal plane. But there is much variation in size, so observation and measurements will help. In this case, my model’s ear was a bit lower. Keep in mind that ears keep growing as one ages (oh super yay), so some generalizations will not be accurate on all models. If a model is far enough off the norm to where it looks totally unbelievable, I will nudge the placement a bit (it’s probably not the best use of my time hovering around my sculpture saying, “but that’s really what they looked like.”) I draw placement lines, then attach the ear wedge.
 Notice that looking from behind, the FPO ear wedge is quite flat and close the the surface of the head. Notice this because this is not how ears are nor how they should be sculpted.
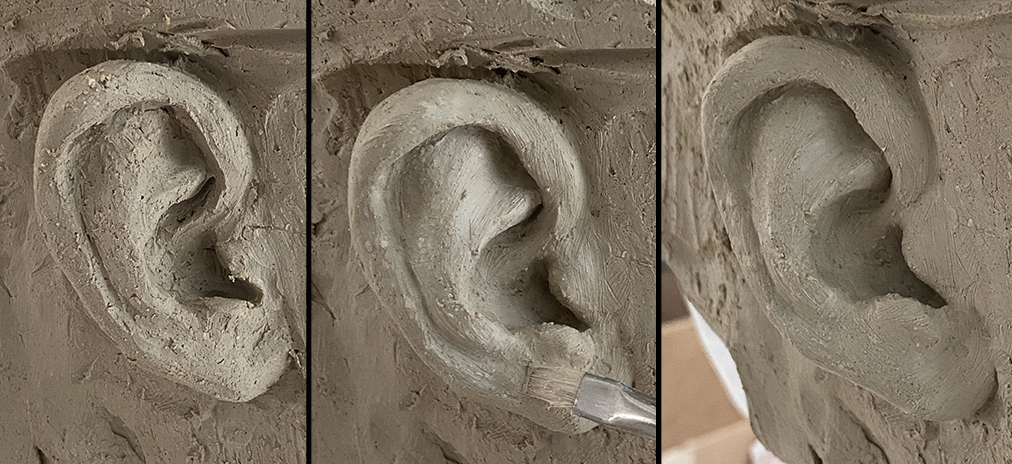
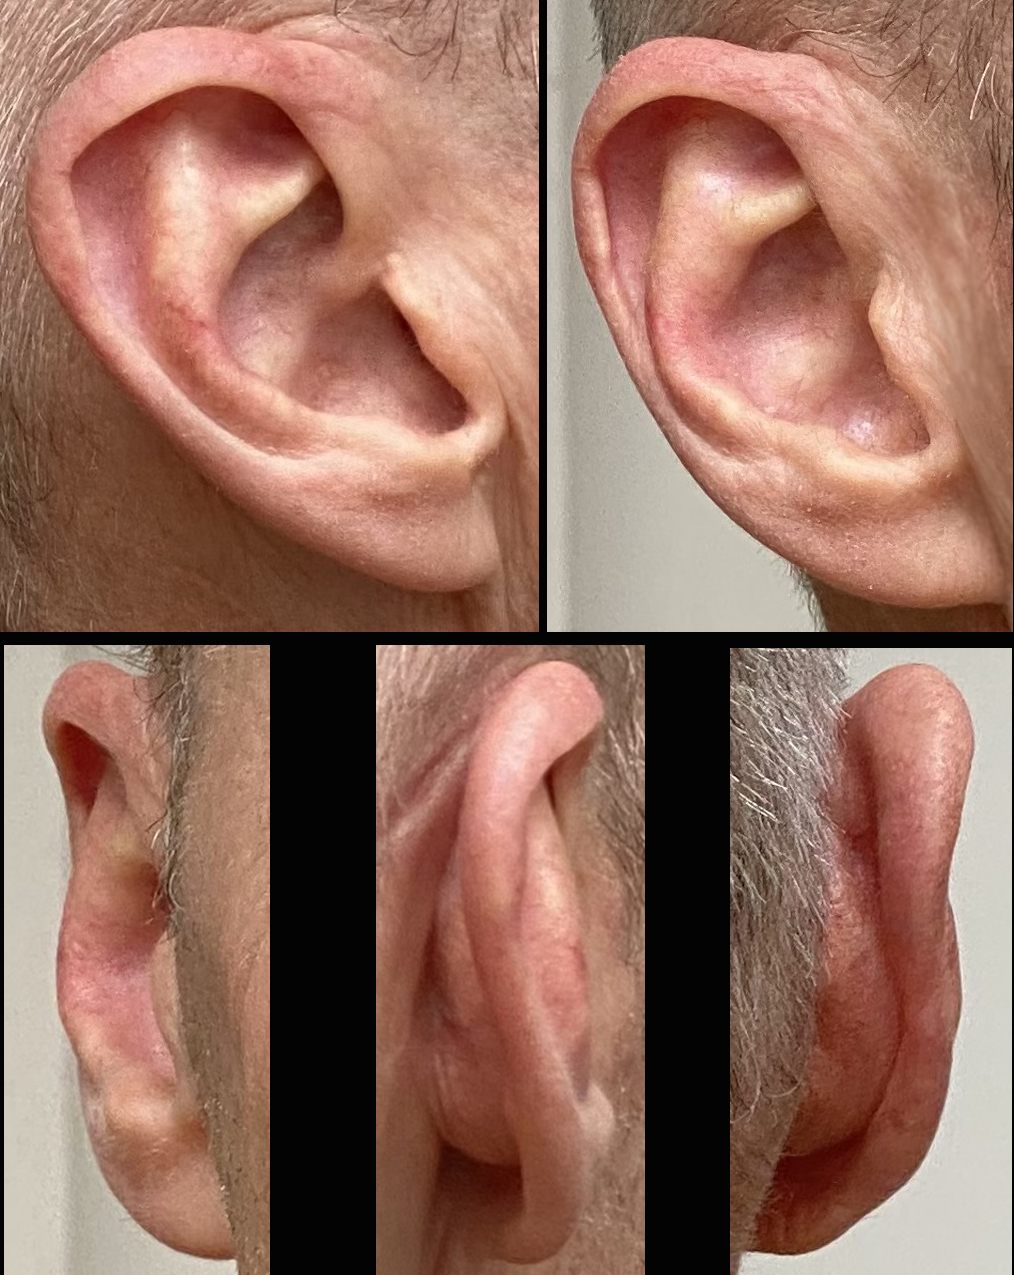
 Let’s take a quick peek at the following very charismatic ear. Looking at the view we frequently see, straight on, the overall shape of the ear actually does look kind of flat and it looks like the form of the antihelix (inner curve) is level with the form of the helix (outer curve). At the 3/4 view, which we also see often, therefore are familiar with in our minds, the forms gain a bit more definition, but we still might believe the overall plane of the entire ear to be pretty flat. Looking from the front view, we now can see this beautiful interplay of hide and seek between the volumes of the helix and antihelix. That inner curving shape actually dances out beyond the outer curving shape at the midpoint of its curve. Not a flat plane anymore.
The 3/4 back view shows this lovely “S-curve” in the rhythm of the ear from top to bottom. And from the back view, holy smokes! What’s all that stuff? Definitely not flat to the head, not even a little bit. If you think about the cartilage that forms the ears, it’s actually quite thin with just a light covering of skin. So the forms you see on the front of the ear must be reflected on the back of the ear – it’s like looking at the inside and the outside surfaces of a shell. Put your index finger into the concha (not the ear canal please) and your thumb on the back side of your ear and you’ll feel how the front and back forms mirror each other.
 The back of the ear tends to be an oddly neglected and overlooked but beautiful part of the ear, so let’s start there (as I usually do). I add a curve to the overall form and sculpt in the reverse forms of the concha and cymba concha (the depressions in the front of the ear are protrusions in the back.)
 Now to the front. 1. Notice how even after adding the curve to the ear from the back, from this front on view, it still looks like a flat plane – this is how ears can be so tricky. I shape the outside contours of the ear – these subtle angle changes give each ear a distinctive flavor. 2. I quickly sketch the general forms of helix and antihelix, concha and cymba concha, tragus and antitragus (see how grouping those works?) 3. Following my outline, I use a loop tool to rough in the external forms. On the lateral edge where the two helix forms meet, I dig straight in. 4. As I move up the curve to the top part, I use the tool to dig under the outer helix as I define the forms. This helps the antihelix tuck underneath the form of the helix. 5. I scoop out the concha. Don’t be afraid to carve this area out a bit, creating the shadow areas. There is a fair amount of depth to the form.
 1&2. I scoop out more of the recessed areas. 3. The helix wraps around the exterior of the ear, then dives into the center of the concha. I angle this tail end of the curve and blend it into the recessed area. I add a little shaping to the tragus and antitragus – those two fun little bumps towards the bottom of the ear.
 1. At this point, I look from the front view to check if I have “flapjack ears” going on (really flat forms as seen here). 2. I can add small masses to the antihelix to emphasize the beautiful interplay of the volumes “playing hide and seek” visible from the front view (image 3). While I’m adding, I show the antitragus a little bit of love too to make the form more interesting (image 2). 4. I deepen and refine the triangular fossa. Usually the lower form is smaller and sharper than the upper. I make sure to keep the forms tucking under the helix.
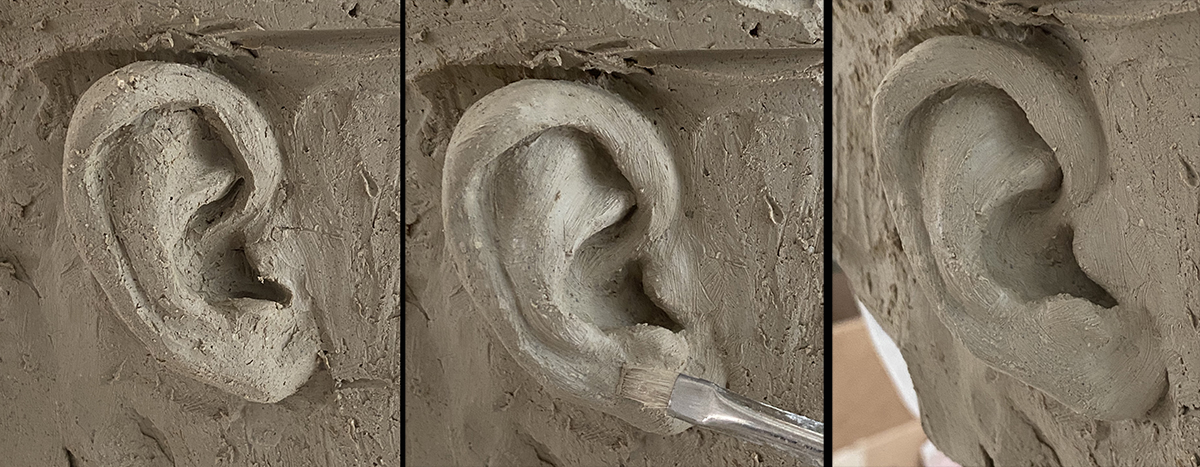
 At this stage, I will go over all the surfaces with a hog bristle brush and water to unify the volumes which helps to see if I’ve missed anything.
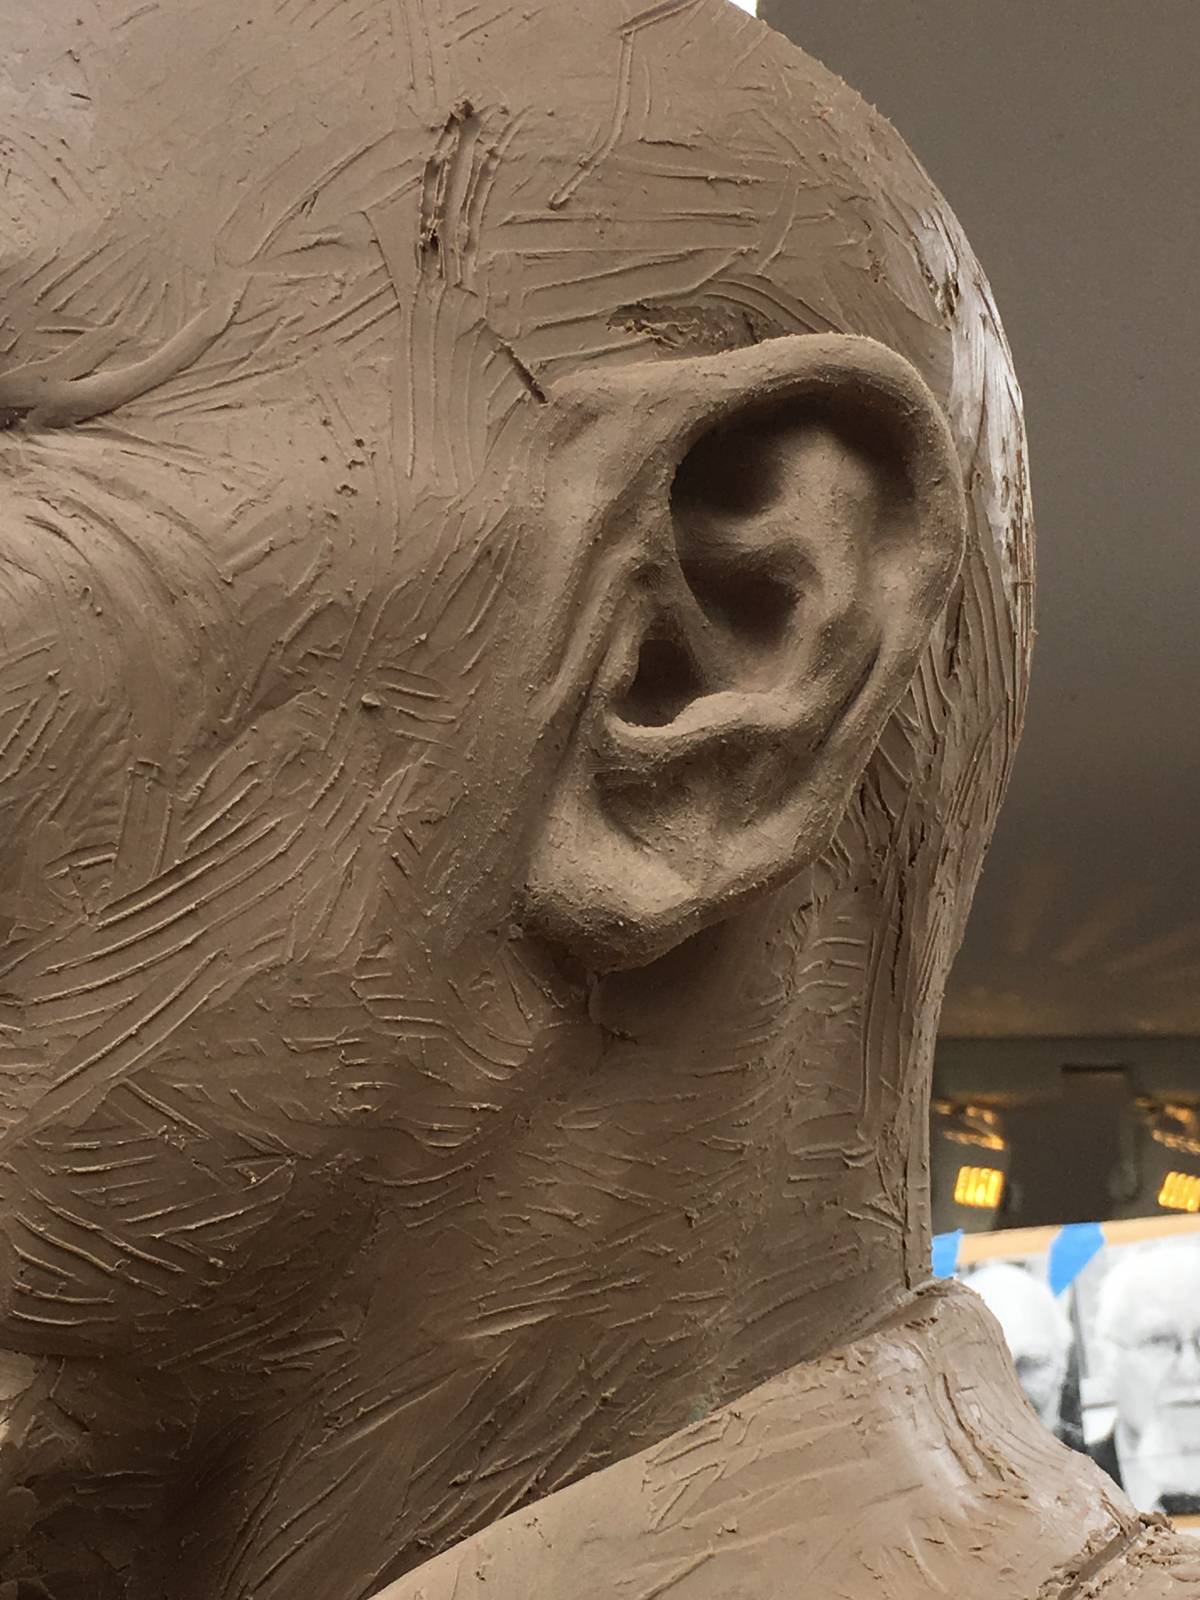
 Then, I return to the rest of the sculpture, leaving the ears at this stage until I’m doing final refinements on the entire sculpture. At that time, I usually make small modifications and additions, fine-tuning the forms and volumes. These slight changes can make the features have tons more life and character.
Talking about sculpting all the potential variations of ears when we consider age, race, gender, genetics and other factors is a whole conversation in itself, but that is for another day. For now,
Ear’s lookin’ at you, kid.


Thanks a lot for this very informative article! Though I am not a sculptor but an illustrator it is very helpful. This a bit different viewpoint is very instructive. Seeing the steps in the third dimension makes it easier to understand than two dimensional “how to draw an ear” articles.
Hi Rianna, Thanks for reading and commenting. I’m delighted to hear that looking at the ear as a 3D exercise was helpful for you. I hadn’t really thought about it the way you mention, but yeah, I imagine understanding any form in the round would be helpful in rendering it in 2D. The ear is certainly one of my favorite parts, for as strange as it may be. 😉 Happy creating! K
Køb kørekort i Danmark uden eksamen. Vi tilbyder absolut alle kørekortklasser i Danmark, Finland og Norge.
Kjøp ekte og registrert førerkort fra nettsiden vår uten å skrive eksamen eller ta praksisprøven. alt vi trenger er opplysningene dine, og de vil bli registrert i systemet innen de neste åtte dagene. kjøp førerkort belgia, kjøp førerkort belgia, kjøp førerkort i nederland, førerkort b belgia, kjøp førerkort med registrering.