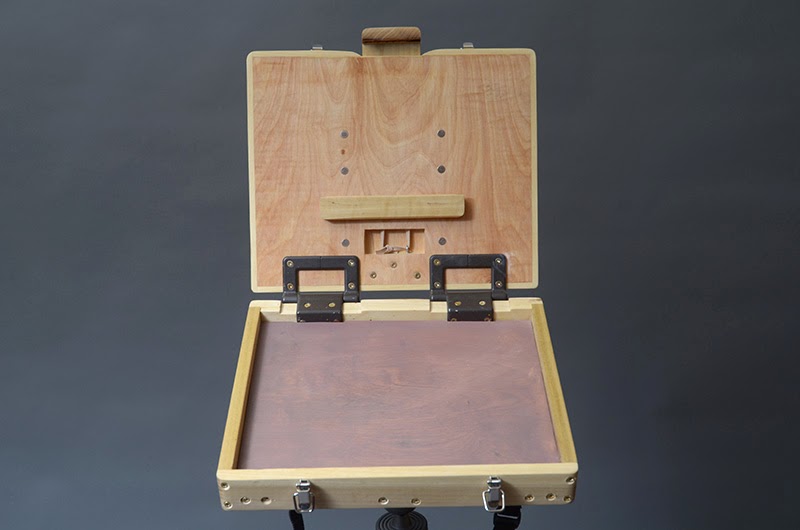
This will be the first of a few posts detailing some of the studio equipment I have built. I built this painting box because I am trying to get out of my studio more and do some plein air painting as well as a good portable setup for location or portrait painting.
Pochade is a french word for “sketch” (according to Collin’s French Dictionary), so “pochade box” is literally “sketch box”. My goal was to create something that was lightweight and easy to setup and maintain.
I am posting the plans here for two reasons. First, with the hope that at least some of you will find it useful. Second, I am sure that should you make your own, you will improve on my design and send me your own results so I can benefit! You could always buy one pre made… but that isn’t much fun and I bet this will save you some money.
These plans should scale nicely. My box is 10″ x 12″ inches but you could scale it up or down. If you are a little handy and have a few tools (or know someone that is), this box will take you 5 or 6 hours to make and cost around $50 – $80 (the $50 end if you can get the hinges on sale, which happens from time to time).
Wood
- 1/4″ x 2′ x 4′ – birch plywood – $9.55 – Lowe’s
- 1/4″ x 2″ x 4′ – poplar board – (this is listed at 2″ wide, but it is actually 1.5″) – $2.07 – Lowe’s – When I was there, I found 1″ wide board. Get this, otherwise you will need to trim this down to 1″
- 1/4″ x 3″ x 4′ – poplar board – (this is listed at 3″ wide, but it is actually 2.5″) – $3.62 – Lowe’s
- 1/2″ x 1.5″ x 4′ – poplar board – (this is listed at 2″ wide, but it is actually 1.5″) – $2.98 – Lowe’s
- 3/4″ x 2.5″ x 2′ – poplar board – (this is listed at 3″ wide, but it is actually 2.5″) – $2.47 – Lowe’s
Hardware
- 1/4″ t-nut – about $0.50
- 3/8″ wood screws
- 1/4″ x 1/16″ magnets – the stronger the better
- Metal pull down loop draw latches – $3.15 – Amazon
- Canvas shoulder bag strap – $8.99 – Amazon
- 2 Heavy Duty D-Rings to mount canvas strap. I had these already. On Amazon, they come in packs of 50, but you might find them at a craft store, or ask a framing shop for a couple. They might just give them to you.
- Rockler 30 inch-pound Lid-Stay Torsion Hinges – $55 (I have seen these on sale for $20)
- 4 Eyelet screws – $1.19 – You might be able to get singles of these at a hobby store
- Heavy rubber bands or elastic bands
Misc
- Wood glue
- Epoxy for magnets
- Danish or Tung oil – This is a penetrating oil that hardens in the wood, sealing it at the same time. Follow directions on the bottle.
Tools
- Drill and small bits for pre-drilling holes for screws and 1/4″ bit for drilling holes for magnets
- Saw
- A set of spring clamps will be really handy here
- Screwdriver
As you can see the most expensive and also the heaviest single part of this design are the hinges, but that is also where the magic happens. The hinges stay where you rotate them to. No screws to tighten, you open the lid to the angle you want, and the hinges keep them there. They are incredibly strong. I get no shake when I paint. Worth every penny. I don’t know what kind of witchery is involved, but the hinges are awesome.
I will leave the screw placement up to you, as it isn’t too critical. Just be sure that the screws are going through as much wood as possible. I countersink the screws so they don’t catch and are flush with surface. Pre-drill all the holes for the screws or the wood will split.
The Plans
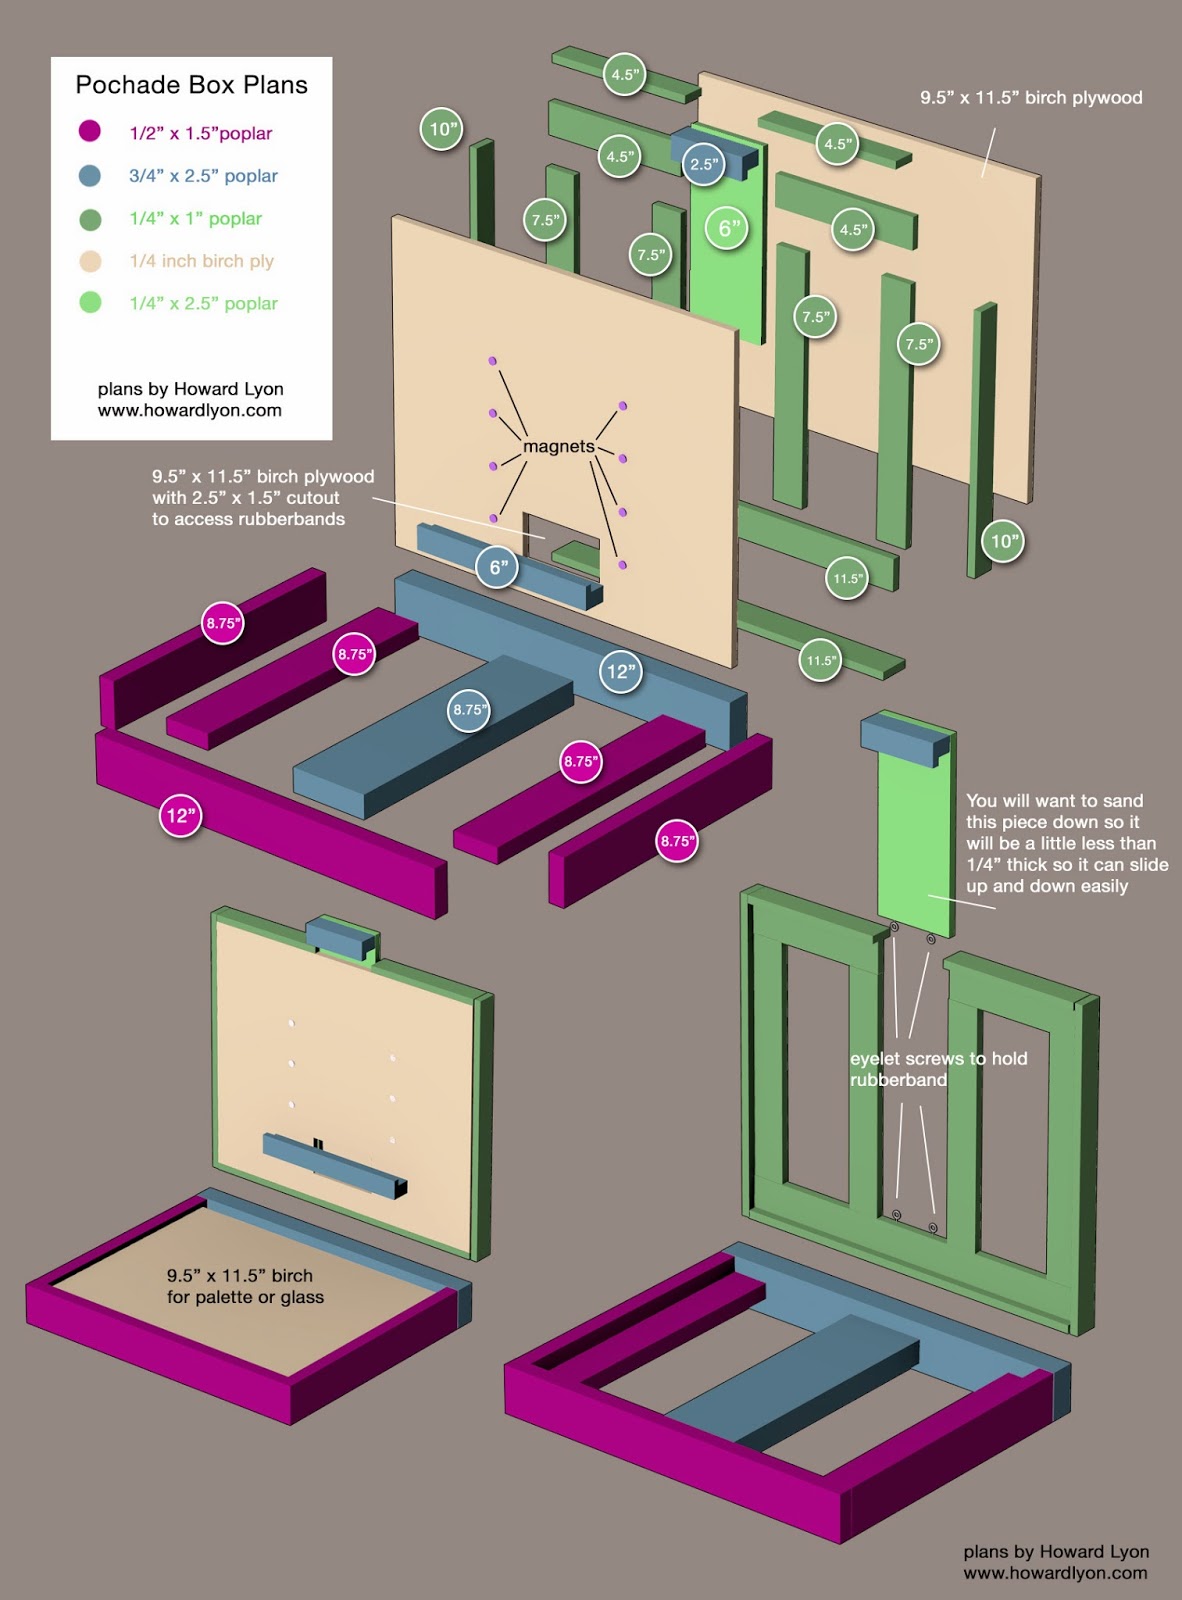
If you want a larger box, just use the same basic layout, but change the size of your cuts.

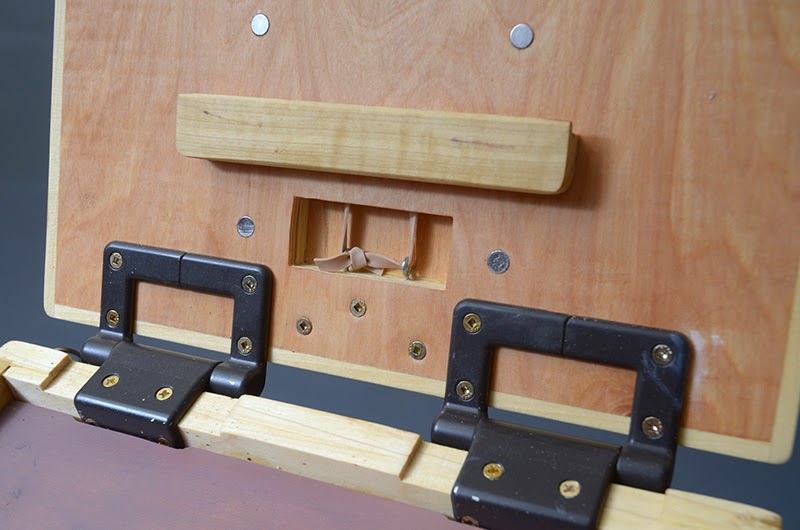
I included this so you could see how the rubber bands loop through the bottom eyelet screws. Same thing for the upper piece. I used a hand held manual old-timey drill to pre drill holes for the eyelets. Much more control than a power-drill. Also, you will need to cut a 1/16″ notch for the hinges so they can close flush when the lid is down. You could use a chisel or a file here too with some patience. I used a router.
See how the magnets are mounted on the back of the lower support. Make sure you align the magnets so they are all attracting and not repelling. Use the 1/4″ drill bit to create the holes for the magnets. They are only 1/16″ thick, so the hole will be pretty shallow. Just enough for the magnets to sit flush. I put a little epoxy in each hole to hold the magnets in. They will fit very snug without it, but might pull out eventually without the epoxy.
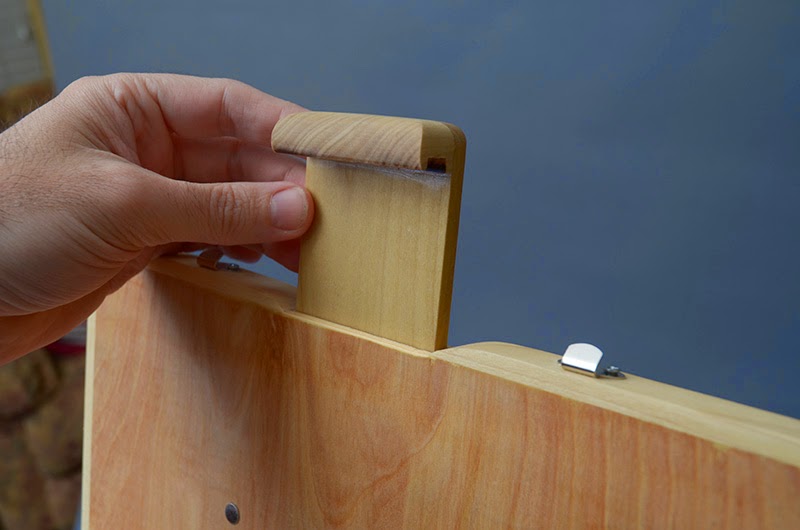
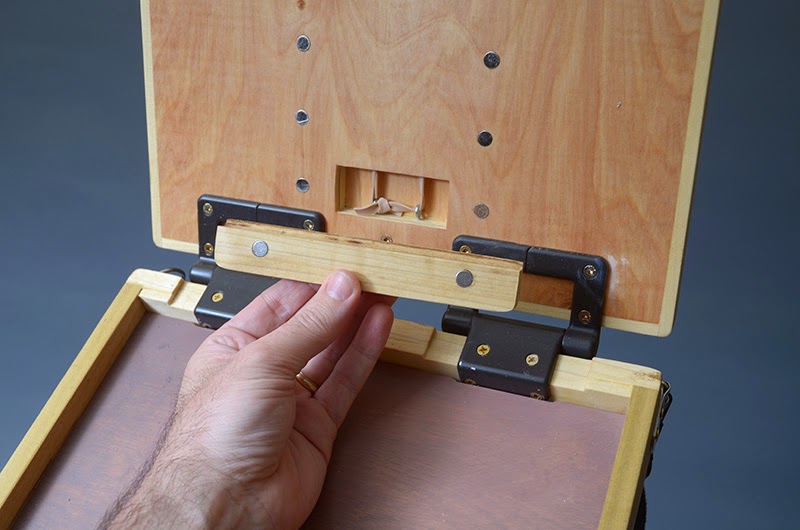
This piece is tensioned by the rubber bands run through the eyelet screws in the bottom of the piece I am holding. The rubber bands loop through the other set of eyelets that you can see in the two pictures above this one. Getting the rubber band looped through can be tricky. I cut the rubber band, looped it through the upper loops and tied a string to the loose ends. Then let the strings hand down through the slot where the upper support will sit. When the showed up at the bottom through the cutout, I pulled them, and then the rubber bands through and fastened them to the eyelets on the bottom.
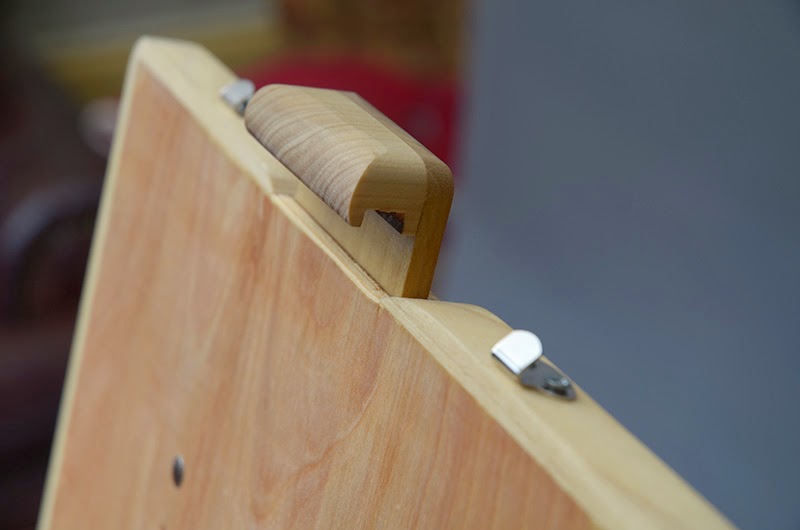
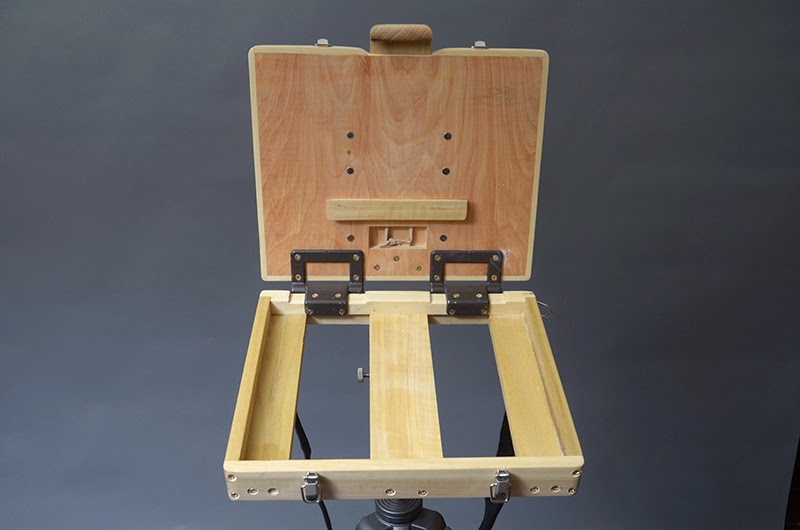
Shot to show you how the upper support piece is sandwiched in here. You will want to sand this piece down so that it easily slides up and down. Also note the groove cut into the top support. This is so that it can easily hold panels. Same on the lower support. I used a table saw to notch these, but there are probably another dozen ways to make this work without having to have access to a table saw. Get creative if you don’t have one you can use.
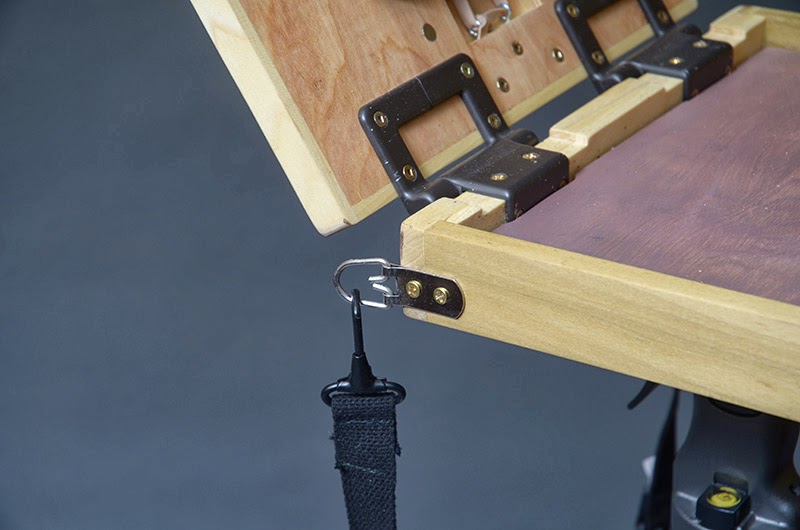
Shot of the D-rings where I attach the canvas strap. Be sure to mount them so the d-ring has free movement and clears the end of the box. Also, you can see how there is now support for the hinges, they fully support the lid on their own and are rock solid.

Rear view.
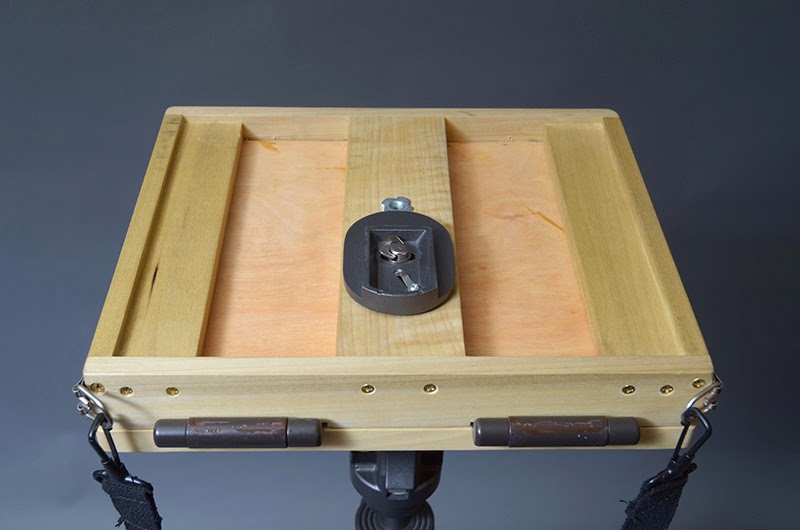
Shot of the underside with a quick release adapter for my tripod. You can also see a t-nut. I put in two for convenience. The quick release screws into the t-nut and then mounts on my tripod.
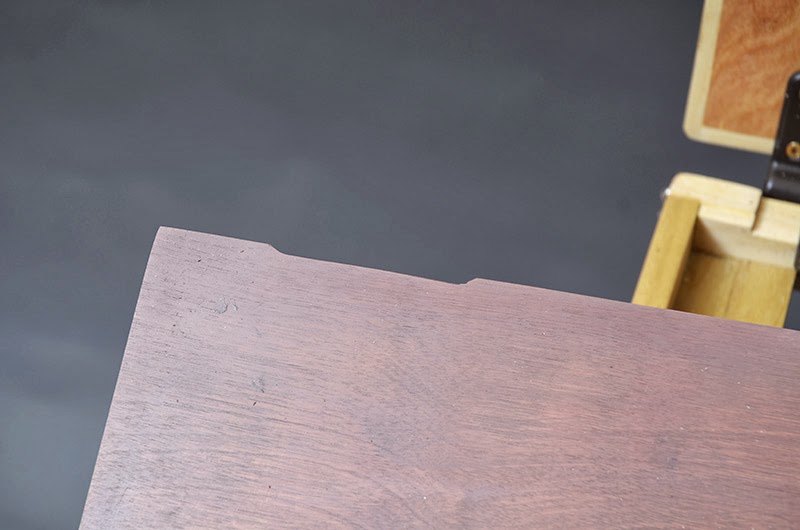
I notched the palette to go around the hinges, but you wouldn’t have to do this if you cut it down a little bit.
I think that is everything. If something isn’t clear or I made a mistake, let me know and I will update the plans.
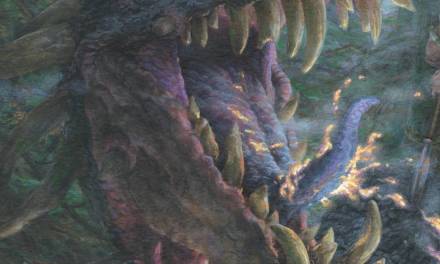
And here is a shot of a painting I did using the above box. It works! 🙂

If you remember from my last post, this week was supposed to be on process and technology, but I postponed it until next time. Check in with me in two weeks for my post on the importance of process in art history and how we might use modern tech to adapt it for today’s studio.
I hope this post was useful. Let me know!


I was just commenting this week about how I wanted to build a pochade box; I was dreading the idea of sifting through countless Pintrest posts for a valuable plan. The plan that you provided is GREAT, much appreciated!
Hi Howard,
Great plan and thanks for posting this! I built my own PB and was trying to figure a way to hold the panel boards better. This really gave me some ideas how to do it! I notice for the T nut that you installed it in the underside of the the box. If you experience instability then I recommend you install it inside the box so when you attach your quick release its pulling towards it. (Like climbing walls, T nuts are install behind the walls) I hope you understand what I am talking about. lol
Cheers,
Josef
What would be a good tripod to use for something like this?
Okay. This is GORGEOUS. And it's giving me ideas for my own rig. Thanks! =)
Awesome post Howard! It looks beautiful and I'd love to make one myself. One thought though, wouldn't using small extension springs work better (and longer) than the rubber band? I was curious if you had entertained that and found issues with that idea.
Beautiful work! I really needed this kick in the pants to begin plans for building a pochade box. Have been using a guerilla painter for the past few years and it is falling apart, not to mention the palette area just doesn't suffice. Thanks for this post!
Cool, be sure to send shots of the results and let me know if you find areas to improve on.
You are right! So far, it has been good, but it might wiggle out over time. If it does, I will put it in on the other side so it pulls when I thread in the mount.
The tripod I am using is a beast. Good and bad. It is heavy, but won't tip over in the wind, and could take a beating. I am going to get a lighter version with a hook for a weight bag. This is the beast I am using:
Ravelli Tripod via Amazon Basics – http://www.amazon.com/AmazonBasics-70-inch-Adjustable-Pistol-Tripod/dp/B00CF1LS94/ref=sr_1_2?ie=UTF8&qid=1395425685&sr=8-2&keywords=amazon+basics+tripod
but I think I will get this one to try: http://www.amazon.com/Ravelli-APLT4-61-inch-Weight-Aluminum/dp/B004ZGLM5W/ref=sr_1_4?ie=UTF8&qid=1395425650&sr=8-4&keywords=ravelli+tripod
Good deal, be sure to share your results!
Thanks Eric. I started out looking for springs to use, and I still might fit them, but I couldn't find them smaller than 1/4″ when I was looking for them. I have since found some 3/16″ springs at Grainger that I might give a try.
Thank you! Yeah, get out there and make one. I have found it to be very satisfying and because I made it, it makes me want to use it more. I also want to make another one. I know the second one will be better than the first. 🙂
This makes me wish I had a wood shop, tools, and the ability to build stuff. Wonderful post!
I just built one too. What are your thoughts on attaching an umbrella for shade? Would you have the attachment on the box or on a separate tripod?
AWESOME BOX… I seriously would want to change my medium just to have this beautiful box.. Well done Howard… It Rocks on stable ground… LOL..
Thanks Megan! Maybe you can find a friend that has some tools. It was very satisfying to make!
Cool, send me some pictures of the box howardlyon at gmail dot com. I would have the umbrella separate. That way you can position it easily, and should the wind grab it, it won't pull your box down with it.
Any excuse to paint in oils (or switch to) is a good one. I bet it would easily modify for watercolors too though… digital, not so much. 😉
Hey Howard, nice article. Southco make torsion hinges you can adjust yourself. 7 bucks each! Find them on amazon! http://www.amazon.com/Southco-SC-773-Adjustable-Hinges-dampened/dp/B002I01QVW/ref=pd_sim_sbs_indust_1?ie=UTF8&refRID=1EZSW0J4RA6NC7246JVW
Nice! I have been thinking about making another box, I will give these a try. Thanks for the heads up Tim!
What is the difference between a pochade box (on a tripod) and an easel? I love the art that Abbey Ryan does, and I read that she uses a pochade box (she wouldn't tell me what kind it was when I asked her in an email, lol).
hey guys, Im going to build my own pochade. I already have some material, still have to get the rest. After I will complete it, Ill be happy to share it with you. Im not painting in oils at all, so I hope it will be a good starting point for me to paint :).
Thanks so much for posting the plans Howard and thanks to others for helpful comments/suggestions. After a long hiatus from doing any woodworking, I stumbled across the PB box idea for a Christmas gift for my daughter who is working on a BFA at the University. As a non-artist I did not know such boxes existed before landing on Howard's blog. I bought some exotic wood at a local wood supplier/furniture maker which sells “shorts” and “cutoffs” from large projects for modest prices. I am using a birch plywood for the tops and Jatoba, a South American Cherry, for the other pieces. Despite the fancy name, the wood was not super expensive as I was able to buy scraps. I am taking a Community Ed wood shop class so I have access to tools and invaluable assistance from a retired wood shop teacher. So far I have most the cuts made and now ready to start assembly. Wish me luck. If I can post pictures here I will. Not sure I have any great value to add to what Howard and others have presented, but hopefully it encourages others to build a box. It's been great fun so far. Thank you.
Patrick
Nice to see people do stuff on their own. But for future boxes, turn the painting area around so you don't have to stand with a bent back when you paint. Or find a way to slide or lift forward the painting area to the center of the box, or to the front which was my first recommendation. It is basically a cramped easel without legs. If you put your three leg easel on the ground and hang a basket under it for your tools you have the same thing, but with the possibility to do bigger canvases. You have to carry around the tripod anyway. Not sure I will go the pochade box route. You can clamp a canvas back board to a note board and hold it with one hand and balance it on your knees if you sit on a chair. Wear colorful pants.