Believe it or not, the goal of figure drawing is to have the information you need to make art regardless of having reference or not and having information to dissect the reference you do have and use. In addition, the information you learn helps you make intelligent, and tasteful decisions in posing your figures as well as what to use and what to leave out of the pose when time to execute on the final illustration.
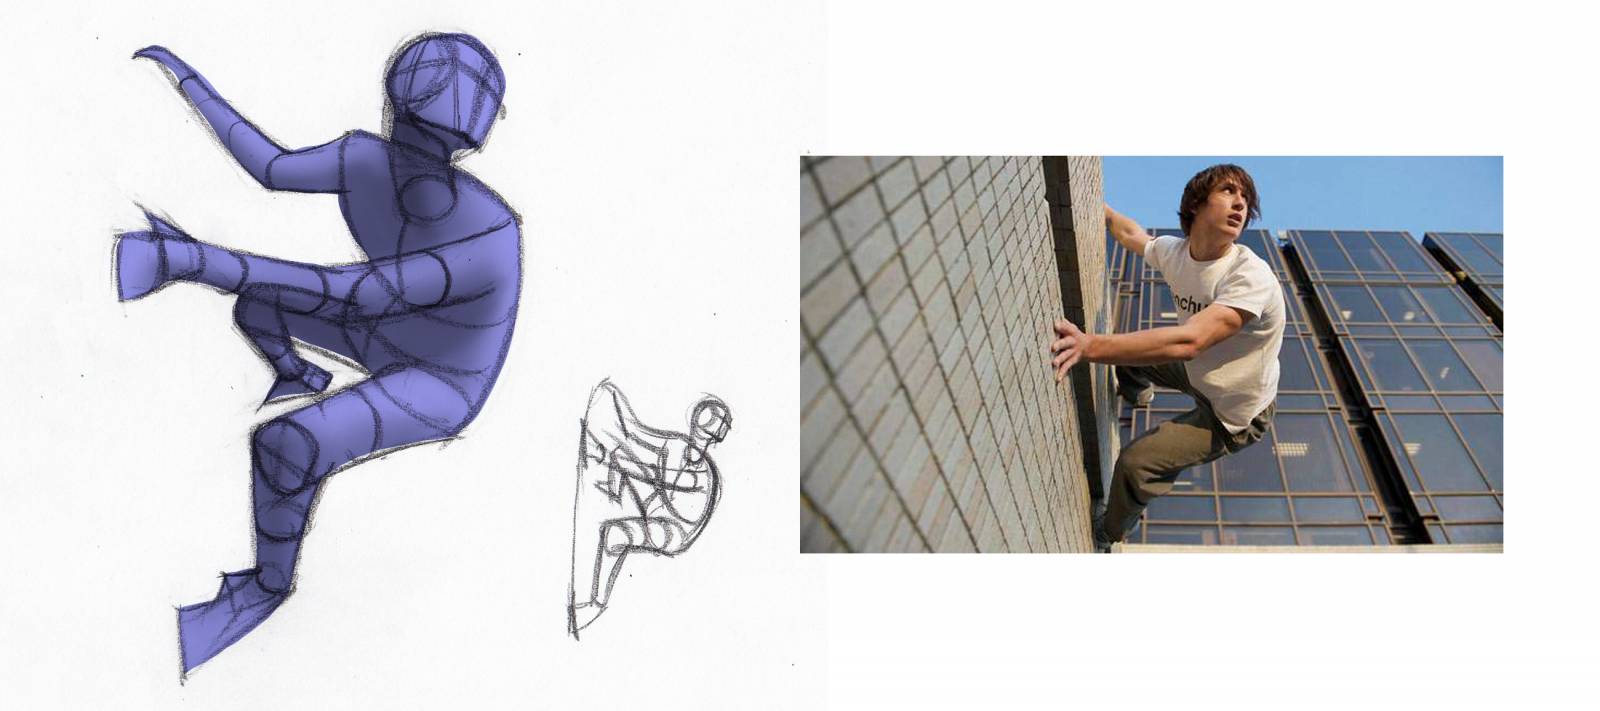
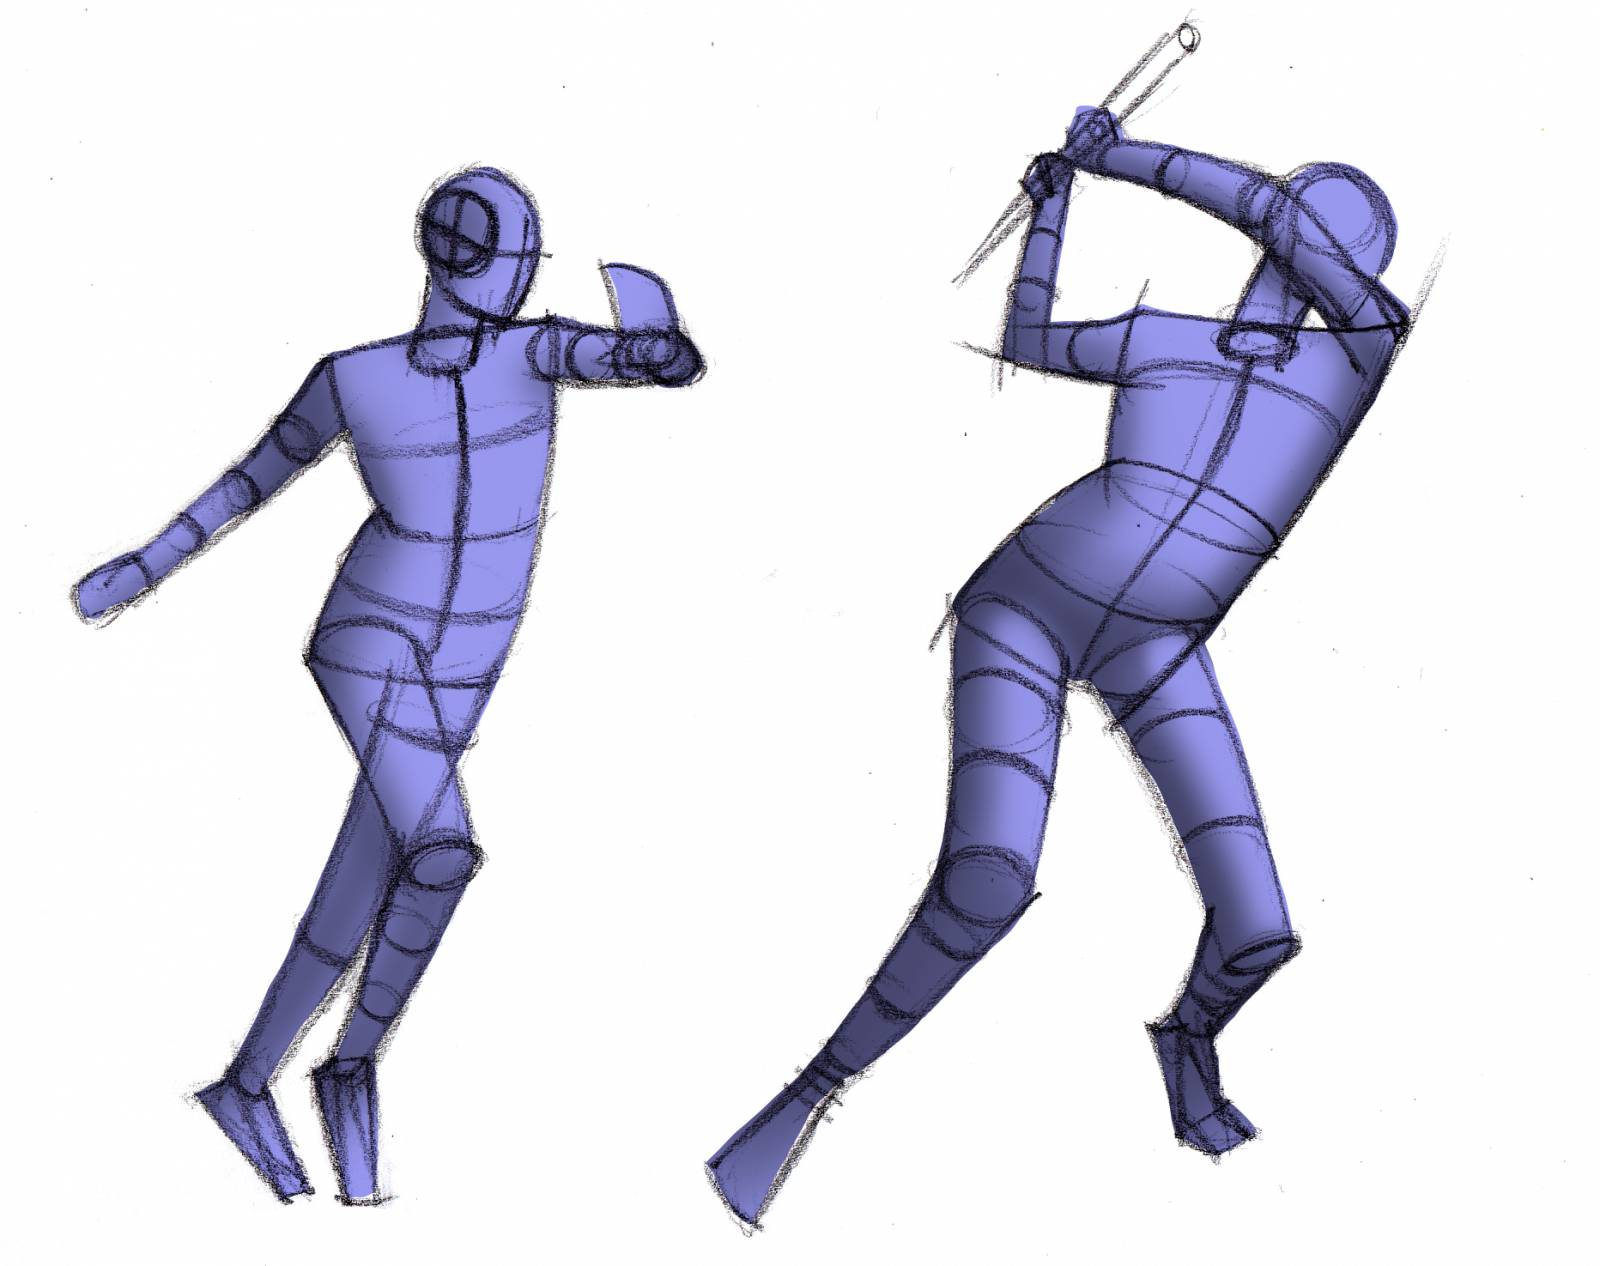
Armature is a term I use a lot, as I liken it to the wire frame designed beneath the clay of a sculpture, or the grid space used to design the picture matrix. This armature is made up of 8 generic parts that make up the whole of a pose. These parts are used together to design every pose you draw. They are simple gestures that bring life to an idea.
We all doodle with these “armatures” without realizing we are drawing with a functional tool that gives us a clear understanding of dimension(overlap), weight and gravity, motivation, flow or mechanical design of the pose, position for anatomy, overlap and connective foreshortening.
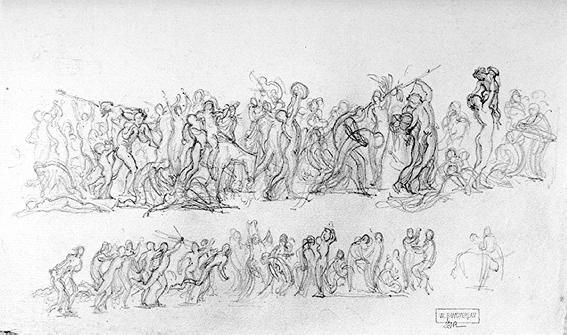
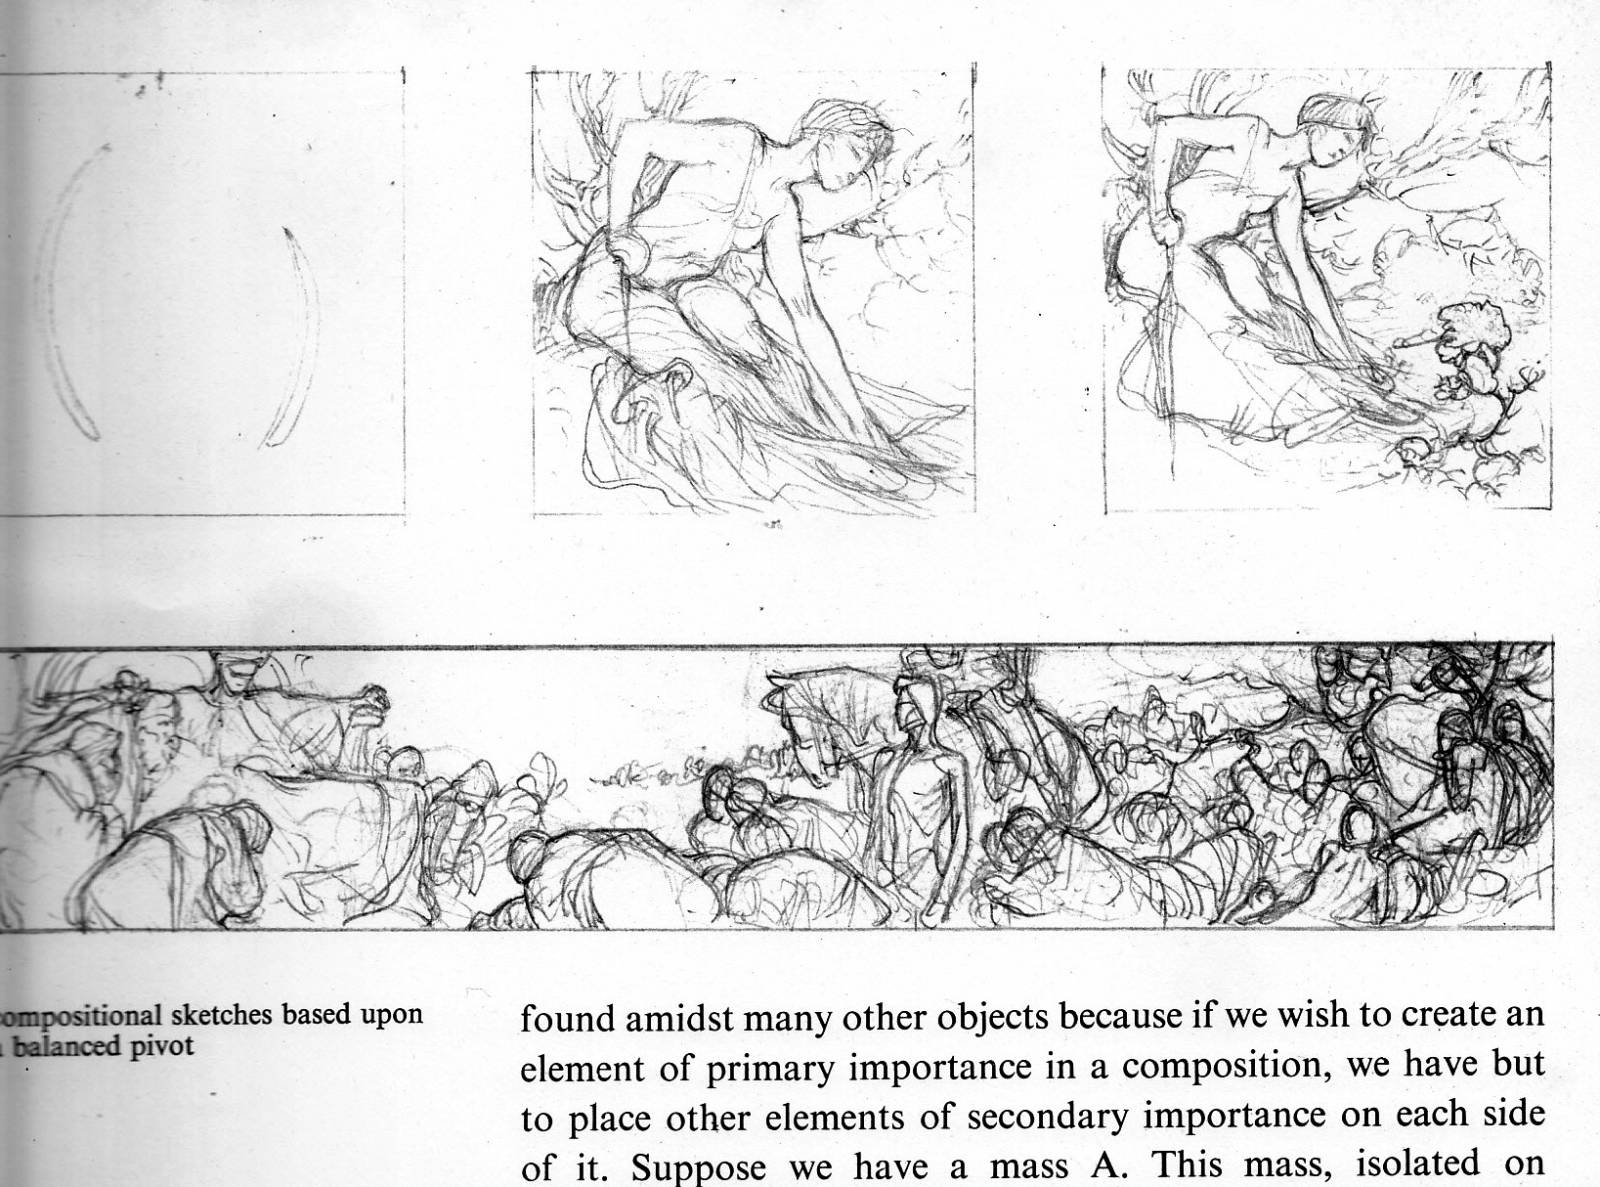
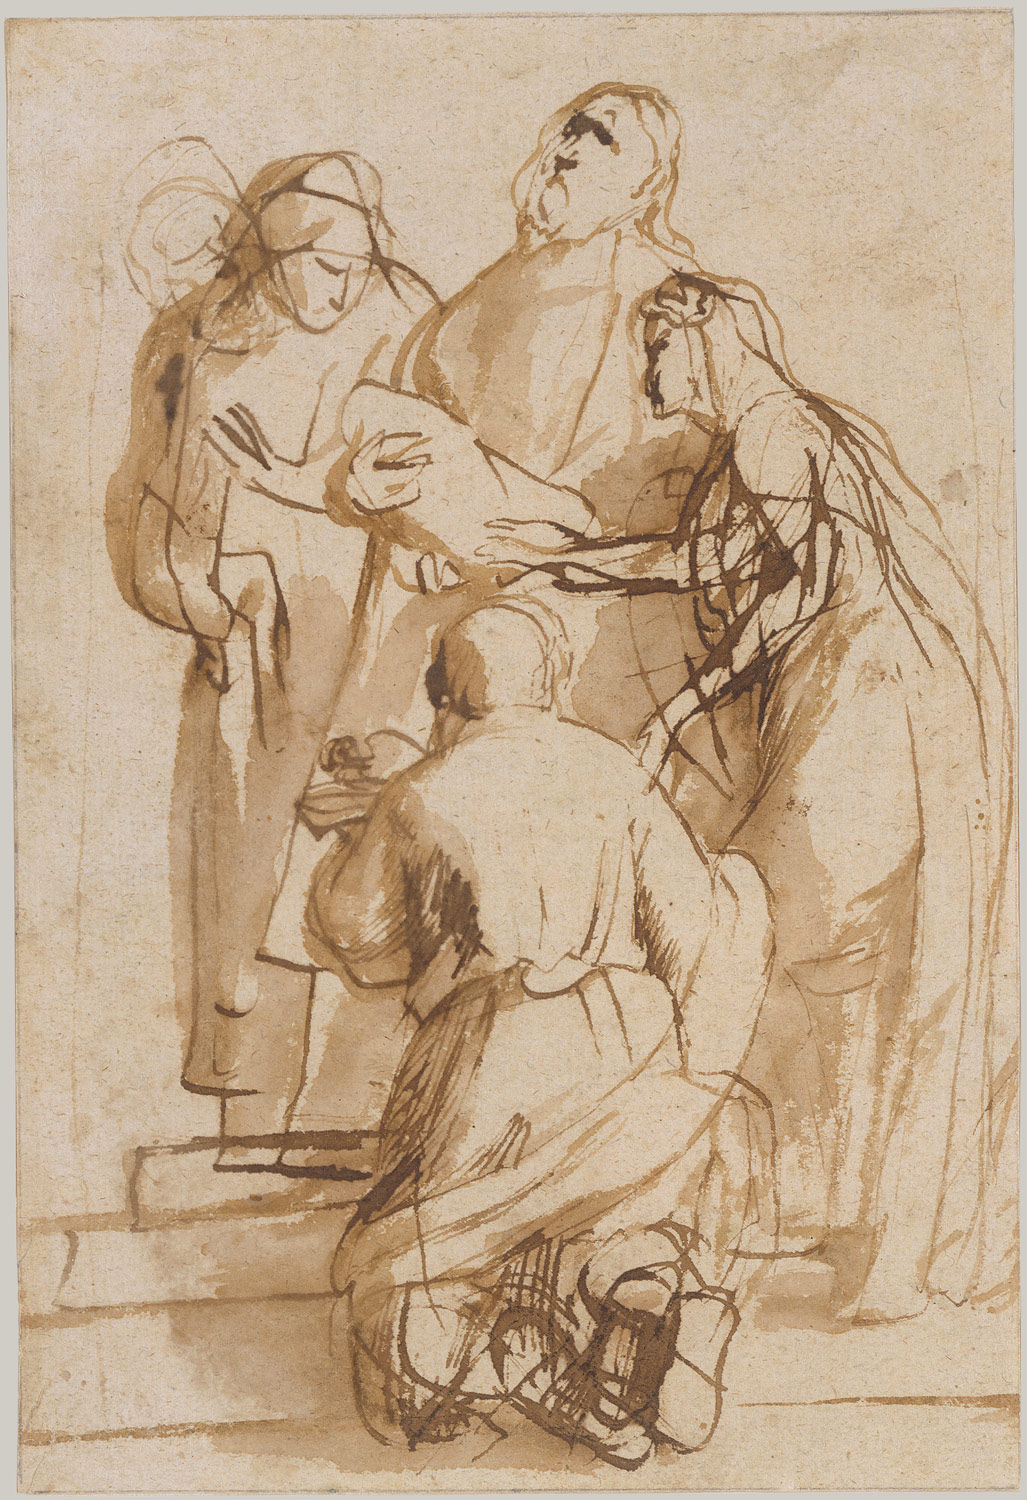
I am going to break down the mechanics of the armature and I am going to shade it so you can see the volumes I see when I am using it. The tool is one of the most useful tools in figurative art and it is no surprise that when reviewing old masters with archived sketches and preliminary drawings still available for us to see that artists like Bouguereau, Mucha, Rubens, Tiepolo, etc. used them.
Bougeureau Comp
Alphonse Mucha Comps from his composition book
Peter Paul Rubens Sketch
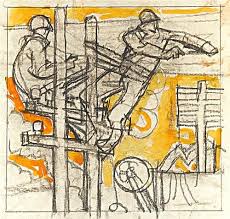
Dean Cornwell Sketch
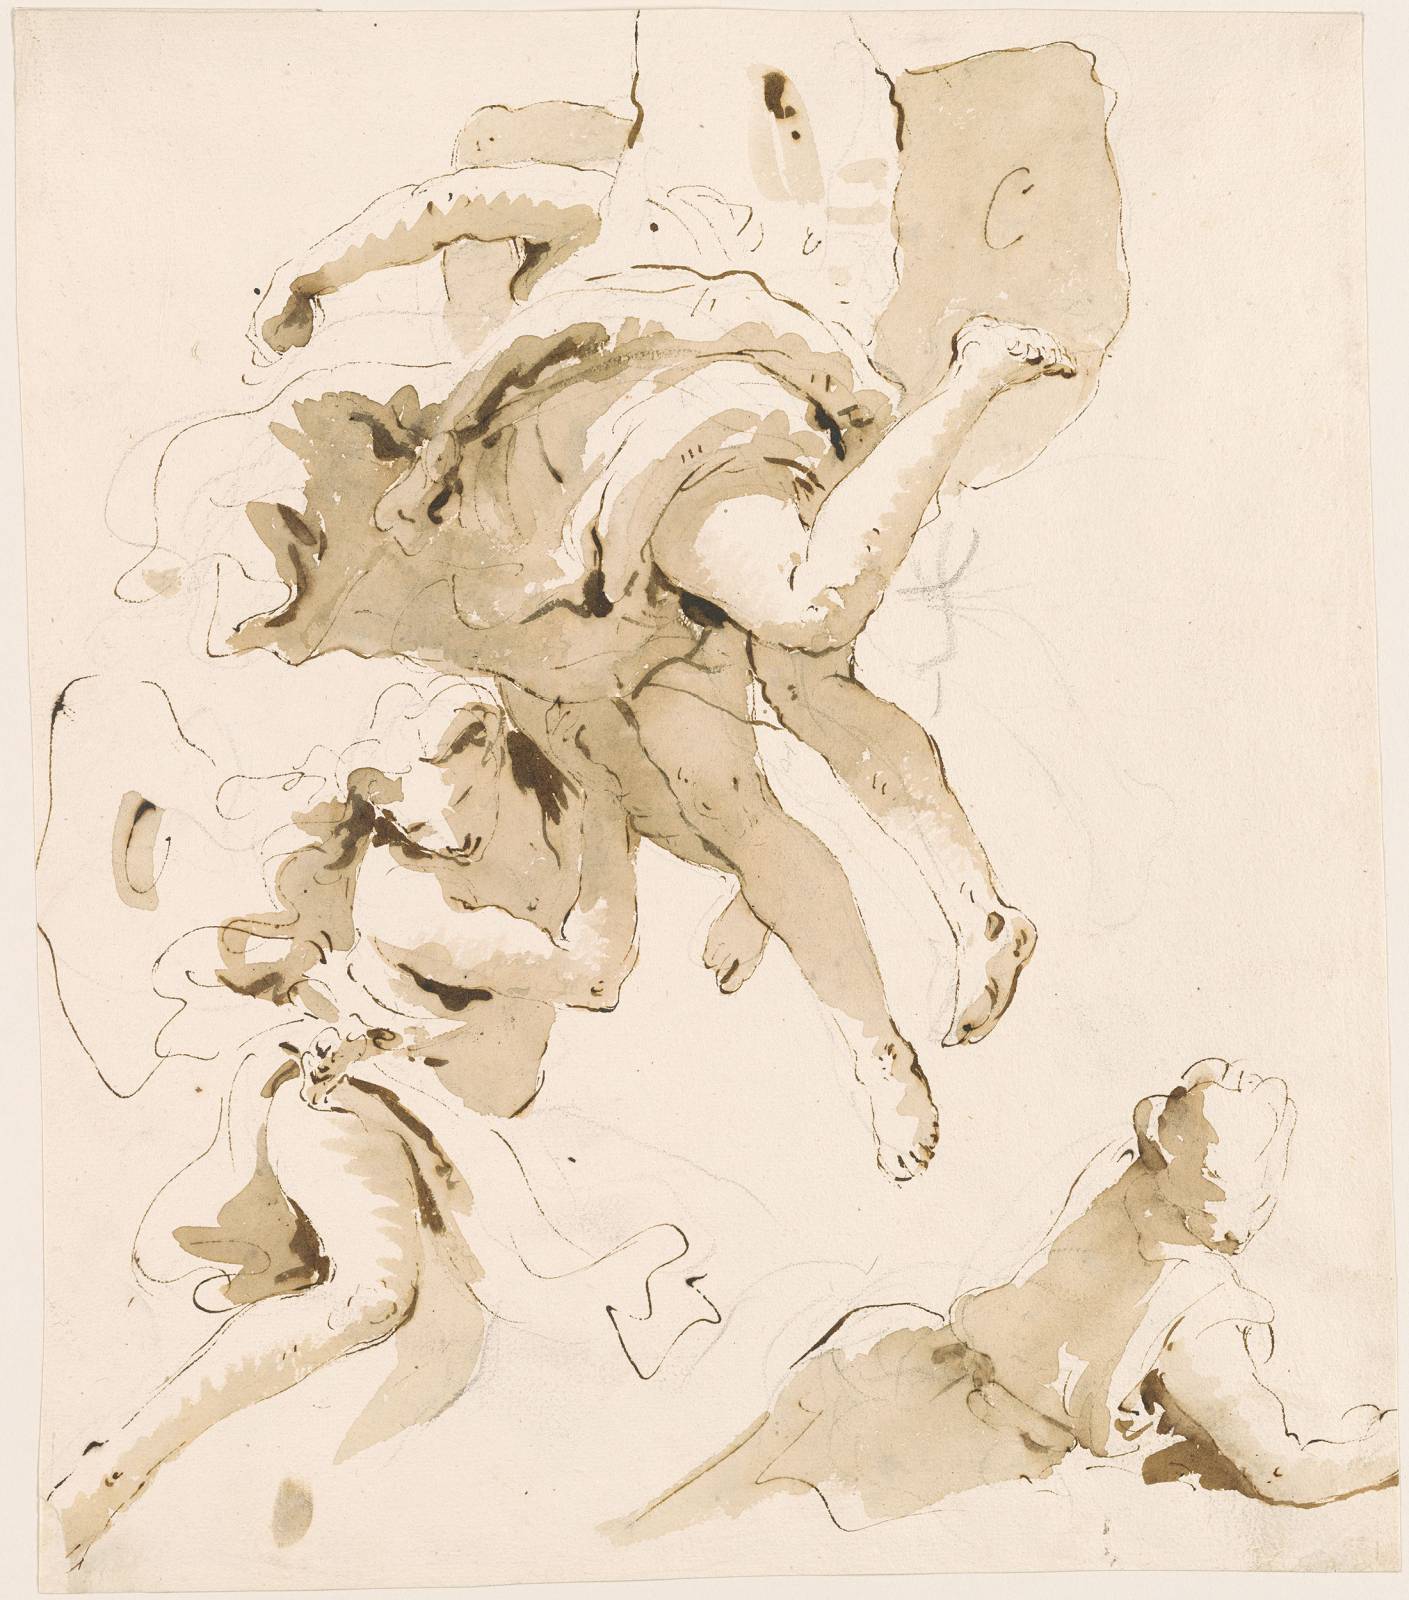
Tiepolo Sketch
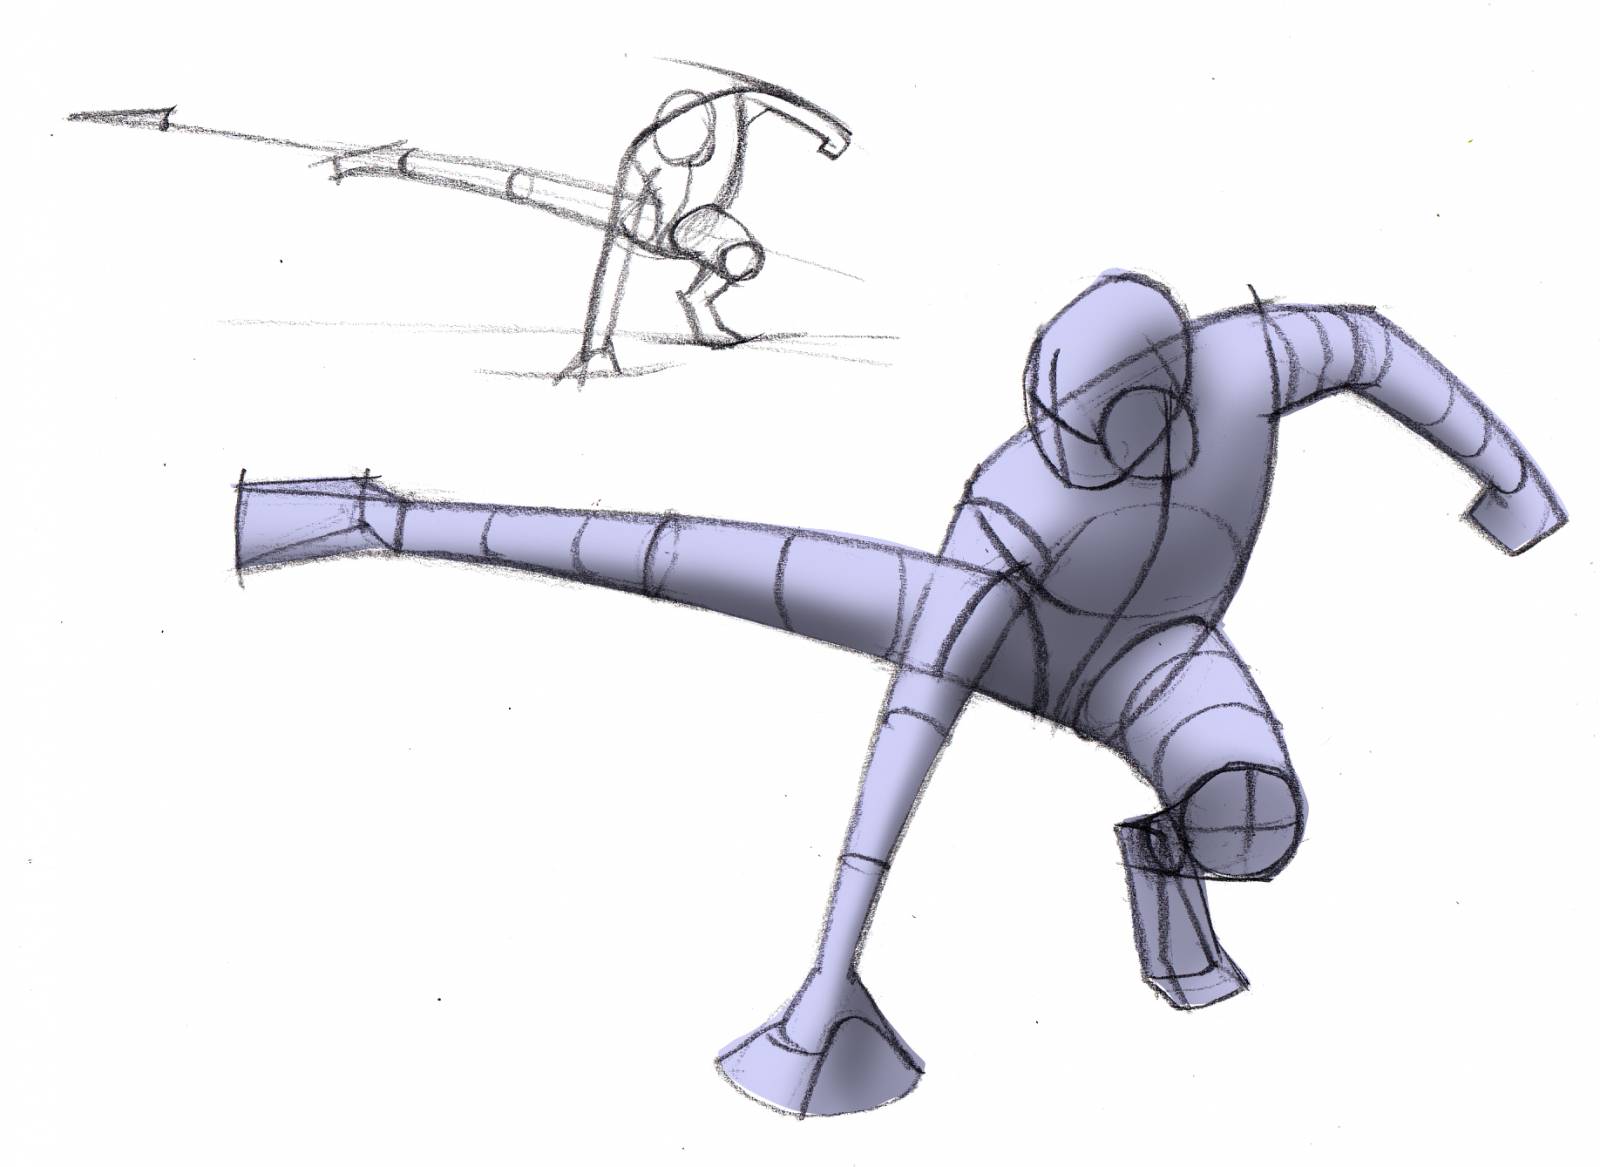
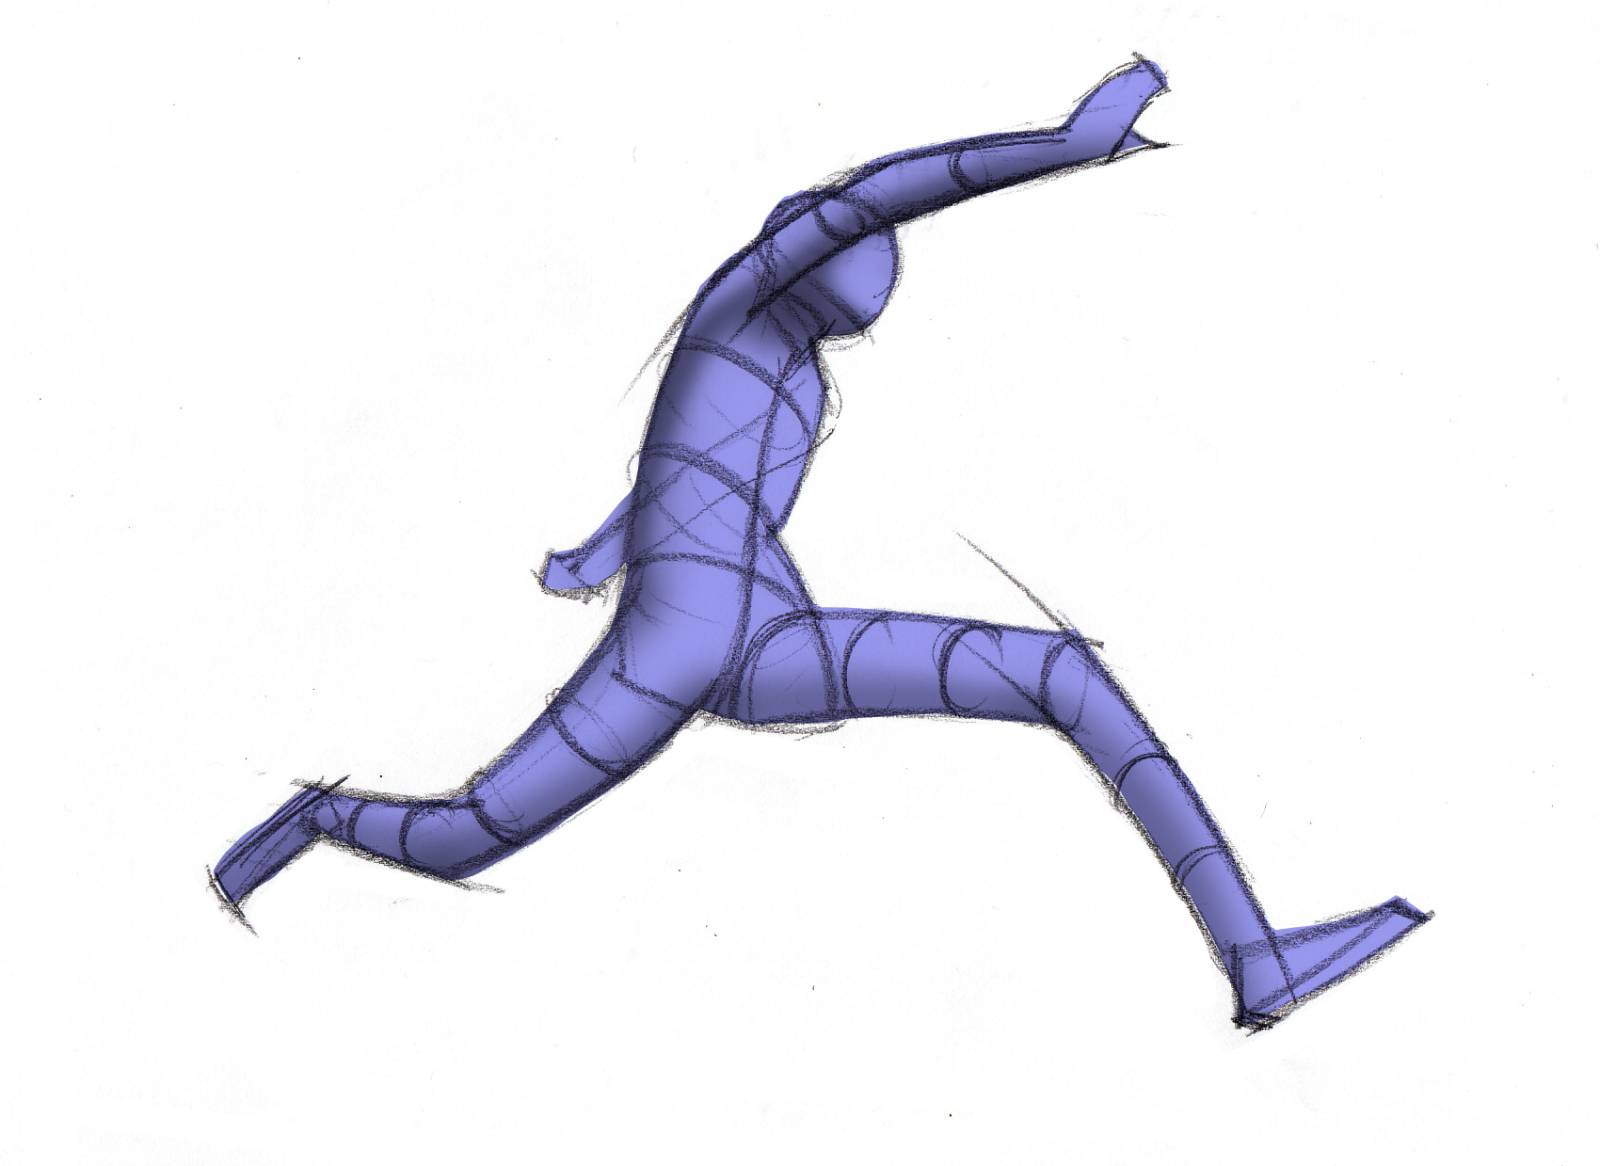
The armature can be used in a simplified form or a more advanced form as needed for the artist to see more clearly and more advanced rhythms and abstractions that travel through the minutia as well as the bigger simpler found forms that inspired the pose from the start.
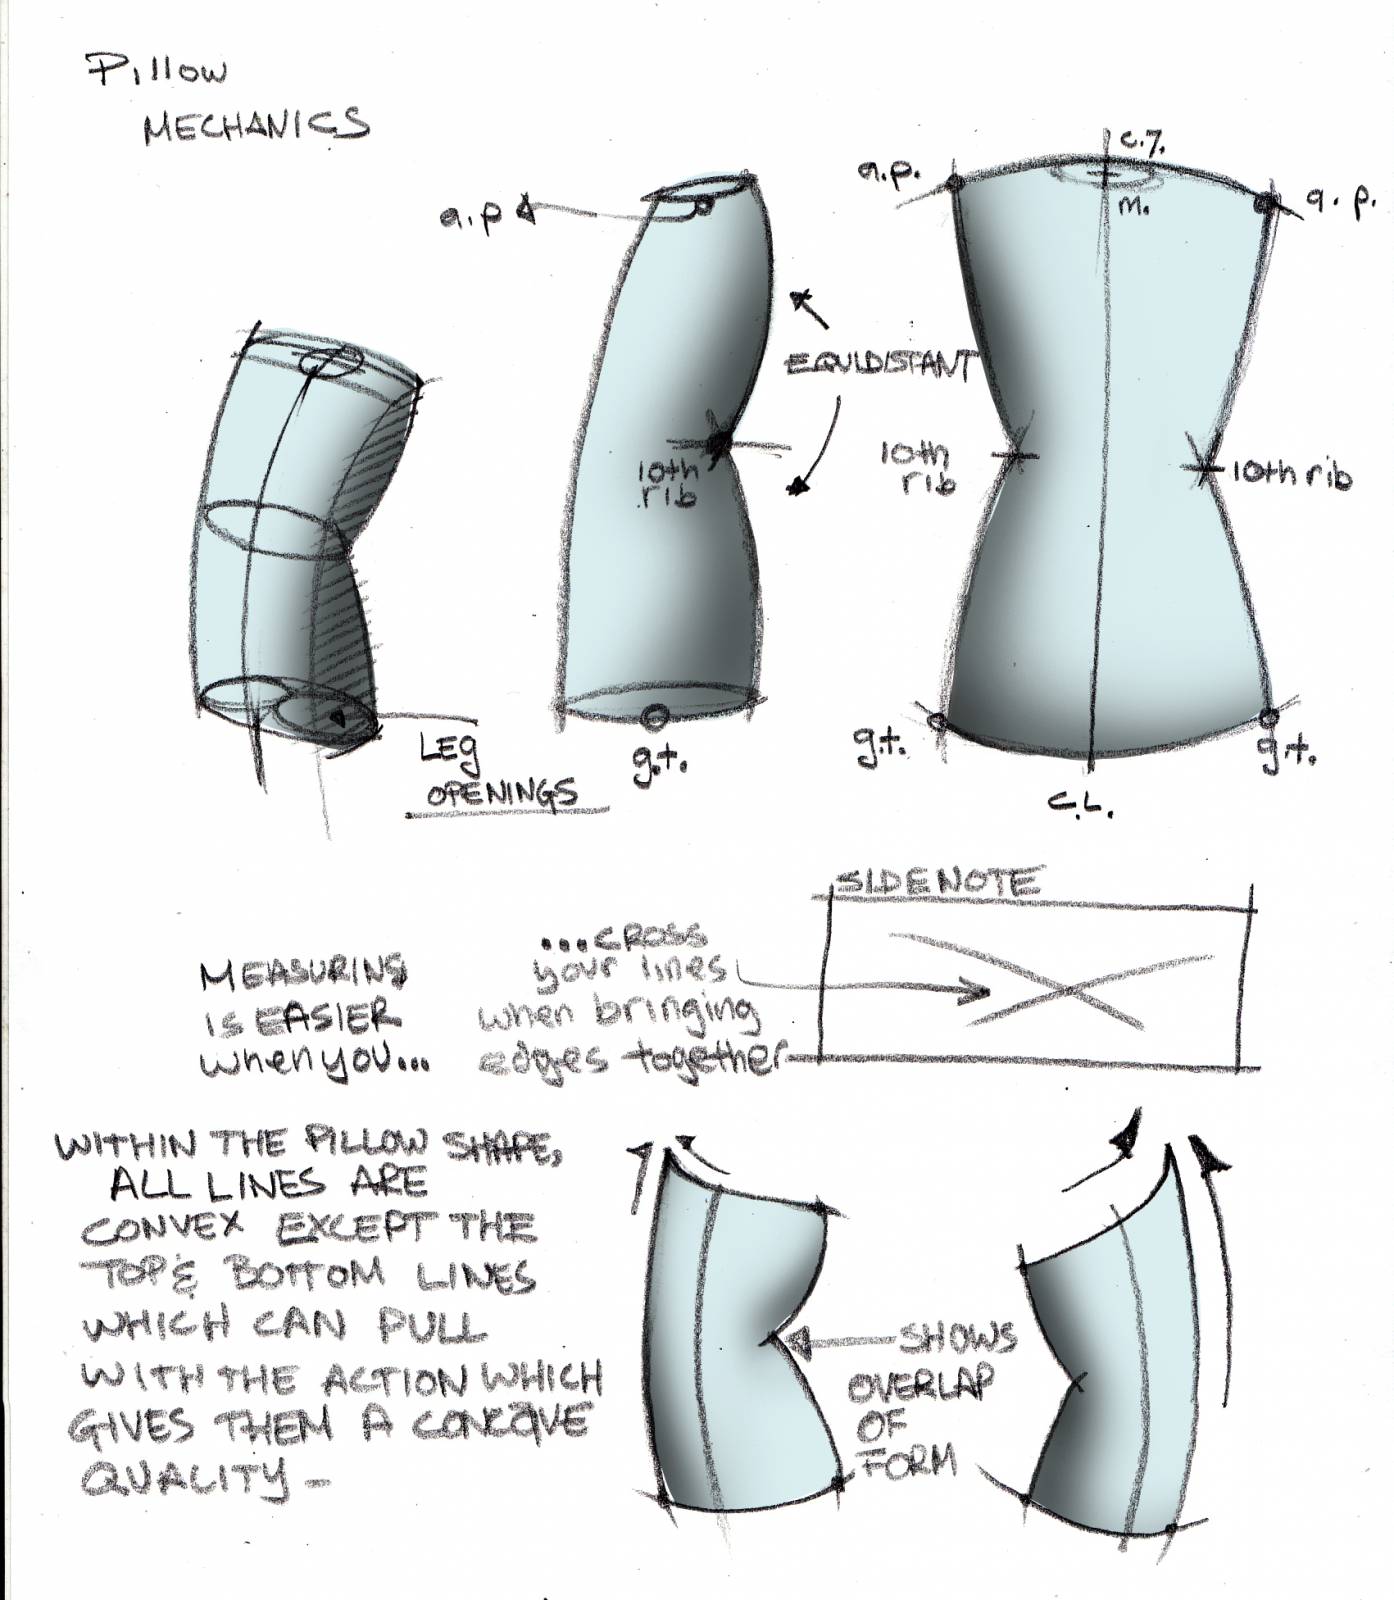
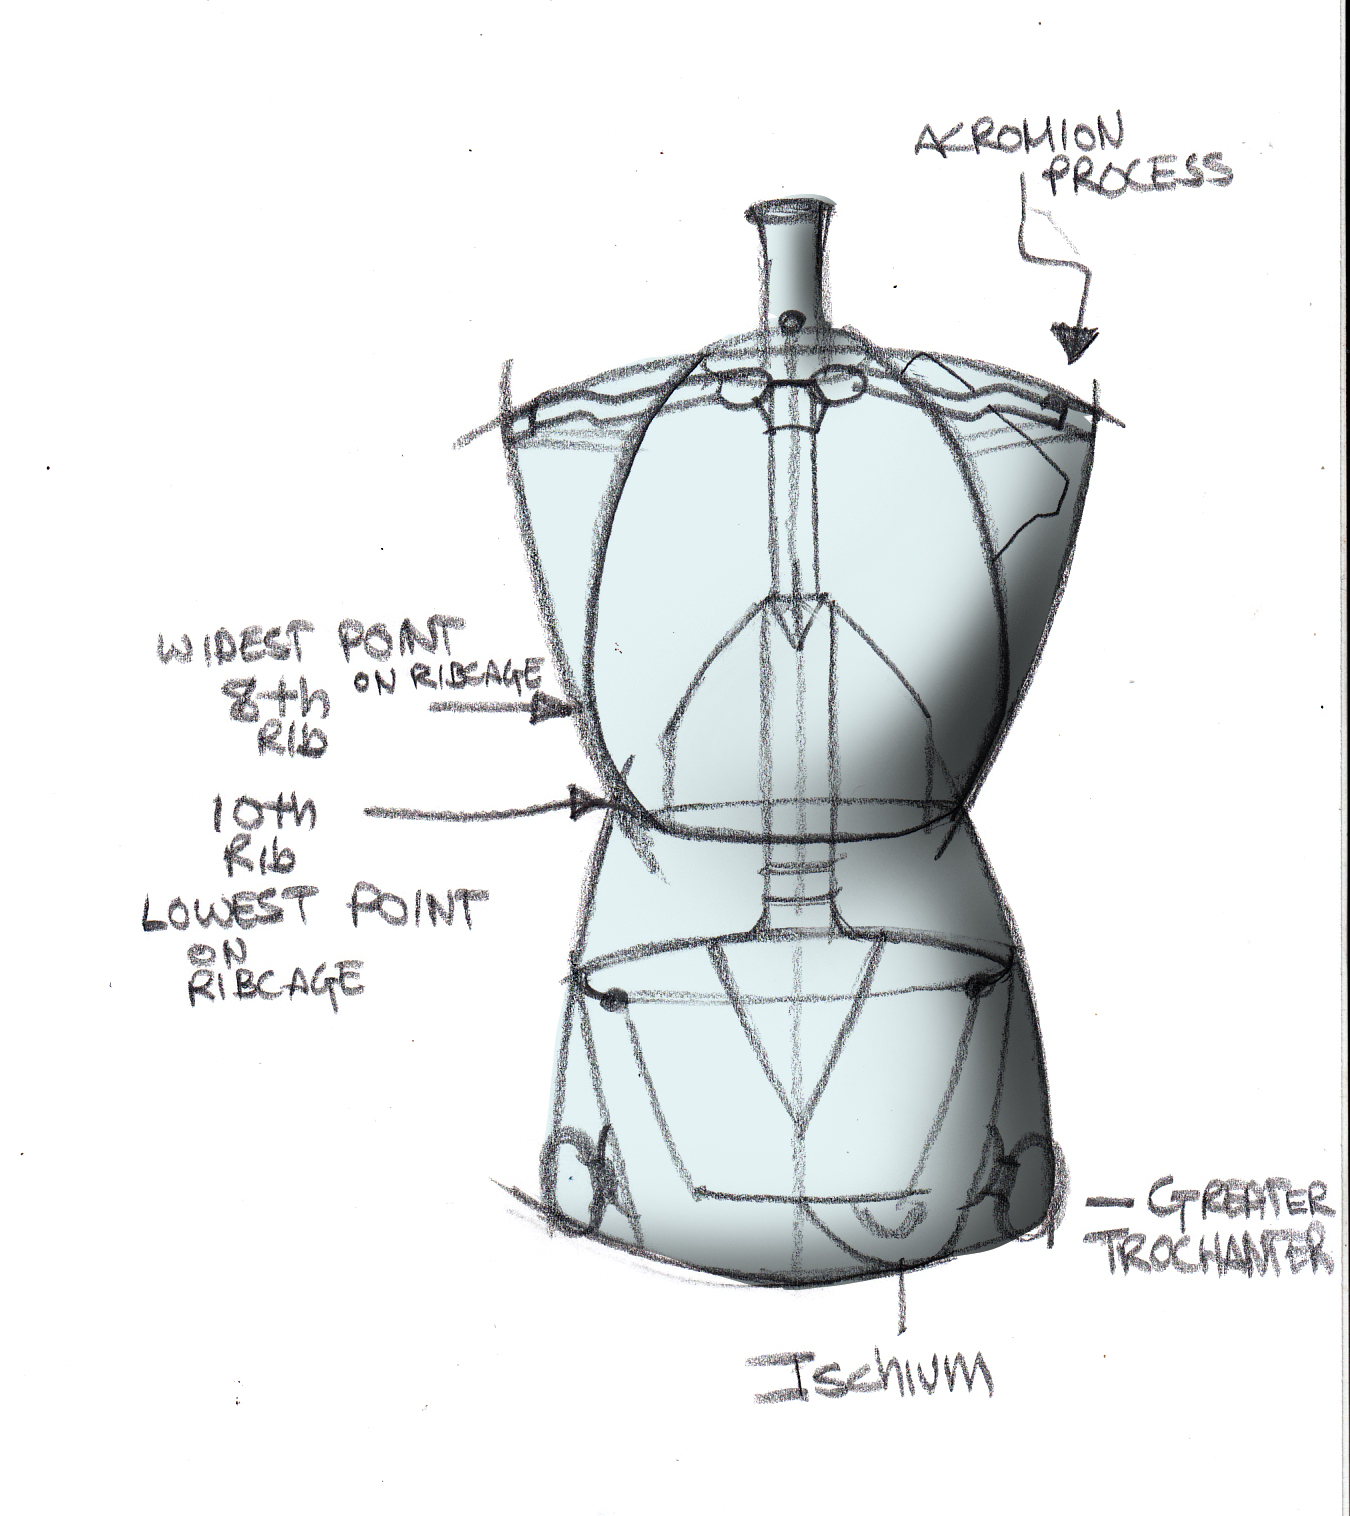
The core of the pose is the pillow form. It facilitates the torso of the figure encasing the ribcage, pelvis, spine, clavicles and scapulae in 5 or 6 lines at most. The measure of the pillow is designed to find the ribcage volume that makes up the total upper half height of the pillow. The lower half finds the pelvis, filling only 2/3rds the height of the space. But both halves together are equidistant from each other regardless of the pitch or tilt of the pose. THE PILLOW FINDS YOU BONES, muscles distort this view. Sometimes it will lead you to believe that the bend in the torso is just above the bottom of the figure like this pose, or further below the ribcage like the pose. BUT AGAIN, you are looking for bones, not muscles in the first few lines of the gesture.
The next two shapes are the head and the neck, shapes 2 and 3 of the armature. The neck is a forward sweeping cylinder, a little more vertical in the back than in the front. AND IT IS NOT THE TREE TRUNK SHAPE WE ALL WANT TO MAKE IT INTO. That is the muscle structure all around the neck fooling your eyes into thinking that is the natural shape of the neck.
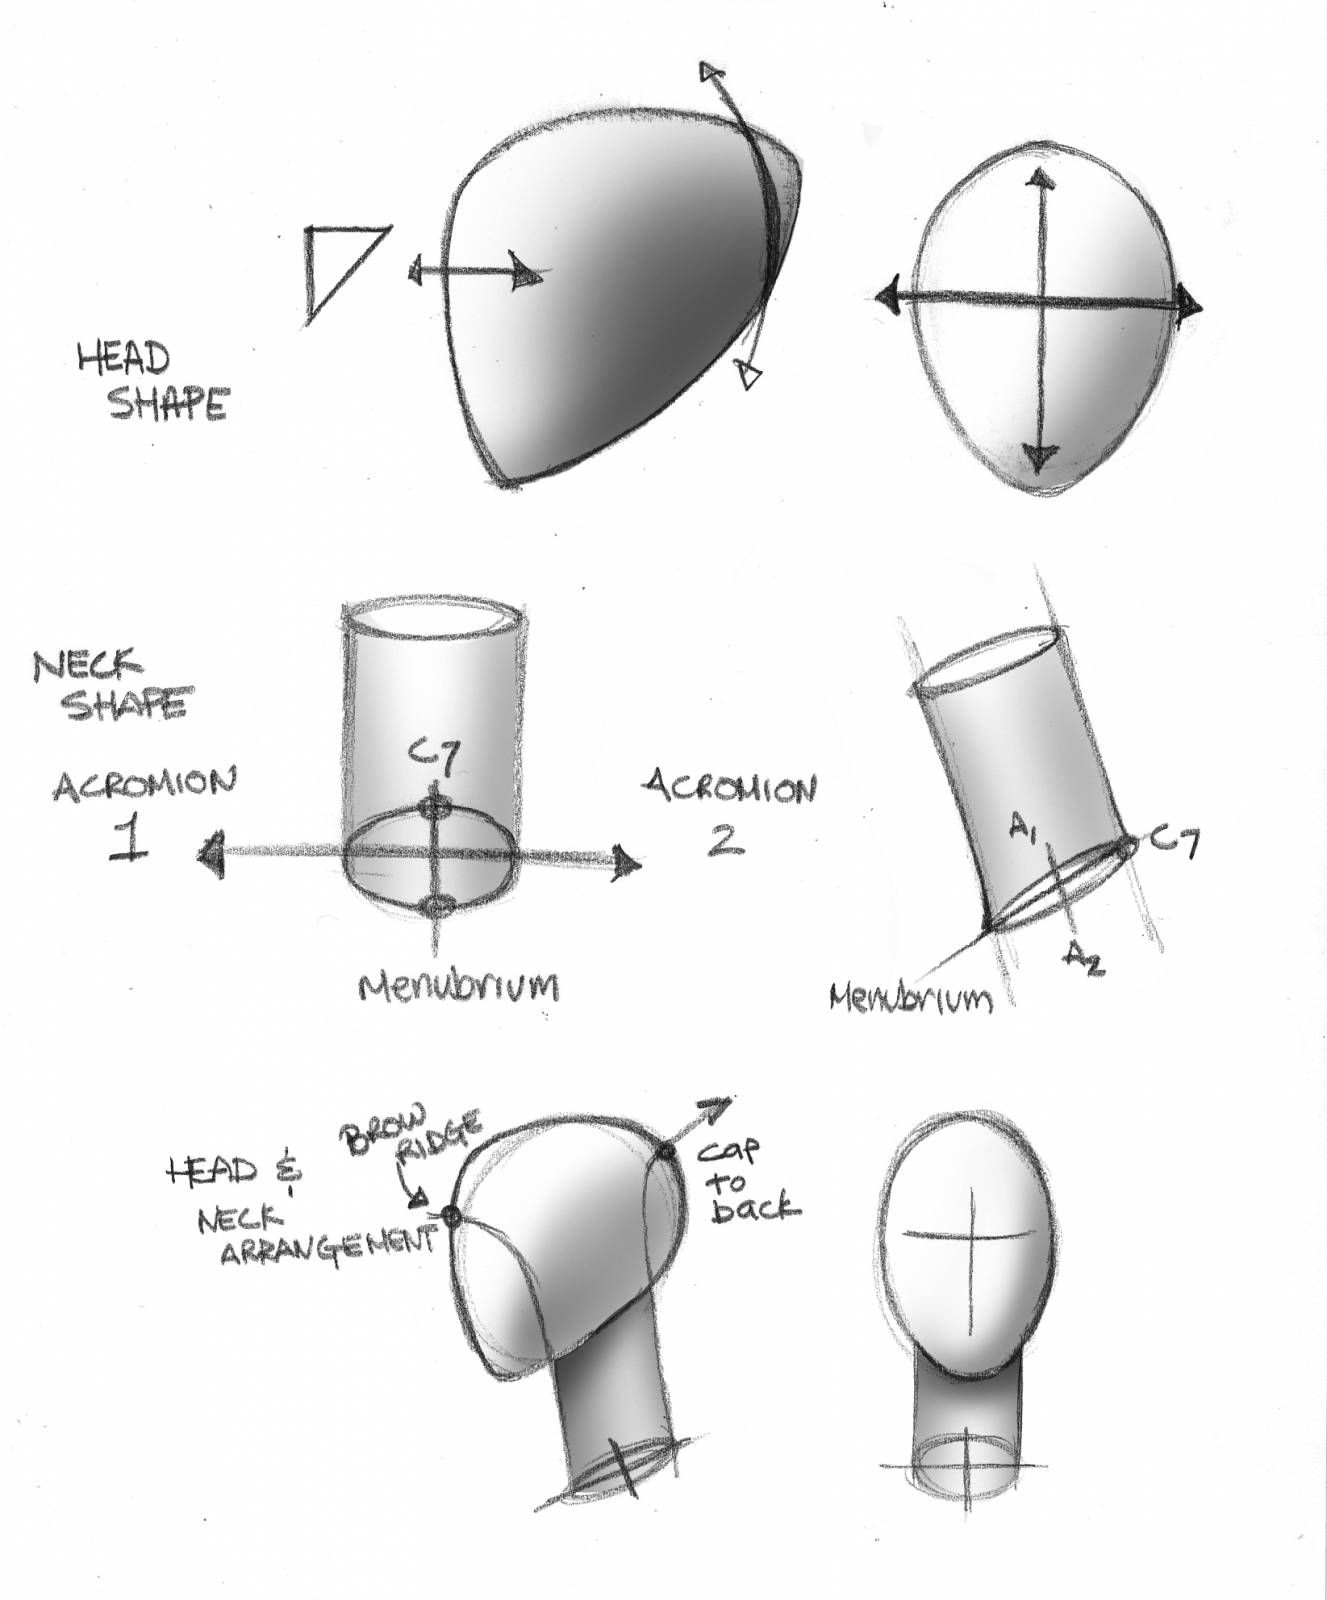
The head shape is an egg like oval from the front, and a long soft triangle from the profile view, or a pitched and slightly oblong oval. The side is wider than the front. The front is roughly 2/3rds the profile width. There is more chin volume than back of the skull volume that exceeds the neck cylinder. The head does not go all the way to the back of the neck, just as in ¾ view poses the neck does not match the edge of the chin. These are both mistaken and are nothing more than a misinterpretation of rhythm in the neck muscles striations, or not paying close attention.
Next, we have two arms, shapes 4 and 5 of the armature that includes the scapula and the hand as a part of the entire structure. We base each of these 8 items on their mechanical function, thusly we do not remove the hands from the arms as their own items on the armature just as we do not remove the feet from the legs when we search for them. The scapulae are triangular in design, and we look for at least two of the three lines of the triangle and make sure to ground them against the contour of the form for context to the outside edge or silhouette of the pose.
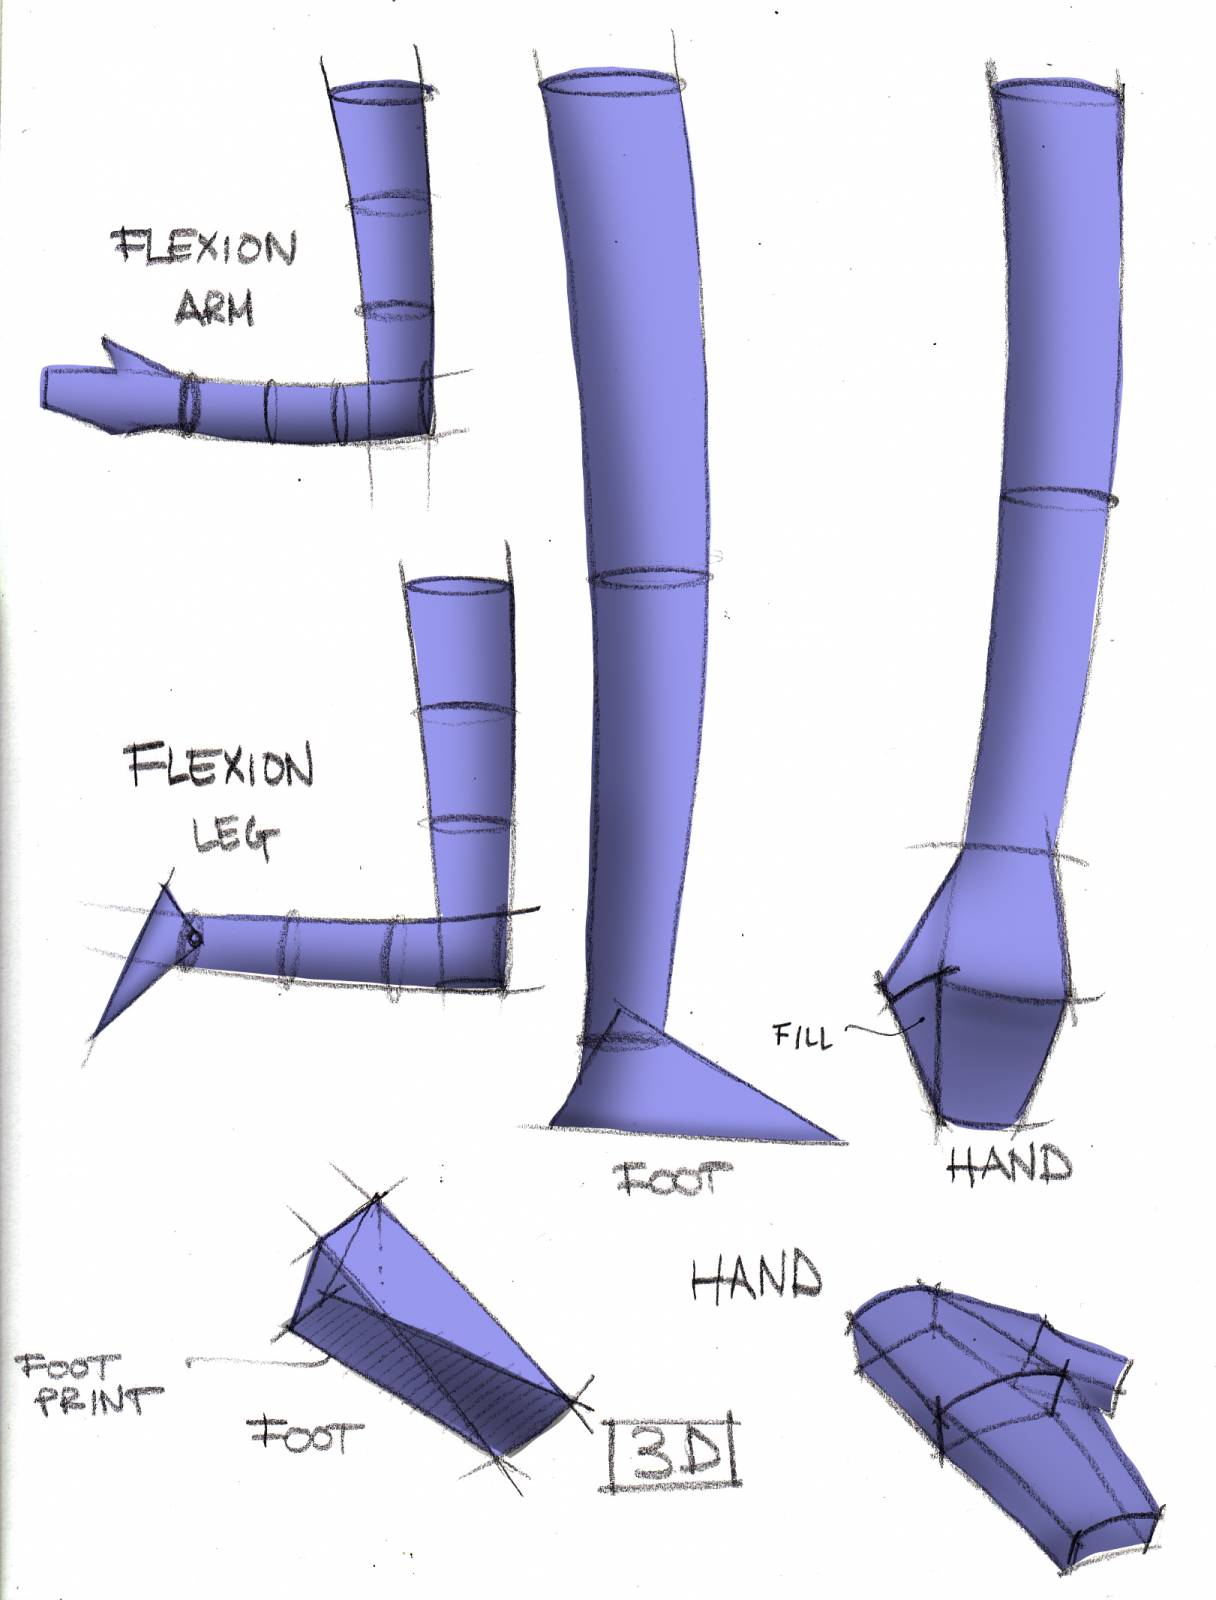
The hands are done up as a simple diamond like block if the fingers are tightly pressed together. The formal block of the hand without the fingers is roughly like a scrubbing sponge, harder on one side, softer on the other in its volumetric design. The fingers are welded together at their finger tips to find the basic shapes all the fingers together make up as the hand mechanics or gesture.
The final two shapes are the legs, which again as I said include the feet, and the knees which we avoid looking for in the early stage of gesturing the figure unless the knee is the center of the action. The feet pivot on the ankles and are found as door stop or door wedge shapes. Finding the flat foot tread of the foot is important if you want to be able to envision the figure in dimensional space. Once the figure is grounded and the mind can perceive it that way, when the rest of the body is worked out in form design the perspective of the geometry will be much easier to spot when it is out of perspective to the rest of the pose.
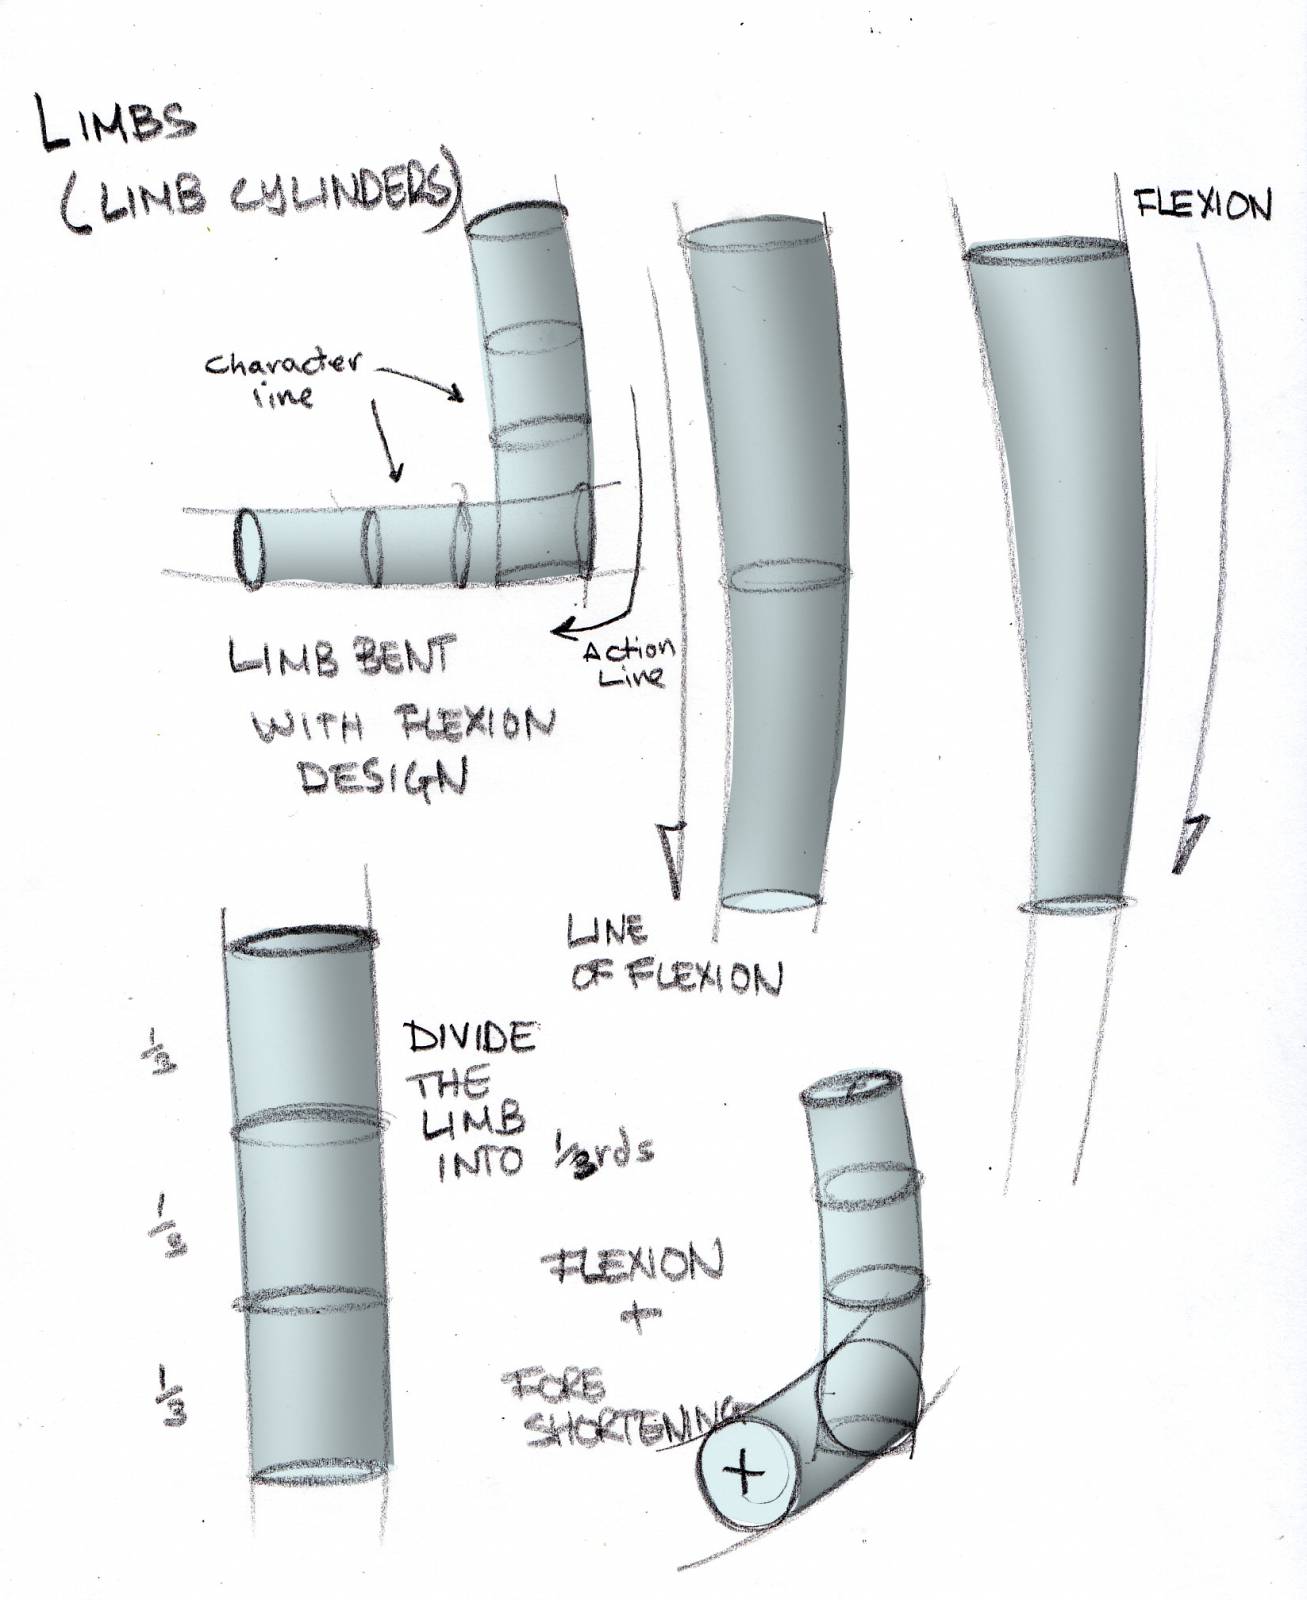
When finding the arms, we have two lines of the length of the arm, each line represents specific traits in the design. Line one is the action line delineating what the limb is doing. It can be long and fluid or broken into segments, in either case intent of the action is described. Line 2 is the character line, describing the weight of the figure, heavy or thin.
When all the shapes have been found, they are massaged into rhythm through two factors, the bones influencing the arms and legs, and the motivation of the pose influencing the abstraction of the entire pose.
The lines of influence on the arms and legs are called lines of flexion, in association with the flexion group of muscles of the arm and leg. The flexion line is more concave than the extension line giving space to the muscles that are compressing together when the limbs flex. These lines can be lengthy from top to bottom if the limb is straighter or they will influence each segment when the limb is bent.
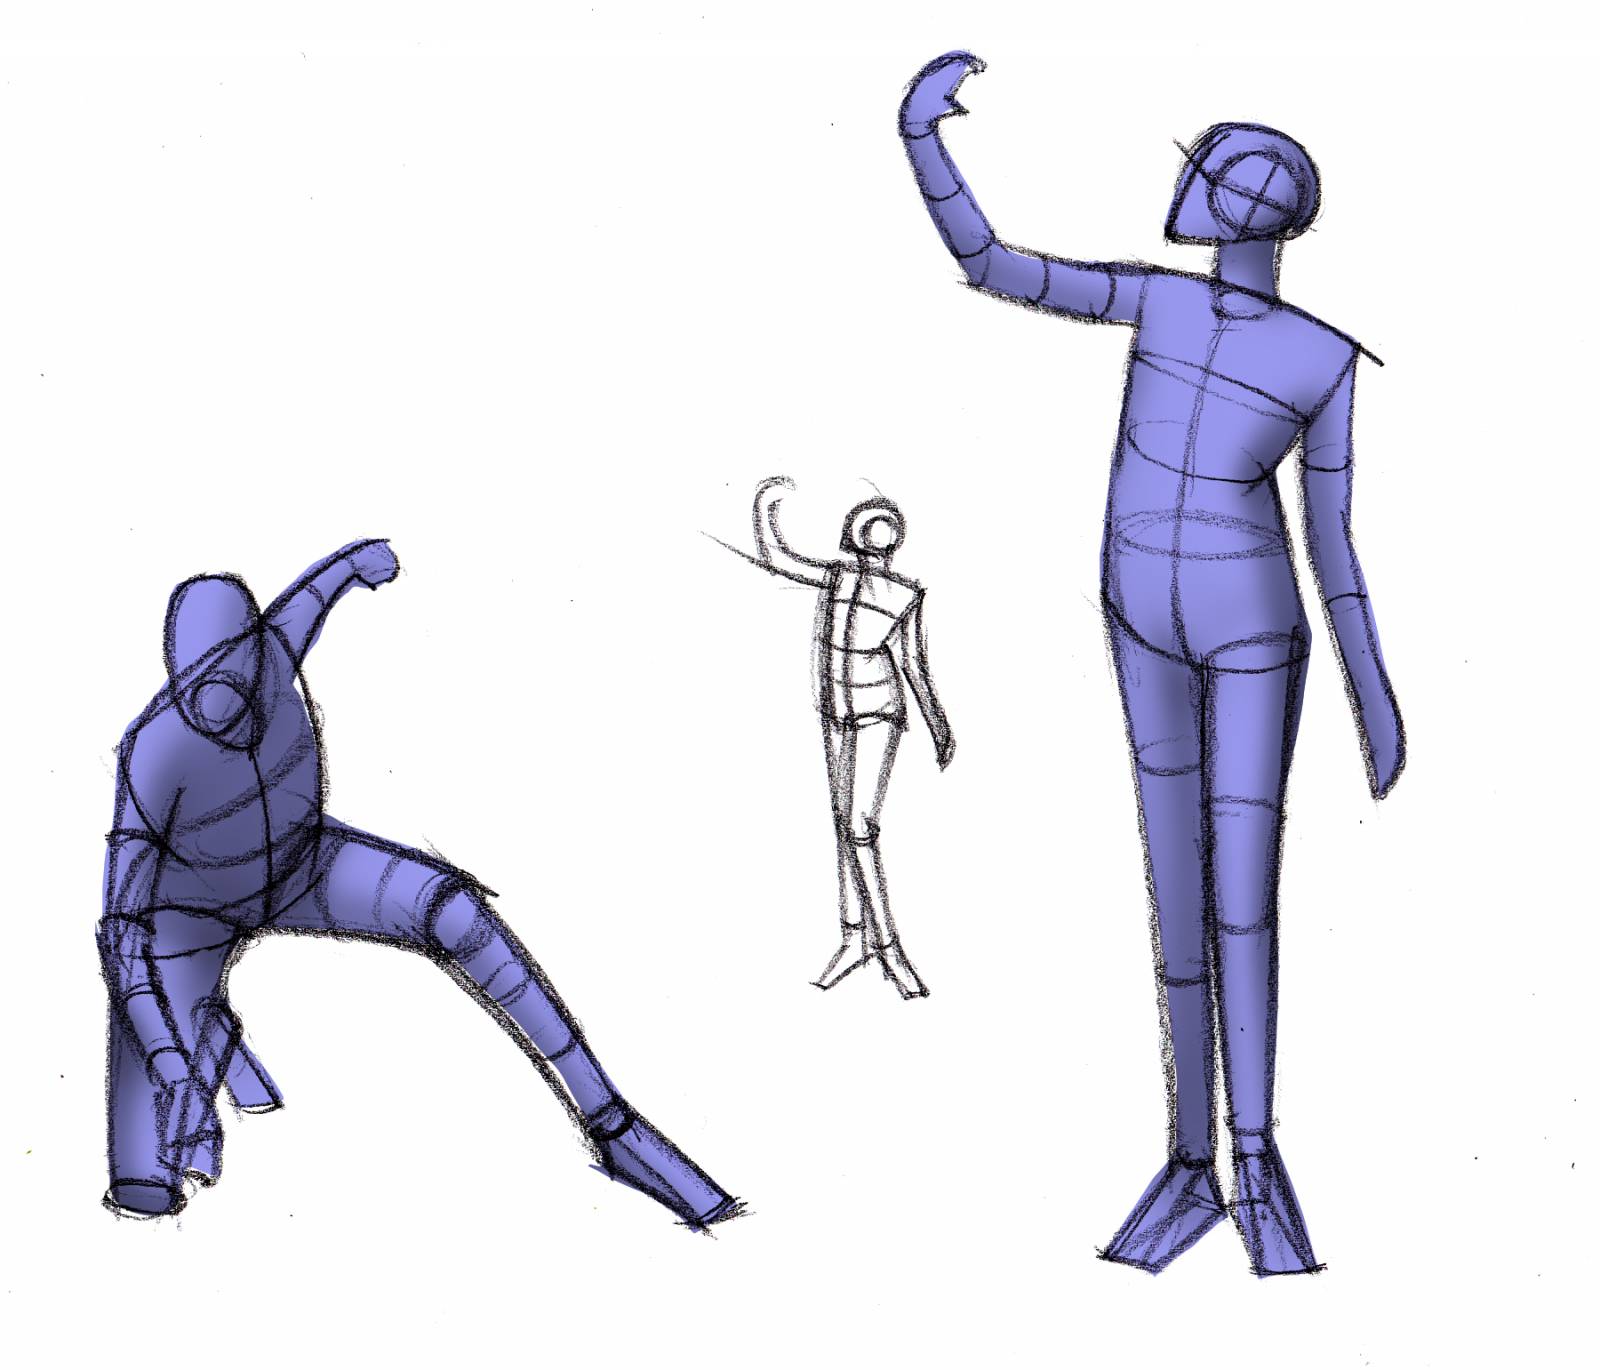
The entire pose moves fluidly through space and we look for a tool called the abstraction or set of rhythms that connect distant parts of the body together using the anatomy as lines of influence. The lines of the abstraction are not arbitrary, and there are many more to be found when looking beyond individual spaces on the body.
Both sets of lines, if consciously used will breath so much more life into the pose long before the details come along and suffocate away some of that expression. Push these concepts in the armature and you will have so much more to work with and bring a lot more punch to the physical expression of your poses.
The last set of lines we work with are perspective lines, ellipses that wrap around the cylinders to give insight into the figures dimension, volume, and the exact points in space where the anatomy is attached for more accurate placement even when extremely foreshortened. I use these lines in conjunction with anatomical landmarks to again solve perspective, pitch and tilt problems, alignment problems, and build stronger abstractions with more information to work with. I use 4 ellipses per each segment of the arms and legs, and 3 within the torso.
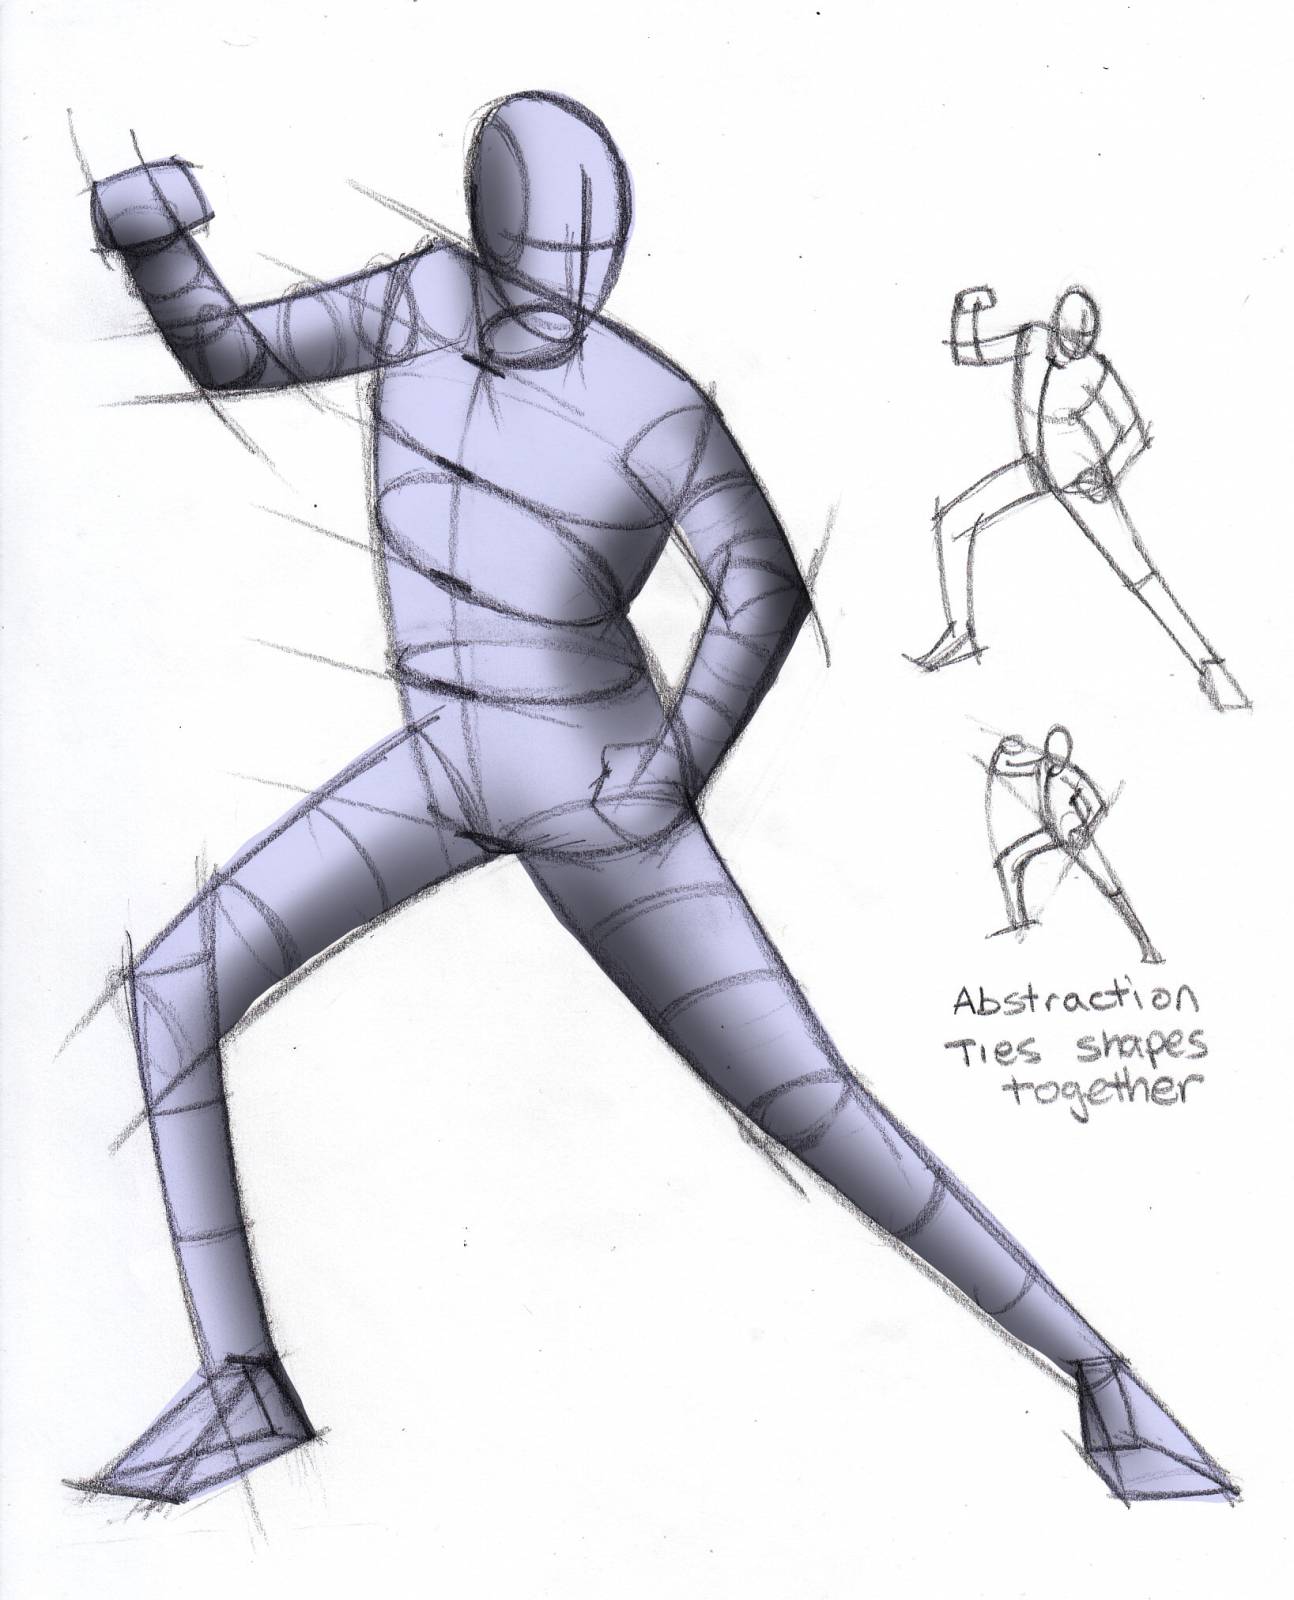
The 4 in the arms divide the arms into 3rds, each third a specific mass in each limb of the body, the bulk mass, the tapering mass, and the tendinous mass. Both the upper and lower segments of the arms and legs are constructed this way, but the arms have an additional set of muscles extending from the upper bone down the side of the arm called the ridge muscles that change the silhouette of the arms and the legs from each other. This complex problem can be solved in the armature, but first solve the action of the arms before getting caught up in such nuances.
You might end the picture with the cross hairs of the face. The vertical line of the face helps represent the tip, turn, tilt, of the skull, and line two or the horizontal line representing the relationship of the symmetrical features of our face, but none as it is for measuring how the head is placed within the pose at this point in the design.
Now again, if you have some understanding of anatomy then you will have no problem adding some additional line work in that might help with extreme poses, action poses, characters of extreme build, and overall design content of your piece. But use these lines as a second set of lines overlapping the initial armature, grounding them against the skeleton. IF you are an animator animating ignore this concept in the initial search for the pose as you are working under entirely different constraints.
If used efficiently, this armature tool set comes in super handy when sketching out on location and in gesture class with the 30 second to 1-minute poses. When done very well, just a few simple lines can excite the mind into believing in an action. INCLUDE THE FEET AND HANDS AND GET OVER THE FEAR OF THEM BEING SOMETHING COMPLICATED! They are not, and they add all the life to the poses, not to mention the measuring stick for each other and the entire pose.
Draw these often, so much that you get a secret 10000 drawings in to up your game, loosen you up to posing the figure, and help you learn to see quality gesture without all the clutter. It is such a useful tool and is so nice to know I don’t have to go searching for that perfect pose.


Excellent information broken down clearly. Thank you Ron!
This post is GOLD. I applied it today and immediately found that there was much more dynamism and a sense of body to my figures. Thank you so much for your generosity in knowledge sharing.
No confusing lump and bump anatomy, straightforward gesture and structure! I can’t wait for your figure drawing book, I think it’ll be a huge turning point in art education! Thank you, Ron! X
holy graphite…. this post blows my mind.. the idea of containing the skeleton with simple yet versatile armature is mind boggling.. this thing will definitely change the my life.. thank you Ron-Sensei..
” INCLUDE THE FEET AND HANDS AND GET OVER THE FEAR OF THEM BEING SOMETHING COMPLICATED! ”
Right on, Ron! LOVE this comment, and guide my students toward the same approach! Nice post!
By focusing on these basic forms (like the “pillow” for the torso, simplified shapes for limbs and joints), artists can capture essential elements of dimension, weight, and movement before adding finer details. This method not only enhances accuracy in representation but also allows for artistic interpretation and creativity in posing figures effectively. It’s a foundational approach used by many master artists throughout history to achieve lifelike and expressive figures in their artwork.