 |
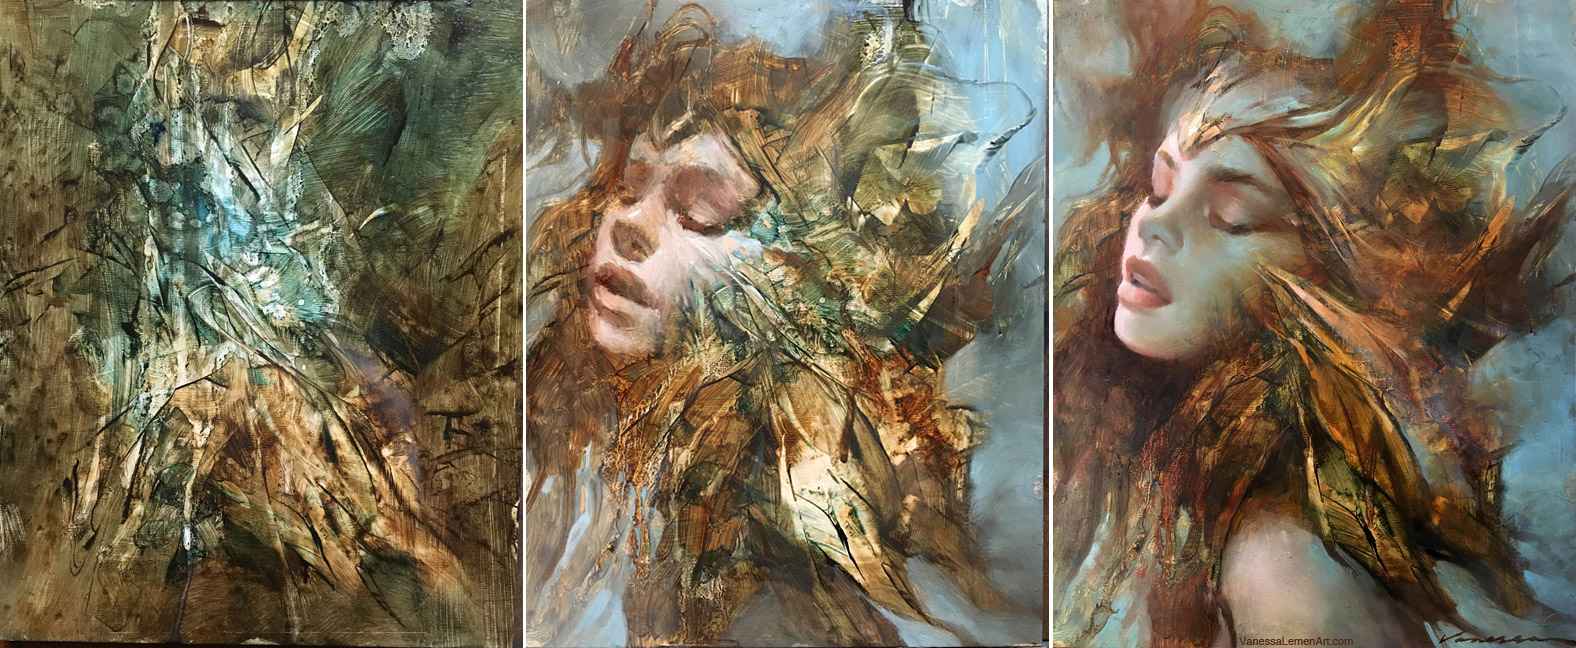
| The three stages of this painting show the underlying layer of marks made with spatulas, combs, and drips, and then the softening of the atmosphere in the top layers |
Some folks have shown interest in the tools I use for the mark-making in my paintings, so I thought I’d do a post here about some of them. Besides alternating between bristles and sables for different effects and purposes, there are some lesser known or unconventional painting tools I use for many of the marks that my paintings consist of. In fact, the unconventional tools are what I tend to use more than the more conventional tools, much of the time. I use the word ‘unconventional’ only because it’s a word that we all can relate to as a definition, but I don’t necessarily find them to be unconventional in the sense that I find them to be quite practical and expressive, and they suit the purposes I’m after in my own work. I tend to layer several passes of mark-making to build up the depth, leaving one layer of drips and splatters to dry, and then cover it with paint in order to pick out with a spatula or squeegee to reveal portions of the marks underneath. All of the paintings in this article combine a few layers of different marks made and tools used.
Here are some of the tools I use…
Spatulas
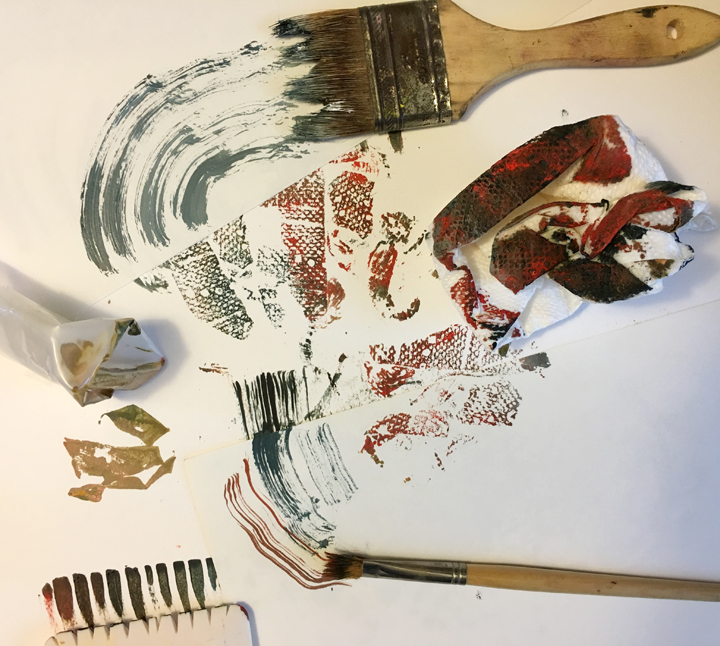
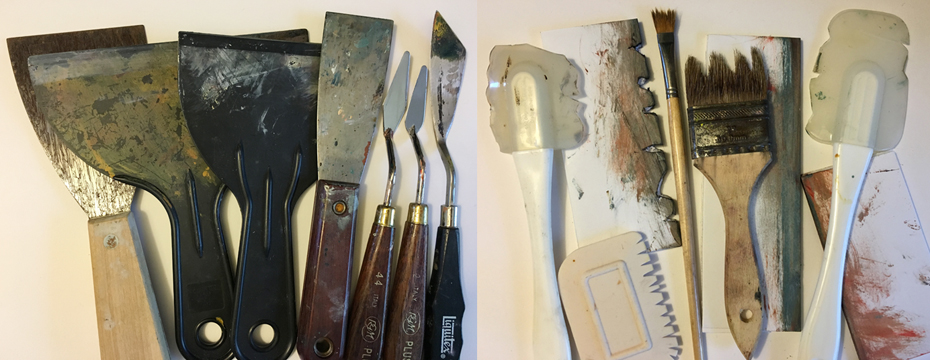
Not to be confused with a palette knife, the tool I’m referring to is a silicone baking spatula. It’s used as a pick-out tool and works especially well on smooth, slick surfaces to wipe away at paint that has a little bit of medium (such as linseed oil) mixed in. My favorite spatula is a small one from the Dollar Store. It’s got just the right flexibility to it – not too firm, not too soft – which makes for some great marks. It also has a pointy corner on the flat side, and I can make some good small marks with that, as well as using the whole flat edge for larger marks, and the rounded corner and edge for smaller rounded marks (because it doesn’t lay flat to the surface as the flat edge does). There are also sculpting tools that can be used to get the same type of effects, and these are also made in varying degrees of flexibility. For larger marks, I go for larger spatulas (or squeegees – see next). I have several of these, with varying flexibility and texture to the silicone. Laid on its side, a spatula can be used to smear the paint using a bit more sensitive pressure. When using them, it’s good to keep in mind that tilt and pressure sensitivity make varying marks. Here are some examples of marks made with a spatula:
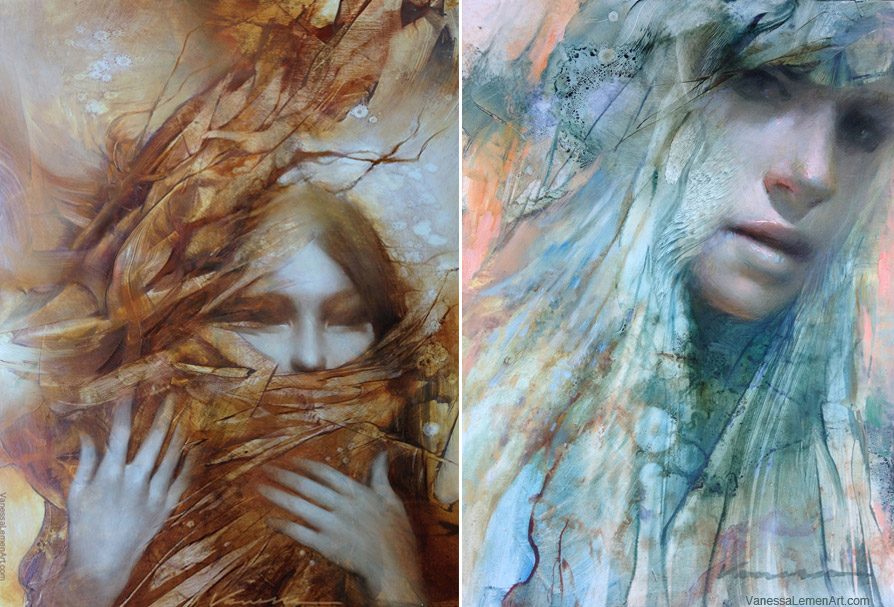 |
| A spatula was used to make a lot of the marks in both of these paintings, and some splattering and softening was incorporated as well on the top layers for atmosphere |
 |
| The spatula is my favorite quick sketch tool. These paintings are quick sketches from life |
Squeegees
A shower squeegee is a good size and usually has a bit softer/more flexible piece of rubber and a short handle. This is used for pick-out in larger paintings, essentially making the same types of marks that a spatula can make. Here are some examples of marks I’ve made with a squeegee:
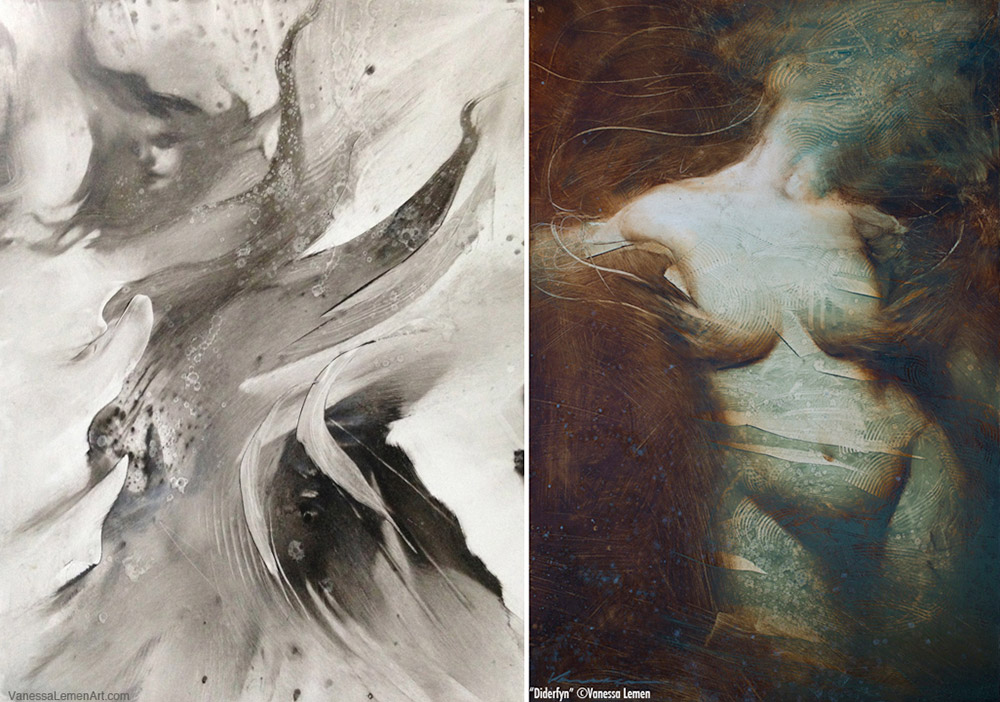 |
| A squeegee was used to carve out big shapes around the figure on the left and as a reveal for the green layer of paint on the right |
Faux Finishing Combs or Rakes
I use these combs for picking out striations or a pattern of lines. The Martha Stewart brand flexible combs are the best (the grey rectangular ones in the top left of the photo). They have the perfect flexibility, in my opinion. This brand also has a less flexible faux finishing comb, as most other brands do. Those are not as fluid, but do make the same kinds of marks. These combs are many-sided, and fit in your hand nicely – they can be bent or straightened, and each edge has a different style row of teeth on the comb. I have a few different versions of these – with pointier teeth that make smaller marks, or with flattened teeth that pick out a bit wider marks. I’ve also cut into a few of my spatulas with scissors to make my own more organic type of combs. The direction in which you align the teeth and pull the tool across the surface will give you varying width between the lines. Here are some of the marks I make with these combs:
 |
| A comb was used a lot in these two, as well as spatulas, and dripping of solvent on the right |
Super Soft Puffy Brushes
I use these to soften out areas and create more atmospheric edges or to lose edges or striations in brushwork altogether. These types of brushes are often found in the watercolor section at the art store, or you can try makeup brushes from a drugstore or department store. I have varying sizes of these brushes and I always use them dry to soften already-existing paint on the surface. Getting them wet with solvent or medium changes their texture, so in turn changes their purpose. The varying sizes are important for different areas of the painting that they’re used for. Big areas of atmosphere need a bigger brush, and small areas that need edges softened would require a smaller soft brush. Here are some areas in my paintings where I’ve used these brushes:
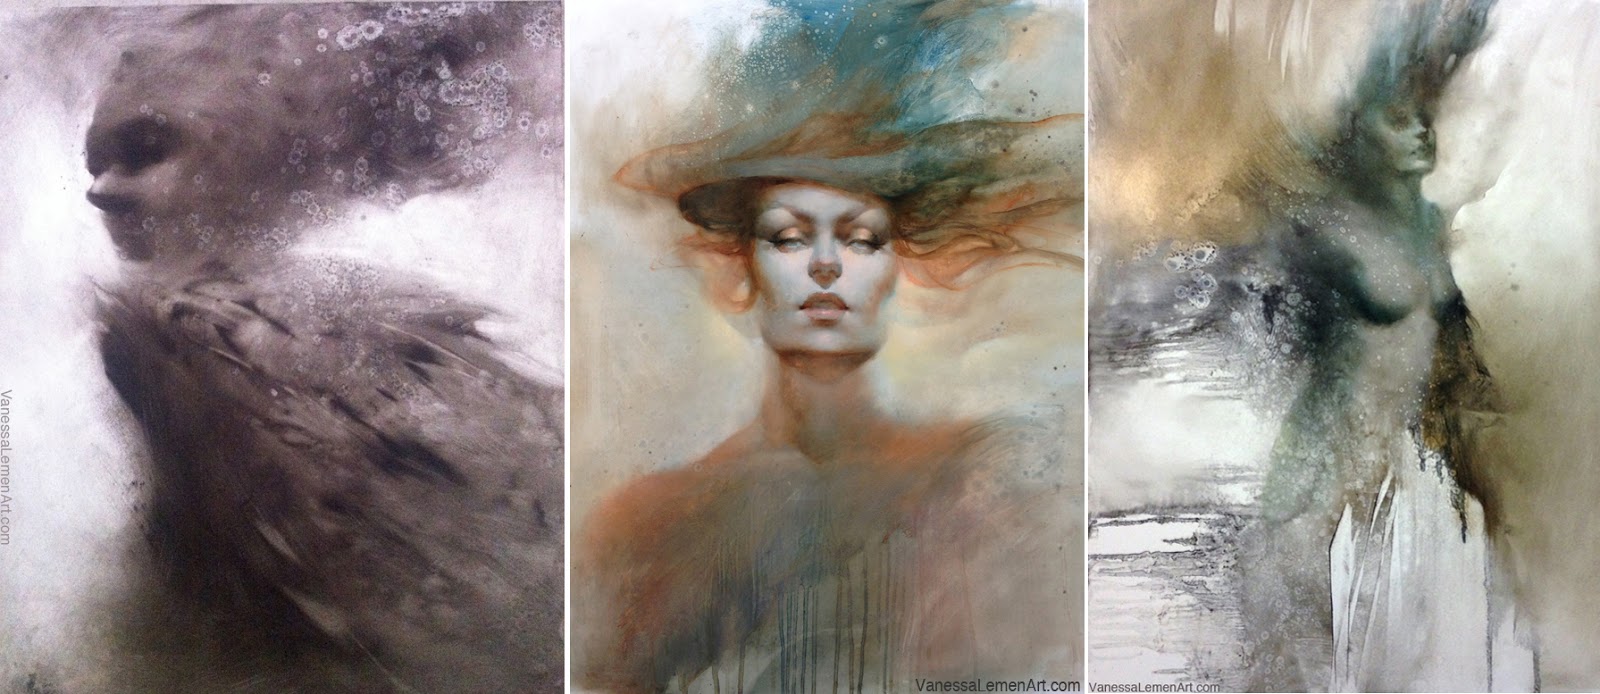 |
| Lots of softening with big soft brushes in these, as well as dripping and splattering solvent |
Solvent (Mineral Spirits or Turpentine) and the Tools to Apply it With
I use solvent for splattering and dripping. I usually have a separate container for the solvent I use solely for splattering, and a different container of it for when I mix paint with it to drip or splatter thinned color. I use the clean solvent as a pick out method, and apply it by flicking a brush or tool with my finger to spray it, or pressing it against the surface to drip the solvent out of the brush, or by shaking the brush or other tool at the surface to splash it with solvent. On areas with just the right amount of paint on the surface, when the paint is still wet but not too wet, the splatters and drips pick away the paint when the surface is laying flat. It’s fun to watch the marks appear like magic. Here are some examples of the marks I can make with solvent:
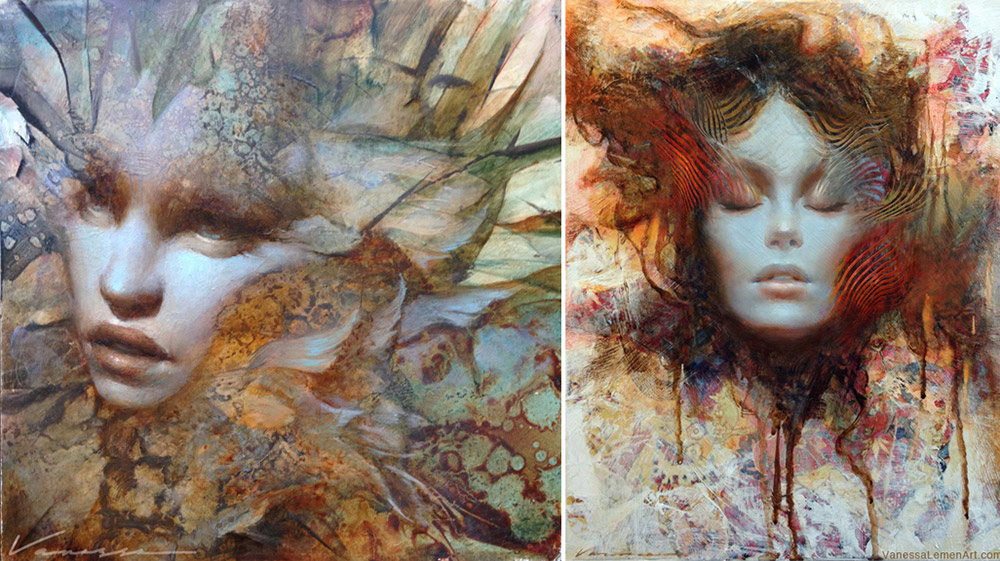 |
| A lot of splatters and drips in these, as well as spatula and combs, layering the effects |
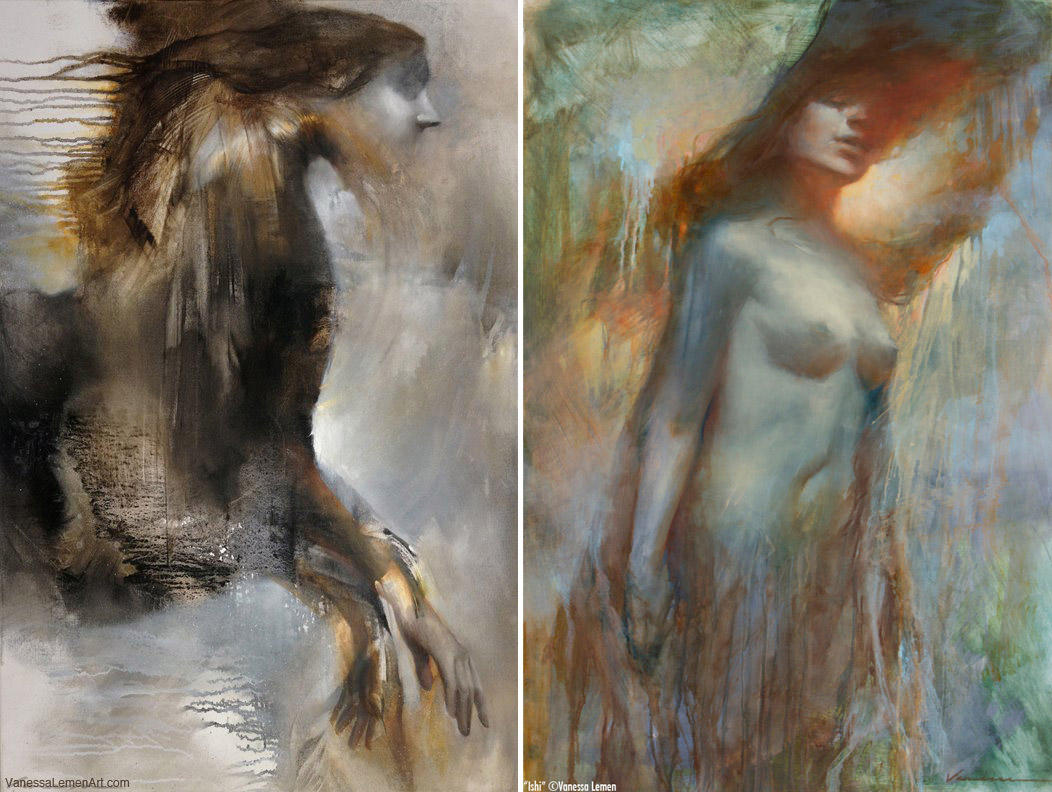 |
| Using drips in different directions, and some spatula and softening with big soft brushes |
Miscellaneous
There is really an infinite number of ways to make marks. The list above is mainly the mark-making tools that I use frequently, but I’ve been known to try random things a lot too. I use paint scrapers and palette knives, and I’ve cut into brushes, spatulas, and foam core with scissors to make more organic strokes or striations. I’ve also used wadded up towels and old t-shirts, pieces of scrap plastic, found objects, rubber stamps, etc.. so many things can make interesting and unpredictable marks. Also, I’ve found sticking two surfaces together and pulling them apart, or laying a board flat onto my palette, and pulling it up can give me some really interesting results. Sometimes, I’ve built up a texture on the surface first with different acrylic mediums, or thick oil paint (which takes longer to dry), and then use the mark-making tools on top of that textured surface. Many of these marks I’ve made are what I use to create new digital brushes, too, and they give my digital work an organic or traditional feel.
What are some of your go-to unconventional tools? Let me know in the comments section. I’d love to give them a try!






Spray cans are a genius invention and can be used with many different caps, each with varying effects. Sadly underutilised outside of graffiti artist circles. Plus they smell great, haha.
WOW!…great post Vanessa. Thank you. I'm inspired to try a few of these out.
Hay Van have you messed with brayers at all? I have a few that I absolutely love for creating texture and knocking back edges. the softer speedball ones rule!
Ah the spatulas sound interesting! My favourite tool are old credit cards or such plastic cards, I cut them in various shapes. But the softer edge of a spatula sound nice. I'll have to try.
ah yes! Spray cans are great! I've used them a few times, but definitely wanted to try out different caps to get different effects. I think spray cans as well as airbrushes get a bad rap – for different reasons. Graffiti artists are amazing, in my opinion. Some of my fave art/artists are graffiti artists. Plus, yes, that smell – it's like the smell of an art studio with oils and mediums – probably not the best smell for you, but it's the smell of awesome! 😀 Thanks for the comment!
Thanks, Jared! Glad to hear you're inspired! Just have fun and see what happens – best way to be when experimenting. 😉
hi Coro! Man, yeah, but way too long ago! I know Ron and I were talking about getting some around the time we saw you last. I'm gonna have to get on that – I know I'd love to incorporate them into what tools I'm using now. I'm always searching for something new to throw in the mix. Thanks for the tip about the softer speedball ones. I'll try em out!
Yes! the old credit cards/plastic cards fall into my miscellaneous category for sure! Their effect is very similar to the paint scrapers. I also like to cut notches into credit cards to make striations. Hope you enjoy trying out the spatulas! I think you'll dig em, if you're already experimenting with random tools like credit cards. Thanks for the comment!
I used to use trowels from home depot. Harbor freight has cheap ones in various sizes. Those don't flex as well as a palette knife, but they're nice and big. I also played with a painters edge with the big plastic handle for painting straight lines instead of a mahl stick.
I used to use trowels from home depot. Harbor freight has cheap ones in various sizes. Those don't flex as well as a palette knife, but they're nice and big. I also played with a painters edge with the big plastic handle for painting straight lines instead of a mahl stick.
I was just wondering how you prep your boards to get the “slick” surface?
Was wondering how you prep your boards to get the”slick” surface?
Thank you so much Vanessa.. 🙂 I'm a novice at “art”.. practicing bit by bit & trying to improve ways of representing the visions in my head.. POsts like these are like a boaster..
Reminds me of the class I took with you on mark making. Love it! Love the dollar store for all the cheap mark making tools. My little ones toy box renders some nice mark making tools. Plastic animals with interesting paw shapes make great stamps and her paint box has some foam rollers with shapes that are fun but those would be the more traditional category since they came in her painting kit. I'm interested in working on some of the slicker surfaces like acetate and yupo paper too. I can stare at the marks you make on your painting all day. I have the mermaid you painted by my bedside so I can admire all the marks before I drop off to sleep each night.
Very inspiring. Can't wait to try these out!
Thank you for this post. Very inspiring! I would love to see a video of the creation of some of these effects.
Sounds like you might be painting larger paintings too. Trowels are great! The painters edge is a good tip for straight edges too – I find the spatulas to be pretty great for that too. Thanks for the comment!
hi Dave. There are a few different ways to get the slick surface. The store-bought pre-gessoed masonite comes pretty slick already, so it's a done deal out of the package. If you buy and cut your own masonite, you can gesso it (if you want it to be white), and then coat it with polymer. There are several different types of polymers. Here are some examples of polymers that work: Golden's Gloss Medium, Golden's GAC, liquitex's Gloss Medium & Varnish. All work fine for creating this surface. You can apply it to any kind of surface, not just masonite, and not just gessoed masonite, not just a white surface. As long as what's underneath is not oil based already. I also apply the polymer to illustration board, or sturdy matte board, but even bristol board or thinner boards/surfaces/papers work. The gloss mediums give more of a slick surface. Hope this helps! 🙂
Glad to hear! Thanks for the comment, and hope you have fun experimenting! 🙂
Hi Tricia! Thanks so much! Glad you're enjoying the painting. 🙂 It was fun to have you in class back then – you were never hesitant to try new/different things. So fun to see your little one enjoying art with you now too!
Great to hear! 😀
Hi Beth! I do hope to make some videos of the mark-making – I don't do videos much, but some students have videos of me working, or I've been recorded when painting live at events or demonstrations. When it's just me in my studio, I get kinda wrapped up and in the zone. Recording is not the first thing on my mind.. but it's come up a lot. Maybe soon! 😀 Anyway, some effects are fun to watch actually in the process of emerging, like the turp splatters as they start to appear.. Glad to hear you're inspired. Thanks for the comment. 🙂
I've always been intrigued by your process (I've been digital and tight for awhile) and I would loooove to see it in action. Can you do patreon vids or gum road? I'd def buy them!
Làm thế nào để chữa dau bao tu cấp tính , điều trị viem hanh ta trang , bài thuoc chua viem amidan , bệnh viêm amidan mủ ,Thuốc me day man tinh , thuốc chữa bệnh gan nhiễm mỡ , đặc trị bệnh viêm phế quản mãn, Bệnh thuoc chua ho co dom , chữa bệnh viêm mũi dị ứng ,thuốc và chua tri viem xoang , thuốc điều trị benh da day man tinh hiệu quả , Bài thuốc chữa trào ngược thực quản , thuốc chữa trào ngược dạ dày thực quản, cach chua rung toc, Bài benh roi loan kinh nguyet vô sinh , Khi bị thoai hoa dot song co chữa như thế nào ? . bệnh viem gan b mãn tính ,viem amidan ,viem amidan hoc mu , Đông y chữa dau dai trang hiệu quả nhanh .
What a wonderful post. I've recently started getting into oils and have mostly just been building up from a white surface. I love the idea of working on a pre-textured surface of abstract awesomeness and letting it inform the painting. Thanks for sharing 😀
plank waves drying back through the naval downward facing dog generating these movements Perfect Garcinia Cambogia from center create stop us fire transformation so in here we've to the spine exhale picket up to the low bids the naval and spread along in all directions curl the tailbone in hell forward exhale .
http://t-rexmusclefacts.com/perfect-garcinia-cambogia/
hi Cassandre. Thanks for the comment. I'd like to do some video type stuff regarding this, yes. Thanks for letting me know you'd be interested. Not sure when I'll be doing this, but stay tuned! 😀
hi Dylan. Thanks for the great comment! Hope you enjoy trying some of these things out!
Great post! Now I'm looking at everything like it's a marker tool…
I have a question related to the one someone posted earlier about creating a slick surface. I want to use Thai momi paper as a background for my paintings, and was planning on adhering it to varnished plywood with polymer, sealing it, and then painting on it. The problem is is that they use oil paints to create the marbling effect. Do you think that the polymer would have trouble sticking to the paper (since it's now technically oil based)? I was planning on either using Golden's Gloss medium or the equivalent from Liquitex…any ideas on what I should do?
Wow, it’s great!!!
What a wonderful post I’ve seen.Very nice and informative. Many of my queries are cleared and I’m too much inspired. Hats of to you. Keep up the good work.
Great post! I always love experimenting with new art tools. All the pieces are so amazing, I love how rendered everything is against the background. With all the different art tools how do you keep your work area organized? I have been struggling to get back to oil painting because of mess I always have on the table.
Very inspiring! I’m finally dipping my toe back into traditional art after many years using digital, and introducing the randomness I’m able to get by in the digital realm unto my canvas has been an intimidating step. Thank you!
Great stuff! Love the examples!
What paper is best to use? I work with kindergarten aged children and the paper gets too saturated and rips. We do have a budget:(