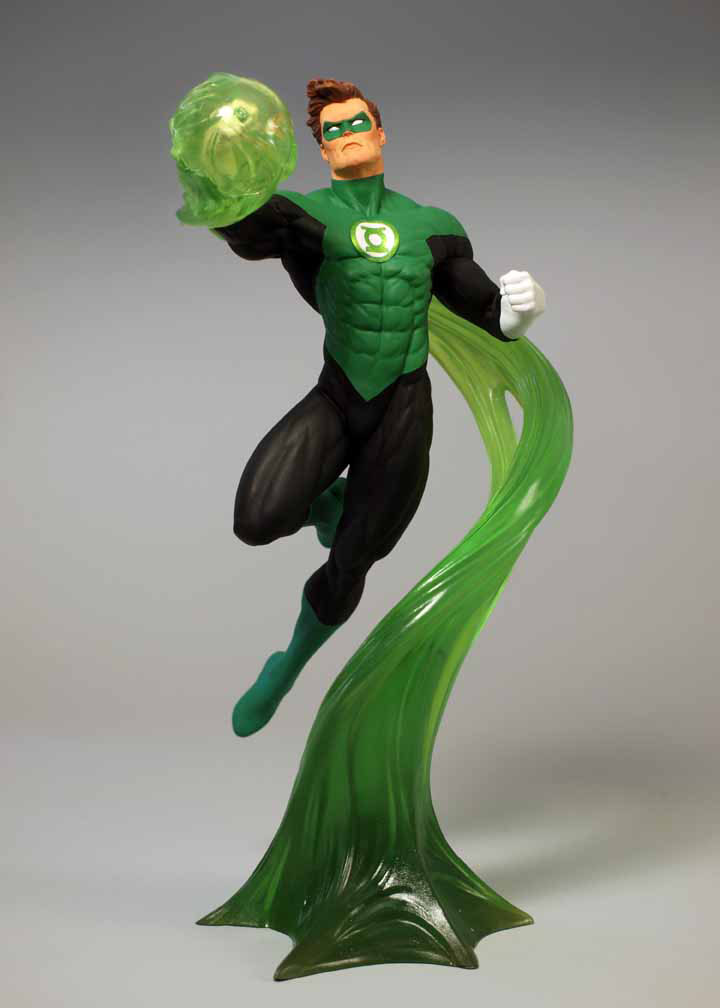
I’m working on a statue that has several stylized smoke elements. Although I’ve posted before about working with clear resins, designing and developing the smoke sections for this statue presented some different issues I thought might be interesting and helpful.
It starts with a rough clay. I built a simple wire armature mounted to a piece of wood and began laying up clay, developing shape and movement. I have to be mindful of the support the section will need when cast in translucent resin. All castable resins are Thermal Cure resins. When the two parts are mixed together they create heat to turn to the liquid into a solid. The manner in which they cure makes them susceptible to high or prolong heat, resulting in softening and warping. Clear resins are even more sensitive to heat because they don’t’ have a binder or filler like opaque resins to. So, in designing the smoke section, I have make sure I’ve created a support system to prevent distortion if exposed to heat over time.

Once the clay is done, I’ll make a silicone waste mold from which I’ll cast a wax. Now the real work begins – mapping smoke motion. That their stylized, there’s a greater emphasis on the units being more decorative. The smoke needs to feel as if its in motion, spiraling inward, over and around. I lay out a general motion map on one side and then reference that as I work the opposite side. I want to make sure that the shapes of each side work against each other. When cast in translucent resin, those opposing shapes will create a sense of movement as the viewer moves around the piece. Its also important to vary the depth of the motion lines. When working with clear or translucent resins you need to cut deeper into the sculpt than you would ordinarily to break up the light and dark patterns. A deep cut will result in a lighter, more transparent effect. A heavier section with appear darker and more dense. So, referencing front and back makes for a balance of shape, cut-ins and density.


With the wax done, I’ll make a Master Mold of RTV (room temperature vulcanized) silicone rubber. I’ll cast several test castings to gauge how much die to use for the effect I’m after. When I’ve got the right balance of opaque and transparent dyes, I start casting parts. I want the smoke to have a dull, lusterless look, so, after casting and cleaning the parts, I’ll sandblast the resin to add a little “smoky” feel to the finish.


Causes of smoking people addicted to smoking lose their appetite
for food and energy for power.Smoking also pollutes the envirnment and the air.
Besides it causes irritation in the eye, offends the nose and unsettles the mind.
benefits of stop smoking
smoking health effects
health effects of smoking
benefits of quit smoking
benefits quit smoking
benefits to quit smoking
Great post Tim!….always loved how you have incorporated the different elements like smoke, super power plasma, etc… into your sculpts. Enjoy getting to see the behind the scenes on how you create them.
Your contents are too straightforward to browse and easy to understand.Subtank Clearomizer