
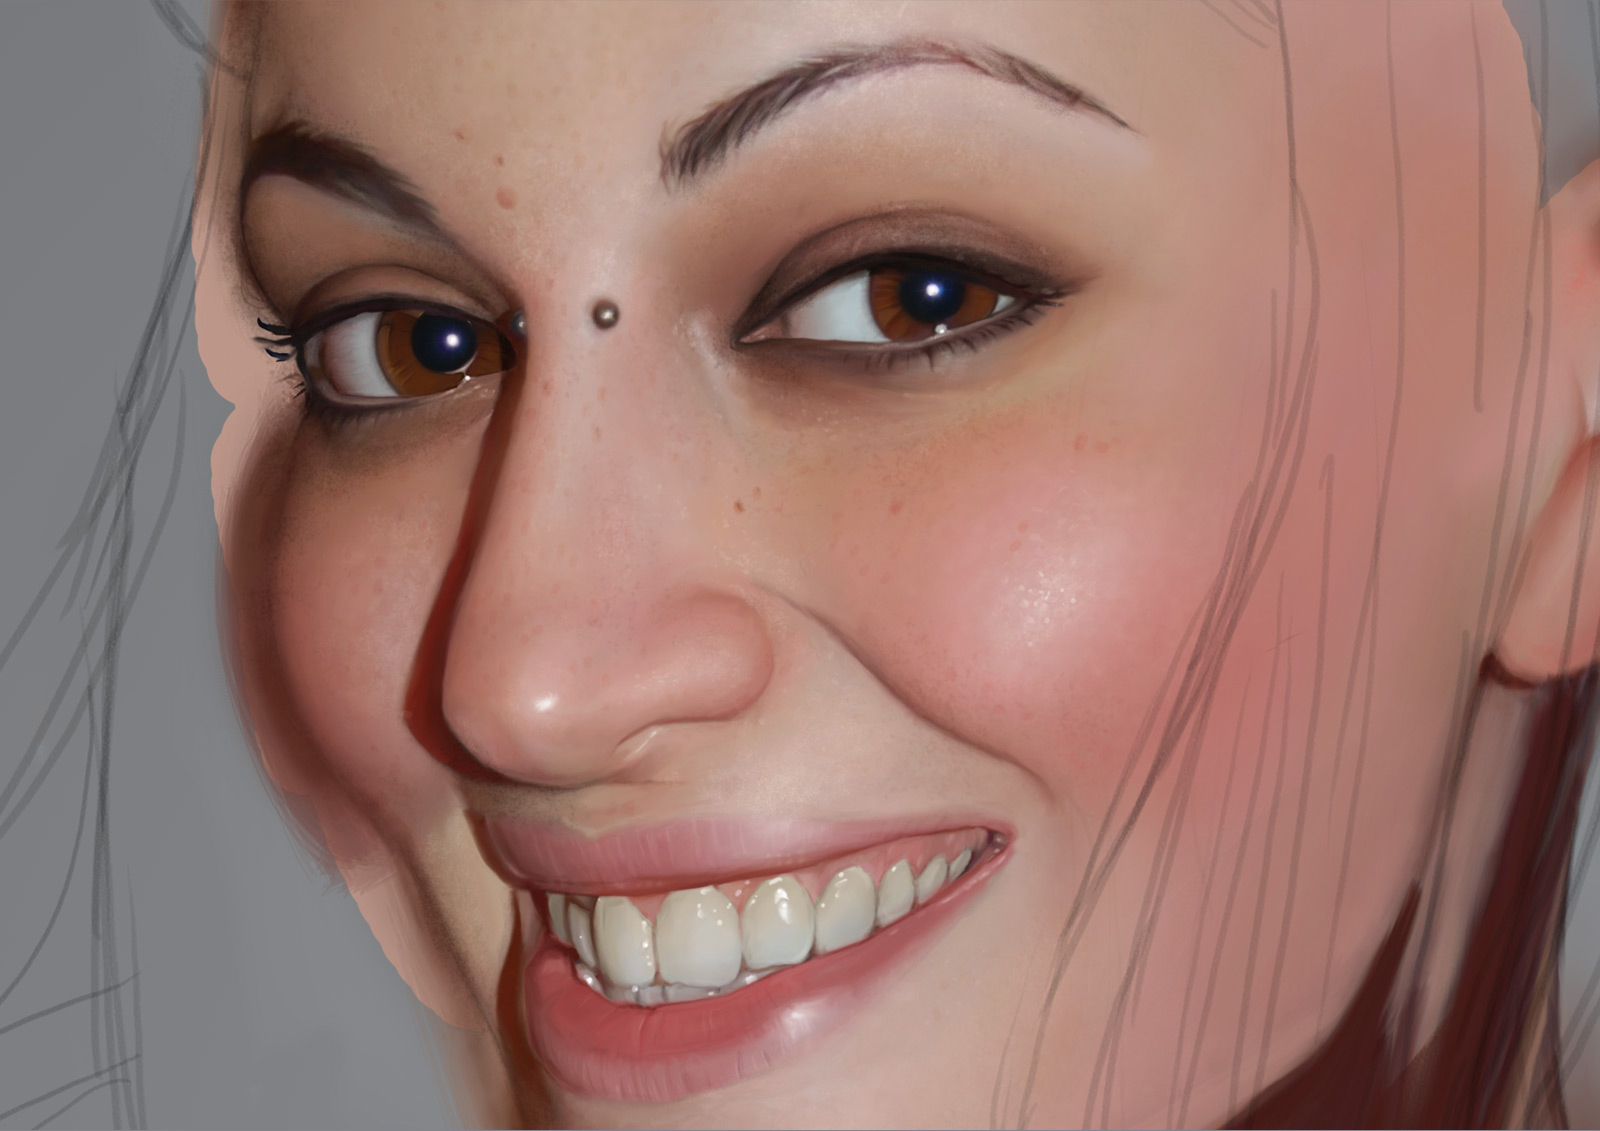
I think I have to speak about skin because I had a lot of questions about this. Here’s a list of tricks to do paint more “realistic” skin with your computer …
Skin Tones
Avoid simple gradients. You cannot obtain convincing skin if you only add black and white to a basic skin tone. It’s more complex than that.
Of course, all skins are different but you can try this :
– A little bit of olive green on the shadow.
– A little bit of blue under the eyes (lower lids).
– A little bit of red on the cheek bones.
Just work with low opacity (0 – 5%), on a separeted layer and with the soft round brush.
By the way, if the contrast is not good, it will not work. Contrast is more important than color.
About black skin, I never find a good and single way. It’s really depending on the color of the skin. As black skin is usually very reflective, the light has a big influence on the tones.
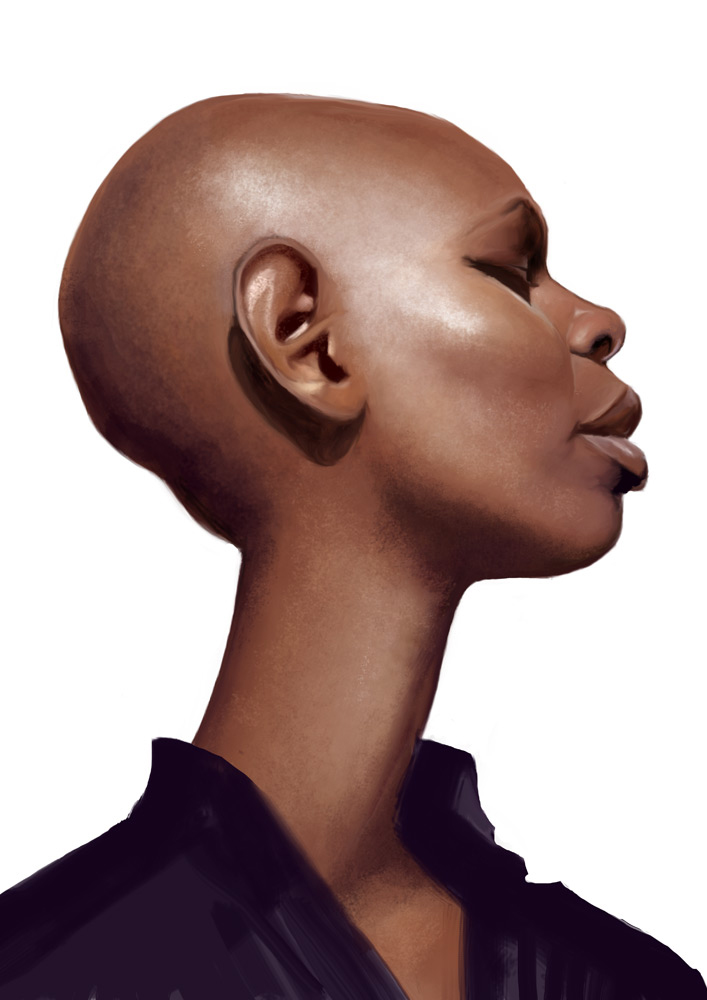
Influence of lights
Don’t forget the ambient and the direct lights could changed your basic skin tones. With a strong light, shadows are very dark and the contrast of your picture has to be high, for example.
The color of the light is important too. Your palette depends on it too.
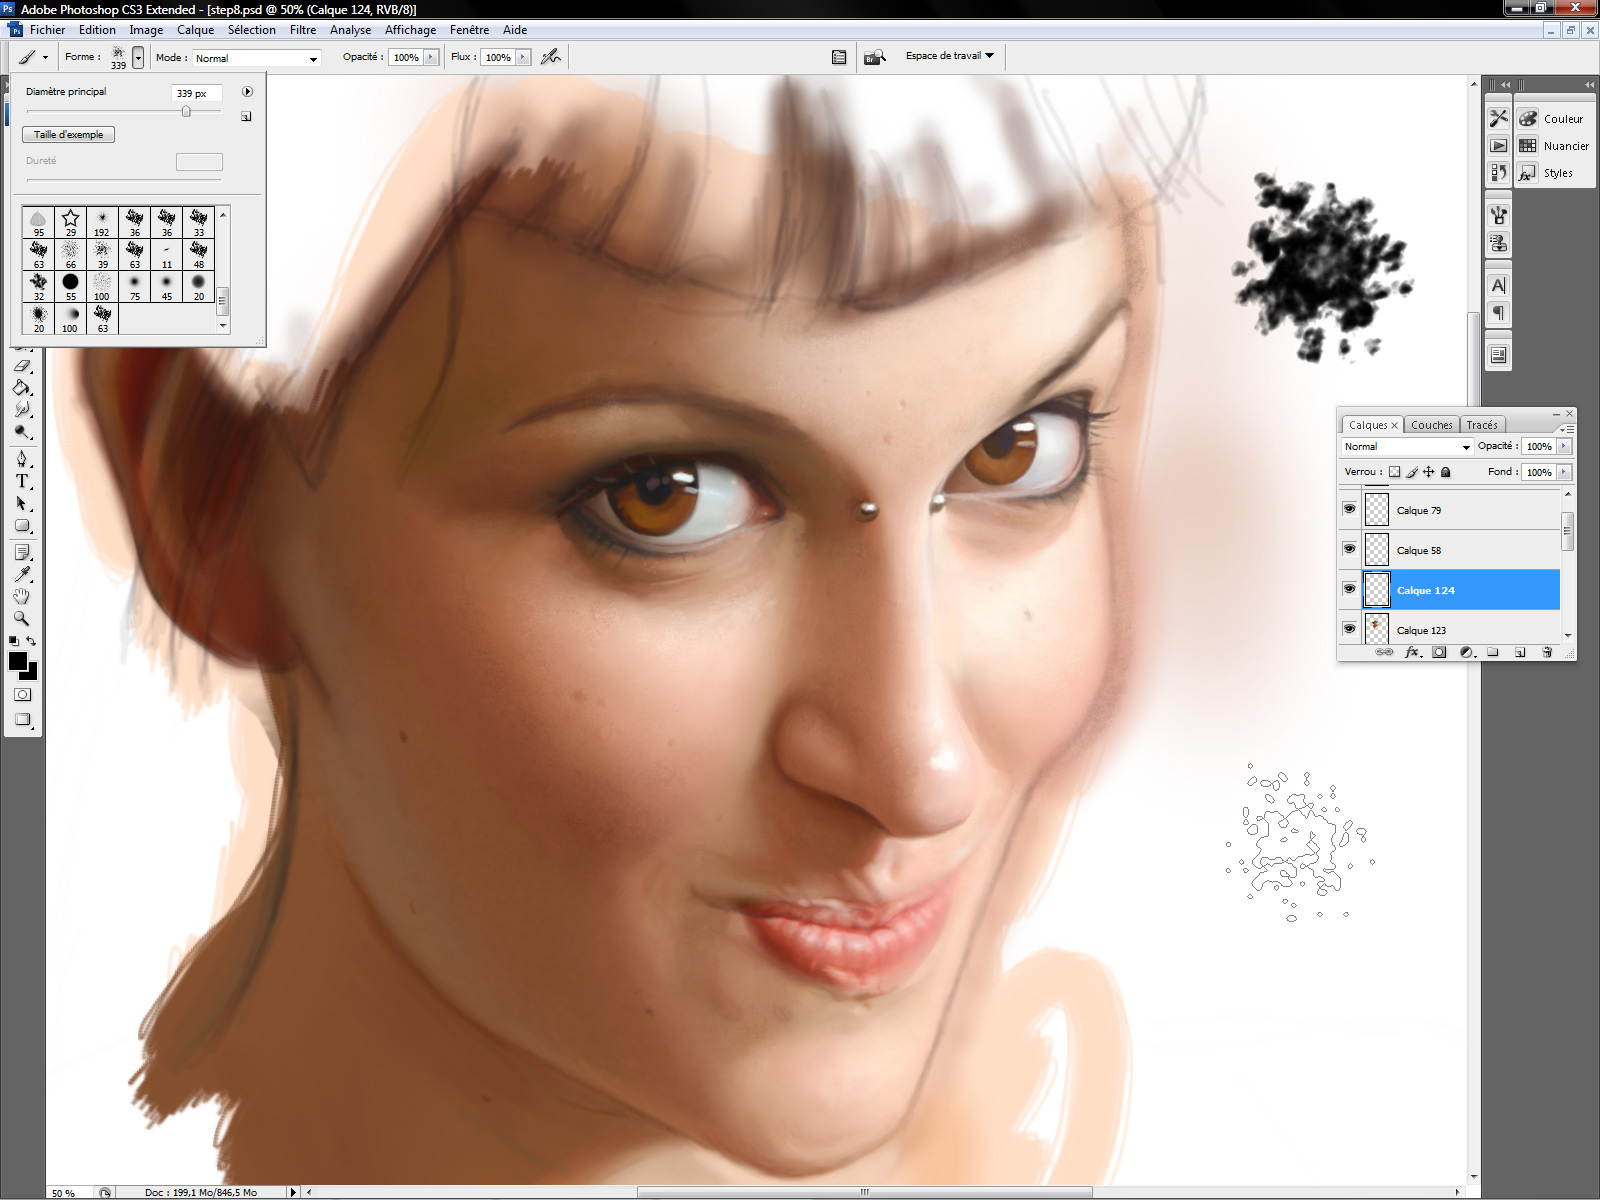
You can easily adjust the contrast/the tones/the luminosity of some parts of your picture with your favourite software. It’s not the better way to work but it could sometimes be helpful.
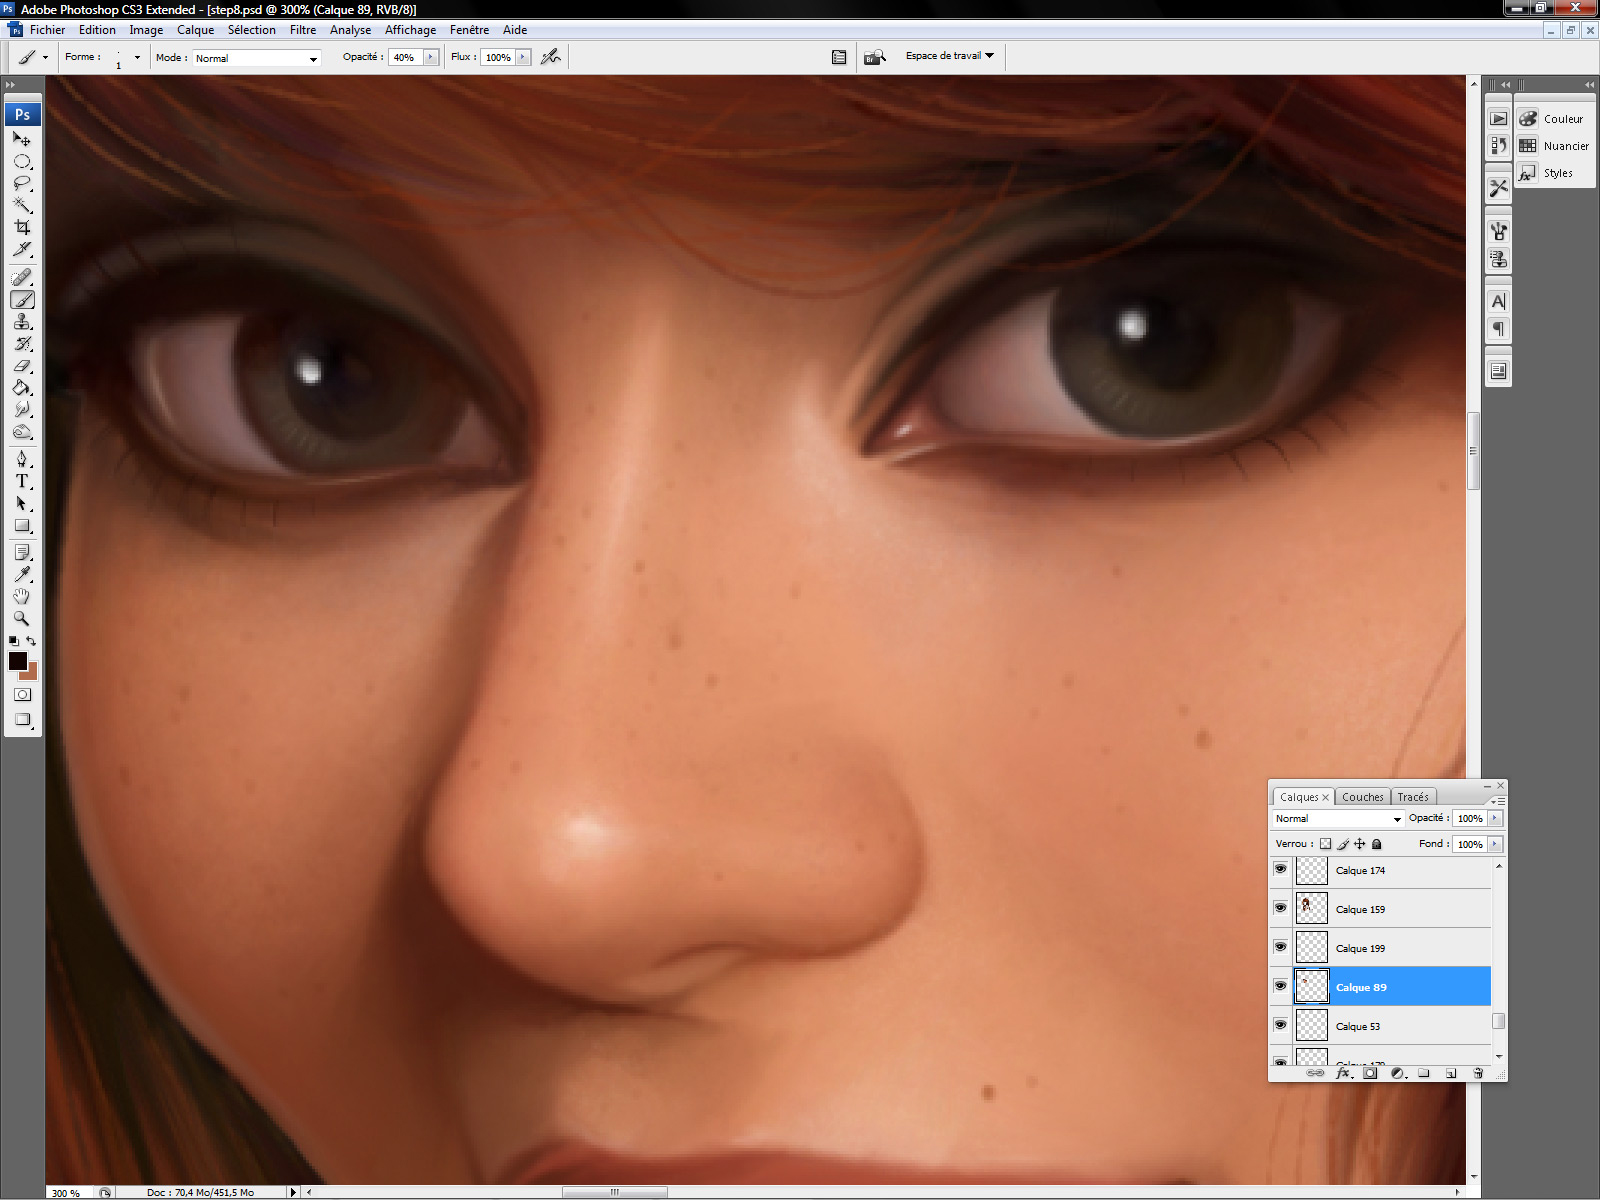
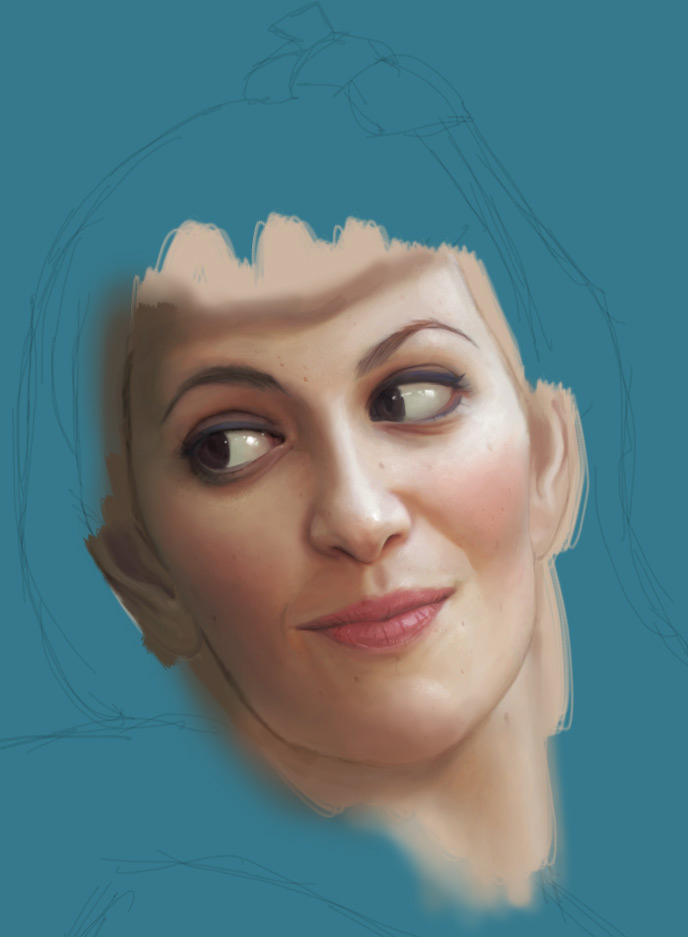
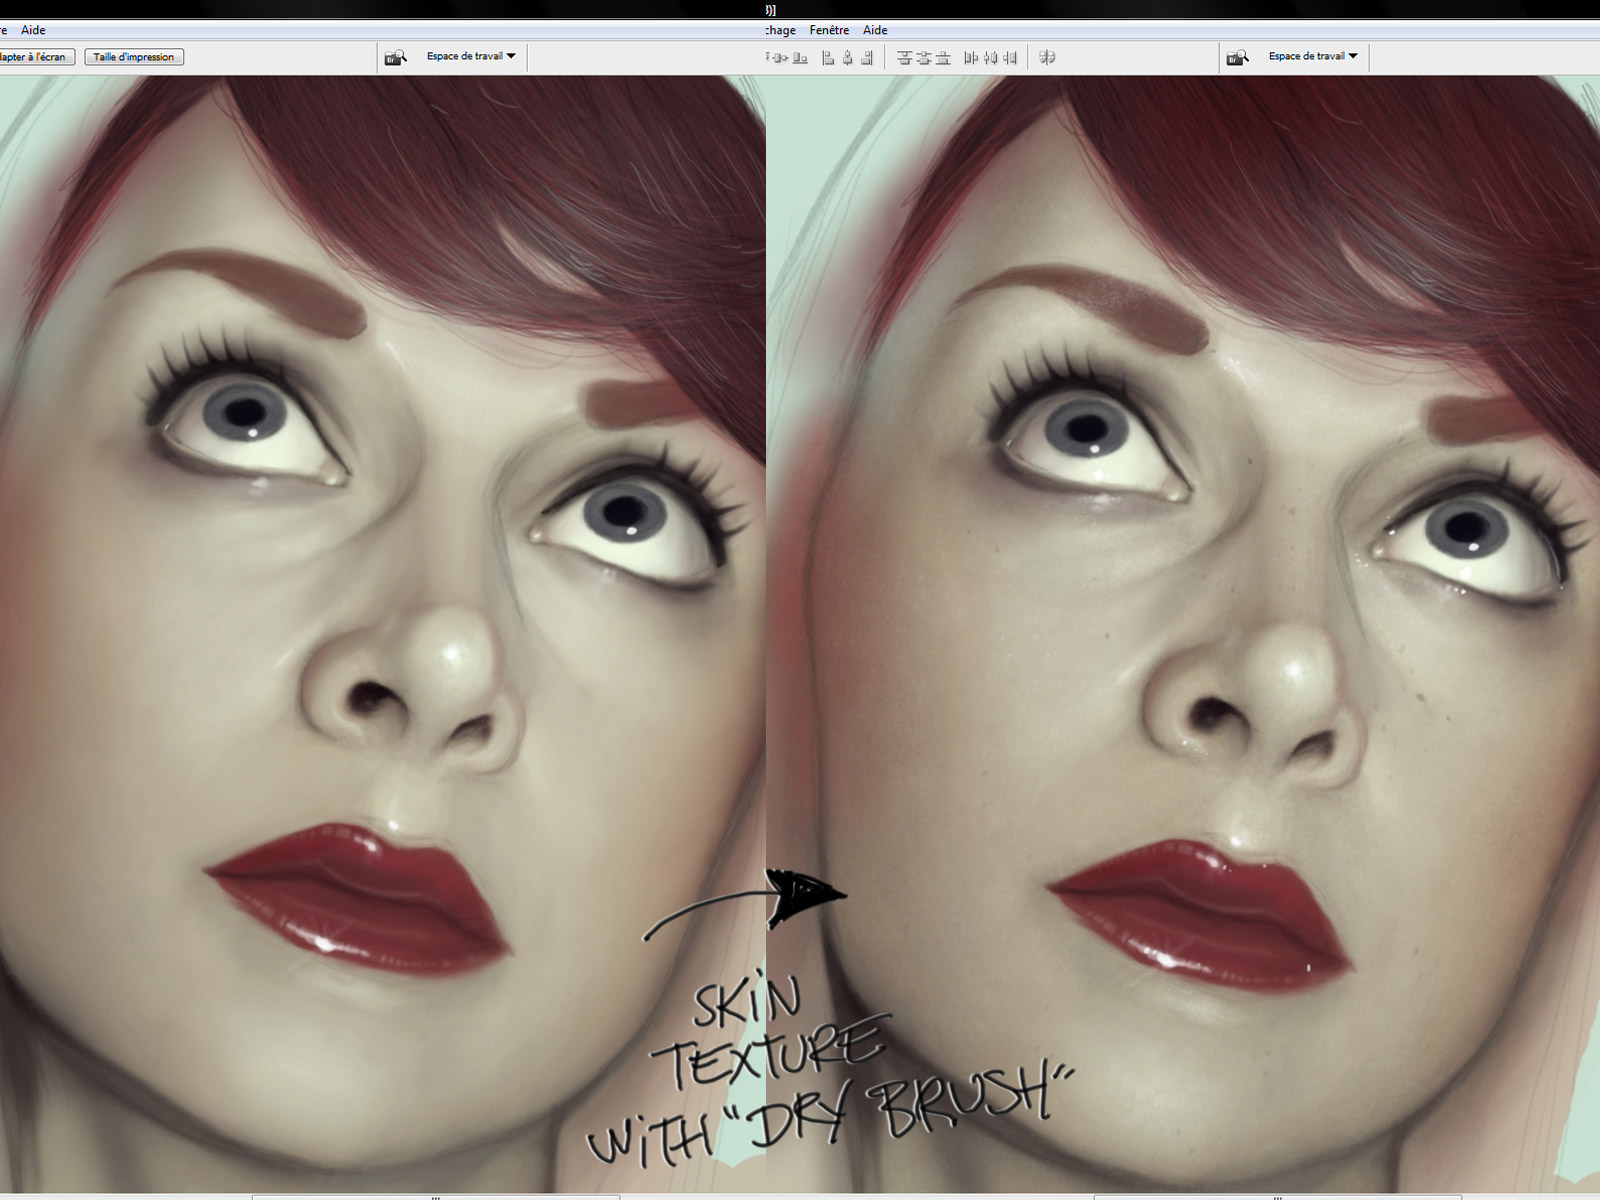
Skin texture
I use the “dry brush” to do skin textures. It works pretty well if you use it carefully. Once again, try to work with very low opacity and on a separeted layer (so you could change the opacity of the layer too).
For the beauty spots and the freckles, I use the soft round brush … A very small one. Working on a high resolution picture is easier … It’s not very long and you don’t have to be very precise.


Can you elaborate more about what “dry brush” is exactly?
It's a PS brush. You can find it easily, it's a standard brush 🙂
Thank you so much for sharing this! :)You are an amazing artist!
Awesome explanations, man! As the other Anon said: Thank you so much for sharing this!
works like a charm, thanks for the useful advise!
Very nice to see how you do it 🙂 Awesome post!
Excellent as always Serge!
thanks for sharing 🙂
I know you probably spent many years achieving the talent you have now – but I think I may still hate you nevertheless : P
Thanks so much for this. You've an incredible talent; and any pearls of wisdom coming from you are very much appreciated! Thanks a ton!
Thank for share, man…this was great
You very good advice man. Thanks and HOORAY.
I gather you do, but to make sure, Do you use a “custom” texture with that standard brush for skin textues?
thanks for sharing, waiting thirsty for more, can we see how you do it?
Serge,
For your dry brushing of the skin texture, what method do you use to select the color to dry brush over the base paint layer? For instance, do you eye drop the area you will be painting over and then select a shade slightly lighter or slightly darker or do you have another method?
Scott Talevich
I usually start with white (or very bright tones) on the most reflective parts. And, yes, I pick up the colors of the brush on the face 🙂
Brilliant! So much useful info explained so well. Thanks Serge.
can you do a tutorial on hair next??hehe..
Awesomee ..tysm for this n can u giv sum tips on drwing nose
Well, I know only one way … use a very, very small brush :DDD
Here's an example :
http://sergebirault.blogspot.fr/2011/01/chloe-photorealistic-attempt-hair.html
oohh..thanks.10 hour hair..i see how much you put work into detail..very nice sir.hehe.also for your dry brushing stage is there a specific type of dry brush you use??very much appreciated sir.
I use a Ditlev brush (You can find the pack easily) but you can use a hard or a soft round brush, it doesn't make a lot of difference 🙂
i do use the soft/hard round brushes. haha! and well i cant seem to get the same texture this is very challenging. man your works are insane!pass me some of those skills.=)
I'm sorry but it isn't helpful at all.. I mean.. how does this help me executing it?
Also if you are painting directly from reference it is way easier than picking the colors by yourself..
I don't work very often with “direct” references. Btw, picking the color is not the good way with my technique (because I work with low opacity brush). It's more about tip do do skin texture here, sorry if it's not helpful for you … Try this :
http://sergebirault.blogspot.fr/2011/01/chloe-photorealistic-attempt-face.html
http://sergebirault.blogspot.fr/2011/01/chloe-photorealistic-attempt-breast-and.html
http://sergebirault.blogspot.fr/2011/01/chloe-photorealistic-attempt-hair.html
http://sergebirault.blogspot.fr/2011/01/chloe-photorealistic-attempt-hands.html
No … I even don't know how to customize a brush ^o^
The problem seems to be that the end result still seems waxy and plastic. Perhaps you might want to try experimenting with a more painterly approach, in which you start from very dark and move to lighter tones by building up layers of colour, shade, etc.. If enough of the darker shades show through it might give things more solidity. A wider colour palette would also help.
The goal is to have a plastic look because I use to paint very shiny stuff (plastic/metal/latex/rubber/ …). I'm a disciple of Sorayama, you know 😉
Btw, I like your work Jerry, your techniqye is very impressive !
Thanks!
My point about waxy/plastic was referring more to the way you've done skin. Have you used oils or anything similar when not doing digital work? I ask as with oils (for example) you can build up layers of darker hues and overlay those with lighter ones. This is doable digitally. So if you were working on the blue of the lower eyelid, the blue would go on first and then you'd add thin layers of lighter skin hues over that. If instead you put blue over the top of the skin hues, that's like applying make-up and causes a different effect 😉
Well, I used to apint with traditional airbrush and acrylic … 20 years ago ^^'
The post is giving information about digital switch. Know all about it
Thank you so much for sharing this awesome!
Opacity of 0 – 5%? I never thought of that. Thank you for the tip!!!
great tricks – and ALWAYS use them!!!
I'll get more from sights like this then all the fucking books I spent money on,thanks.
Very glad to see you here, i’m a huge fan of your work !
I have never tried painting Digitally and recently I have been really interested to do so. I have learned some useful information and I have gotten more inspiration to try doing a digital painting.
Thanks to share this best information with us.
Your work is so amazing! Thank’s for sharing the knowledge!
What painting site do you guys use?
Very nice .
Thanks for sharing this article, It was quite insightful.
Hoping to see more articles with useful information.
Well described.
Top Health Center is a leading provider of comprehensive care, specializing in mental health services. Our Mental Health Clinic Minneapolis offers personalized treatment for individuals seeking support for mental well-being. Whether you’re facing anxiety, depression, or stress, we provide tailored solutions to help you regain balance. Trust Top Health Center for compassionate care that prioritizes your health.
Diprima offers premium hair accessories designed for comfort and style. Our Hair Elastics are gentle on hair, preventing breakage while providing a secure hold all day. Perfect for all hair types, they combine durability with elegance. Choose Diprima for high-quality hair solutions that keep your style flawless and your hair healthy. Elevate your everyday look effortlessly.
Estate Lindohlm offers a luxurious escape with stunning views and exceptional amenities in the Virgin Islands. Whether you’re seeking a peaceful retreat or adventure, it provides the perfect setting for relaxation. When planning your trip, explore the best places to stay in Virgin Islands. Estate Lindohlm stands out as an ideal choice for unforgettable vacation experiences.
At Crystal Sensation, we specialize in creating elegant, high-quality awards and plaques that honor excellence and inspire achievement. Whether you’re recognizing employee milestones, corporate achievements, or personal accomplishments, our custom designs add a touch of prestige and sophistication.
Boost your winning chances with Cricketids expert Cricket Betting Tips. From match predictions to live odds analysis, our smart strategies help you make informed bets. Join Cricketids today and start betting smarter on every match, league, and tournament around the globe.
At Insightful Technologies, we deliver high-quality Laravel development solutions tailored to your business goals. Our team of skilled developers builds secure, scalable, and high-performing web applications using the power of Laravel elegant framework. Whether you need custom web portals, enterprise solutions, or API integrations.
Looking to grow your music presence on Spotify Famups offers a reliable solution to boost your Spotify Plays and help your tracks gain the attention they deserve. With high-quality, real plays delivered quickly and securely, Famups ensures that your music gains traction on one of the world’s top streaming platforms.
The Law Offices of SRIS P.C. offers legal guidance based on your situation. Call today to learn more about how these laws may apply to your case and next steps.
Want to track your Facebook ads effectively? Learn how to set up Facebook Pixel easily with Famups. We help you install the pixel on your website to monitor visitor actions, improve ad targeting, and boost ROI. Start smarter ad campaigns today Famups makes Facebook Pixel setup fast, simple, and hassle-free.
Experience the magic of professional photography with Sensesatplay. We specialize in capturing the raw beauty and emotion of your most cherished moments. From sun-soaked ceremonies to candid celebrations, our creative team turns fleeting memories into timeless works of art. Trust us to preserve every laugh, tear, and tender glance with unforgettable, meaningful photography.
Want to clean up your Instagram profile without deleting posts? Learn how to archive Instagram posts easily! Famups helps you manage your profile professionally while growing your audience. Archiving hides posts without losing them, keeping your feed fresh. Stay organized and on-brand with Famups’ expert social media tips.
Want to control who sees your posts? Learn how to make your Instagram private in just a few steps. At Famups, we help you manage your social presence while growing your followers safely. Switching to a private account gives you more privacy and control over your Instagram audience. Stay secure with Famups!
Discover effective, non-invasive depression treatment with TMS Therapy in Minneapolis at Top Health Center. Our expert team provides personalized care using advanced Transcranial Magnetic Stimulation to help you regain control of your mental health. Safe, FDA-approved, and medication-free experience lasting relief today. Call Us to schedule your consultation and start your journey to wellness.
Stay ahead in the blooming world of floriculture with Flowersandcents, your go-to source for fresh floral industry news. In 2025, the sector is seeing dynamic changes from rising demand for locally grown flowers to innovative eco-friendly packaging solutions. Growers are focusing on sustainability, while global supply chains are adapting to climate and transportation challenges.
Looking for a trusted Cricket ID to enjoy seamless cricket betting and fantasy play? Look no further than Cricketids, your go-to platform for secure and fast Cricket ID services. With 24/7 support, instant withdrawals, and verified agents, Cricketids ensures a hassle-free experience for all users. Whether it’s IPL, T20, or international matches, enjoy real-time action with 100% trusted Cricket IDs.
Wondering how to appear offline on Instagram without deleting the app or ignoring your friends? Famups brings you a simple solution. Just go to your Instagram profile, tap the three lines in the top-right corner, then select Settings and Privacy. Scroll to Messages and story replies, tap Show Activity Status, and turn it off. This hides your online status and lets you browse peacefully without showing you’re active.
Great post! Offers like the free 500 sign up bonus no deposit are perfect for new users who want to start without any risk. I recently came across ARS Group, and they provide some of the best no-deposit bonuses in the market. Definitely worth checking out.
Choosing the right YouTube video editing tools is essential to create high-quality content that attracts viewers and grows your channel. With Famups, you can discover top editing tools that make video creation easy, whether you’re a beginner or a pro. These tools offer features like smooth transitions, advanced filters, audio enhancement, and quick export options to help you deliver professional videos in less time.
Experience safe, non-invasive mental health care at Top Health Center, your trusted choice for TMS Therapy in Minneapolis. Our expert team delivers personalized treatment plans for depression and anxiety, using advanced technology to improve wellness without medication. Discover a natural, effective solution to reclaim your peace of mind with professional TMS Therapy in Minneapolis today.
To thrive on Twitch, consistent viewership is essential for gaining visibility and trust. When you buy Twitch viewers from Famups, you boost your live streams with authentic engagement that attracts more organic traffic. Famups delivers high-quality, real viewers that enhance your credibility and push your content higher in Twitch’s algorithm.
When clutter begins to take over your home or office, Hercules Movers is your trusted partner for fast, affordable, and eco-friendly junk removal services. Our professional team handles everything from old furniture and broken appliances to renovation debris and yard waste so you don’t have to lift a finger.
Effective industrial wastewater treatment demands innovative solutions for controlling contaminants like heavy metals. At Jenfitch, Inc., we specialize in advanced chemical technologies that enable metal removal in water systems with high efficiency.
Stay updated on global floral industry trends with Flowersandcents, your trusted source for Floral News Updates that matter. From new flower varieties and seasonal demand shifts to international trade changes and sustainability movements, we cover it all with expert insights.
Top Health Center proudly offers trusted Mental Health Services in Minneapolis, delivering compassionate care for ADHD, depression, anxiety, and more. Our experienced team provides personalized treatment plans, therapy sessions, and innovative solutions like NeuroStar TMS Therapy. Discover effective, affordable, and supportive care at Top Health Center, your local choice for mental wellness. Schedule your appointment today!
Senses at Play specializes in capturing unforgettable moments at the most beautiful Key West wedding resorts. Our expert photographers turn every stunning beachfront, garden, and sunset ceremony into timeless memories. Whether it’s an intimate escape or a grand celebration, trust us to highlight the magic of your special day with breathtaking, personalized photography.
To grow your audience and drive consistent traffic, mastering Pinterest SEO is essential. At Famups, we specialize in optimizing your pins, boards, and profile to improve visibility across search results. By strategically using keywords, creating engaging pin descriptions, and maintaining consistent activity, we help boost your ranking organically.
If you’re looking to buy 10000 YouTube subscribers, I highly recommend using Famups. Their service is fast, reliable, and helps boost your channel’s credibility. I’ve seen real growth after using them, and the process is super simple. Famups truly delivers what they promise authentic and effective results
Buying Twitch views can significantly boost your stream’s visibility and attract organic viewers. It helps in gaining traction quickly and improving your stream’s rank on the platform. Choosing a reliable service like Famups ensures you receive real views that enhance credibility and help grow your Twitch presence effectively.