My post today is the second half of my entry from two weeks ago. If you didn’t read that post, or would like to refer back to it, here is the link – Process to the People: Part 1. My goal in the first half was the show how the predominant artistic tradition over the last several centuries and through the Golden Age of Illustration followed a specific process. Also, I hoped to show how changing your process can potentially improve your final results.
For this half of the post, I am going to show my steps for a recent painting, applying some of the traditional steps but also using some modern tech to possibly add efficiency. I want to reiterate that this is just one approach. I find it intriguing because it was used by nearly every artist of the past that I admire. It is where I want to go with my work. That may change, but for the last 7 years or so it has been my focus. It doesn’t mean it is the only way to get the results you are after. There are some incredible artists today that start right on the canvas, designing as they go. So, with that in mind, take from this post what you think might help your process and not as an indictment against any other approach.
As a quick recap, the process used to go from idea to final was this:
1: Thumbnail sketches
2: Detailed sketch
3: Studies from life (or photography)
4: Value/color sketch
5: Study of head/hands/feet/fabric/difficult passages
6: Full sized cartoon
7: Final painting
A few years ago, I was approached to do a series of religious paintings. The commission was enough that I could really focus on the images, take my time and develop the work. I decided that I was going to proceed with the above steps, but also use what I had learned using the computer as a tool. So, as you will see I adjusted the process, changing some of the steps. I am still in the middle of my experiment so I can’t say if it is an advancement, just different, or step back from tradition. We will see!
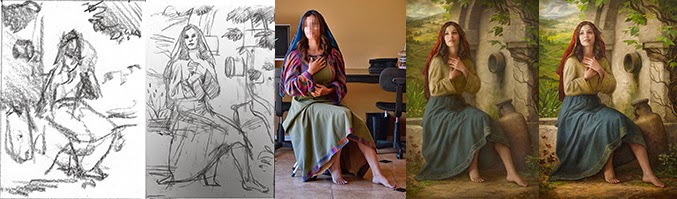
1. I started with thumbnails as usual. I did 20-30, but here are a few to give you an idea. Just a minute or so on each one. Investing a half an hour at this stage is small, but with a huge return. I went through a lot of ideas. Most of you probably do many thumbnails, but if you don’t, force yourself to do more than you think is necessary. The purpose of this step is to possibly find new ideas and refine your vision.

2. Detailed sketch – Still from imagination, really just a more developed thumbnail. The purpose of this step is to direct you when posing your model, gathering reference and determining other details for the final. Still a rough drawing, but enough information to get you moving forward with some confidence.

3. Life/Photography and 3D model if needed – At this point I had to decide, do I paint from life, or work from photography? If possible, I would paint from life, but often it is not an option for the model or budget. I would rather have the right model for a specific piece and use photography than find someone who isn’t quite right who could pose and have to compromise.
I have invested a fair bit of time into learning better photography skills (though these photos do not show it particularly well). Not from an artistic standpoint, but from a technical standpoint. If you are going to use photography and take the images yourself, learn how to really use your camera. Decide that you are going to become and expert and invest the time or hire someone who has. I fuzzed out the face of the model, because in the model agreement (always good to have one signed) I didn’t have the rights to publish her likeness from the photo. I don’t think she would mind, but good to follow the agreement.

When I do a photo shoot, I usually proceed with this mindset:
1 – Try to capture the whole figure at once
2 – Focus just on the facial expression, don’t worry about the whole
3 – Focus just on the hands
4 – Feet
5 – Fabric
By the time I was done with this shoot, I had 200 or so shots that I was able to choose the best elements from.
4. Value/color sketch/studies/full-sized cartoon – If you are comparing my process to the one listed at the first of the article, you will see that I am combining several steps into one here. Here is where my digital background is coming into play. I painted a finished version of my piece on the computer. This let me work out all the values, colors and detail that I wanted in the final. It also provided me with the chance to do studies of the hands, head, feet and fabric. It also provides me with a full sized cartoon. All in one piece.
When the file was done, I sent it off to a blueprinter and had it printed at the final size. The prints are rough, black and white, but only cost $2 for a 34″ x 50″ print. Very cheap. I used this print to transfer the drawing to the canvas and then inked the drawing with india ink and a brush. It is a very fast method to get your image onto the canvas. There are other great ways too. I will comment on that later in the post.
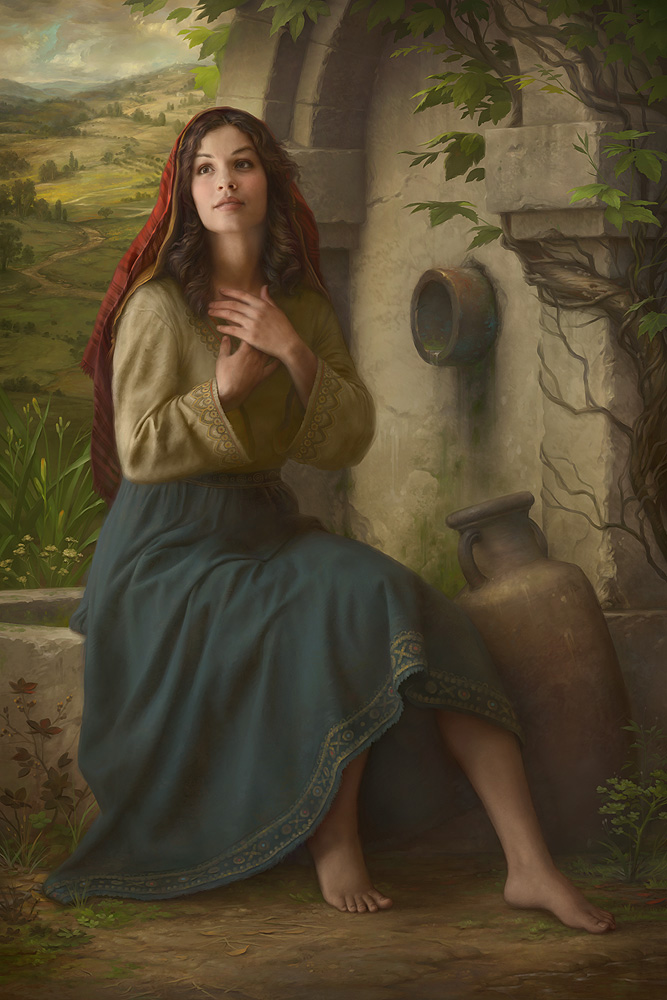
Once I have this image, I take advantage of the tech at my fingertips and try some different color ideas. Even if I am pretty certain, I always shift the temperatures around, or change colors completely. Why not? It is fast and I learn a lot about color relationships, even if I don’t go with the changes. I actually do this every time I finish a piece. I spend a few minutes trying out different color schemes. It is a great way to explore color!
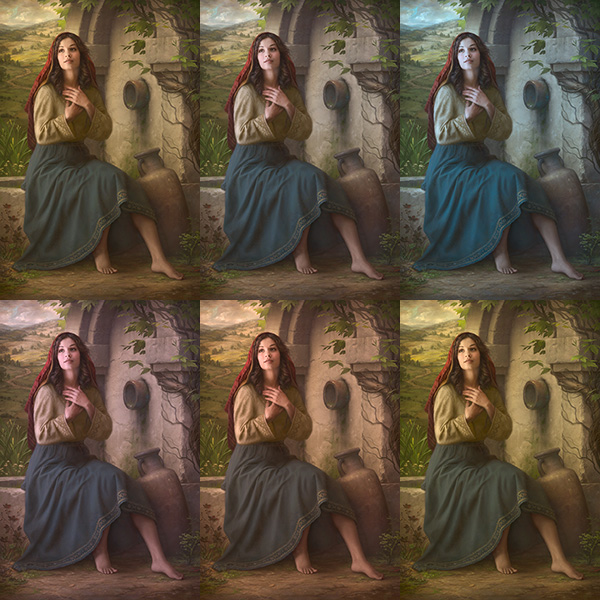
Maybe some different costume colors too

I think I know what I want, so on to the oil painting!
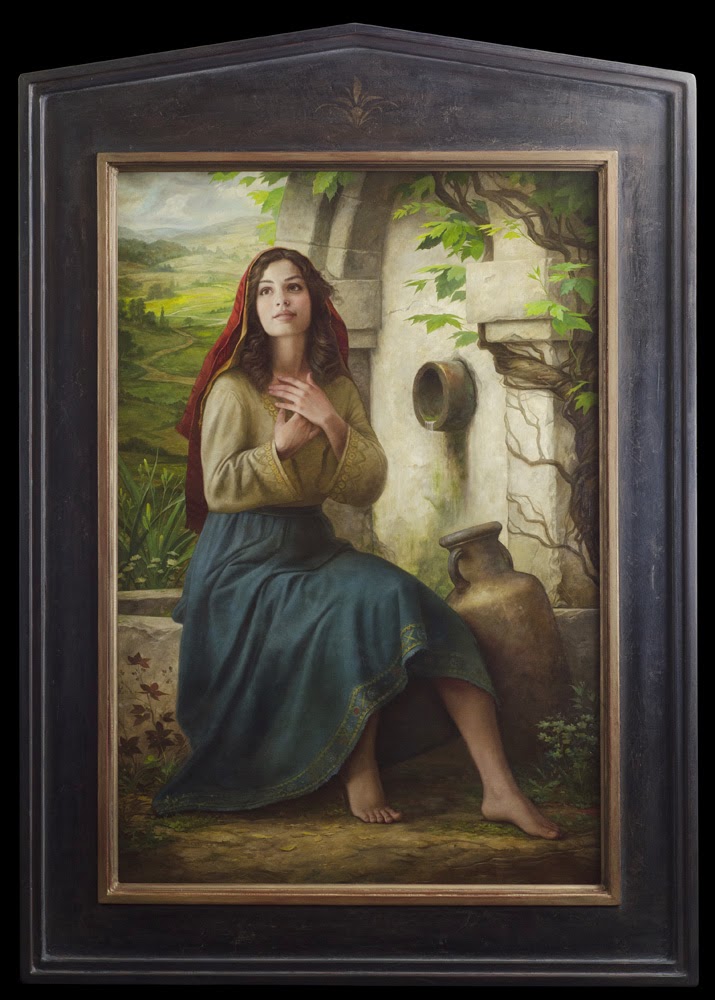
5. Final painting steps

Early progress shot. You can see the transfer lines, inked over with india ink.

A little more progress. Color wash on the whole lower piece, face is nearing completion.
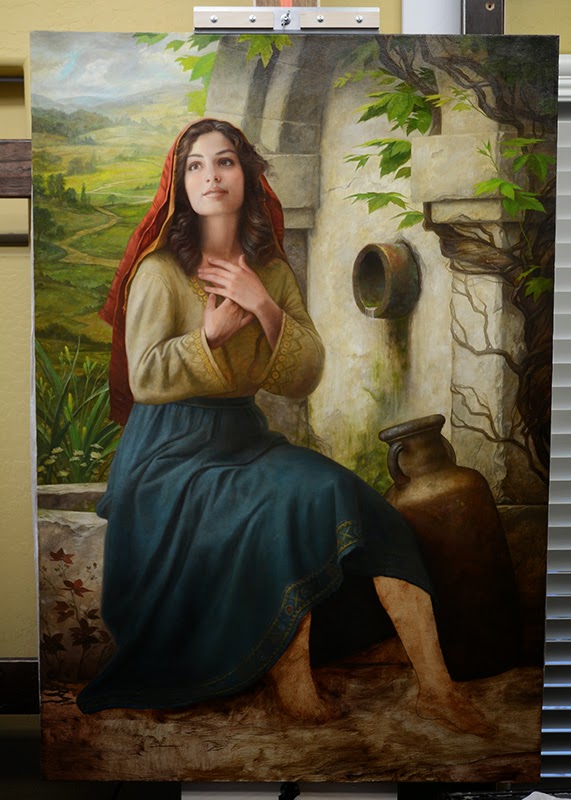
Upper two thirds are done, just the feet and ground to do. Almost there!

I also decided to build the frame for the painting. 🙂
Conclusion – I definitely feel that all the work before starting the final was worth it. I have more years under my belt working digitally than traditionally, so there are aspects of the digital version that I probably pulled off better, but overall, I feel that the final oil painting is the strongest, especially in person. I am still finding out if substituting the digital study for traditional is an improvement. My mind tells me it is, but there is a nostalgic, even romantic side of me that wants to do those steps with just like the old masters did.
For my most recent paintings, I haven’t printed out the large print to transfer the drawing (like I mentioned in step 4), but have done a grid and scaled up my digital painting by hand. I find that I like the direct interface with my drawing at this stage. I add in little touches that are interesting that I miss when transferring the drawing like I did with this piece. I might make a conscious effort on my my next painting to combine the two, transferring big shapes and free handing the details. We will see.
I don’t think I will give up tubed paint or my digital camera as a tool, but look for a future post where I work without my digital toolset and create everything with a traditional approach.
Experience will tell. I am sure that I will refine my process along the way, and will post results when I think they are informative. I would love to hear your thoughts.
Last step – onto the next painting.

Such a beautiful painting! Thank you for sharing your process.
I think if I wrote this post, it would be exactly the same. It's funny how we all stumble across the same process, simply due to efficiency.
I suspect a lot of people are going to wonder why you did such a detailed digital piece first, or even paint it in oils at all (I know I get asked all the time). The fact is, doing a complex digital comp and then a full oil painting may be a stupid way to produce a piece of art if all you're concerned about is reproduction. But it's an amazingly effective method to create an oil painting.
Oh, and in case I didn't mention it the first time I saw this piece, Howard… Fantastic painting! The size, the frame, the feet… it's making me jealous.
What a great breakdown! Thanks for sharing this, Howard.
Its so interesting to see how detailed you got with your digital study before the final oil painting but it really makes perfect sense in the context of these steps. Fantastic work Howard!
This reminds me a lot of Bouguereau. It's a well executed piece and I'm happy you shared your process. As a beginner painter, I often have to slow myself down and force myself to do a solid drawing and value study before I move to painting. I think people in my generation have been seduced by digital tricks that promise fast results but always end up feeling like disposable Art. Thankk you for giving us encouragement to follow a process that can only make our pieces stronger. I actually did this in my last painting project for class and I'm happy to report it's my best painting yet.
Thank you
I ain't much of a critic, all I can say is this is just great 😀
Really great post Howard!…..all of that planning really paid off on the final painting.
That nifty looking frame you built as well deserves a post all on it's own. Would love for you to share some tips on that at some point.
Thank you Will!
That is really cool to hear Dan. Even with a lot of steps, it does seem to be the most sure way to get consistent results. When I cut out steps, I always risk coming up short of the goal and seem to spend more time trying to fix the piece anyways.
I have a few other pieces where I did really detailed digital versions and then the final in oils. I will share those in future posts. I am making a time lapse for a current piece. Hopefully it turns out well enough to share!
Thank you, it means a lot! Next time I am in NY, I will take you up on the offer to visit and jump a train up there. Looking forward to it!
You are very welcome, I am glad you found it useful. Thanks Megan!
Thanks for giving it a read Max!
“Reminds me a lot of Bouguereau” is one of the nicest things you could tell me. 🙂 That is great to hear that you are following these steps. I am convinced it is a great way to develop a painting. Thanks for giving it a read and for taking the time to respond.
That is my one of my favorite critiques to receive. 😉
Thanks Jared! I have really been having a blast making some frames lately. I will work up a post on how I have been making them and share it in the future. Good idea!
Wow, Nice painting! Thank you for sharing.
Awesome painting, thanks for explaining your process in such detail. I too use the computer to create my design and layout for paintings, but not to this level. I can see how fully rendering the piece on the computer first instills confidence in the final oil painting. The downside I would think, is that the creative process is pretty much over in the oil painting stage, and it becomes almost like copying a photograph. Personally I would find it difficult to maintain motivation and enthusiasm for the project during the analogue painting stage using this method. However, your incredible results speak for themselves. Plus you end up with a REAL painting instead of a digital one, which will always be considered more valuable.
Wonderful work Howard! This is exactly the kind of thing I've always imagined doing as a route back to natural media work. The process seems simple, elegant and logical and I can't wait to try it for myself.
It's like this is the traditional process, just modern-style.
If da Vinci were alive now you wouldn't be able to keep him away from the modern tech!
Another good reason to incorporate 3D and digital painting techniques in our workflows, aside from their utility, is to demo those skills to potential clients and employers.
Great work on the frame too! Considering the hours we spend painting, it's surprising more of us don't frame all our own work.
This is a really great piece, Howard. I enjoyed both these articles immensely as I have been struggling with painting, and trying to decide on alla prima methods, but finding myself enjoying the 'feel' of using a more traditional layered method. usually I work in a very direct style, but I am really feeling the benefits of having to focus on a piece and ponder it at length, rather than just get caught up in the moment with it.
I love how you had a reference for the model, the fountain, the wall, the ground, and even the stone texture. But the landscape came from your brilliant mind! This is still my favorite piece of yours, you are an excellent artist.
This is great painting!! Thanks a lot for post, Howard.
You made great work on the computer!! I have worked more than 15 year as computer's designer and know computer enough well , but I still have problem with oil painting medium…What kind medium do you use? I have tried to use just OMS for Under painting , than Oleogel for the thinner and still I am in stuck with medium..My painting not fresh…and the pain do not go easy….What could you recommend and I would appreciate your advice a lot!
I am late with a response, but hopefully you find this. I don't use much medium, but when I do, I prefer a 5:1:1 mix of Turpentine:Damar:Stand Oil. It is very fluid, making the paint quite thin. It dries to the point that you can lightly paint over it quite fast, but takes a little while to fully cure. Good luck, let me know if you try it!
MC, hate to burst your bubble, but the link to Pt. 1 has gone missing.