Start and Finish
I just finished this painting, and have a few progress shots of it, so I thought I’d share it here along with some notes.
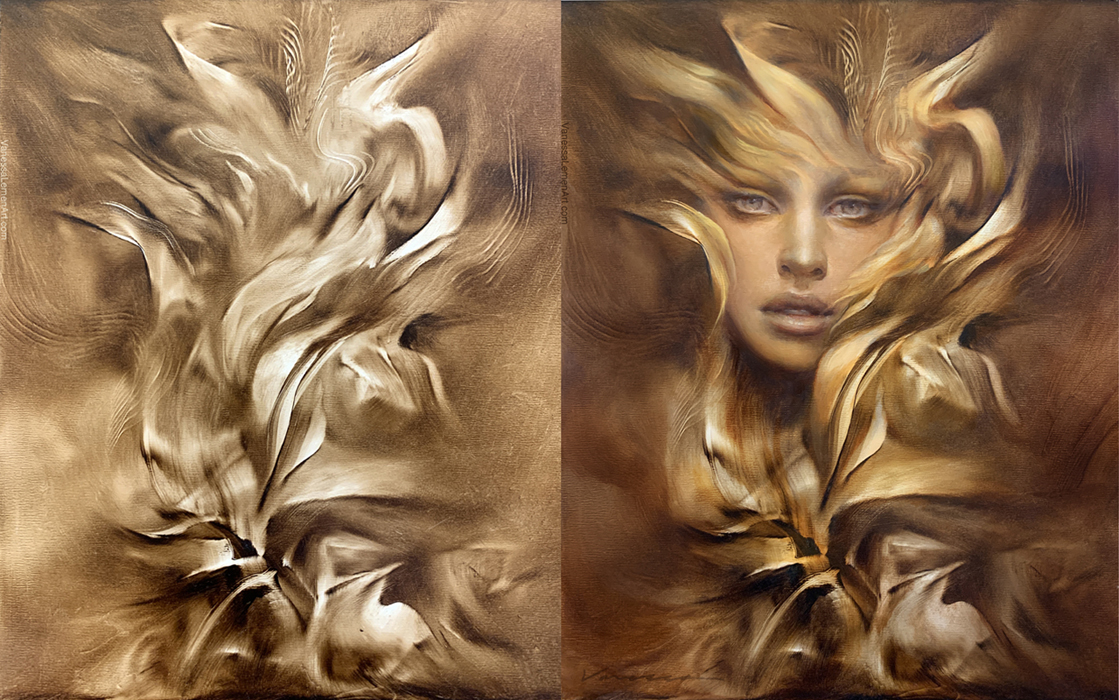
This was one of several quick abstracts I did for a demonstration. It was done mainly using a kitchen spatula and a mop brush and burnt umber on a pre-gessoed art board. If you’d like to read more about how I make these marks, I’ve posted several articles here on Muddy Colors about that already.
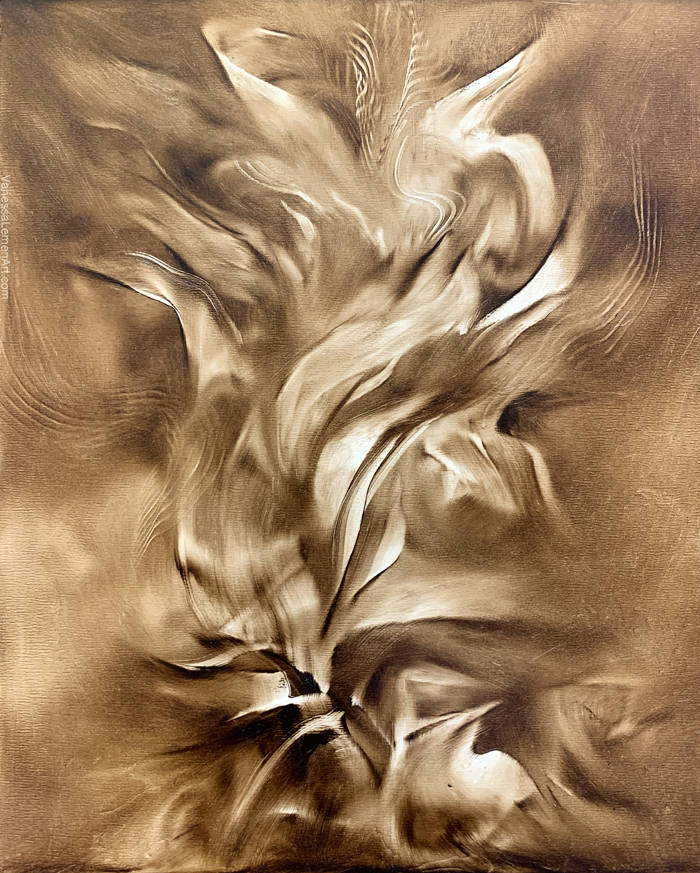
Abstract Start
_______________________________
The face was painted on top of the dry abstract underpainting using titanium white in thin veils to create varying degrees of transparent and opaque gradients. The gradients were not mixed but were done in a similar way that drawing with white charcoal on a dark surface would be done, where the most opaque areas represent the lightest lights of the portrait, and the thinner layers allow for some of the color/value underneath to show through, which creates the appearance of the gradation or turning of the form. You can see how the face appears lighter and noticeably cooler due to scumbling Titanium White on top of the underpainting.
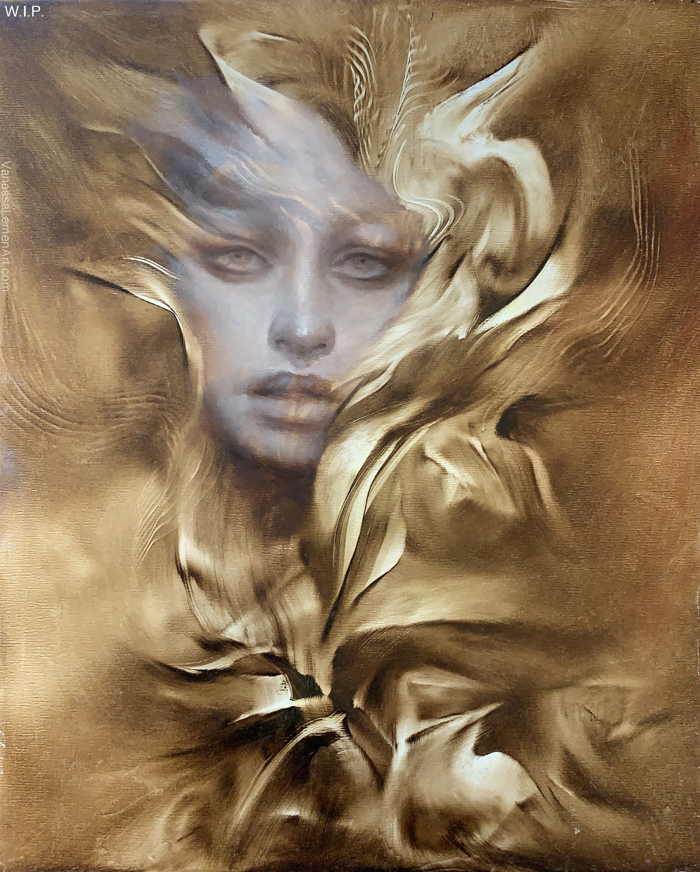
Scumbled in Face
_______________________________
After that second layer was dry, the face was glazed in order to have it feel more cohesive with the warmer surroundings using a mix of very small amounts of Transparent Gold Ochre, Transparent Red Iron Oxide, and Burnt Umber (with a tiny bit of linseed mixed in) to do this glaze.
Glazing the Face
_______________________________
Here is what the quick glaze looked like after covering the face only. Compared to the first stage (shown earlier) it’s much warmer and feels a bit more as if it’s integrated with the surrounding marks and background.
_______________________________
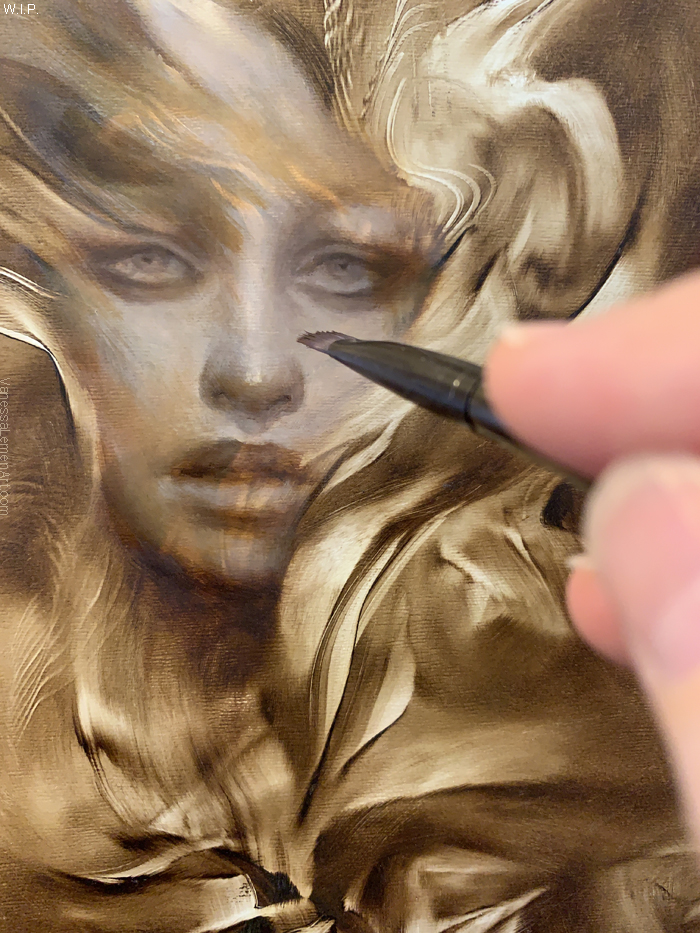
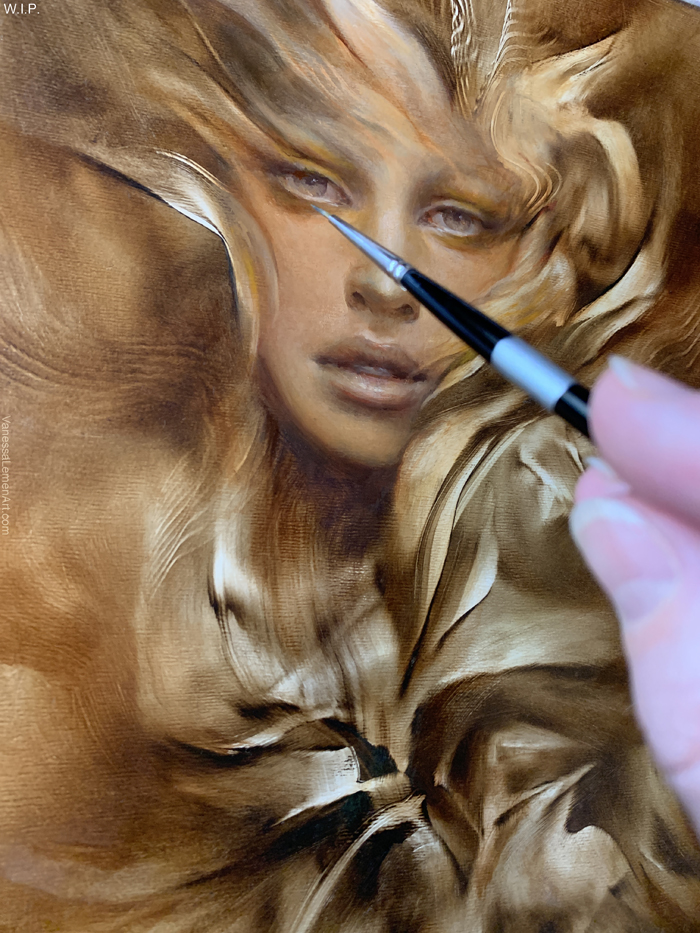
After that stage, it sat on a drying rack in my studio for a few days, then some opaque marks were added to the face with a few sable brushes using various mixtures of Titanium White, Transparent Gold Ochre, Transparent Red Iron Oxide, Cadmium Yellow Orange, and Cadmium Red Light, and sometimes some Burnt Umber mixed with Transparent Gold Ochre and/or Transparent Red Iron Oxide in the fall-off areas as the form turns in small areas like the mouth, under the nose, and a little bit around the eyes.
_______________________________
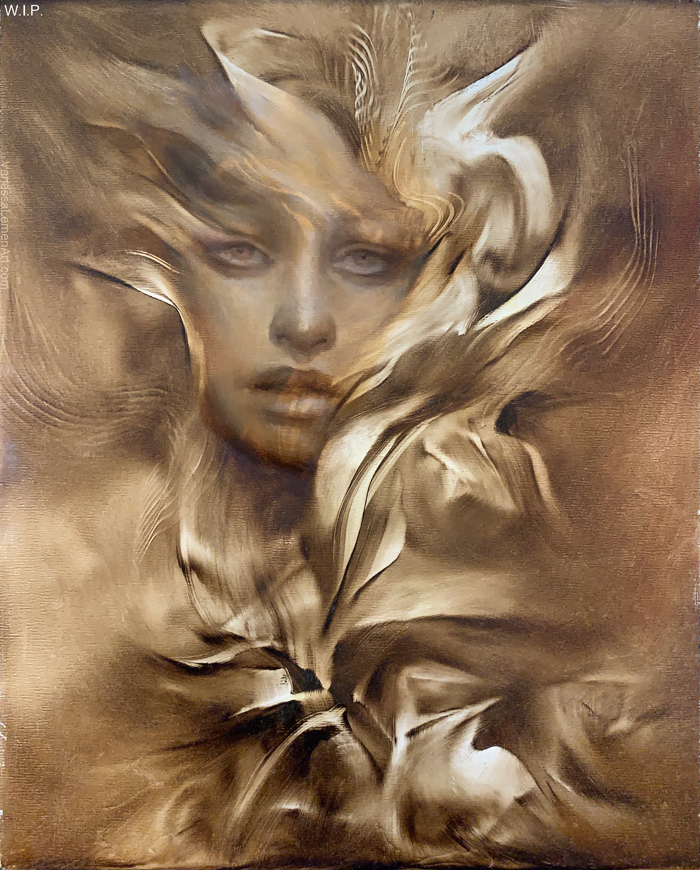
In this next stage, a lot more opacity was added using those lighter mixtures of paint I described above. Some of these opaque strokes were added in the abstract areas in the forehead and some next to the face as well. In an attempt to temper a bit of that yellow-orange in the prior step, the lights became a bit too light overall, but a glaze added in a later stage again can remedy that.
_______________________________
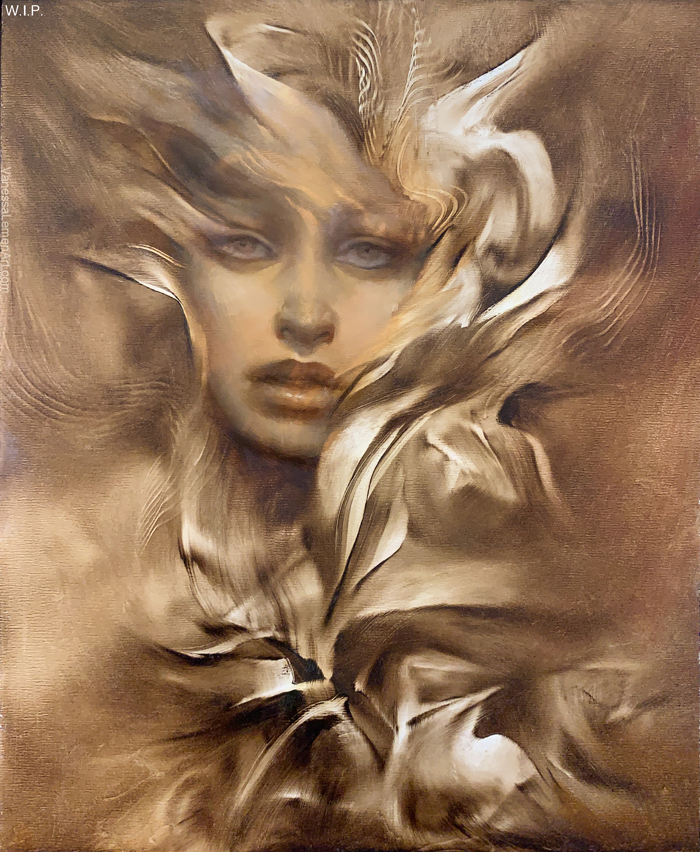
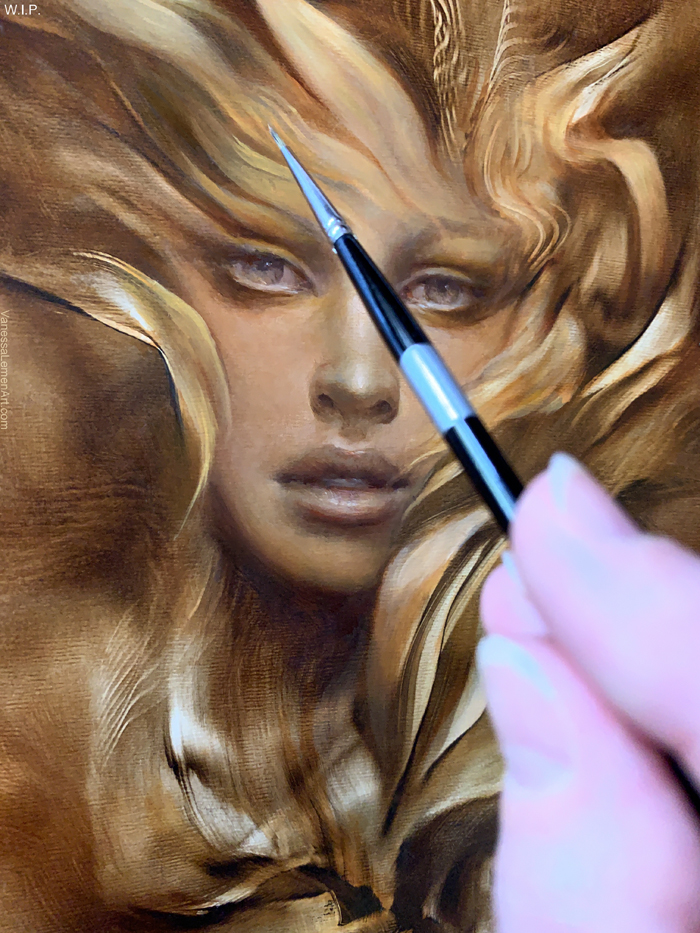
So the glaze was added to the face, as well as some glazing in the background, and at this stage more information was added in the eyes using a small round sable. The glazing in the background is slightly warmer than the underpainting was, and the intention was to darken the broader areas on the outer edges in order to push some of the lighter abstract marks forward. You can see the difference in the warmth added to the underpainting on the outer left and upper area of the background and face in this image compared to the lower right of the image where no warmth was added yet at the time this photo was taken.
Adding Details
_______________________________
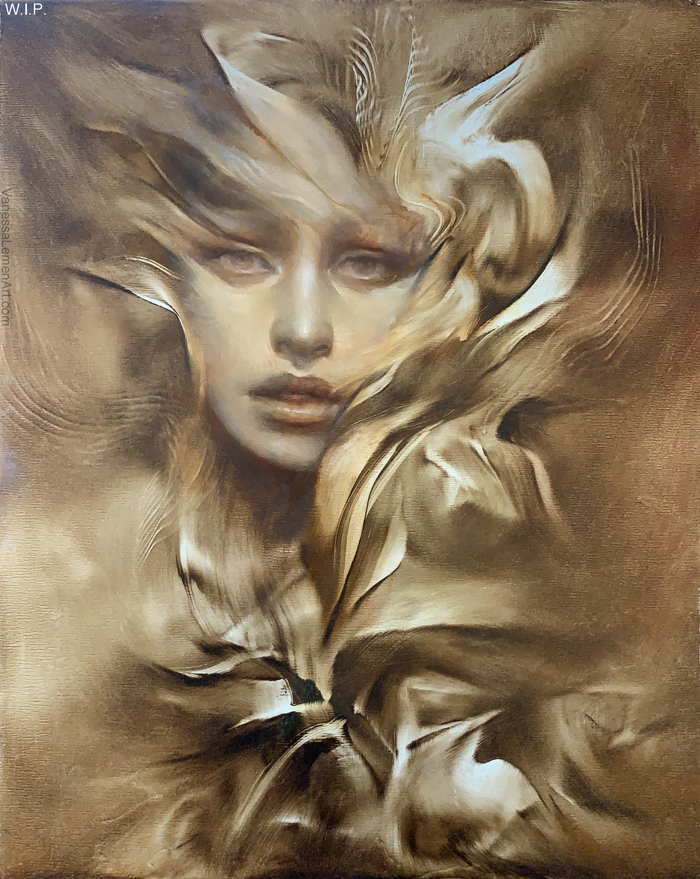
A small detail round sable was used to add small areas of warm lights to the abstract areas in the forehead to bring those lights forward again after adding a glaze of warmth that was darker there. Eventually, the background was glazed again to push it back into a darker value overall, and it was glazed so that the existing marks still show through.
Adding More Details
_______________________________
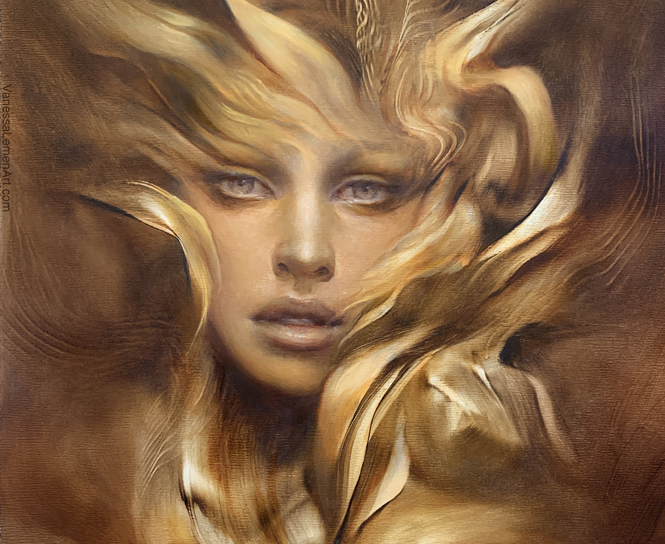
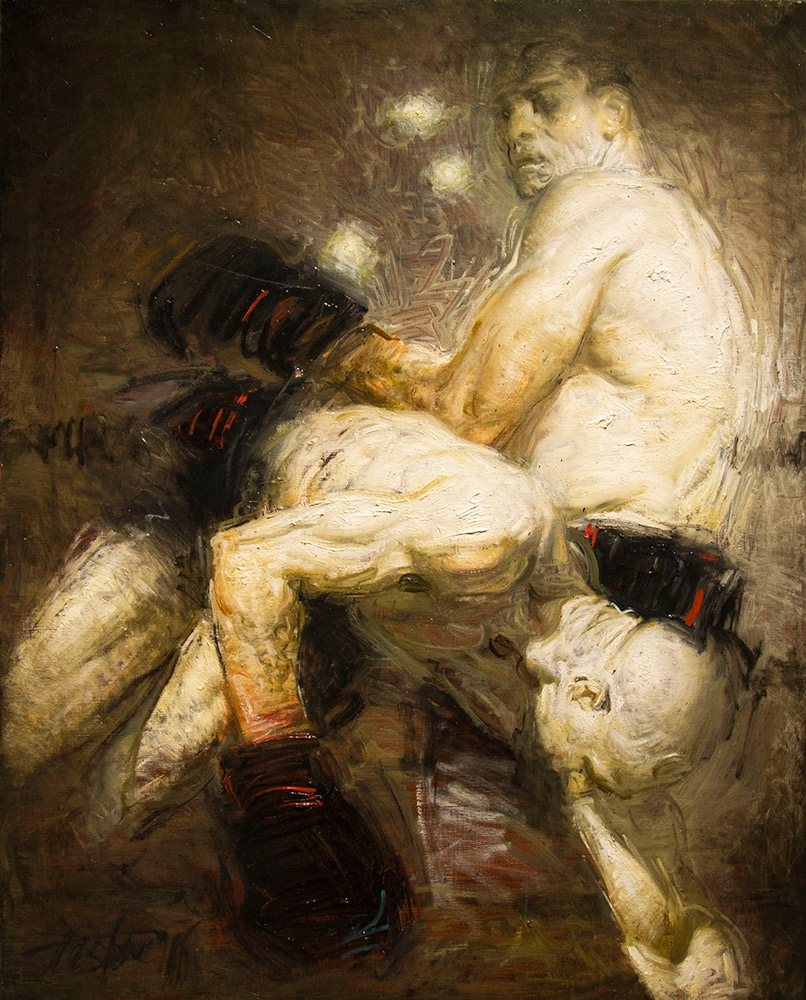
The finished painting in full is here below:
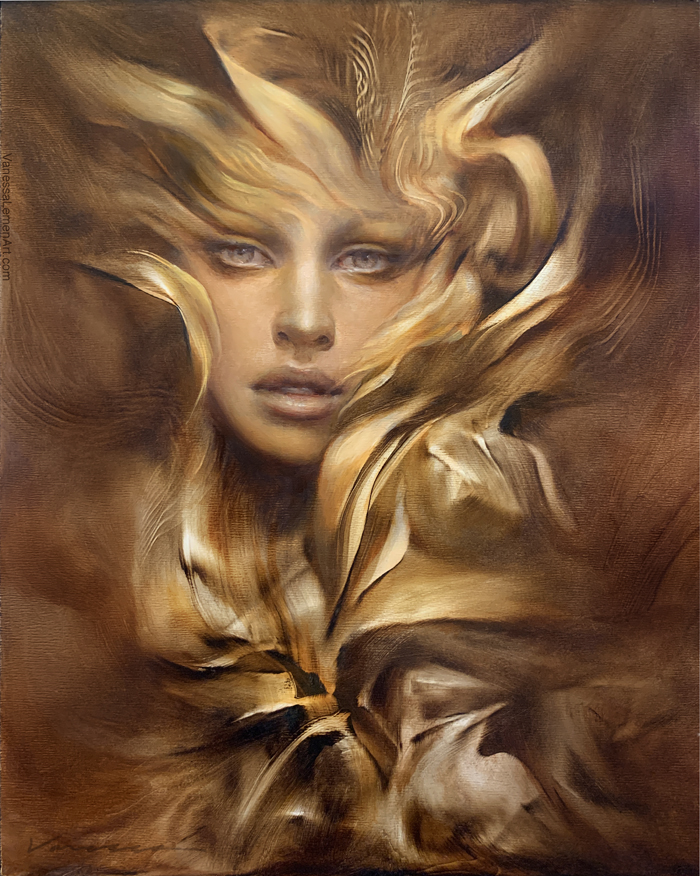
The Finished Painting
I hope this was helpful or at least fun to see the development of this painting. Thanks for checking it out.

I love your work Vanessa. And “how” you work. It makes it look easy though it is not.
Thanks so much- I appreciate the nice words about my work and process. 🙂
Reminds me of Gustav Klimt except with a more modern approach to it. It’s an interesting technique: start with an abstract composition and then add realistic objects within it while making sure the composition holds together. The cool thing is you can use this idea with different media as well.
It’s true that this sort of process lends itself to being applied to many different ways of working. I’ve always thought that that’s how a lot of things are, really. As for this particular step-by-step, though I do mainly start with abstract marks first in most things I create – be it graphite, water media, or oil – it often goes through the abstract stage for a while (as seen in other articles I’ve posted here on MC) and I’ll find something in the marks as they are still wet too.. and will start to develop from there. And sometimes, I’ll even “wreck” that and rebuild into it, even after many layers and time has been spent on it. As for glazing on a grisaille, that method is well known for a certain academic kind of look and feel and approach, but can be used in all sorts of ways (For example, this post). I’m very glad that your takeaway is that a process can be utilized in many ways. I feel like that’s my point to pretty much all of the technical sorts of posts I share here. Thanks! 🙂
Beautiful work, and and a creation process which is at both very free in the beginning and then quite meticulous towards the middle / end … fascinating!
Even though it would be super important for myself to grow as an artist, it is that beginning stage where I fail … looking for the literal pretty much from the first stroke. Oh well.
Hi Nico- that last bit in your comment is seriously a big part of how I evolved into working the way I do, and I anticipate that that will even evolve further over more time.. I used to be a more academic painter from start to finish, and I think that shows itself in the aspect of my process that I focused on in this particular post here, as opposed to other posts I’ve shared here that focus on the abstract mark-making or ideation from automatic drawing/painting. This way of working In my current stage of evolution is a marriage of ways of working and *being* while working that I enjoy. That’s why I have many paintings going at once too. At any given moment, I may want to delve into a certain aspect of these processes I enjoy, and so the paintings being WIPs at different stages available to me to work on make that possible for me to do that. This fits my temperament best, but might not be fitting for another person. We find what works best for ourselves. At least, I hope everyone does find that way for themselves. Not just for organization, but for the love of the process and the creation of art itself. It comes in so many forms!
If you enjoy looking for the literal pretty much from the first stroke, then your process isn’t a failure at all.
Thank you for the encouragement! Not seeing it as a failure per se, but definitely something every artist should try: leave the safe zone and try something else. One can always go back to the ‘old’ way of working, but denying yourself the chance that you may learn … something (a new technique, new tools for making marks, all of it) – it would be a shame never experience that.
That is the one thing about MC that is so great. Various artists with various techniques and in quite a few genres, and almost all of them in one or the other article suggest trying new things. Love it!
Thanks again!
I really love this. I’ve always wondered how you get that look. If you don’t mind I would like to try that process and see how it goes for myself. I know there is a lot of wisdom to get from this.