Happy Thanksgiving! Among the many things we celebrate today, one thing we are always grateful for is the commitment, generosity and creativity of our models. They help us bring our vision to life and we are honored to work with them.
Today is Part II of Working with Models for 3D. If you missed Part I, you can catch up here:
Some Basic Ground Rules
1. Make sure everyone is clear about the fundamentals before beginning: whether the session will be clothed or unclothed, whether the model’s actual image will be used in the final product (if so, you should be paying more), how much the model will be paid (anywhere from $25/hour for non-professionals, up to $200/hour), about how long you expect the session to run (we find 1 – 2 hours is generally how long a model’s focus lasts for energetic modeling), how and when the model will have breaks (depending how strenuous the pose/session is – every 15 to 30 minutes).
We tell our models that if they feel uncomfortable with anything, to let us know and we’ll try something else. If they feel like they need a break, tell us – sometimes we can get involved with what we’re doing and forget (setting a timer is helpful in these cases).
2. Ask before you touch a model – always. If there’s stray hair covering their face and you don’t want them to move from the pose, ask if it’s okay for you to move it. If you’d like to reposition their hand, ask first. Always ask. Simple courtesy and respect goes a long way.
3. Try to make the workspace comfortable. We make sure to have water, coffee or tea available – never alcohol (that’s a bad mix). If they like a particular kind of music, we create a Spotify or Pandora station for them. Make sure to clean the props and (especially) costumes (stinky costumes = major ewwwwww!). Clean the floor, especially if you’re planning to have your model posing there. We always have a clean, “model only” robe available in case they don’t bring one for in between shots. Make sure the temperature is comfortable for your model – while standing behind a camera you may well have a different sense of the ambient temperature than someone who is working moving through many poses.
4. Try to have your lighting / camera ready to go when your model arrives (batteries charged etc.). Our studio has ample natural light from the skylights and north facing windows and we find this highlights the musculature well for sculpture. When using artificial lighting, make sure it highlights the anatomical features in as natural and realistic a fashion as possible (photographs are notorious for “tricking” us into exaggerating or leaving out essential information – great images can help prevent this).
Tools and Photography
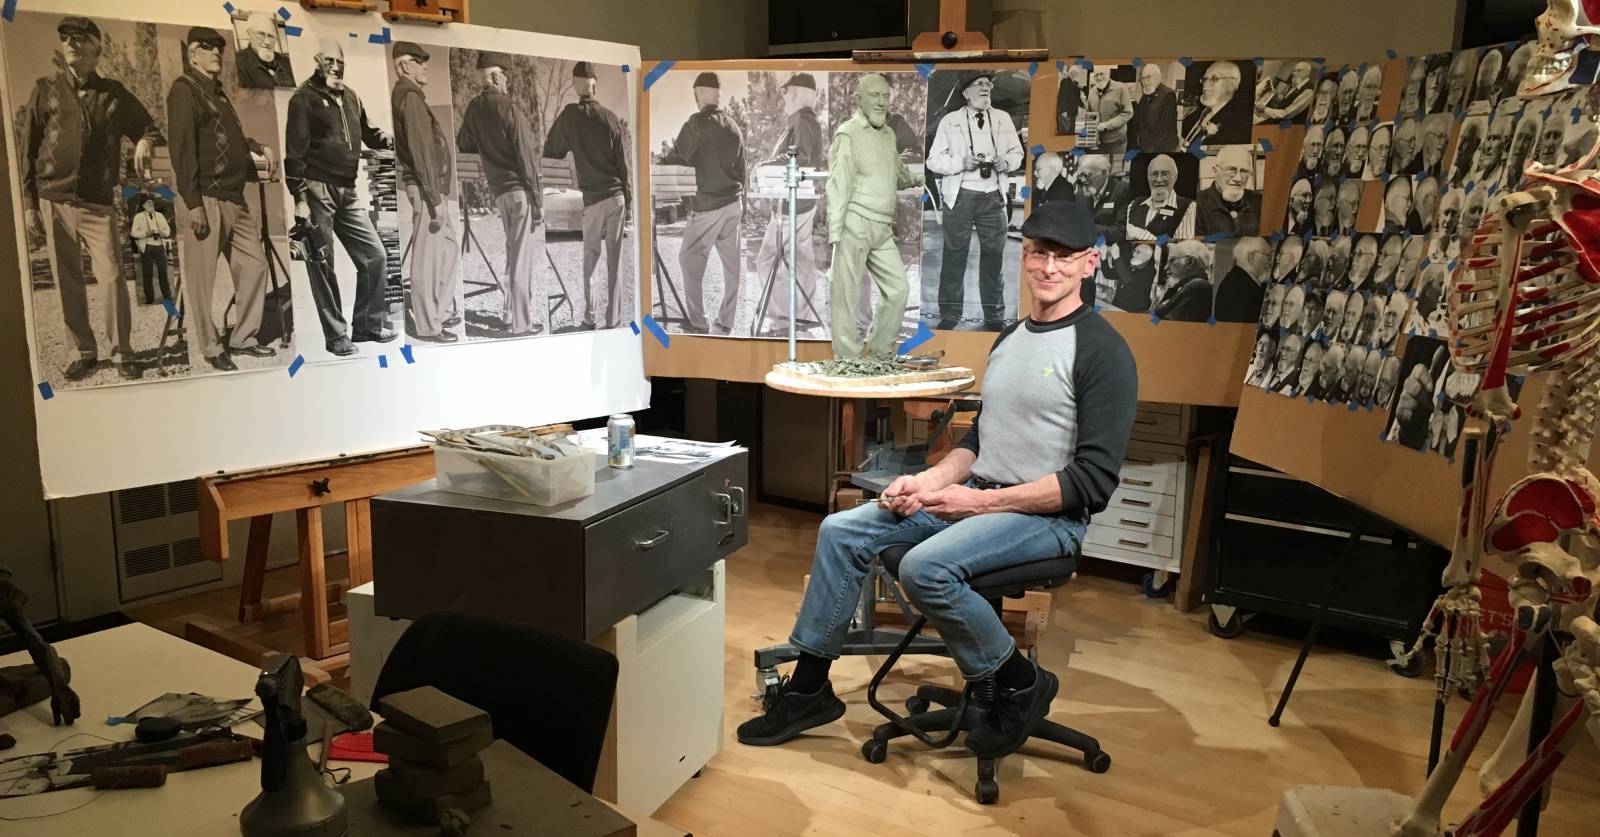
We like to work directly from models whenever possible. As I mentioned in Part I, during the pandemic and sometimes in the sculptural process, this is impractical. We must then become skilled generating and working with photo reference.
While there are many similarities, taking reference pictures for sculpture is a bit different than for 2D work. There should always be at least a few terrific angles and the pose should be interesting from as many views as possible. If you’re not working directly from the model, you’ll need sufficient 360º reference to successfully sculpt in the round (a background in anatomy is hugely helpful, but all bodies have their own uniqueness and the reference will help you bring these characteristics to life).
Other than props we might need for a particular shoot, the tools we use are pretty basic. We shoot with a Nikon DSLR, usually on automatic. We run all the pictures through Lightroom (Photoshop can work as well) – cropping, adjusting exposure, often lightening shadows, booting up the clarity, and usually turning them to grayscale.
When taking the pictures, we are aware of keeping the camera level. If pictures are shot on an angle, we can fix it in Photoshop, but if we don’t notice it, it can really mess you up. The angle relationships of the masses of the body will be different from different views. It can get confusing in a hurry. Having a vertical line, like a door frame, in the shot is helpful for straightening out hand-held shots.
We built a human sized turntable to get pictures from every angle. We bought a basic Lazy Susan from the hardware store:
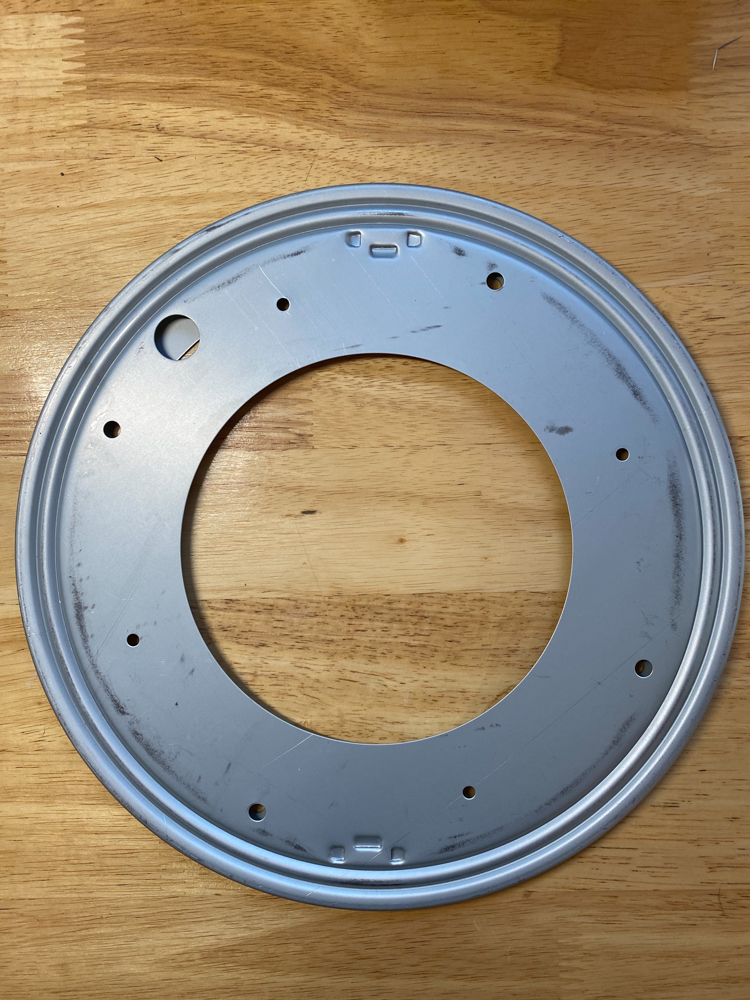 and attached it to two 36” diameter circles of wood so we can slowly spin the model.
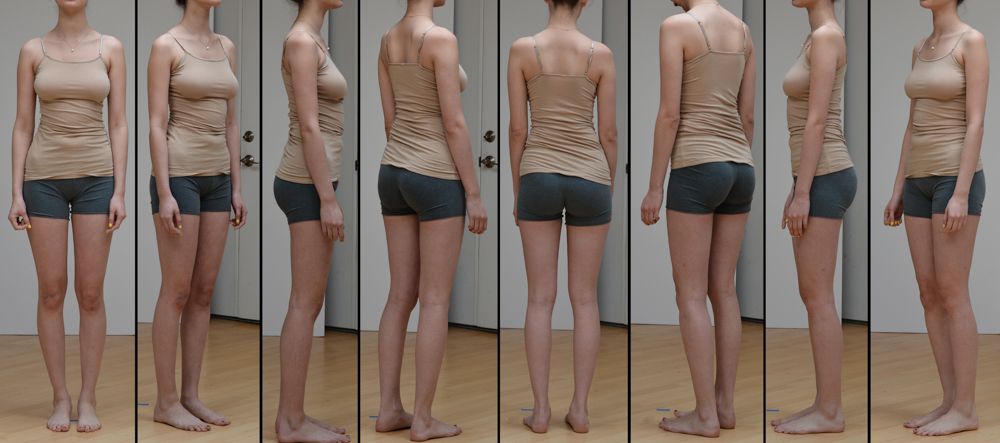
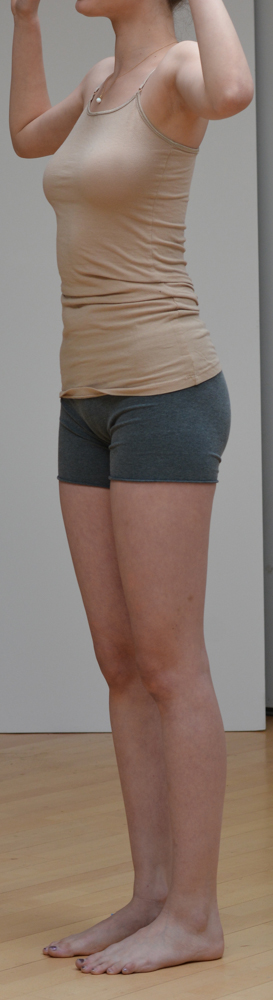
We typically will take a “roundabout” of images in a basic anatomical pose for each model we work with. This is useful for measurements, proportion and relationships between body masses.
 We then do the same thing with the head – our “mug shots.” We ask the model to look straight forward with no expression and we take pictures all the way around their head. The bone structure and basic proportions are not going to change with expression, so this is always a good starting point (and it usually makes them laugh, which helps everyone relax a bit).
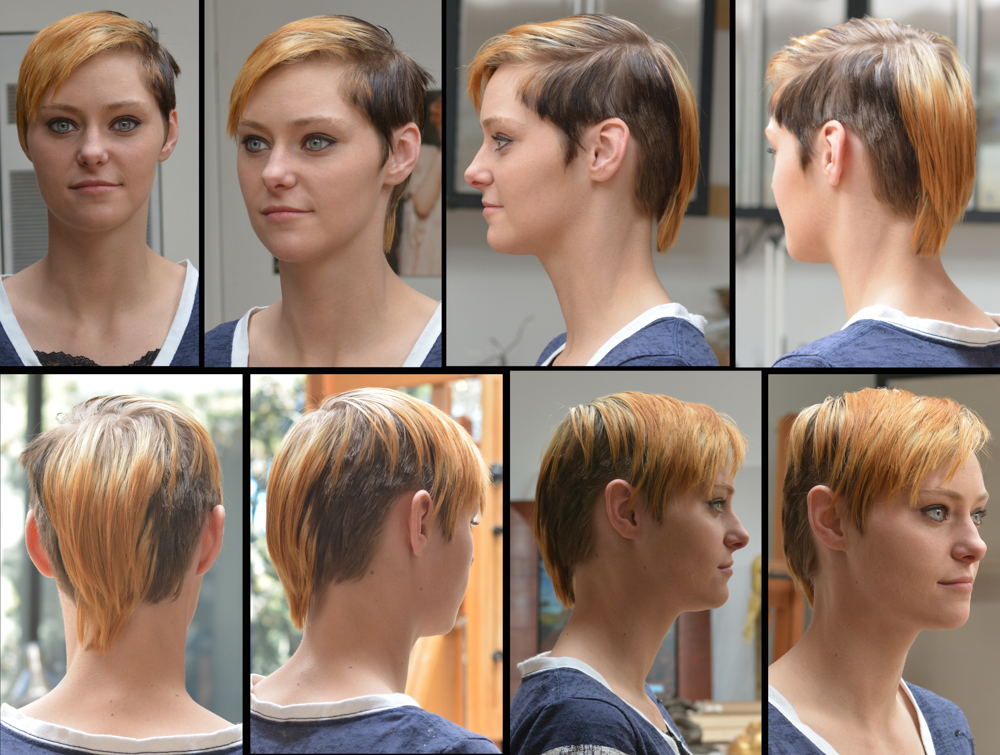
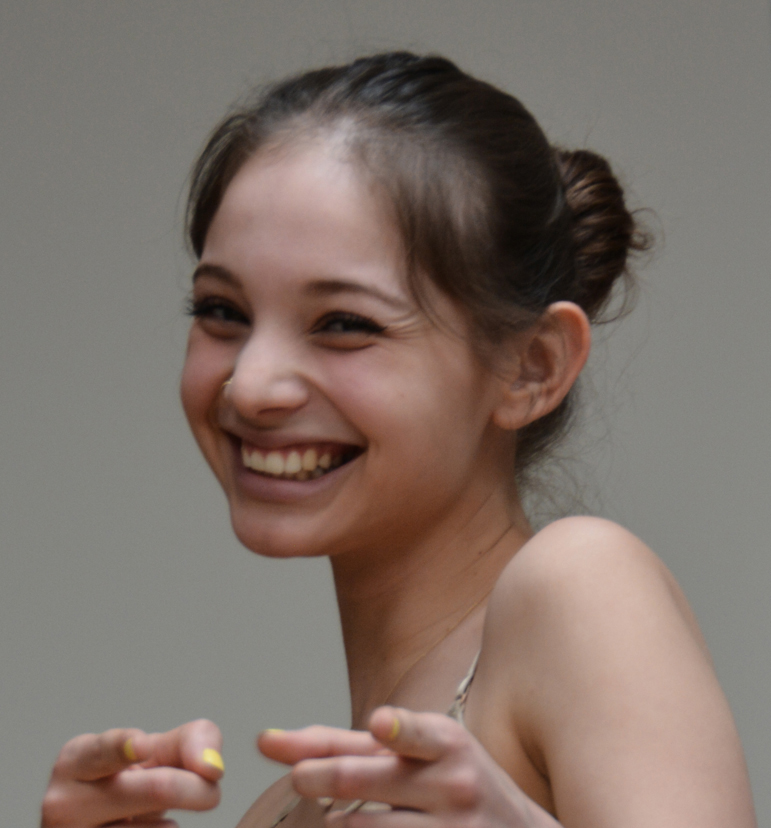
It’s harder than it looks to keep from giggling when you’re supposed to keep a straight face.
When we’ve selected a final pose (information on how we get here is in Part I), we take a roundabout of 24 pictures straight on to the model. With the camera on a tripod and the timer set to take one shot every 2 seconds, we turn the model. We also do a roundabout at a 45º angle looking down at the model and detail shots of hands, feet, flesh folds and so on.
When taking detail shots, we have the model move their arms out of the way, altering the pose as little as possible so we can photograph the torso/ribcage information that is hidden. While these parts will also be hidden in the final sculpture, it’s disconcerting to rough in those areas prior to attaching the arms with missing information.
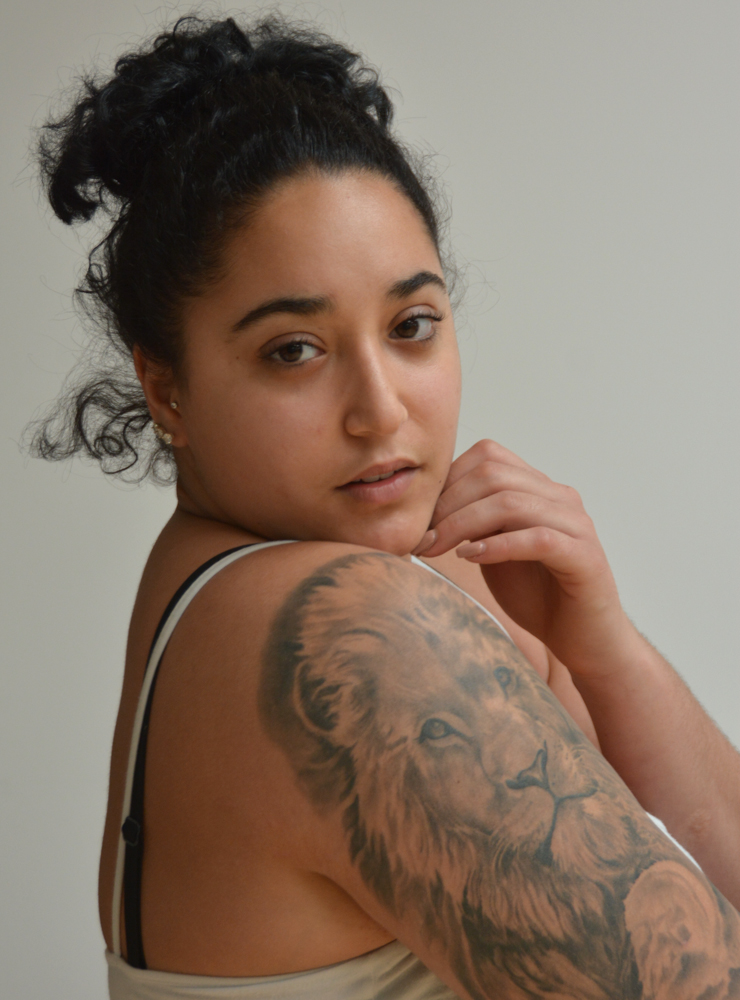
When I’m using the roundabout reference, I will keep the “concept or energy shot” open in a separate window – the “money shot.” This is the one that captures the feeling I want to come through in the finished sculpture. Expressions are fleeting and it’s unlikely a model could hold on to an authentic expression long enough for me to get several angles. Some poses are really hard to hold for any length of time as well. All of my choices when I work the sculpture are based in bringing forth the feeling I get from this primary concept image.
 Tools For Model Measurements
Again, our tools are pretty basic: calipers, measuring tape and a proportional scale (this is really for the sculpting, but I thought I’d mention it as it’s so useful).
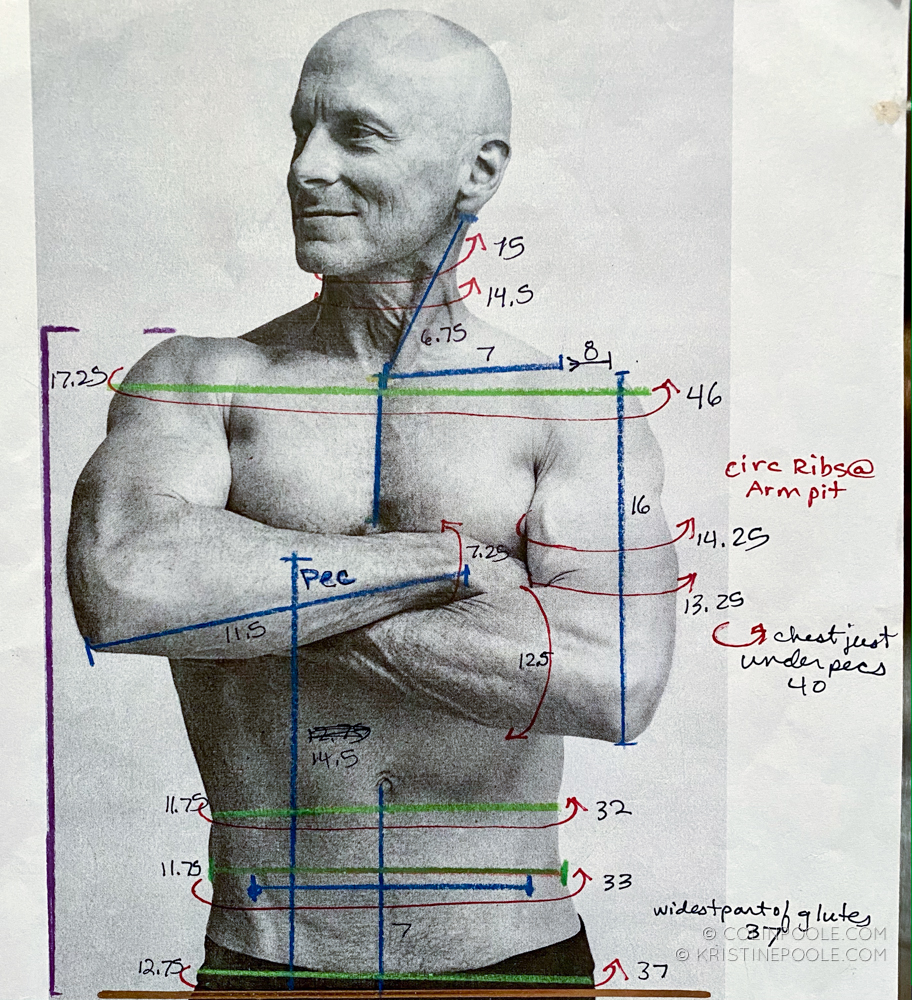
When we’ll be working with a model long-term or if the sculpture is a portrait, we take extensive measurements. We use these to keep the proportions and relationships on track when we’re roughing in the sculpture. In the refining stage, when something in the sculpture doesn’t “look right,” this gives us a solid starting point for assessing what it might be. I ask in the initial conversations with a potential model if this is okay with them. Time and again, a simple measurement helps me sort something out when I’m working in the model’s absence.
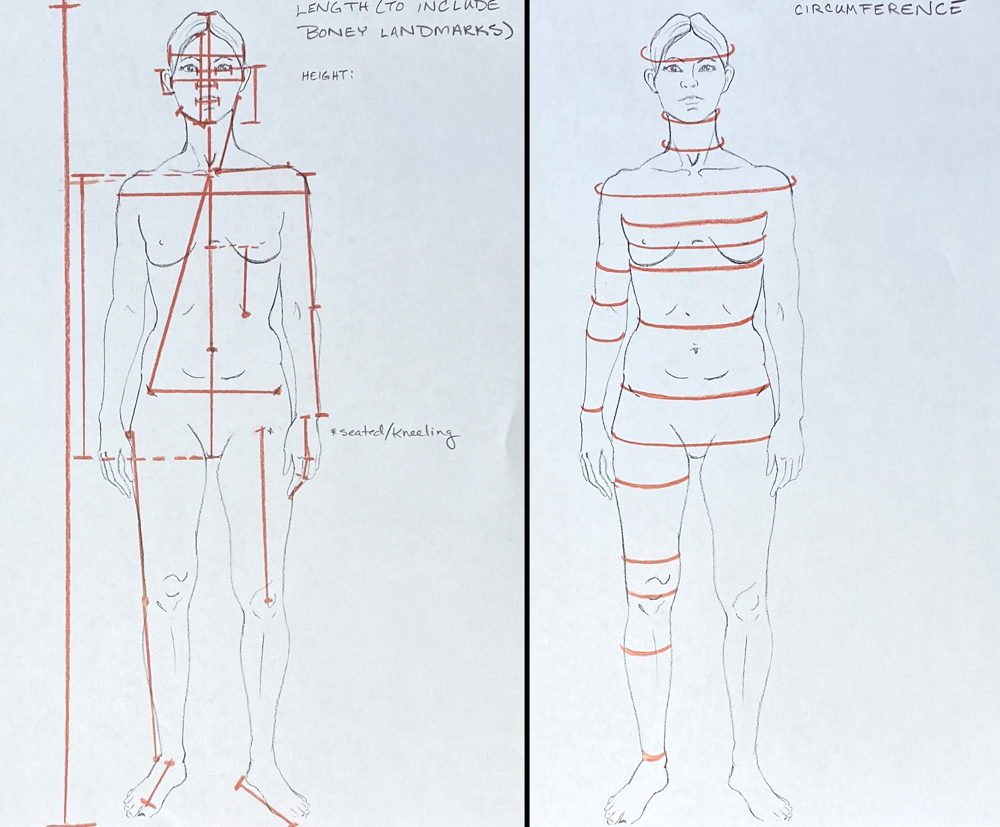
samples of measurements from the front. We also do specific measurements from the side, back and head.
If possible, we print out a copy of the pose and write measurements directly on the picture. This way, we can account for measurements shifting as limbs bend, posture changes and so on.
If you hang out with me long enough, inevitably you’ll be modeling for me.
I think I messed up the model’s head on this one…
When measuring, again, be courteous. The models can do much of the measuring themselves to keep touching to a minimum. When using calipers, I like to keep my fingers just over the metal pointy ends so I don’t scratch the models’ skin. I always tell them what I’m going to do before I do it – imagine someone coming at your eyes with a pair of these things if you didn’t expect it! I always have the model measure (or hold the end of the tape) anywhere that might be uncomfortable for either of us.
 Communication
Abide by the rule of the outdoors: Leave the campsite better than you found it. Do be clear about what you want, but keep refining your communication to balance requests with compliments (“Yes, that’s it – great! Ok, now can you try…?”) Enthusiasm and encouragement are magic.
What to Do When It’s Not Working: Reality check – of the thousands of photos we’ve taken in model sessions, only a very small percentage actually ever make it into a finished piece. Sometimes, it’s just not clicking – the concept and the model may not be a fit or the model may be off their game. We often will put the camera down and just very naturally start talking about something else for a few minutes. Invariably, they will relax (or get bored!) and do something natural that looks great. We say, “Wait! Stay right there – that’s perfect!” We’ve gotten some of our best poses when the model is just doing what they do between “posing.”
If it really isn’t coming together, we’ll move on from those first concepts and do some pictures in other poses that we might be able to use in future projects. Modeling is hard – your physical and emotional being are on display and we believe anyone working with us should leave the experience feeling good about themselves.
One of our favorite models had been working with us for years when we met her mom at a show opening featuring work that her daughter had modeled for. Her mom said working with us had helped her daughter grow into a confident and happy young woman. We couldn’t ask for more.
A couple of other great articles with resources for finding and successfully working with models can be found here:
Sam Weber – March 16, 2019
and Dan Dos Santos – February 15, 2011
This was a comment on Part I that has some useful suggestions:
JOHN on August 6, 2020 at 11:22 am
“Great article and I look forward to Part 2. As a photographer, I’d add that there are resources we’re used to that might work well for other visual artists as well. An old standby is Model Mayhem, which conveniently allows you to search for models within a certain radius of your studio as well by a variety of other attributes. Dedicated sites like Model Mayhem are being overtaken these days by Instagram for both professional and amateur models, though it can be hard to find models from scratch – look to use hashtags relevant to your local regional names, such as #newenglandmodel in my area for instance. I often see models whose primary area is modeling for photography, but also have modeled for painters and sculptors as well. It does certainly have some different skills though!”
H*Art to H*Art Chat
If you’re reading this, like us, you have many things to be thankful for. In the face of many losses this year, I always feel like one of the best ways to honor a loved one’s memory is to renew your commitment to give the best you’ve got every day you have. Create – art, stories, songs, gardens, music, beauty, life – bring it all every moment – and share it with people around you. You never know what someone else is going through and your contribution of beauty or inspiration or a moment of peace may well help them get through their day. As we all know, this has been a really, really hard year in so many ways. Reach deep inside and bring out the beauty that is there. We all need each other’s creativity, more now than ever. Til next time, keep creating!


Your article is great, thank you for sharing this useful information with me and everyone.
Thanks for reading and commenting! I’m pleased that your found it helpful! K