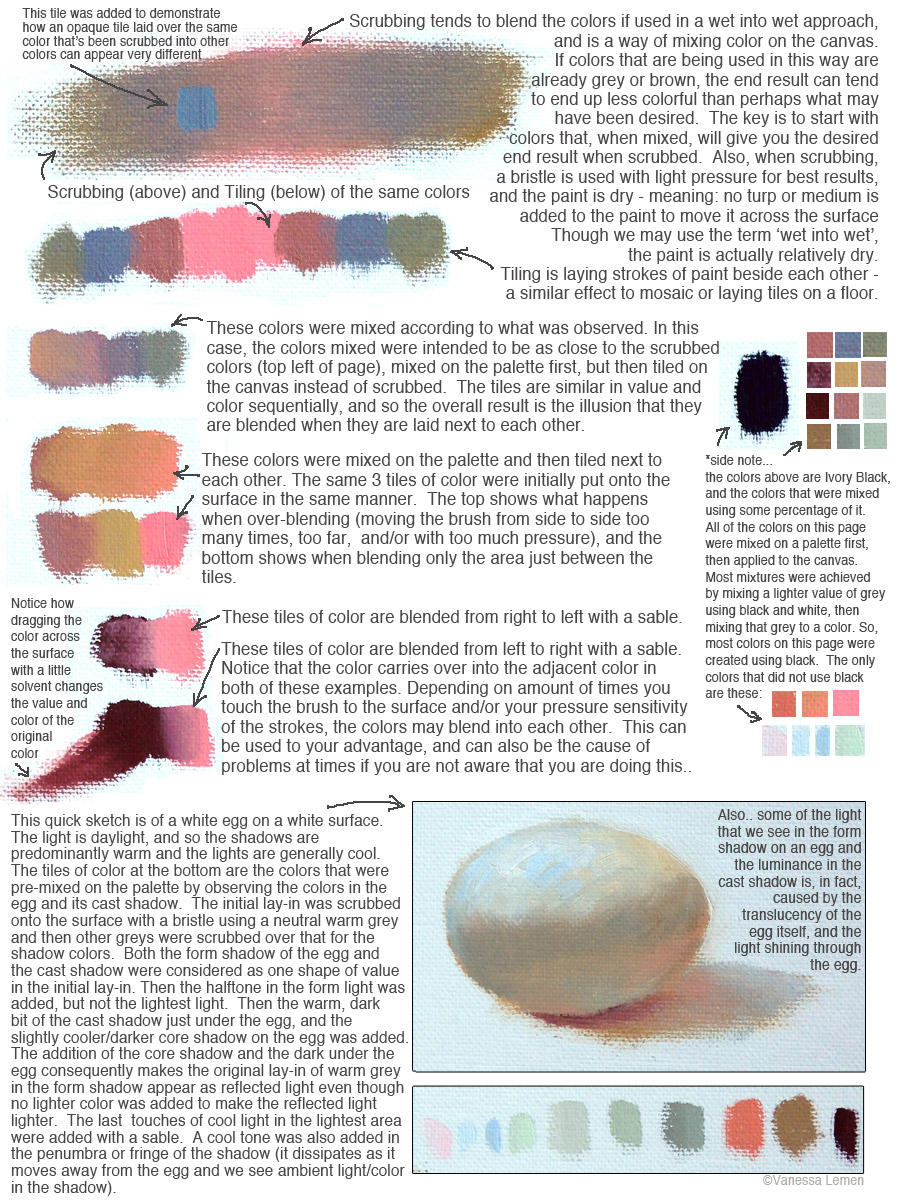
Some notes and tips inspired by observations made while teaching oil painting
I’ve noticed a lot of times when students’ paintings become muddy-looking that it not only has to do with accurate (or inaccurate) color mixing and observation, but it has a lot to do with application as well. In classes, we go over observation of color, the mixing of pigment, and application of paint to the surface. Lately, it’s come up that though students may be spending quite a great deal of time and effort to get the colors correct according to what they’re observing in the set-up, they’re still getting muddy paintings at the end of a 3-hour alla prima session.
I’d like to note that the term “muddy” is a relative term. Mixing colors in order to get browns or grays is definitely a way to work, and you can achieve an endless number of colors by mixing to indicate the subtlety of differences in hue and temperature. Those browns and grays aren’t necessarily mud. The term “muddy” usually applies to a lack of color, or dullness – which can be relative to other colors that are adjacent to one another on a surface, or as an overall appearance on the surface – which a lot of times occurs from over-blending or scrubbing.
There can be many reasons for the tendency to over-blend – not only can it be due to a possible lack of experience, but it can also have to do with prior experience in painting. For example, students who are new to oil painting but have experience painting with acrylics have developed different routines in order to get the results they’re intending. Because acrylics dry faster, those with acrylic painting experience that are new to using oils tend to blend as they go out of habit of working a certain way with the faster drying medium to achieve a certain look before the paint dries. Also, the time one has available to paint has much to do with approach or temperament. But the main purpose of this info and handout below is to demonstrate a few things about blending, tiling, and scrubbing in oil – and hopefully it can be useful no matter what your experience or temperament may be.
In alla prima painting, or wet-into-wet painting, there are many ways to approach the application part of the painting process, but knowing ahead of time what will happen and what your tendencies are can play a big part and help tremendously in the process. For example, if you intend to scrub or blend on the surface as you go, it would be good to know that often times the colors will dull in intensity by doing so, so it it would be best to start with a bit more chroma to account for the dulling when scrubbing or blending the colors on the surface. Or.. if you intend to paint in more of a tiling method, and blend only the edges between the tiles, then it would be best to spend the time mixing the colors on the palette first to have a solid gradient of color and value available to tap into as you paint. These are just a couple of examples.
I thought it might be helpful to share some info I’ve put together in a handout for this purpose here as well. I’ve made it a downloadable image, so that if you’re interested, you can save it in your files to refer to. This handout demonstrates these aspects using a small still life set-up and observing the colors from life, but these points can be applied to other aspects of painting such as figure, portrait, landscape, and even abstract painting. I will try to post up more of these types of handouts in future posts. Happy painting!


I'm brand spanking new at oil painting, in fact, I still don't quite get it, I'm sure this handout will help quite a bit, thanks for putting it together 🙂
If youre a beginner, dont blend. Oils work the same was watercolors in layers. Watch the PBS NOVA episode about Leonardo. Some of his paintings have 300 layers. Draw a good drawing, doesnt have to great because you will obliterate it anyway. Then paint one layer and let it dry. Then paint the next layer. If you mess up, you can erase without disturbing the first layer. As you practice, you will learn how to control the blending. When youre ready, you can paint alla prima with confidence. John Singer-Sargent painted with the tile method (Carolus Duran) and the secret is: JSS painted, scraped, painted 9 times before he made the “effortless” look of the final painting. So, the secret is practice. Michaelangelo destroyed his drawings and mess ups so no one could see his struggles & to impress others.
This is such a great post. Thanks for sharing.
This is such a great post. Thanks for sharing.
Hrrmm, I do get a little blend crazy when using oils again, since I mostly paint with acrylics. Thanks for pointing that out. Different medium, different fidelity. Such a knowledge packed post! Thank you.
SAP SD
Introduction to Sales and Distribution
Introduction to Sap
First Steps in SAP
Easy Access Menu
The Customizing Menu
The Basic Sales Cycle
Getting Help
Database Tables
Data Browser