
“A good tool improves the way you work. A great tool improves the way you think.” Jeff Duntemann
After several years, I taught my first in-person workshop again last month in Santa Fe. All of the participants were having their first experience with constructing large-scale (60 – 75% life-sized), hollow-built figurative ceramic sculptures. This involved a lot of learning about how to work with large amounts of clay – bigger, heavier and more awkward sculptural sections require a fair bit more physicality, effort and technical strategies. The method of hollow-building that I use requires visualization of the whole, even as you are constructing separate body parts that you won’t see assembled for many days. Many people found this part particularly challenging. It’s different from classical sculpting where the entire form is at a similarly developed level through out the process – here, it can take several days to several weeks to construct, rough in forms and proportions, then assemble all the parts to get to the point where we can actually begin to sculpt the relationships between the parts.
During the week, I sometimes saw my students working with the clay in ways that seemed ineffective for getting a specific desired result. When we had conversations about their process, an interesting thing I heard over and over again was, “well, no one ever showed me how to use this tool.” Having worked with sculptures that are as big or bigger than me for many years, using tools, leverage and body weight has become somewhat innate. Colin reminds me that with many tools, we learned the fundamentals of how to use them so long ago that we don’t even think about it anymore (like most of us with a pencil). It might not even occur to us that another person may not have the same instinctive feel we do in picking up and handling some manner of new-to-them tool.
So, today, I am going to share some of my favorite tools and a bit on how I use them for the various stages of sculpting large scale ceramic works. As a reminder for anyone just starting to sculpt, you don’t need a multitude of tools at your disposal in the beginning. You can get by for a fair bit of time with items you can find around your house that make marks and move clay.
It’s Not Your Dog; It’s a Sculpture (even though it may be a sculpture of your dog)
The first thing in talking about using tools is intention. I often see people “petting” the clay – sort of absently stroking the surface, not doing anything that directly impacts the form. Now, clay is a wonderfully tactile material. It just feels good in your hands. We instinctively want to hold it, squish it, roll it, play with it. All of which is fine when exploring the material.
With a sculpture however, there are two things: 1. the more you handle the clay, the more it dries out. On a large scale sculpture, one of the main things we have to continually manage is the dryness of the clay – it needs to be firm enough to support the weight of the sculpture without sagging or collapsing, but at the same time, remain wet enough that we can still sculpt the forms once all the parts are assembled. The more random touching of the surface we do, the more difficult it can become to maintain a workable state of the clay. 2. (And this is the important thing) When we touch a sculpture, regardless of what stage it’s in – roughing in, assembling, refining, detailing, finishing – we need to touch it with intention. What I mean by this is, I look at my reference (live or photographic), look at my sculpture, look at my reference, look at my sculpture, make a decision about what I’m going to do, select a tool and affect the clay/ make a mark/ shift the gesture/ change the contour/ impact the form – I do something specifically to the clay with an intention in mind of what I’m going to do. If I get to a point where my interactions with the clay become random in any way, I need to take a break so I can come back later with focus. This “petting” the clay feels unintentional that way – you know something needs to happen in a particular area, but maybe haven’t quite decided what that thing is, so resort to making little, ineffective actions.
You will often see us grab a tool, try it, grab another one, try that, and so on until our hand finds the one that it’s looking for. This is because we have an intention about something we want to do to the clay and our hand keeps searching for the correct tool to make that mark we’re after.
This is a different conversation than if we were talking about intuition. I feel intuition can play a big role in my sculpting, where a form that emerges or the way the clay itself is responding might beckon me down a different path with my sculpture. That said, if I choose to explore that path of intuition, I still make my decisions and interact intentionally with the clay.
Measuring Devices
When I start constructing the sections for a large hollow-built sculpture (to visualize this part, think of simplified tapered clay cylinders for lower and upper legs and arms, cylinder with a section of a sphere for pelvis and rib cage – basically it looks like a hollow wooden anatomy model in clay), I’m going a lot for “ballpark.” I do have measurements of the models we work with and I use them to get roughly the right proportions as I construct the basic geometric forms of the body sections.
 The tools I use for this part are quite basic and simple.
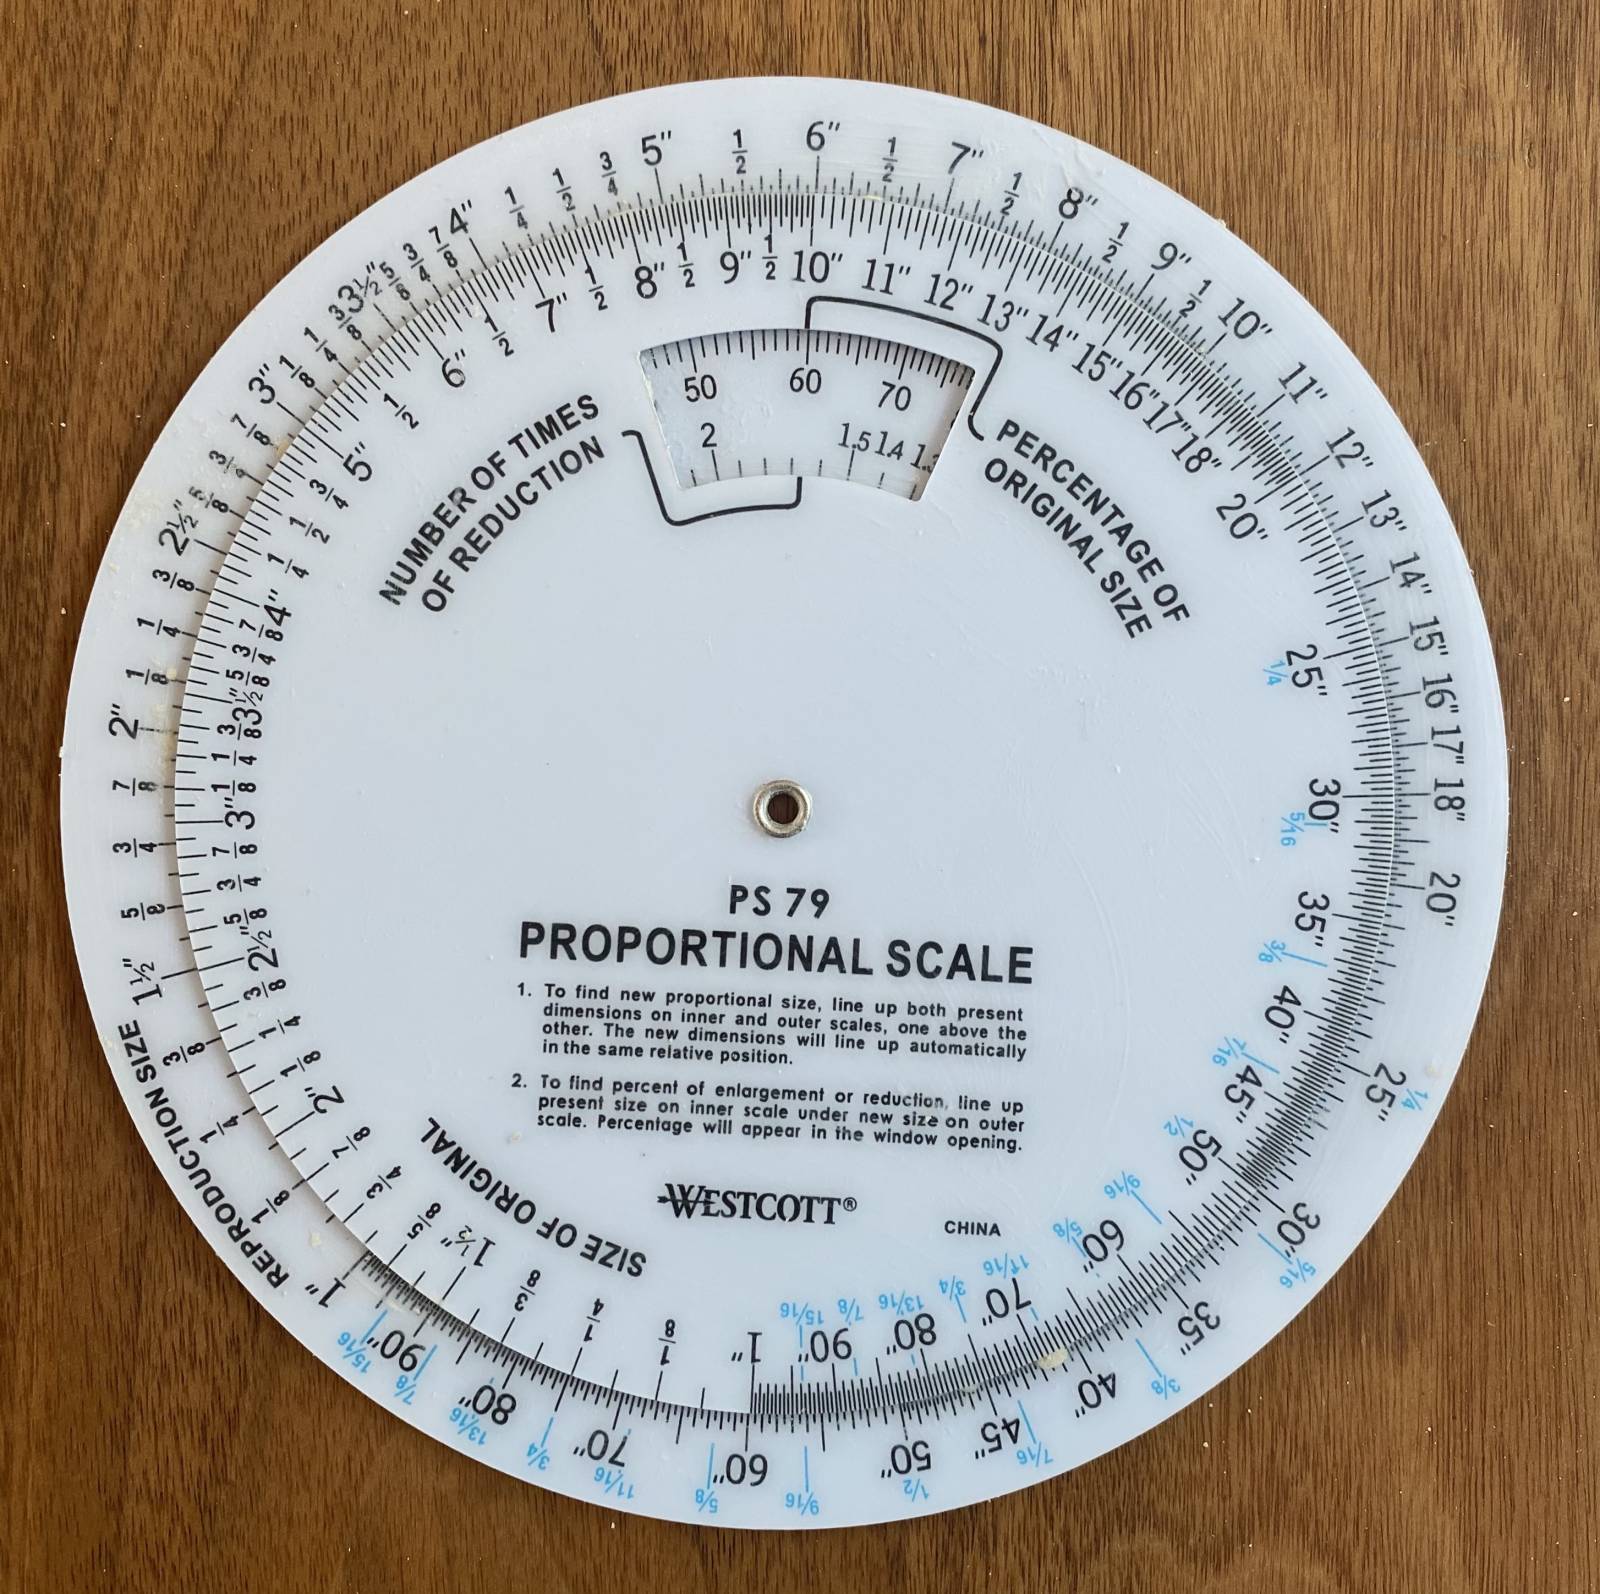
1. Proportion scale – This is a very useful tool for quickly converting measurements for enlarging or reduction. Set the center window for what proportion of the original you want, in this case, a 60% reduction in scale. The inner wheel shows your original measurement and the corresponding number on the outer wheel is your size for reduction, for example, 15” original measurement = 9” on your sculpture. You set the percentage once and from then on, all the calculating is done for you. The same thing can be accomplished with a calculator, but the proportion wheel is much quicker. You could also use an enlarging caliper tool for sculpting, which is specifically made for translating enlargements or reductions from the original to the sculpture.
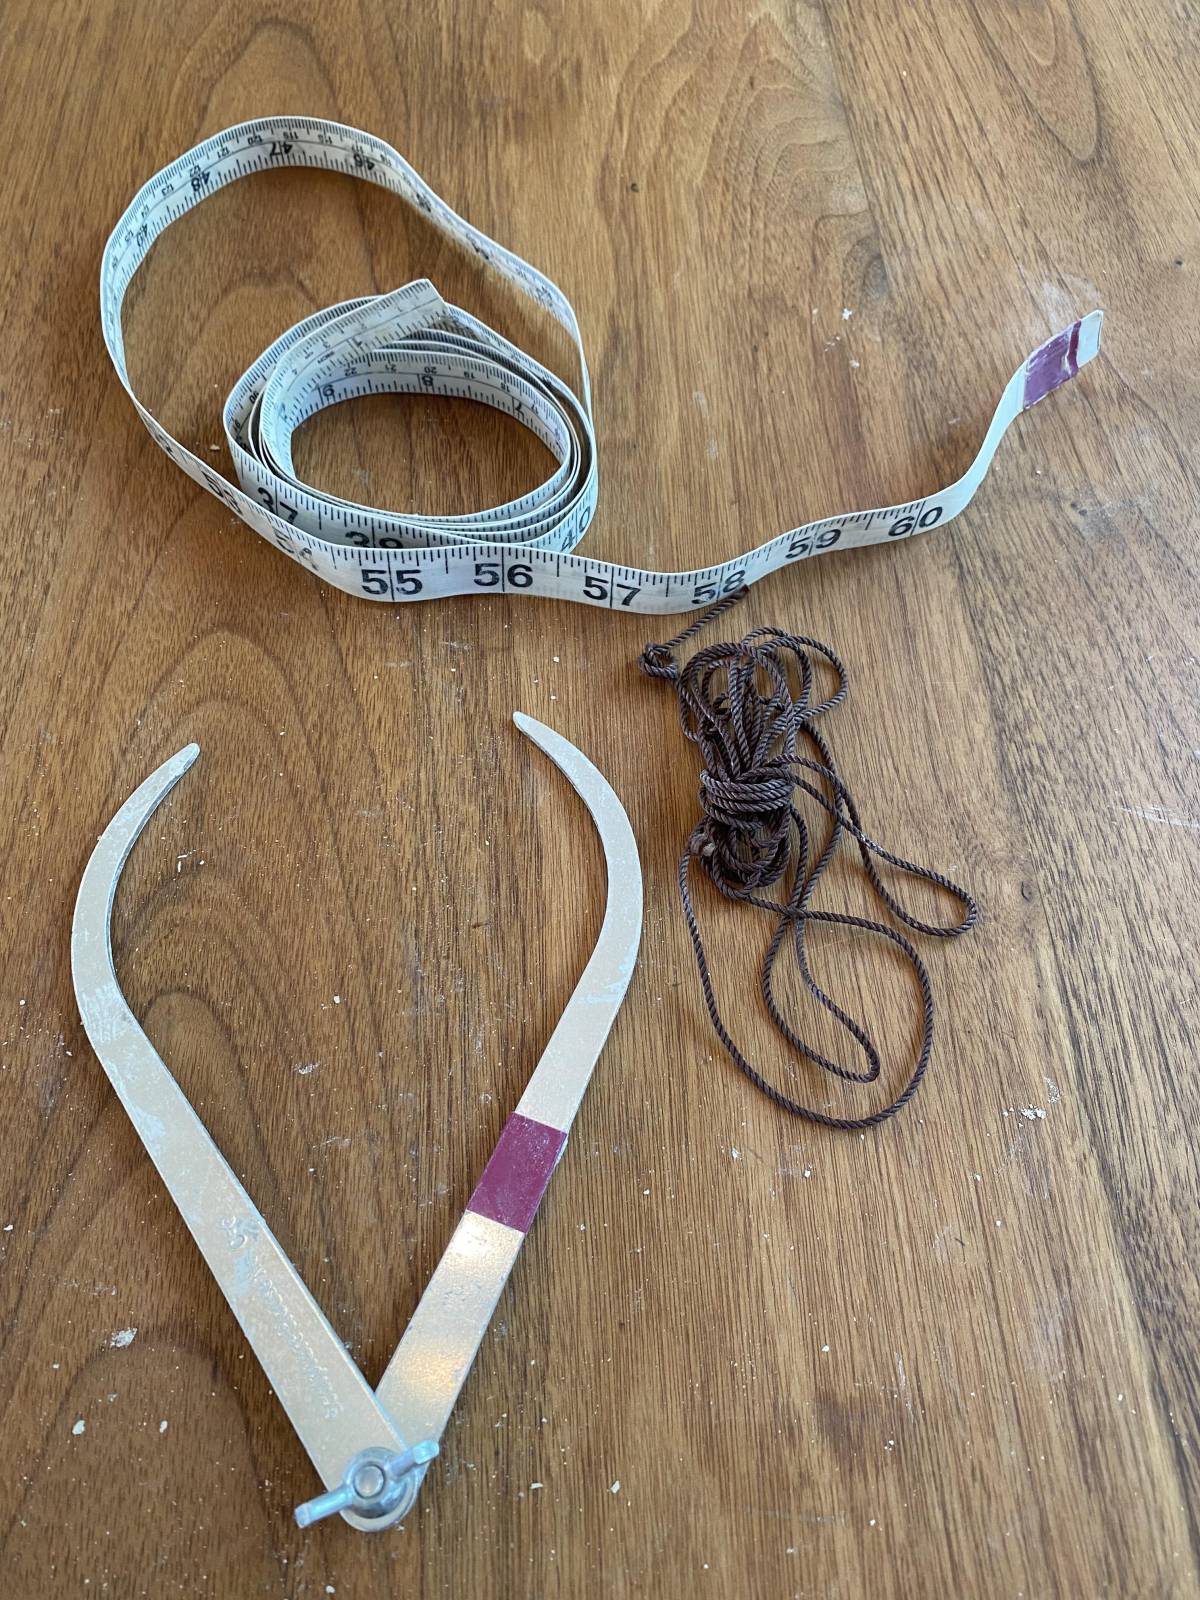 2. Measuring tape, calipers, string. I typically just use the first two, but for some hard to reach areas, a string can be useful.
Basic Clay Construction
Because sculpture clay bodies have a lot of sand and grog (pre-fired, ground up clay) in them for structural support, once they set up a bit, they can be very hard to move with just your hands, so we have to become proficient with using leverage, gravity and tools.
When working with larger forms, use anything you can to move the clay effectively. Use gravity and leverage to your advantage rather than trying to muscle everything – the clay will win the muscle war every time. This means if you’re trying to turn a 25 pound lump of clay into a slab, rather than breaking into a sweat and maybe breaking your rolling pin in the process, you can get a head-start by picking the clay up and “throwing” it laterally onto the board to get it to flatten and stretch a bit. Flip it over and do the same thing on the opposite side. Pounding it with your rolling pin flattens it out a bit more before you try rolling it. Always repeat what you do on one side of the clay on the other – if you pound the clay with the rolling pin on one side, flip it over and pound it on the other too. Clay has a “memory” – if it’s only worked on one side, sometimes it will “remember” and warp a bit if you haven’t applied the same forces to both sides. No potato chips here. Using your body and leverage effectively for the hard parts will also extend your working life as a sculptor.
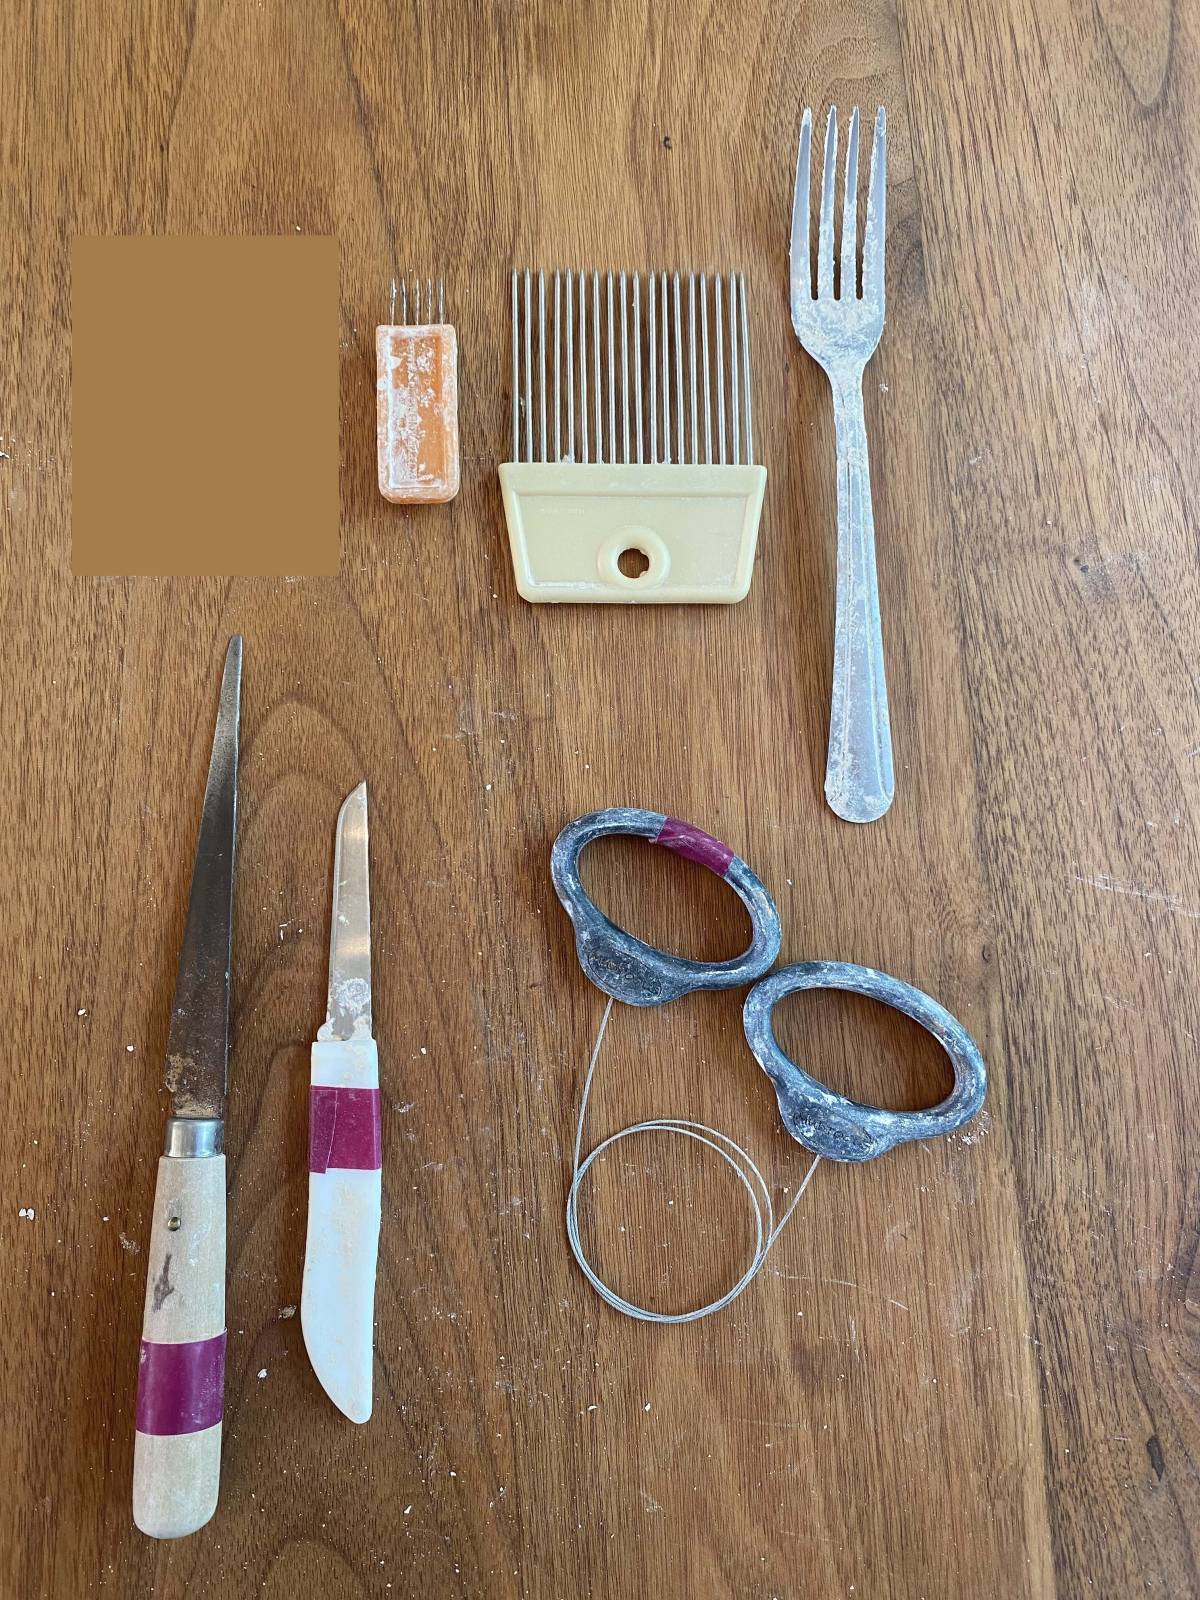 Here you see tools used for cutting and joining clay. Sections of large scale sculpture need to be joined well to avoid cracking and splitting. We call this “score and slip” – this means you scratch the two sections to be joined, then apply slip (made by combining your clay with water to make a very viscous goo that acts as glue). The little orange scoring tool on the left is made specifically for this purpose, but usually used for pottery. I only use it for attaching very small parts like eyelids or ears. For large sculpture, I like things that make big grooves that can hold more slip. My favorite is the fork, but a hair pick like the one it the center works for some hard to reach areas.
The pottery wire at the bottom right is used for cutting sections of clay – the wire moves through solid sections easily and effectively.
Pottery fettling knife or basic kitchen knife for cutting slabs to shape.
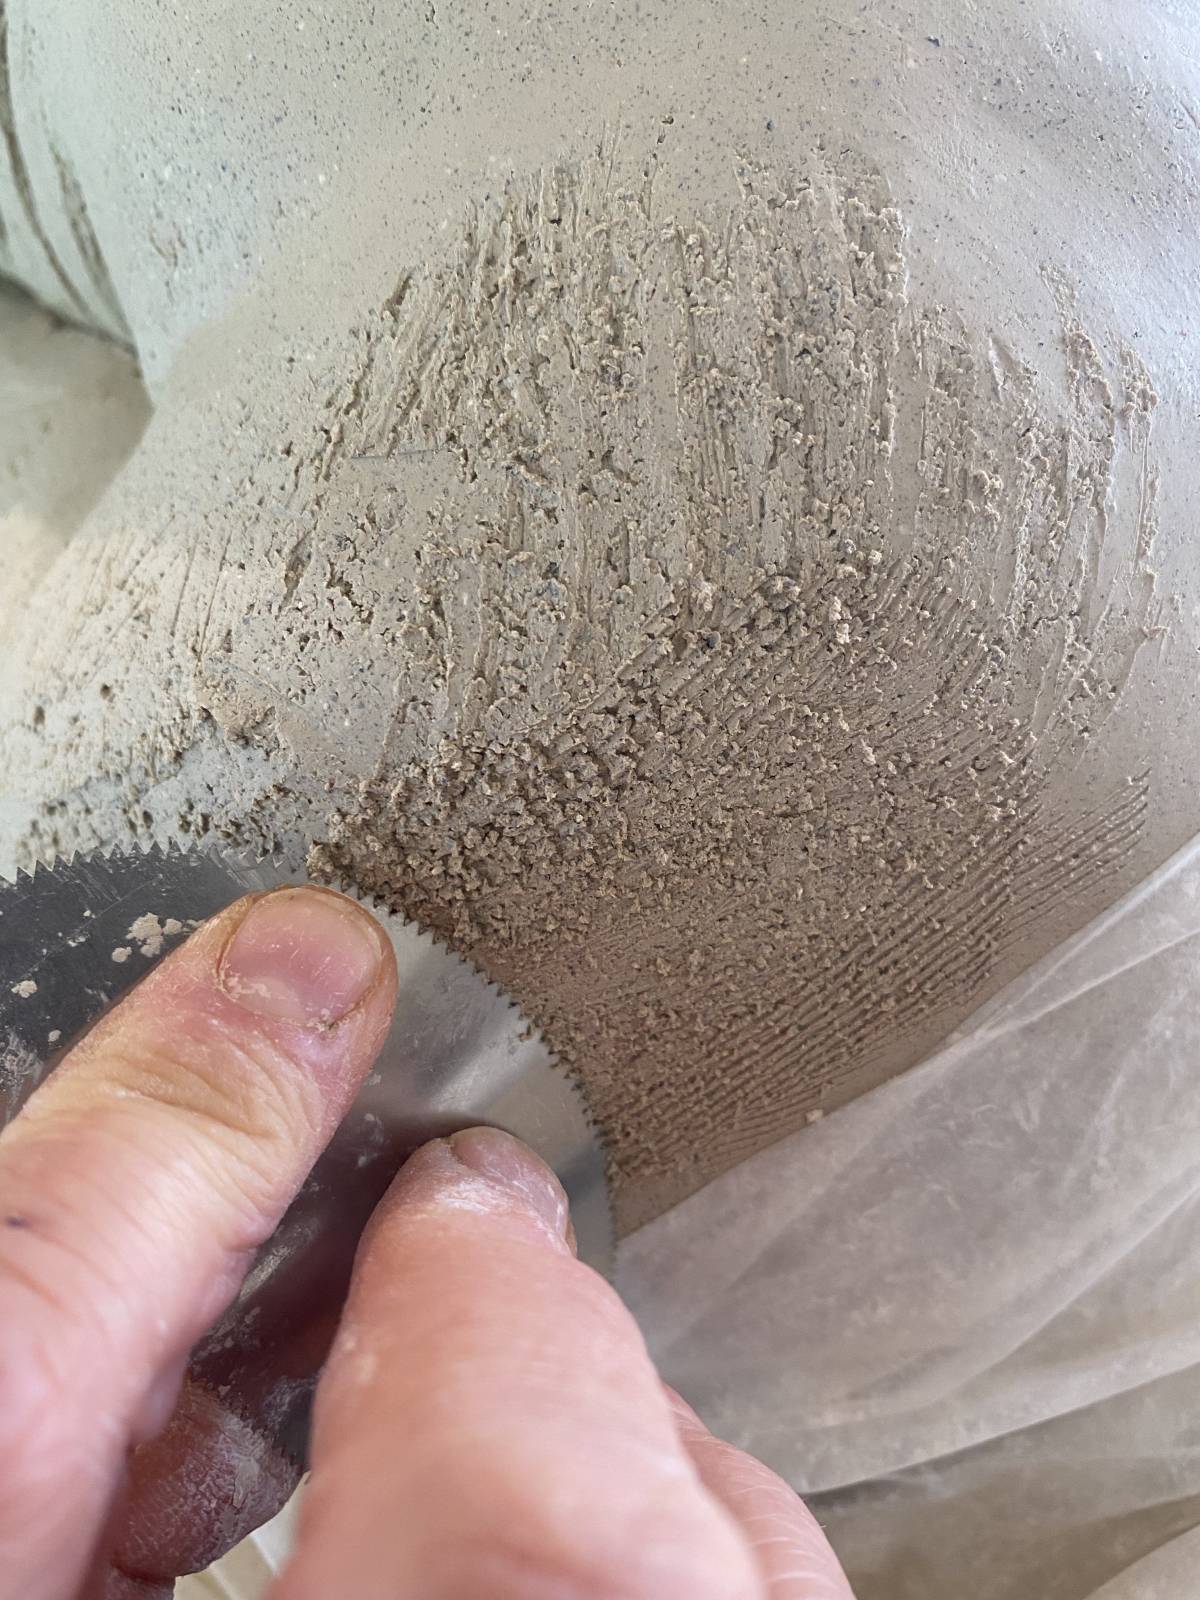
 This is a metal scraper rib which is useful for unifying surfaces, as we’ll see later. Many people were using this tool to “score” and we found that the grooves simply were not deep enough to keep the pieces joined with the stress of larger sculpture. For me, it’s a no go on using this one as a scoring tool – go for the fork.
Start Big
The initial phases of sculpting involve considerations of gesture, contour, line, proportion, shape, form and volumes. Notice that “detail” is nowhere to be found here. If the foundation shapes, volumes and forms are not correct, no amount of adding beautiful eyelashes is going to fix it down the road. This is the stage where we make big corrections and big changes assembling big parts. For this, we use big tools, working down to smaller and smaller tools as we move through the process.
Think of big tools as being an extension of your forearm. We usually grip them pretty aggressively with the whole palm, as you’d hold a baseball bat or a rolling pin – throwing a bit of controlled mayhem at your sculpture with movements of your shoulder and arm. Small tools might be thought of as an extension of your hand, held gently and controlled with movements of the wrist and forearm. Tiny tools are extensions of your fingers and controlled very delicately.
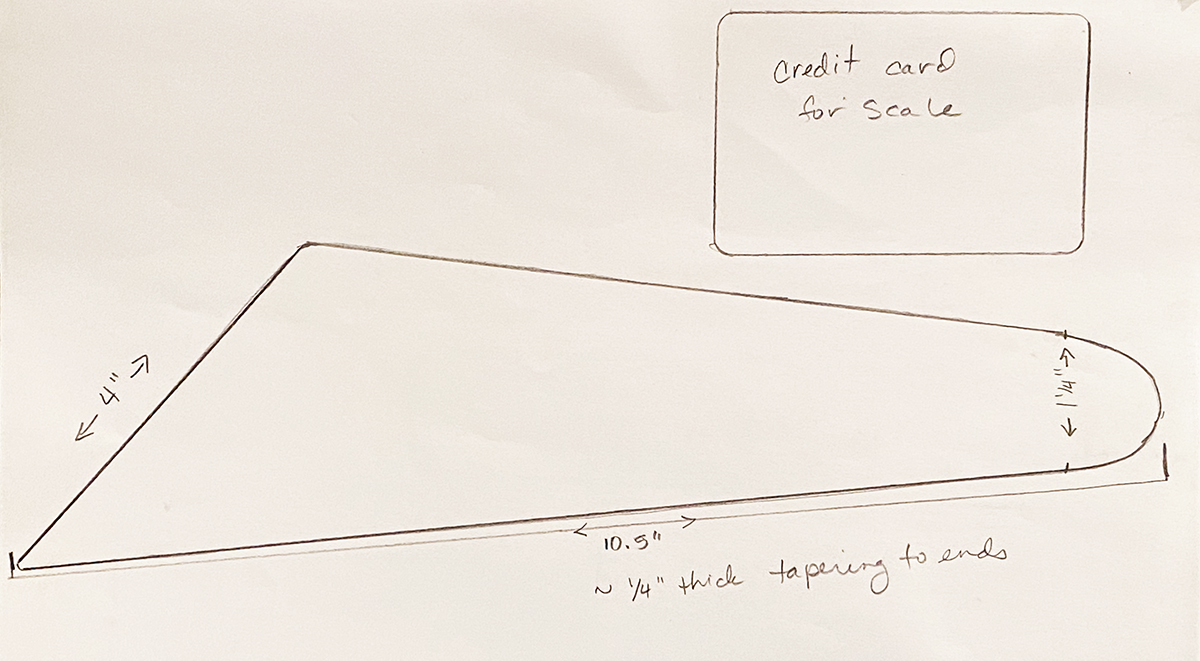
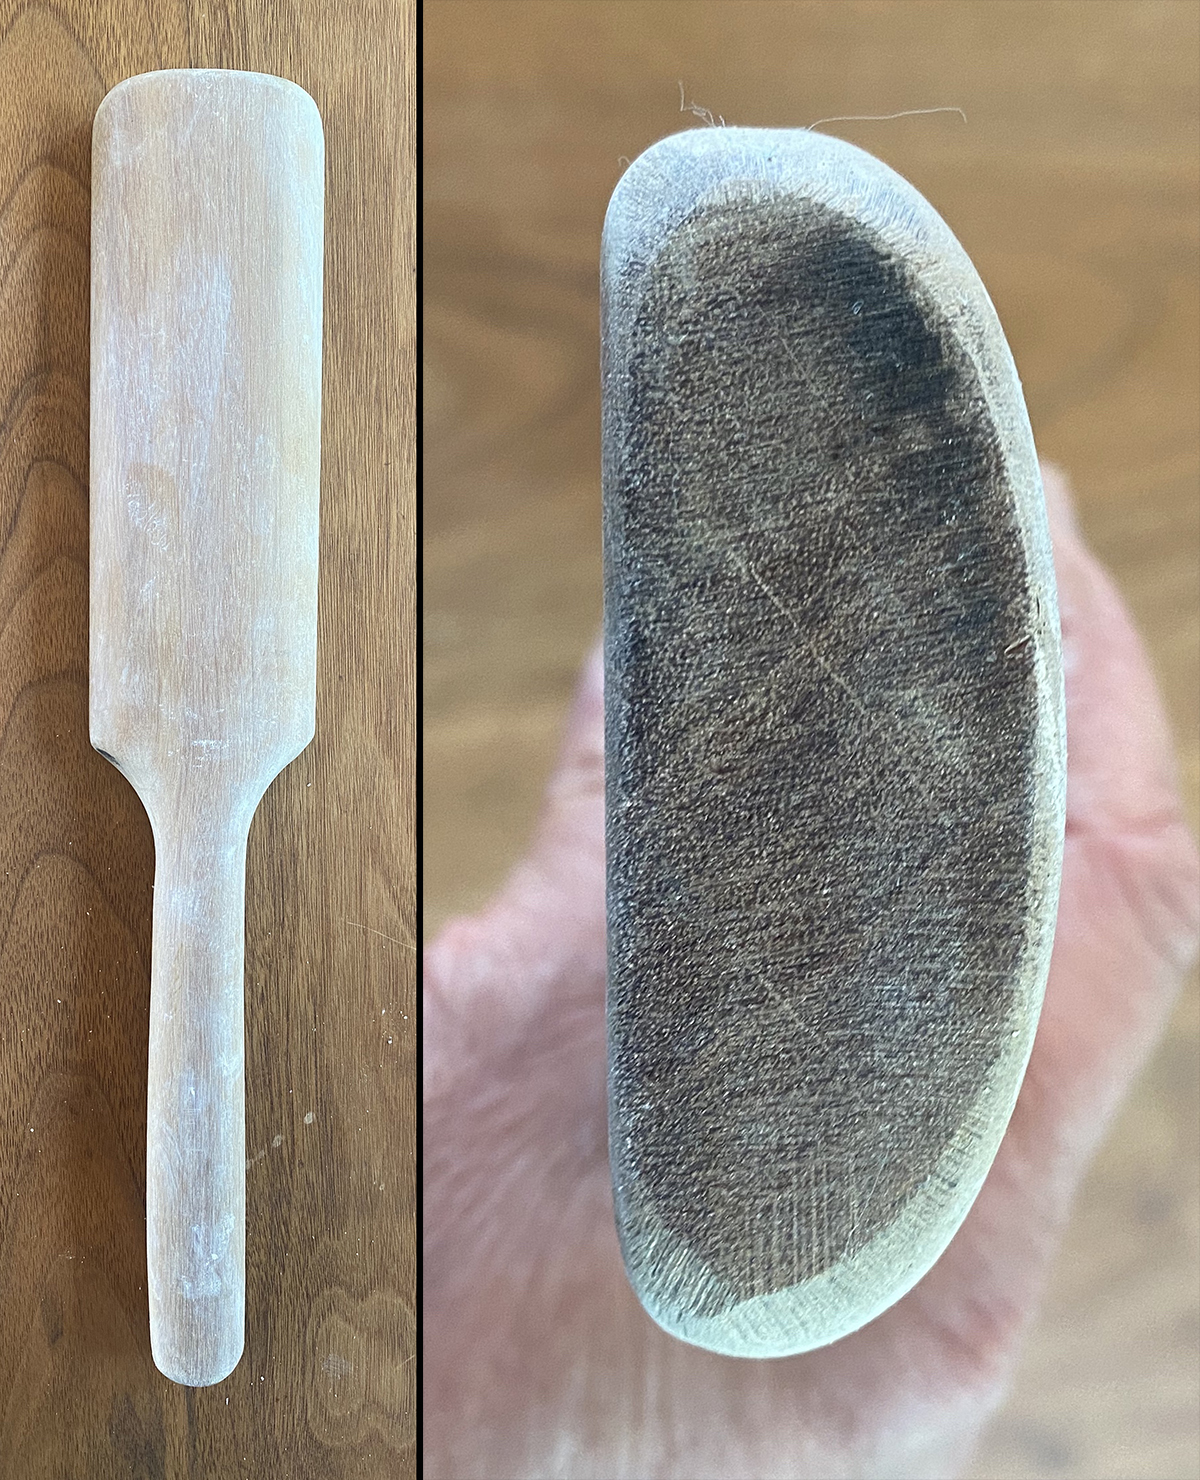 I have a wooden paddle Colin made for me out of a 2×4 (an outline map and measurements are provided at the end if you want to make one of your own). It is, of course, used to “paddle” the clay. This involves changing the forms – gradually moving the basic geometric cylinder into something that your eye will roughly accept as a thigh, for instance. I find this size, weight and shape effective for gently coaxing and “sculpting” the contours of sections of clay. I use the flat side for paddling convex curves and the curved side for paddling concave sections. If I use the flat side on a concavity, the edges leave a bunch of dents that I then have to fix, so having both options on one paddle is very beneficial.
It is best when paddling the outside of a clay wall to gently support the inside with your other hand so you don’t accidentally collapse the wall. This also helps to dampen the reverberations from your swatting and keeps them from radiating through the sculpture to areas you didn’t intend.
 In this method, in addition to paddling the geometric forms from the outside, I also push basic contours and volumes out from the inside. You can imagine pushing out areas on a basic cylinder that would represent the masses of the hamstrings on one side and the quadriceps on the other, with a rough form of adductors between, giving the general impression of “thigh,” and even right or left thigh. This method of moving the clay from inside and outside helps to keep the walls a similar thickness (if I only added clay from the outside like traditional sculpting, some walls would be 3/4” thick and some might be 2” thick – this is not ideal as it can cause the clay to crack or dry unevenly). My favorite tools for “sculpting from the inside” are the following:
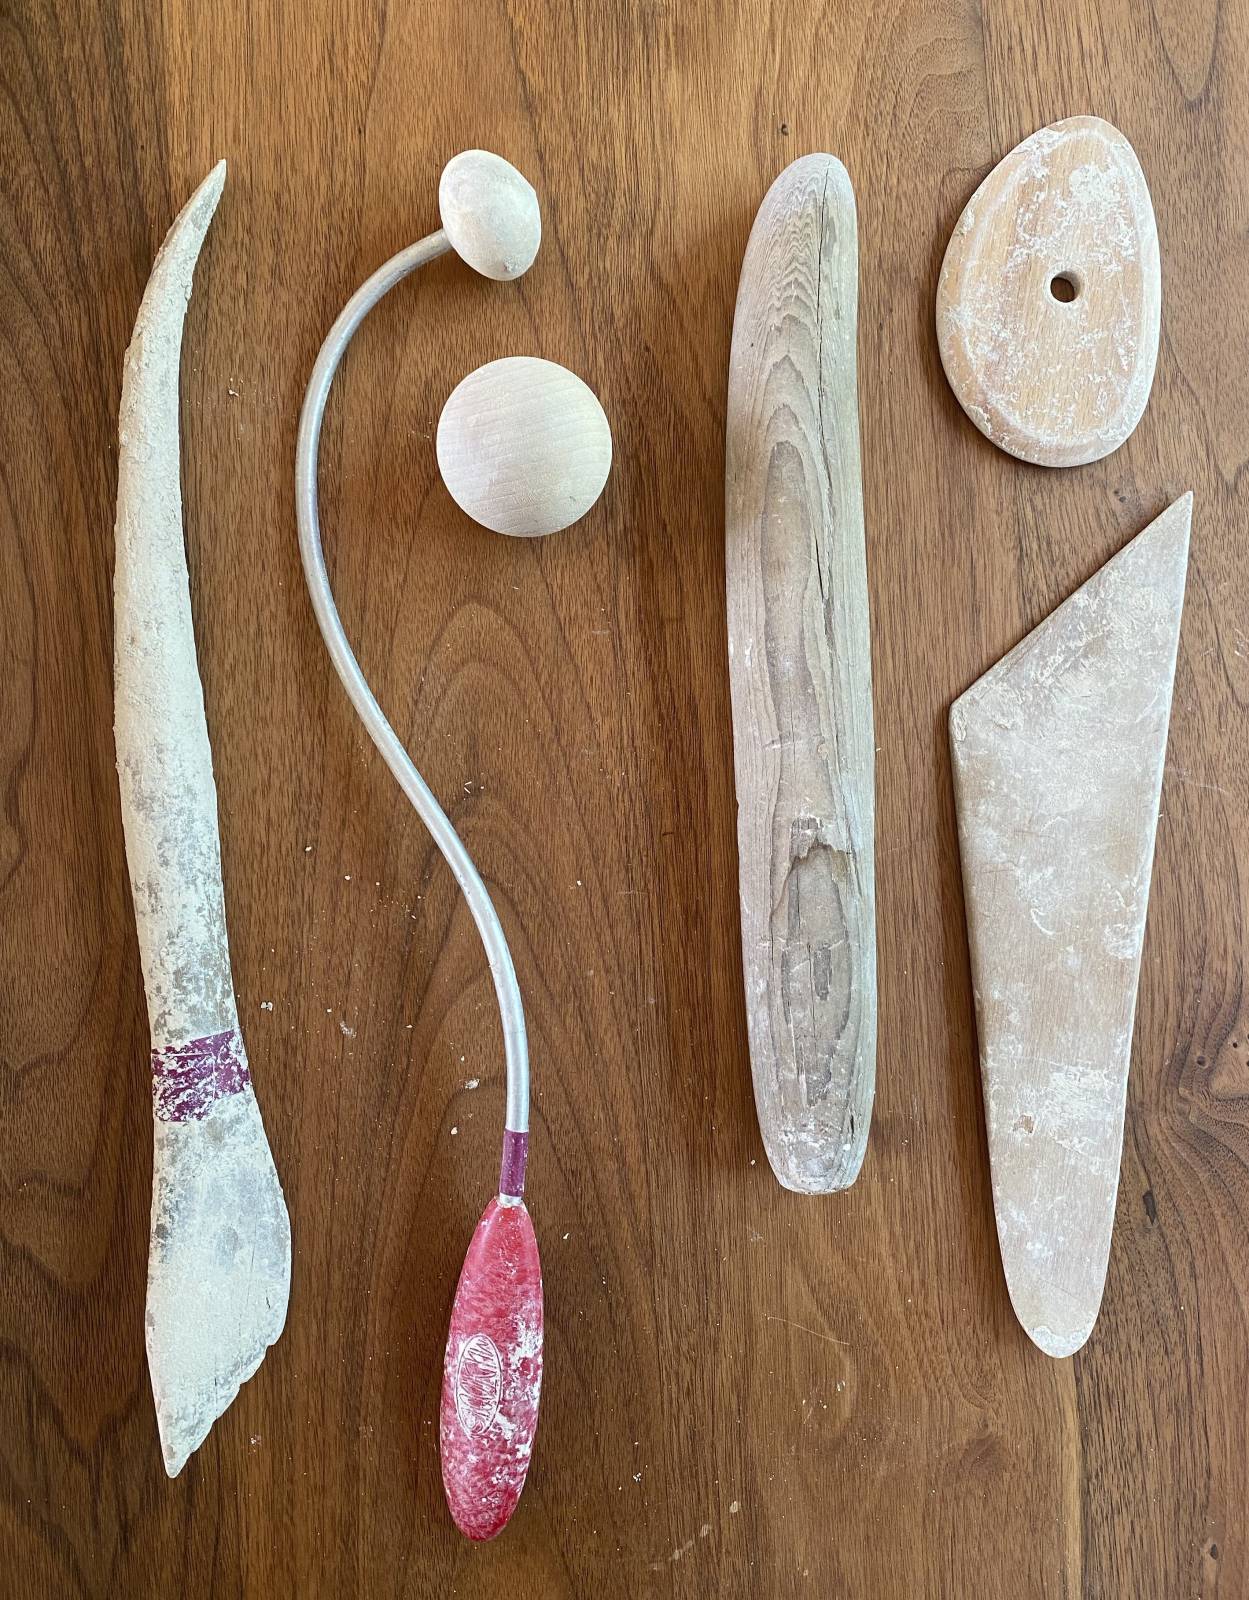
The first two tools – a wooden one (outline and measurements provided below) and the “pottery bump” (used for expanding the walls of pots outwards when working on a potter’s wheel and you can’t get your hand inside) have long, curved handles. The curve lets me work the inside of narrower forms that I can’t reach with my hands. The fourth tool is a simple, thick, curved wooden cylinder that I use for the same purpose, just within different contours. Again, when pushing from the inside, the other hand is supporting the outside wall.
In places where your hand will fit inside, a simple wooden craft ball (available on Amazon or at any craft store) can be used for the same purpose. The sculpting clay can be pretty firm and hard to move with just your fingers. Rolling the ball along the surface applies a focused force that will move the clay.
The tool on the top right is a wooden pottery rib, usually used for throwing pots on a potter’s wheel. Like the wooden ball, it can be used to push contours out where your hand can’t effectively apply enough force.
The final tool in this picture, on the bottom right, is a copy of one of Colin’s grandmother’s sculpting tools and I use it all the time. It is great for moving clay walls that are slumping. For example, if the figure is seated and the thigh cylinder is in a horizontal position, it often wants to slump into a pretty flat thigh. I wedge the flat side of the tool between the board and the cylinder and rock it up. It moves the entire cylinder back into its previously round form. In the same way, it also works well for creating a little shadow undercut in these areas that contact the “floor” where the clay tends to want to flatten out. (outline and measurements provided below)
Ribs
Again, these are tools created for pottery, but I wouldn’t be without them for sculpting. Returning to the metal scraper rib we mentioned earlier, here you can see that the teeth can be effective at unifying the surface. It works much like a sculpture loop tool, which we’ll discuss in the next section. The small teeth on the edges scrape any wash-boarded areas on the surface and make it easier to smooth using the yellow or red polymer ribs.
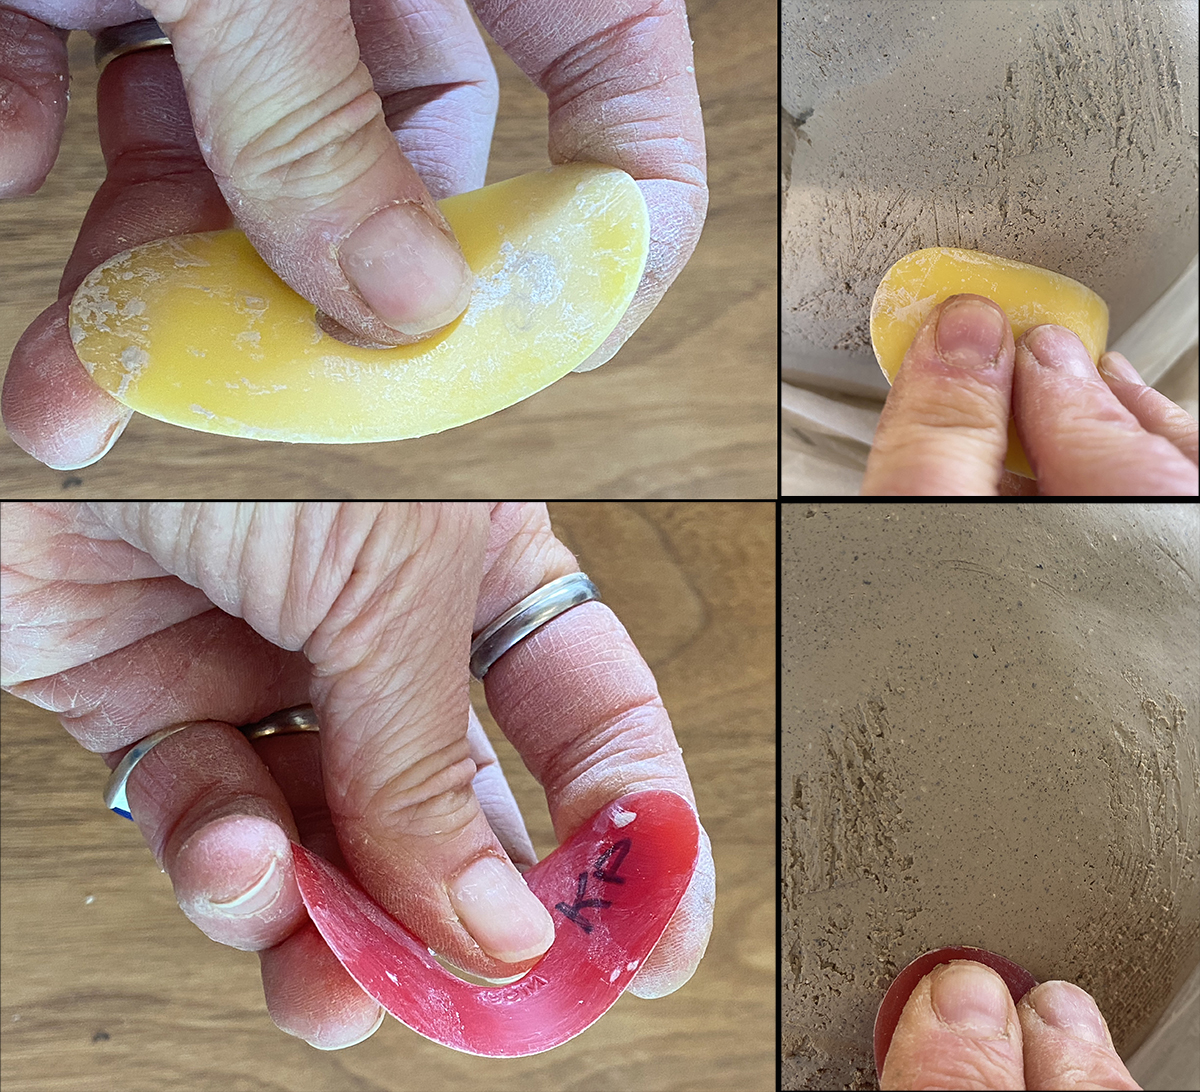
 The different colors of these polymer ribs are different hardnesses. I use only the yellow and red. Yellow is a bit stiffer and I use it for blending the seams where I’ve scored, slipped and joined parts. It is useful for sculpting contours, both inside and outside. With it, you can also create beautifully articulated skin folds and luscious fat pads by pressing the edge into the clay, then curving and shaping the form as you pull the rib away from the crease. Because the sculpture clays have a lot of particulates in them, these little “rocks” show up as bumps on the surface. The yellow ribs work well for compressing this bumpy surface early in the sculpting process.
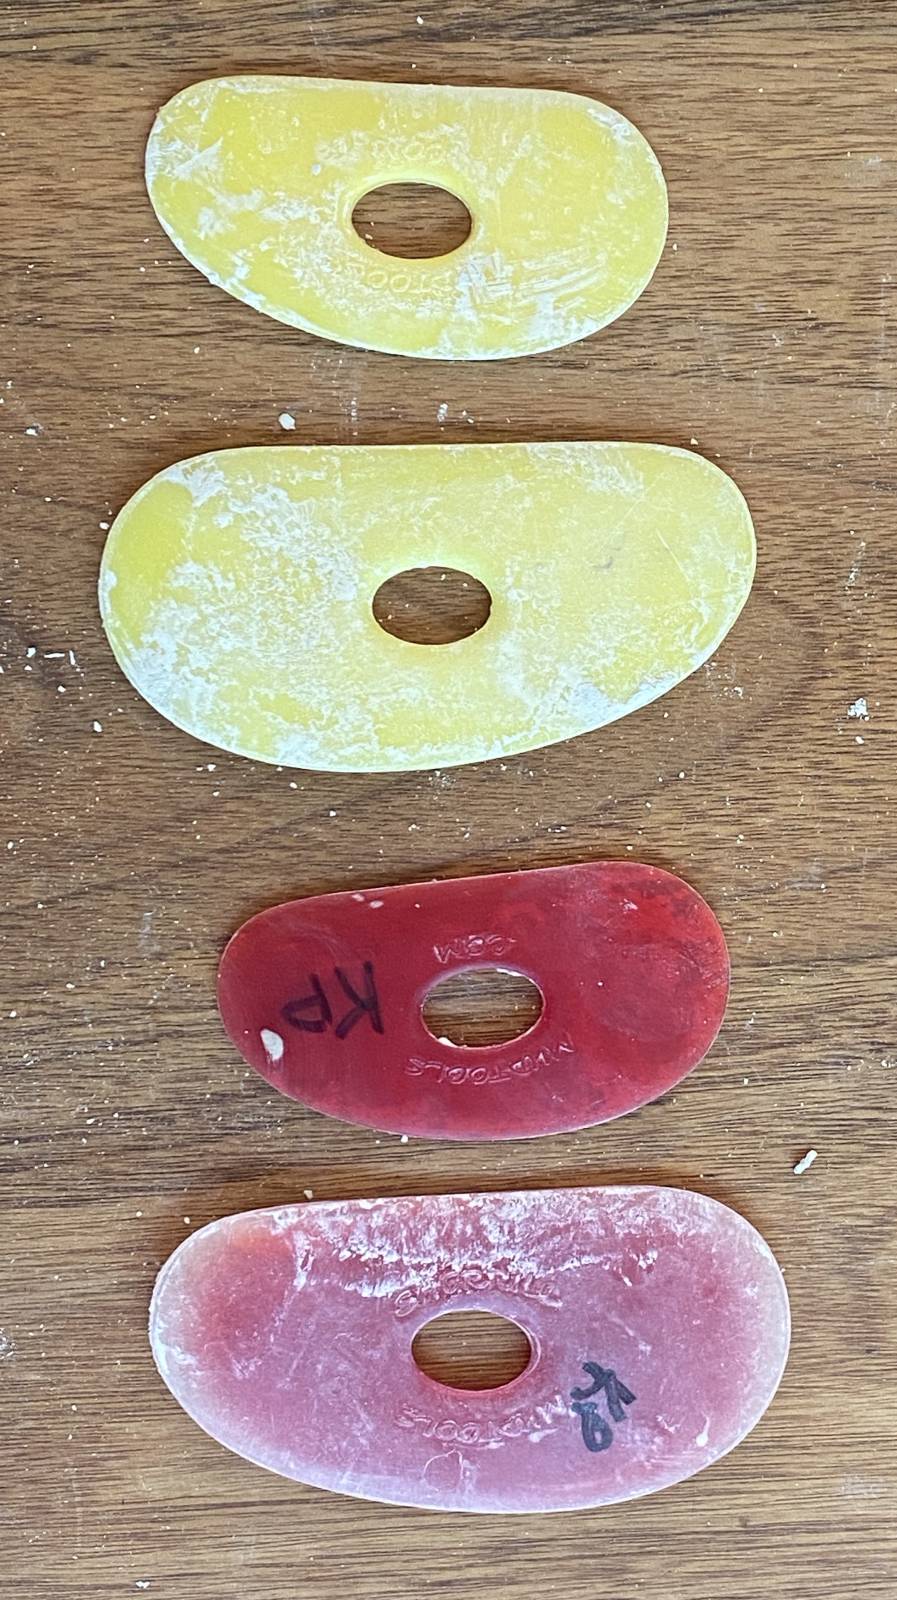 When I get to the refining stages, I use the softer red ribs to again compress but also smooth the surfaces. Here is where we want to steer clear of “petting” the clay. Avoid using the ribs in a choppy, cutting motion. You need to hold the rib with a curve in it, on an angle to the surface of the clay. You then press into the clay, following the contours and compressing the surface.
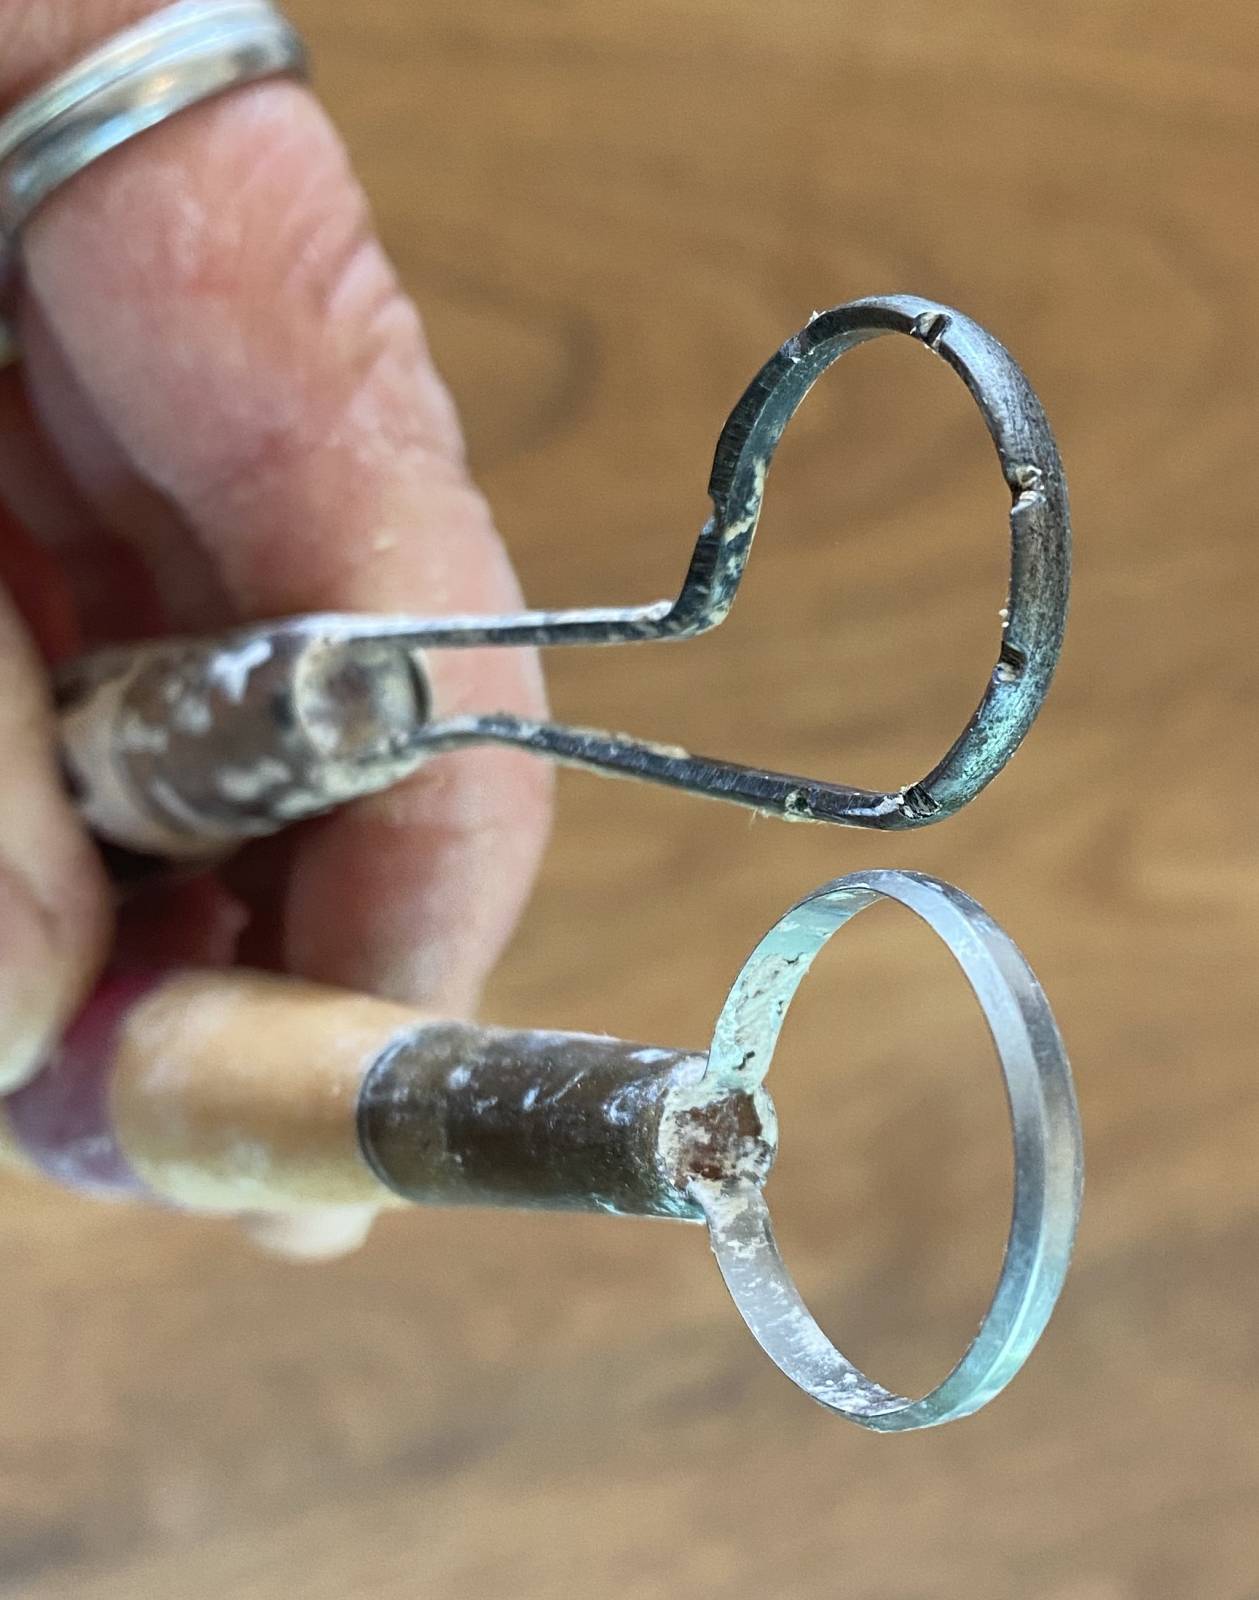
Sculpting Loop Tools
For me, these are a must. I have a selection in various shapes, sizes and patterns that I use throughout the sculpting process. My favorites have a round loop on one side and an angled straight edge on the other. I use them for unifying surfaces as discussed above with the metal scraper rib, adding texture, and sculpting contours. They work well for establishing smaller forms as you “break apart” and begin defining more specific shapes within the larger rough shapes we sculpted initially. I often use them in a sort of cross hatching pattern.
 Here you can see the difference between a sculpting loop tool and a pottery trimming tool (used to trim the excess clay off the bottom of pots). The loop tools have a pattern of “teeth” that help unify the surface rather than “chattering” over the surface of the clay. Think of it like a washboarded dirt road – the pottery tool will follow and magnify the bumps. The toothed loop tool will remove the high points and level the surface as you sculpt your contours.
 These are tiny loop tools, one with teeth and one without. The one with teeth is a new favorite of mine for all the reasons discussed above, but it works on small areas like facial details and ears. I’ve also used it for adding tiny hints of texture in hair. The plain wire loop can be found at any sculpture supply or Amazon, but the toothed version I have only come across through Ken’s Tools.
 Wooden Sculpting Tools

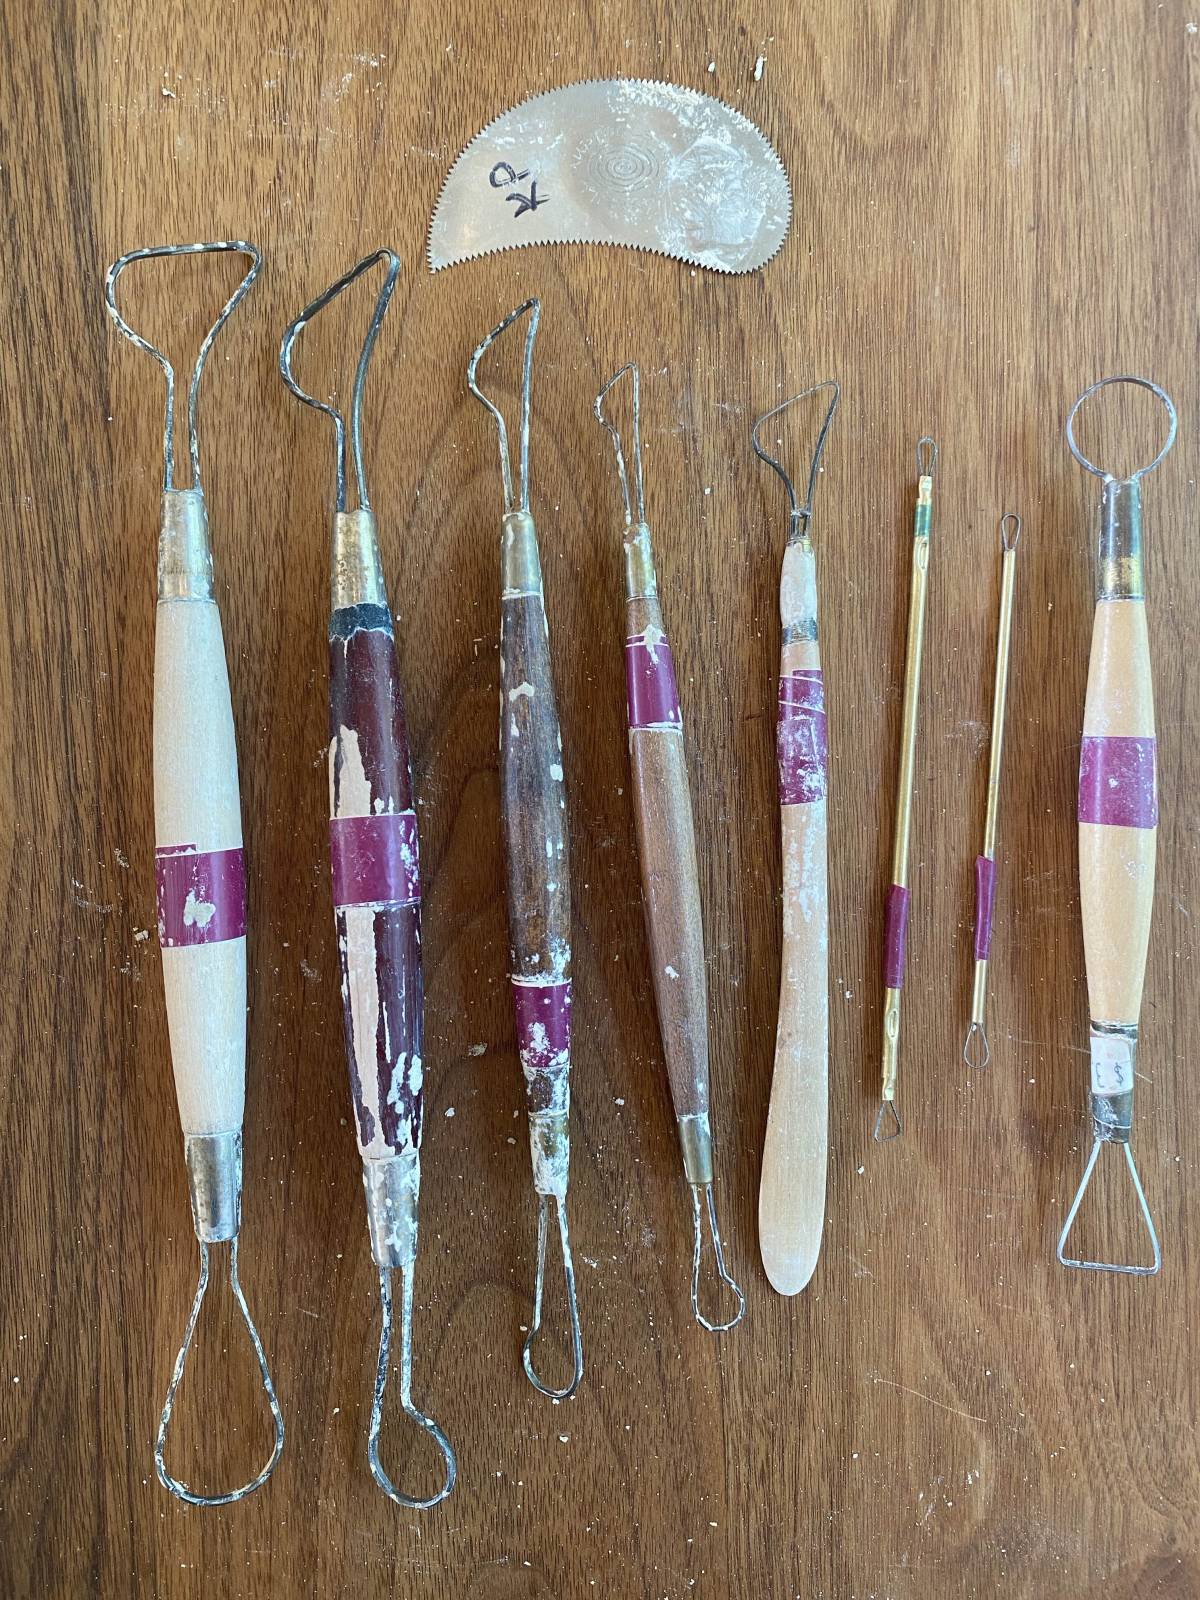
We have an embarassingly large collection of wooden sculpting tools we’ve collected over the years. The large tool on the left is used more in the preliminary stages of sculpting and the smaller ones in the detailing, refining and finishing stages.
 We certainly have our favorites that we use all the time, but every so often, we need something just a little bit different and we appreciate having a stockpile to reach into for those moments. Typically, as seen here, we like wooden tools that have a slightly pointed tear shape with a gentle curve on one end. We like when they taper to a very thin edge and often will sand down commercially made tools to make the end a bit more delicate. We hold these gently, often like a pencil between the first two fingers and use them for refining small shapes and forms like facial features, fingers, hair and details.
Specialty Tools
Here is a selection of special tools that I use frequently. The first four are a set of “fingernail tools” by Philippe Faraut. The different sizes are convenient for various size sculptures. I do indeed use them for sculpting fingernails, but they are also very effective for forming the curved volumes of fingers and toes.
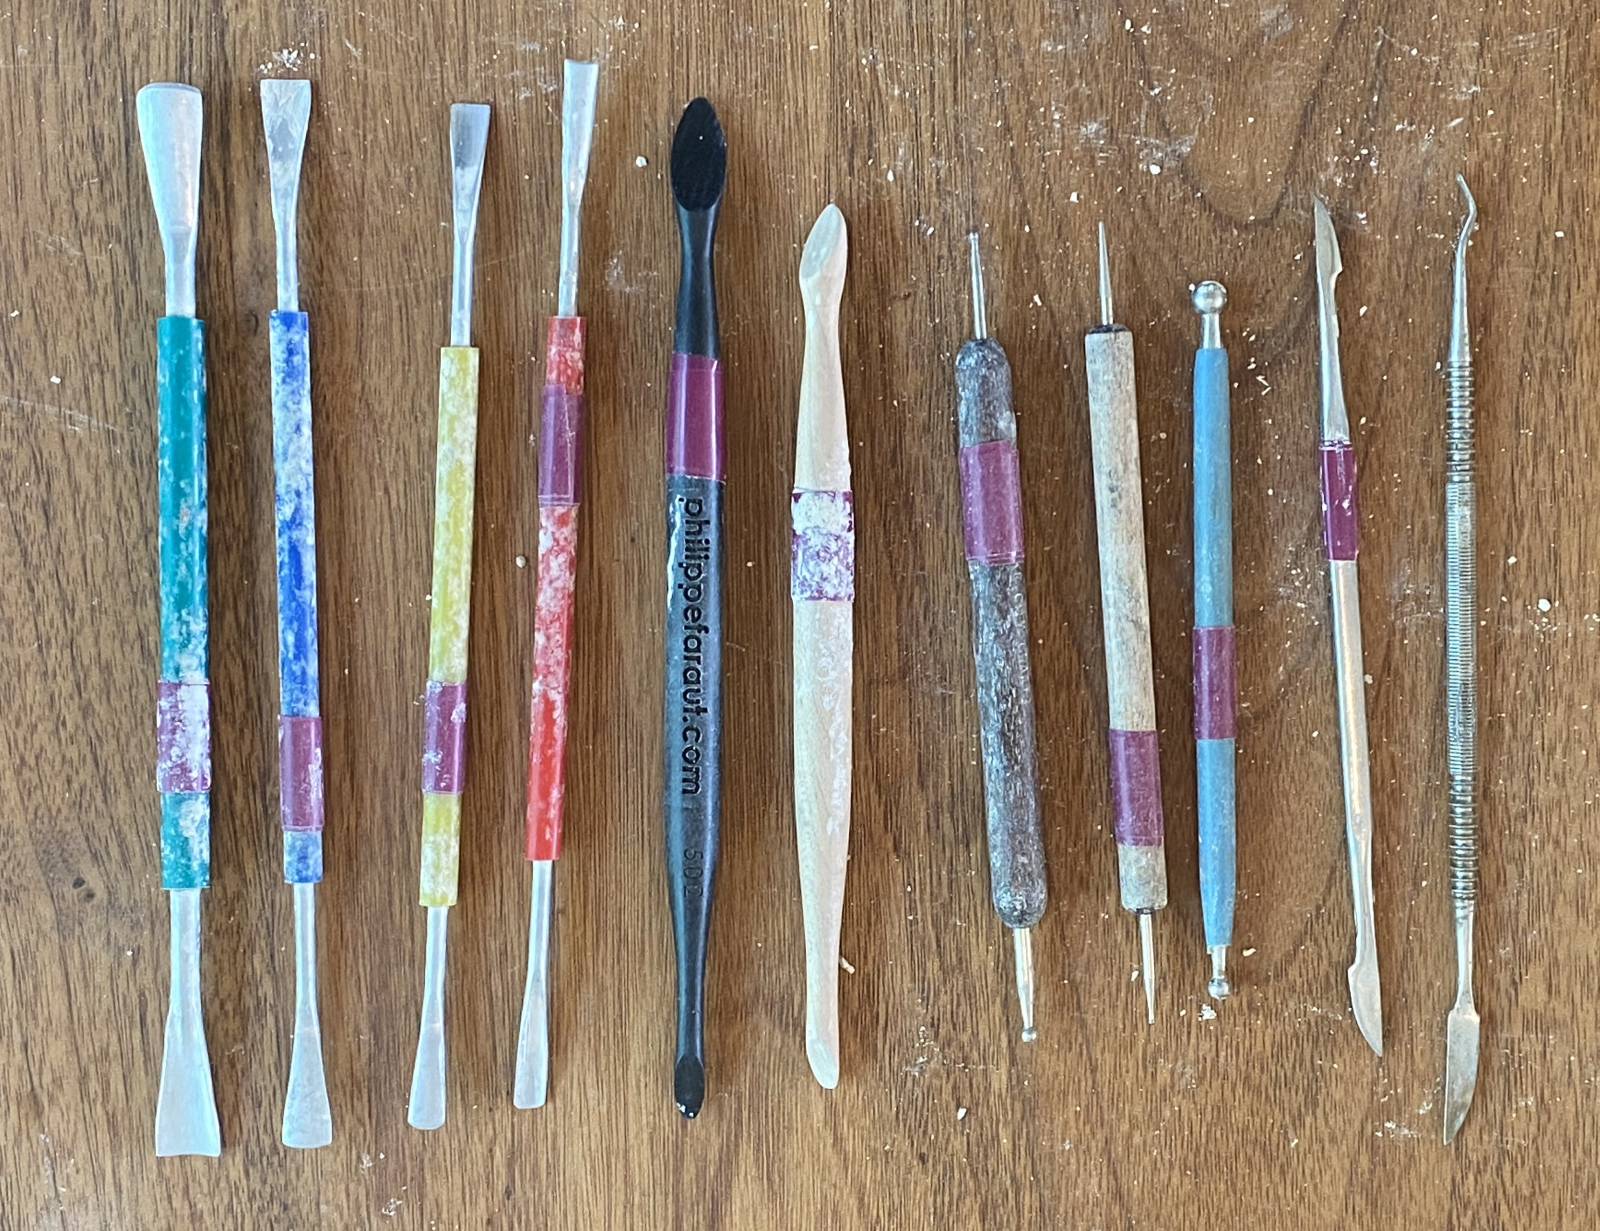
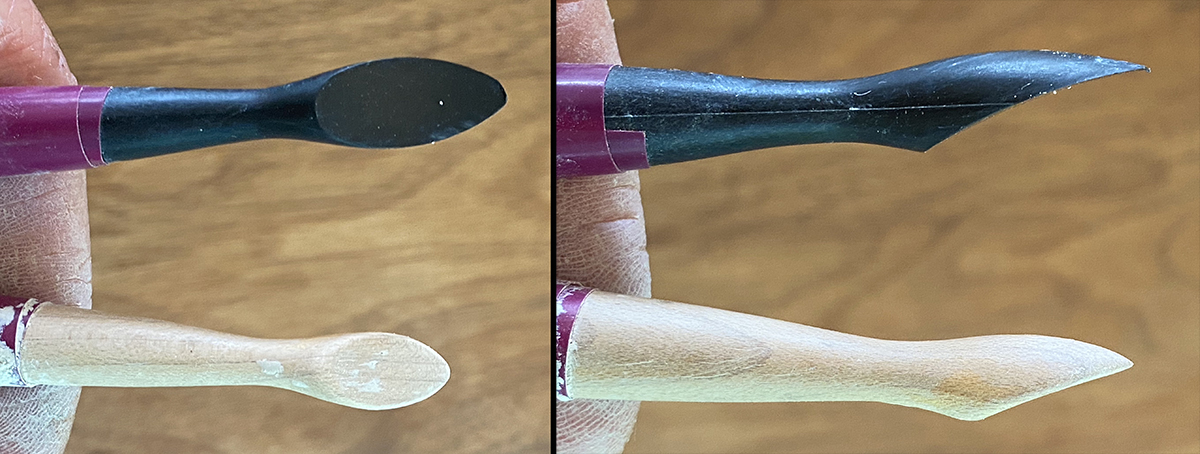 The next two are Philippe Faraut “eye tools” with a spoon shaped head similar to the favorite sculpting tools of many sculptors we know. I use the wooden version all the time, where Colin has no use for it whatsoever. I use it for sculpting eyes, but also for noses, lips, texturing hair, eyebrows and creating decorative details. The shape and softly sharpened edges work well for my sensibilities. Currently, you can only get the black plastic version which has a longer foot and sharper edges. I do use this one as well when I need a sharper line variation, but prefer the original wooden version for most purposes.
The next three are ball tools in varying sizes, often used for polymer clay sculpting. We use them for forming the iris and pupil of the eye, the inner contours of the ear, creating decorative details and for smoothing tiny interior spaces.
The last two are steel tools, usually used for wax working. I find the sharp edges perfect for trimming tiny slices off of contours that just need a slight adjustment and for creating highly defined folds in small areas, like eyelids or to deepen the shadow areas between lips. They are also effective for creating irregular (and thereby, believable) “clumps” when I’m sculpting eyelashes.
The top three tools shown below are created for painting, but work fabulously for smoothing small areas. As mentioned earlier, the polymer ribs work well for smoothing large planes. Your finger can work well for smaller contours, but for the tiniest spaces, these rubber tips create just the right firmness for smoothing and compressing, working remarkably similarly to a tiny finger.
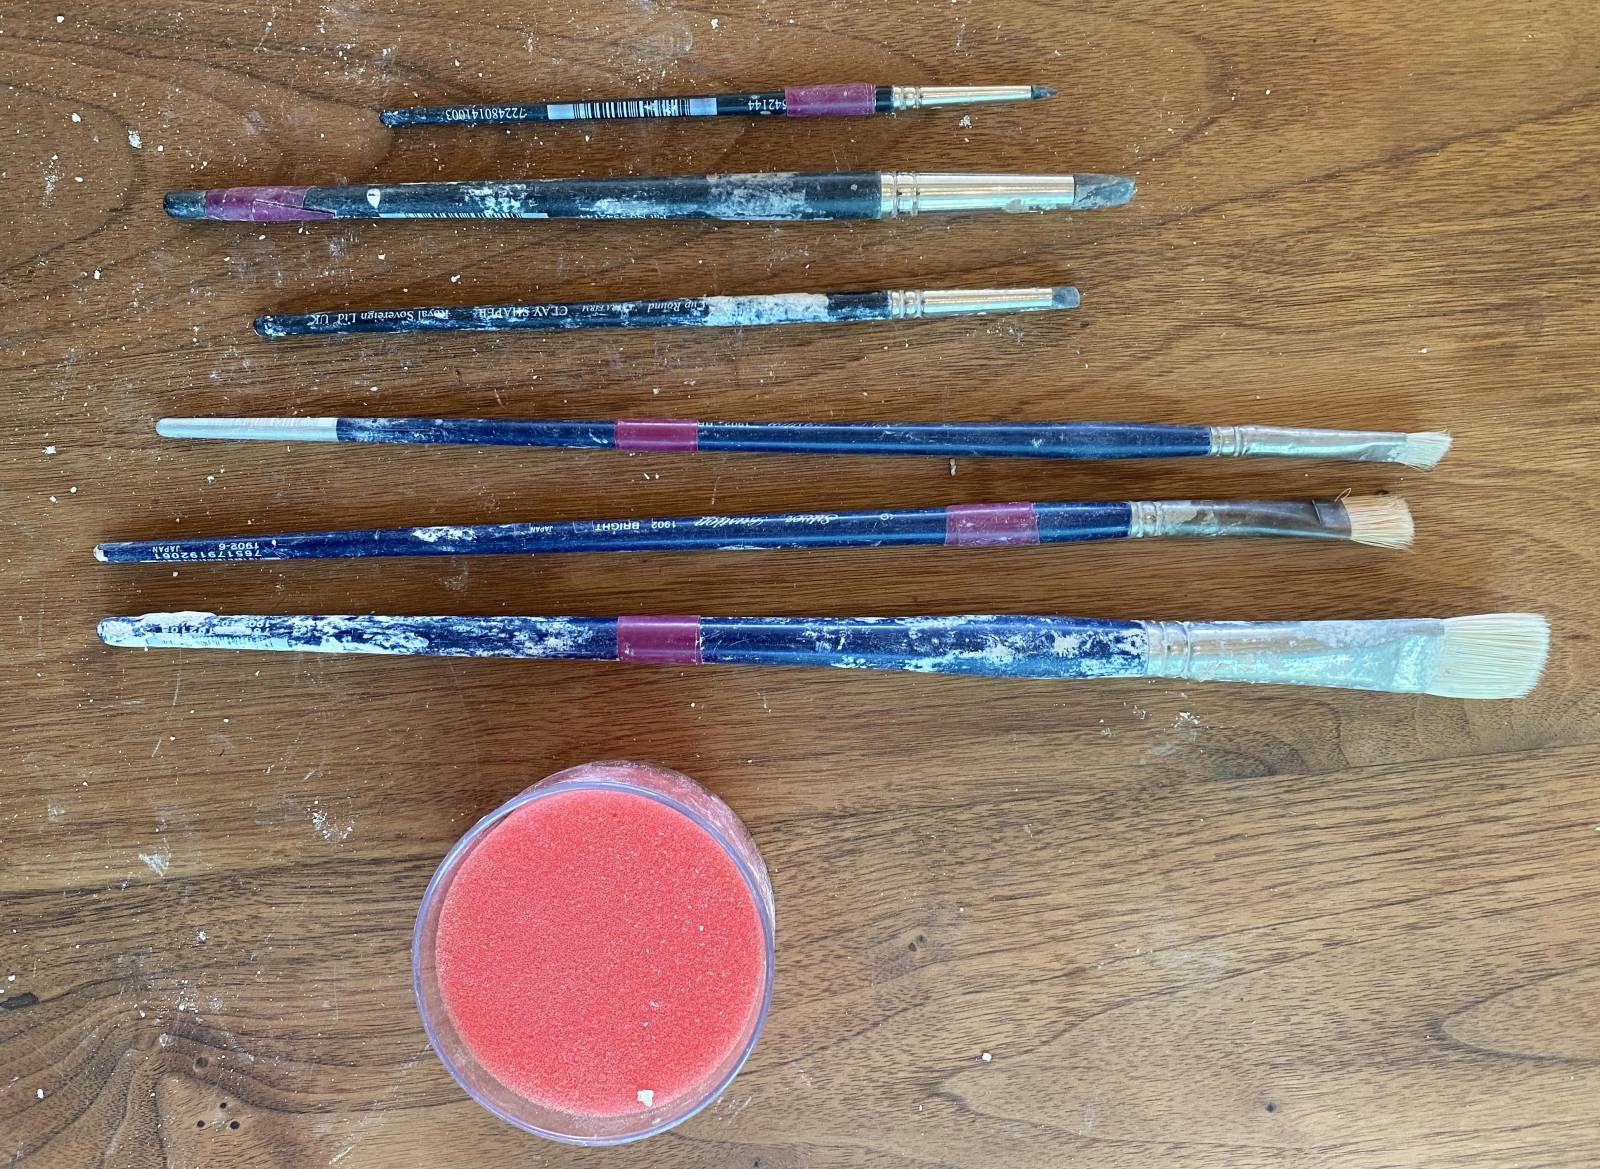 For a final refinement of the surface, with many clays I use Colin’s old painting brushes. I like these natural bristle, flat or bright brushes. They are firm enough that I can still shape the clay a tiny bit as I smooth the surface. I use the finger moistener to wet the brushes and also throughout the process to clean the tips of tools that have dried clay bits attached to them. These clay bits can leave grooves in the surface of the clay, so it is best to keep the working parts of your tools moderately tidy.
Tool Maps
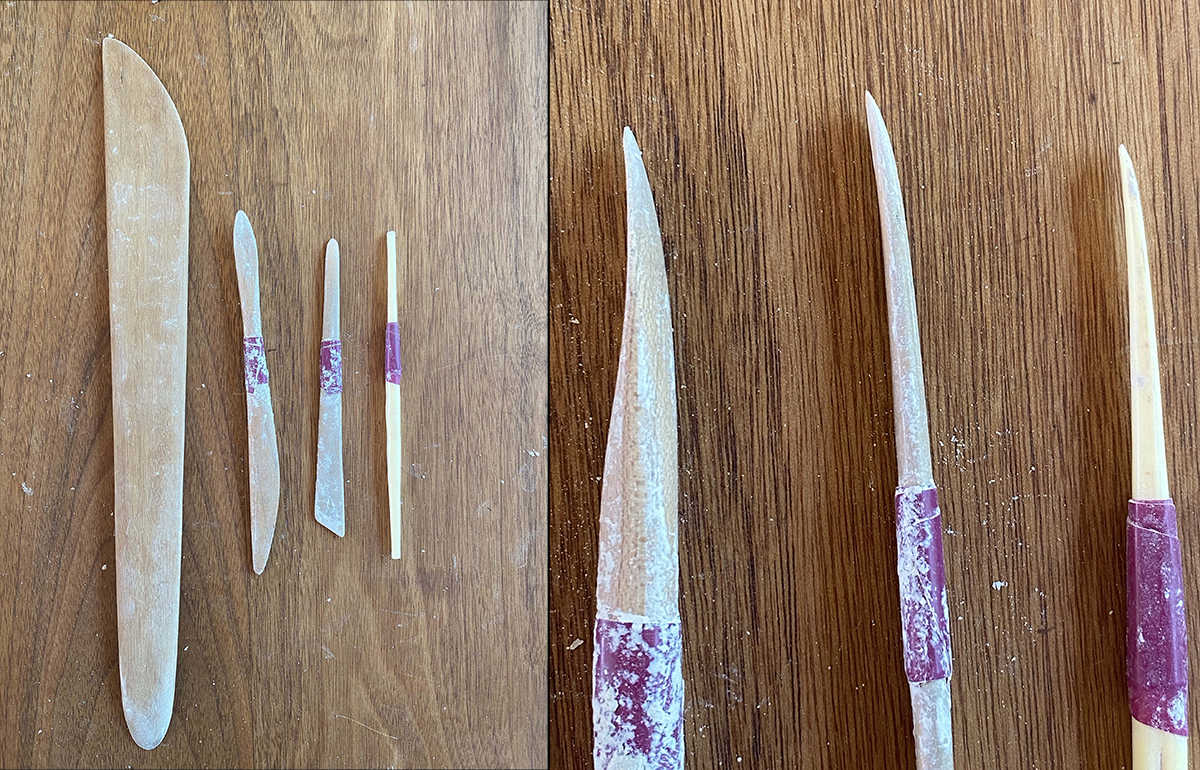
Here are outlines and measurements of some of my favorite tools for the roughing in portions of the large scale clay process. I haven’t found a supplier for any of them, so we make them ourselves, using a band saw for the rough cuts and a belt sander for the rough shaping. We then refine the forms with hand sanding and finish with Danish oil for years of wonderful working.


As you might guess from the fact that we still use many of Colin’s grandmother’s sculpting tools, a great tool continues to be great through time in yours as well as other artist’s hands. Those are the tools we always reach for and feel a bit like we’re missing part of our hand when we can’t find them. For that reason, I believe it is worth having a few very nice tools to work with for the sheer joyful experience of it. You pick it up and it just feels good – it feels right – it makes you want to create something with it. We establish a conversation and a history together, our favorite tools and us.
Where to Find Some of These Tools
Proportion Wheel: https://www.amazon.com/Westcott-Proportional-Measuring-Scale-PS-79/dp/B001E1TI1G/ref=sr_1_2?crid=3CTAPQ7TTIVW0&keywords=proportion+scale&qid=1659570725&sprefix=proportion+scal%2Caps%2C358&sr=8-2
Ribs (yellow and red kidney shape): Mudtools
https://mudtools.com/
Mudtools also has a selection of “Pottery bumps” (the curved tool I use to push sections out from the inside), wire cutting tools and metal scraper ribs
Sculpting tools (hardwood tools, loop tools, steel tools), armatures, oil based clays, sculpting stands: Many basic tools can be found on Amazon, for more specific tools, try Sculpture Depot
https://www.sculpturedepot.net/
Philippe Faraut (eye tools, fingernail tools, plaster casts, instructional books and dvds):
https://philippefaraut.com/pages/online-store
Ken’s Tools (tiny wire tool with teeth, selections of tools for texture and detail, aggressive loop tools): https://www.kenstools.com/
Water based clay:
Laguna Clay: https://www.lagunaclay.com/
Clay Planet: https://shop.clay-planet.com/
New Mexico Clay: https://nmclay.com/
Oil-based clay (modeling clay, plasticene, plastilena):
I recommend avoiding any clays with sulphur in them – despite their lovely working qualities, they often do not play well with contemporary mold-making materials and put off some pretty toxic fumes. Colin uses Chavant’s “Le Beau Touche” in hard
Chavant: https://chavant.com/


Excellent read. Really insightfull article for me, as I am just starting to get into sculpting. Thanks!
So happy to hear you enjoyed it – we love experimenting with new tools, but always have our old standby favs too. Hope you have a wonderful adventure in clay! K
I will learn to be a great painter… I really love painting.
Nice and detailed article discussion, I really like it.