I’ve been asked this question a lot here on Muddy Colors, and I guess it’s about time I finally got around to it.
One of the reasons it’s taken me so long to do a post about photographing my work, is because photographing a piece is the very last phase of a commission. Which means when I do it, I’m usually strung out, on my 40th hour of being awake, trying my hardest to make a deadline, and just don’t have the time (or stamina) to snap pictures of my setup. Which is shame, because it is arguable the most important part of a commission.
Getting a good photograph of your work is absolutely essential to the reproduction process, and deserves just as much consideration as any phase of an illustration assignment. After all, it doesn’t matter how beautiful the original art is, the Art Director is not going to be impressed if the cover it was commissioned for looks bad.
It is important to know, different types of reproduction are better suited to different types of paintings. I work in oils, on a smooth untextured surface, with a decent amount of transparent layers. The process I am going to explain is what works for MY WORK. You may find alternative methods work better for you. The key is to experiment.
So let’s get to it!
Why photograph a painting myself?
Typically, it is the Publisher’s responsibility to scan a piece of original art. So why do even have to bother doing it ourselves? Well, for a few reasons…
Firstly, I find my work reproduces a LOT better when I photograph and color-balance the image myself. Different artists use different mediums, and no one means of reproduction are great for all of them. A studio photographer will default to what method works best for the majority, which means you are not always getting the best results possible.
Secondly, it’s more convenient for my Publisher, who would otherwise have to send the art out to be scanned and lose at least a day in the process. Sometimes a day is really important when you’re working against a deadline. Even if I hand deliver an original, I still bring a scan of the image as a courtesy.
Lastly, cost. Sending a painting to get scanned professionally will cost upwards of $100. If you are doing this a few times a month, that will add up quickly. That money can be better invested in nice photo equipment.
For particularly large, or particularly important pieces, I will sometimes go to a professional photographer to get my work scanned. But 9 times out of 10, I just do it myself.
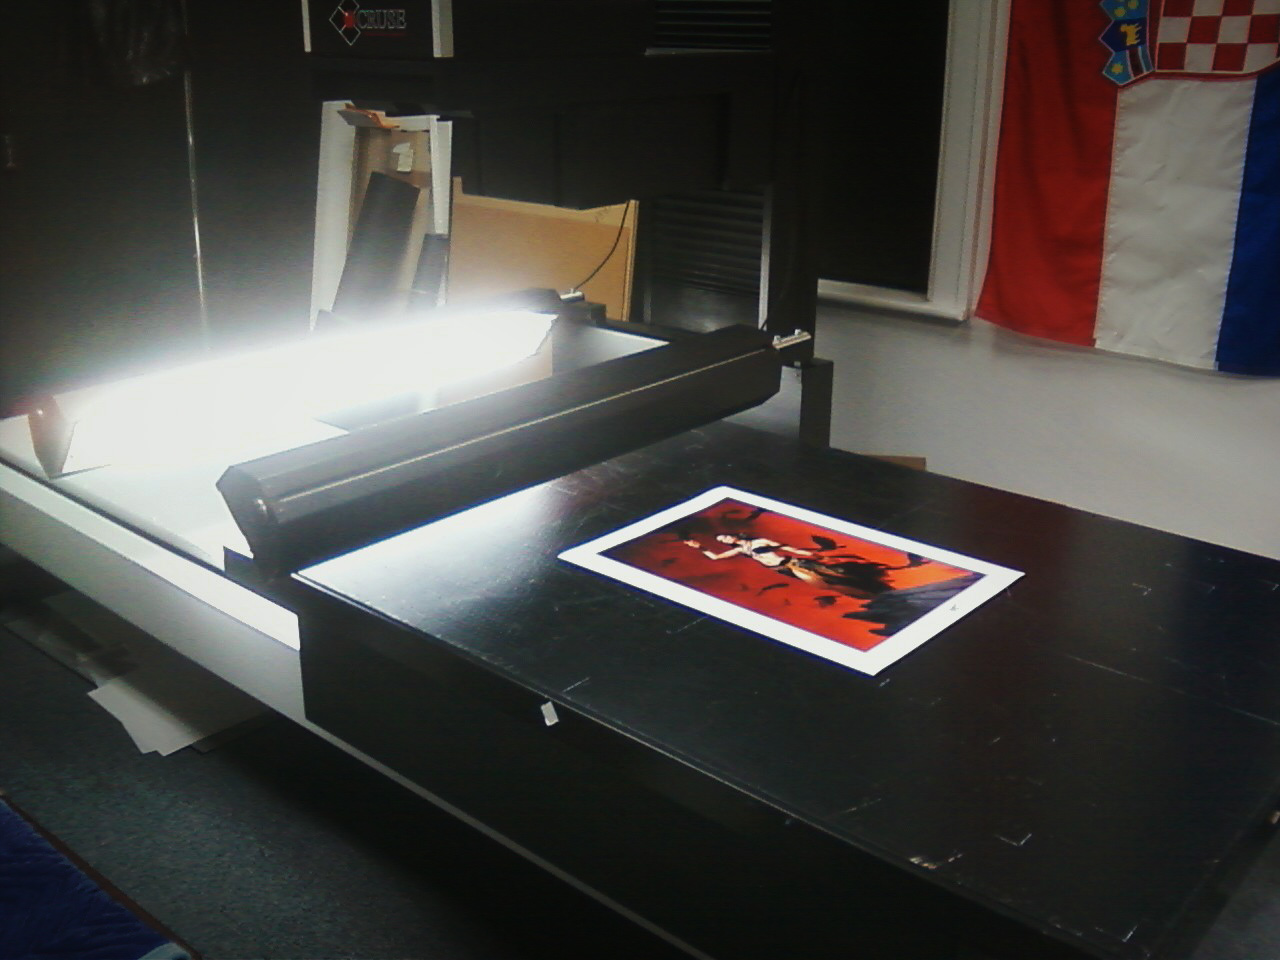 |
| I often visit a local professional who has a 12 foot bed scanner. |
Should I use a Camera or Scanner?
Personally, I choose to photograph my work instead of scanning it. This is for two reasons:
1. Scanners tend to be quite small, and I don’t want to stitch together 20 scans to get a single image.
2. The light a scanner uses is really harsh, and tends to overpower the appearance of subtle glazes.
For me, I find a camera better captures the way a human eye perceives the original art, particularly if you work with multiple layers of glazes. It seems to better retain the sense of luminosity and transparency.
Of course, this will vary depending on what type of surface you work on, what mediums you use, etc. For instance, if you work on paper in a medium with a matte finish like gouache or watercolor, you will likely have better results with a scanner.
Should I shoot inside or outside?
I always shoot indoors. On a cloudy day, you can get a decent shot outdoors, but it will never compare to the consistency of a controlled studio environment.
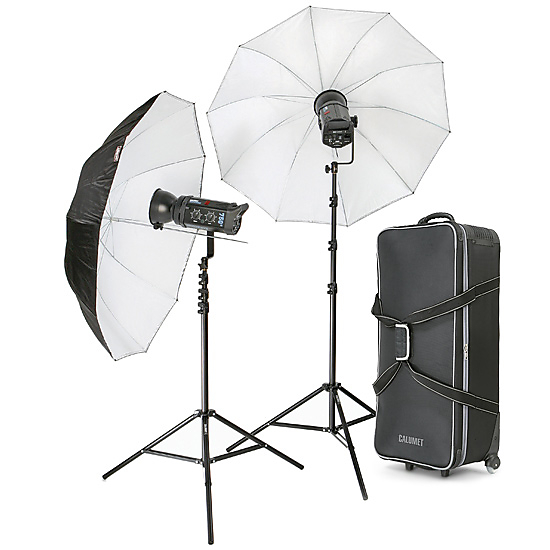
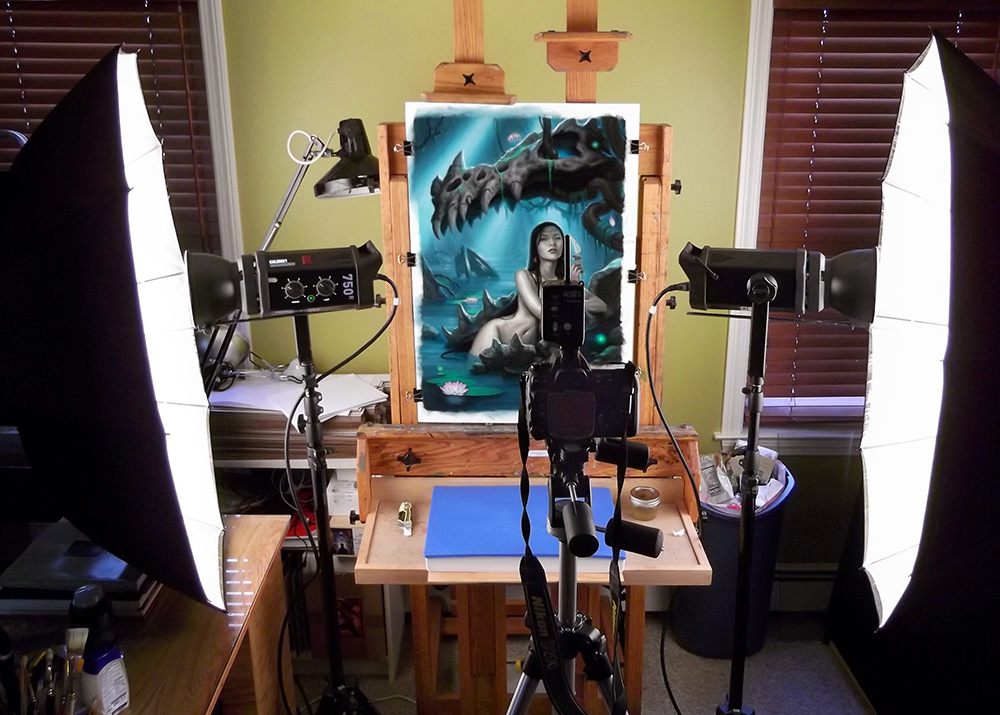
I use the same lights to photograph my paintings, that I use to photograph my models. It is a monolight kit, consisting of 2 x 750 watt/second strobes (1500 total), complete with umbrellas and stands. I use the exact kit found HERE. A set up like this costs about $1000.
If you are looking for something less expensive, I recommend a ‘continuous light’ kit. For the first 10 years of my career, I used this kit HERE. A set up like this will cost about $350
The advantage of the strobes is a much brighter and much whiter light. Having a lot of light is important if you want a lot of detail, and the whiter light makes color balancing your image a lot easier. The strobes also have an adjustable intensity, which the continuous light do not. Lastly, strobes do not put out as much heat as the continuous lights. Continuous lights are commonly referred to as ‘hot lights’, and for a very good reason. It may not seem like a big deal, but trust me, after 40 minutes under a 650 watt bulb, your model WILL be sweating.
So what if you can’t afford either set-up?
You can achieve similar, albeit diminished, results with common lighting tools found at a WalMart or Home Depot.
I would recommend:
4 x clamp lights, like THESE
4 x 120W compact fluorescent bulbs, in the 5000K range, like THESE
2 large sheets of white foam core.
Total cost: $50
If you do not have umbrellas, you can use a white piece of foam core. Just angle it appropriately so that the light bounces back at the painting the same way the umbrella would. You can even score and bend the foam core to create more a concave shape.
Once you have the necessary lights, the next step is positioning.
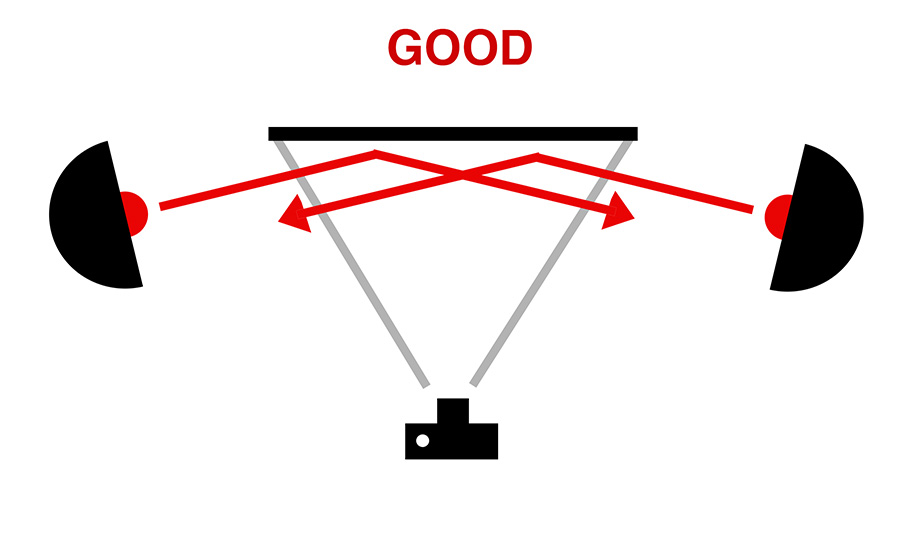
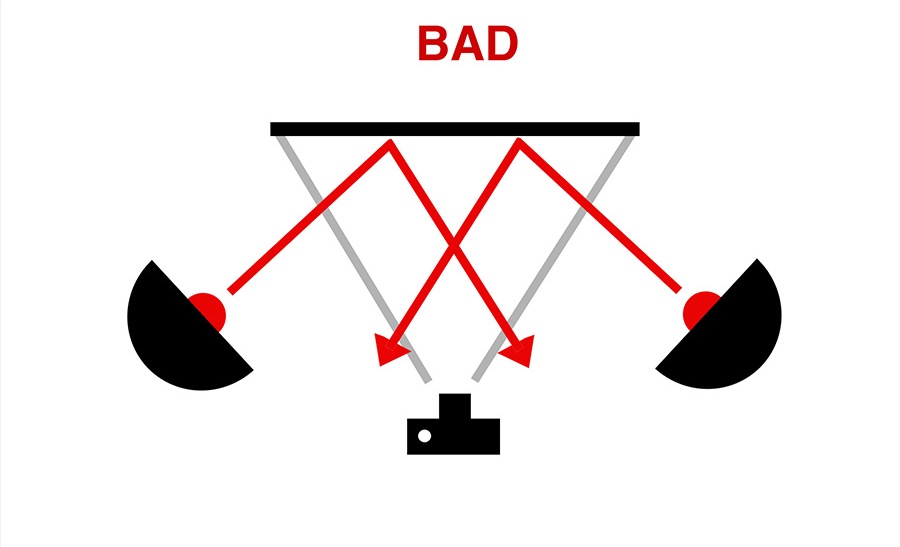
I photograph my paintings upright, at a 90º angle. To either side of my painting, is one of my strobes. I aim the strobes AWAY from the painting, and let the umbrellas bounce the light BACK toward the painting at roughly a 160º angle. This is called a ‘raking’ light.
This angle is extremely important! If you place your lights in such a manner that the light strikes the painting at an acute angle (less than 90º), the light will bounce off the painting, and back into the camera lens… causing glare. Glare, is quite literally a reflection of the light source on your painting’s surface. The more acute this angle is, the worse the glare will be. An on camera flash would result in the absolute worst glare possible, since it is striking the surface at an angle of 0º degrees.
Once the lights are in position, I set up my camera and tripod. Now cameras and lenses are a great big bag of worms that I am not going to open here. We could talk about that for days! Suffice it to say, the better camera you have, and the better lens you have, the better your image is going to be.
I will say this though…
Lenses:
I shoot with a 50mm prime lens. A prime lens is one that does not zoom in or out. Instead, you have to move the camera forwards and backwards. That is annoying for reference shoots, but the advantage of a prime lens is that the image is crisper, and has much less distortion around the edges. A prime lens is not necessary (I only got mine a year ago), but it is a big help. If you do get a lot of lens distortion with your camera, there are several features in Photoshop that can help correct that.
Aperture:
File Format:
Always shoot in RAW format if possible. Check your camera’s settings, and try to find the highest quality/compression possible. Many high end cameras offer a RAW format option. RAW format does very little compressing, and allows you to alter your exposure/color settings after you shoot the image.
ISO:
Always shoot at the lowest ISO possible (Sometimes called ASA). I typically shoot at 100 ISO. If you go above 400, you are likely going to get a lot of noise in the dark areas. It’s better to have a really slow shutter speed than to try to bump up the ISO.
White Balance:
White balance is imperative! Look at your lightbulbs, and find out the exact color rating. The closer to 5000K (or above), the better. Anything less than 3000K, and your image is going to be too yellow. Yes, your camera will correct for it, but in doing so will lose the difference between subtle whites and yellows. Once you know the temperature rating of your bulbs, set your camera to that exact white balance. On my camera, I can set it in 100K increments. Your camera may only have ‘custom’ option. In this case, you will need to photograph a ‘grey card‘, in order to accurately calibrate your camera.
Tripods:
Do not attempt to hand hold a camera when reproducing your work. Even the subtlest of vibrations will ruin the detail. In fact, not only do I use a sturdy tripod, but I usually set my camera on a delayed timer, because the simple action of even pressing the shutter button by hand is often enough to shake the camera. Like wise, if your camera lens has a Vibration Reduction feature, turn it off. If there is no vibration, that feature actually does more bad than good.
OK!
So we’ve got our lights set up with no glare…
Have our lenses zoomed into their sweet spots…
Set our ISO to 100…
Adjusted our White Balance…
And leveled our tripods to ensure they are perfectly straight with our painting…
We are ready to shoot!!!
Now my camera is by no means ‘top of line’. I shoot with a slightly outdated, 10 megapixel, Nikon D200. The image this gives me isn’t huge, but it is certainly large enough for a 6×9 inch book cover at 300 dpi. However, I’m worried about more than just the book cover.
What if my client wants to zoom in on the painting, and use just a detail of a the face?
What if I want to make a poster of the painting?
What if I finally do a book of my art?
I am going to need a MUCH larger image for any of these purposes.
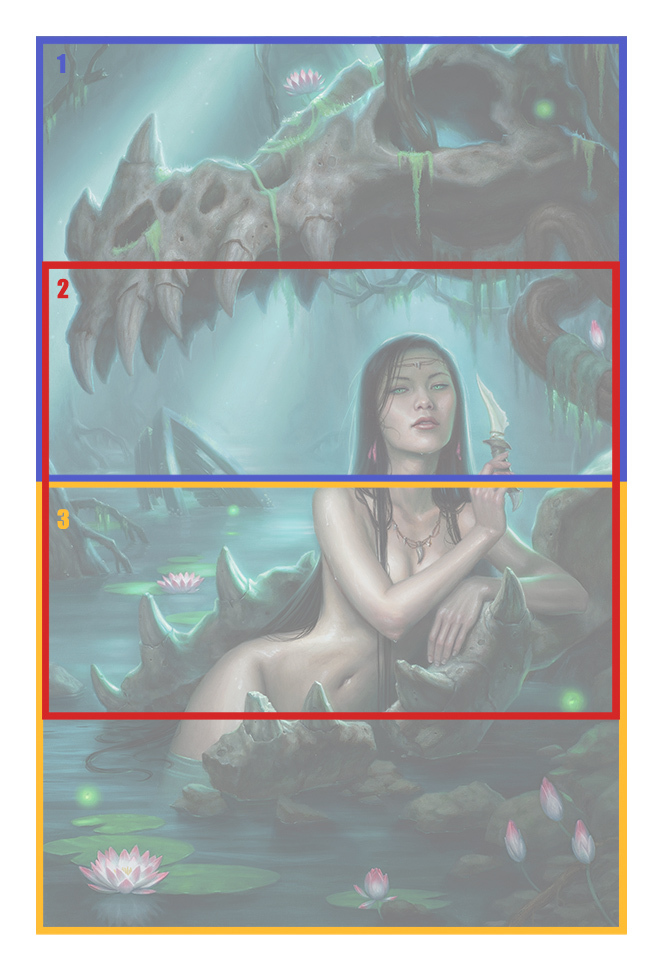
Because of this, I actually shoot my painting in 3 separate shots, and then stitch them together later. I take a shot of the top, the middle, and the bottom of my painting, all with significant overlap. When shooting the middle, I take special care not to crop on any particularly important areas like a face.
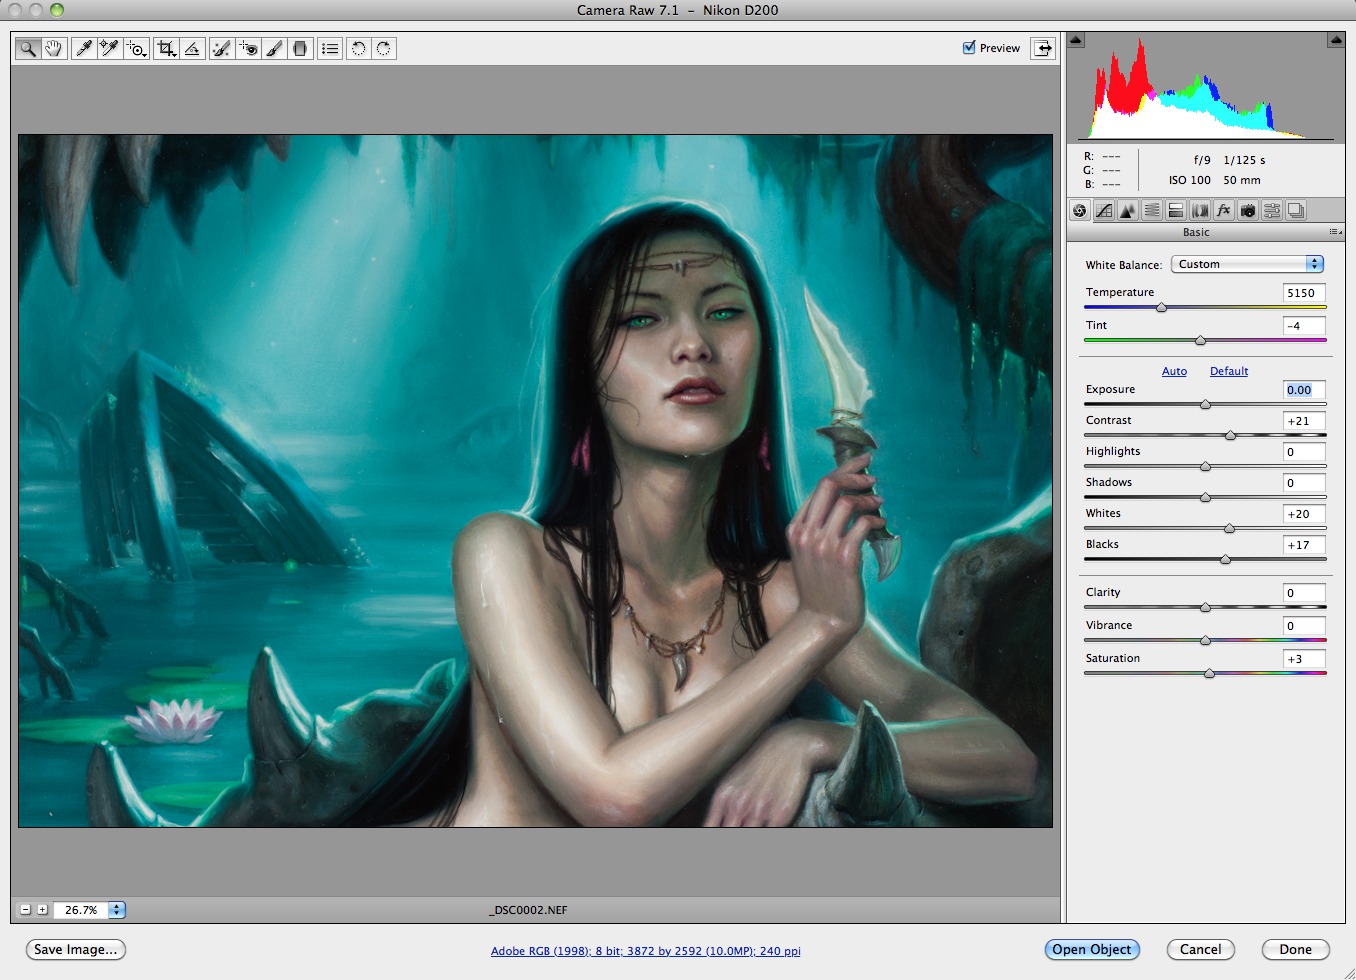
I then import these RAW images into Photoshop. Using the built in RAW editor, I can adjust any exposure/color inaccuracies I see.
Once I am content with the exposure/color balance, I splice the images together. Photoshop actually has a really nifty Photomerge tool just for this sort of thing. Go to: (File > Automate > Photomerge). If I still see some color imbalances, I usually remedy it using the ‘color balance’ tool, or ‘selective color’ tool.
The final result is a file that is about 20 inches tall at 300 dpi… more than enough for most professional applications!
I tend to keep this original file for my own personal records. I usually give my Art Director a slightly smaller file, roughly 11×17 (300 dpi), which is still more than enough for any of their needs.
I then make a low-rez version (800-900 pixels) for my website, add a small watermark, and I am done!!!
As lengthy as this article is, I’m certain there are still some aspects of my process that I overlooked. If you have any questions, please ask away in the comments section. I may not get to them for a few days (as I am traveling at the moment), but I will answer all questions as soon as I get back!




Thank you SO much for taking the time to write about this. I've been wondering how to get high quality photos of my paintings for quite awhile. I think your technique will be very helpful.
Thank you very much for this write-up, Dan!
I recently completed a large (for me -2'x3') acrylic abstract (NOT my usual fare) and this will definitely come in handy, though I tend to work significantly smaller.
Thank you for this excellent article – very helpful and informative. It's great to see a setup that is actually in regular professional use.
TOTALLY BOOKMARKING THIS SO HARD! Excellent resource, I don't think I've yet found any single article about photographing artwork that's as comprehensive and detailed as this…
I've been meaning to invest in a basic setup for photographing art (scanning pictures in pieces is getting pretty old,) this will help enormously in figuring out what equipment to get.
Fantastic post Dan. Thanks so much for sharing. Very in-depth!
I've been waiting for this post since you hinted at it a while back, well worth the wait. Thanks for sharing!
Have you ever run into issues with paralaxing or “fisheye” distortion when stitching the final piece together?
Thanks Dan…. great post!!!
Great post.
Many artists share framed images of their work. Would they use a rig similar to that you have described?
Should all paintings (particularly gauche and watercolor) be removed from their frames (and glass) to be photographed?
Great post, thanks for the tutorial.
One question though, do you use Silver or White umbrellas? I think they serve different purposes and I'm wondering which one's the best for taking pictures of artwork.
Thanks!
Fantastic! Thank you so much for taking the time to write this out. I never would have thought to photograph different parts of a large painting, and them digitally stitch them together. SMART! Thanks again!
Excellent Tutorial. Thank you very much for share this knowledge
Wow, Thanks. I am actually finishing up a commission right now and would love to have a nice copy for my own display purposes. This was so helpful.
Great Post. Have been looking into some details about this for some time. Thanks for taking time to cover it.
Nice post… I have searched the web and bookmarked many pages on photographing art and each always seems to say “THIS IS HOW”. Yet there are so many variables!
Yours is refreshing for a change.
You come right out and say experiment, this is what works for me and you mention that your art is… “… in oils, on a smooth untextured surface, with a decent amount of transparent layers.”
That is really important to know.
I work very similar so this will help a great deal, thanks.
Its also good to know that many pro photographers use what works for them the MAJORITY of the time instead of a 'custom' shoot for each.
… meant to ask…
How do you avoid a parallax view or how do you set up and check it so the painting and the camera are both exactly parallel to each other?
Thanks for a great post again, this sure will come in handy! It's great to learn about things that are necessary in working as a professional (aside from the obviously crucial arty stuff).
P.S. On a related note, I have a humble suggestion for a future post for you Muddies. I think some earlier posts on MC on the subject of portfolios and websites are pure gold, but I'd like to know what one should put in a portfolio. I understand that one should fill the portfolio with the kind of stuff one wants to work on. BUT if I wanted to do, say, book covers, should I do mock covers for existing books (and if so, classics or contemporary writers) or covers for imaginary titles?
I used to. But using a Prime Lens virtually eliminates that problem. If you don't have a prime lens, just let PS's photomerge take tare of it.
I always remove them from the frames. Not only does glass cause glare and framing cause shadows, but personally, I have never been a fan of including the frame in the image. I just don't like the way it looks. With the exception of sculptural frames (Like Mark Ryden), I just don't think it's necessary, and actually detracts a bit.
Silver umbrellas reflect a higher amount of the light .White umbrellas let some light through. Because I make use of the bounce, I prefer silver… however, some people shoot THROUGH the white umbrellas (like a filter), creating a 'soft box' type of effect. Both methods work well. Many umbrellas actually have have removable layers, so you can have both silver and white.
My camera has a grid on the screen that I can turn on an off. This helps a LOT. Still, I usually make use a level to ensure everything is perfectly parallel.
Both are good. Personally I prefer to see very little 'classics'( and never want to see them with type on them). By putting fake covers in your portfolio, it's just as good as saying 'Hey, I've never done a professional job before'. If the cover is an original concept, with no type, the AD has no idea if it was professional or not… the quality will instead solely dictate his/her opinion.
Great info here, thank you very much.
Can you (or one of the other Muddy Colors experts) possibly do a future post on shooting reference photos as well. I tend to run into problems of consistent lighting and POV.
Thank you!
How are strobe lights controlled with your camera? is there a cable that connect them to fire off at the same time?
Great post!
Thanks for sharing, I love the painting by the way? Which paint did you use? Acrylics?
Excellent post, Dan. Good, artist-specific info. I am fascinated that you can achieve such consistently fantastic results from printers without including color separation cards or grey cards in your shots. To achieve such excellent color results, you must be relying on your Photoshop color profile settings.
another really outstanding post/article. I would think this would also be a good reference if one DIDN'T have all the equipment, but had a professional photographer that was willing to work with an artist outside of their “defaults” to get the best results. Would love to see a post sometime on computer monitor calibration – as I imagine that doing color corrections and other digital work would make proper calibration imperative. Thanks again!
Thankyou, thankyou, thankyou, thankyou! This canges everything, I have had such trouble with this, thankyou!
As others have said…Thankyou, Thankyou, Excellent, Excellent….Wonderfully well presented…For an article it is very succinct!
Another excellent article by Dan dos Santos!
Thanks.
Thank you! I've struggled with this a lot.
Thank you,Thank you,Thank you… 😀
Another invaluable and necessary tool is a pocket fold open colour checker…as ALL digital sensors are different…and white balance check is oh so unreliable from one camera to the next. Lights technically change from one use, turning on and off…they diminish in colour output minuetely …the degree kelvin is inconsistent. However a colour checker..and its accompanying software can colour set and correct a batch of photos taken at the same time with the same light. This can be registered in Photoshop…and make adjustment much better. It is also important to set the colour for the type of production presentation that the painting will be seen….images on a computer versus printed, versus other.
Just a few tips to make this EXCELLENT posting that much better. Cheers.
I hope that I can give some critical advice as a professional in this field.
First, the barrel distortion seen in wide-angle lenses is always prevalent, regardless if the lens is a prime (non-zoom) or not, and sometimes even if it's a 50mm. The right lens can eliminate it to almost nonexistent, though. I'll come to that soon.
The point with a 50mm focal length is that with film cameras (with 135 film), it used to be their 'normal lens', it gave the perspective humans have naturally, so it felt the most natural to shoot with.
In digital SLR's, the sensor has dimished in size from the 135 film frame. This means that in reality your 50mm zooms in a bit more; 50 x 1.5 = 75mm.
1.5 comes from the 'crop factor', which is individual for almost every brand. 1.5 is for the D200, but otherwise you need to google up your own to get this.
It's not actually critical to know this, but you now know that in reality you could use a 28mm lens as well.
Now to the meat; this handy widget at DPreview.com will display the distortions of colour and geometry of an individual lens.
When finding the correct camera and lens in the list, the diagram will display the amount of distortions depending on the focal length and aperture.
This is important about what you said of the aperture; it is indeed not f22, most often the optimal point is f4 or f8. The point has been calibrated according to the perceived function of the lens, so you best do not go and guess. It could be anything.
The diagram shows one half of a picture face-on, like on the finder or screen of the camera. Blue is sharp, magenta is blurry, and you can see how they diminish toward the edges.
Through menus, you can see the spherical distortion by a grid. This is will help you determine what focal length or prime lens is the best for a distortionless image.
My apologies if it was too much to take in, I can answer some questions if anybody has them 🙂
can you answer my question about how the strobe/flash lights work? Do they hook up to the camera somehow? or do they have sensors? or they react to the camera's built in flash?
Thanks!
-George
Both, George. Most strobes can be set to 'Slave' mode, which means they will go off when they detect another flash nearby. However, you do not want to use the on-camera flash to initiate that, because the on-camera flash will give you glare. Instead, I use a radio transmitter. This transmitter triggers one of the two strobes, and the second one goes off automatically. If your strobe doesn't have a radio sensor, you need to use a 'sync cord', which manually triggers the strobe.
Thanks so much for the info. I just ordered the continuous light kit. I'm sure it will serve my needs quite well. Thanks again!
Nice article Dan!
I always have used polarizing filters on the lights and lens, but I am going to try your method and see how it works on my stuff- I always have had problems with glare that only polarizing seems to eliminate. Having the softer lights at a shallow angle may work, if it does it will be great, as the polarizers are a major hassle.
Woh Nice post.
Thanks for provide different types of reproduction are better suited to different types of paintings.
Hi Dan,
thank you very much for this post. I was so much looking forward to it. It helped a lot when I recently captured my oil paintings. Now I'm really happy with the photographs of my paintings. Thanks a lot!
Best regards,
Andrea
Shot my painting tonight with the low budget option you provided. Although I did have to put a third dispersed additional light since the foam core did not reflect as much light as I though it would. It was just a tiny bit dark in the middle of it. I'll probably look into purchasing those umbrellas one day. But overall it does the job well. Thanks for the info.
I'm happy to hear that, Andrea! You'll find that once you have the basics down, you'll perfect the process over time. The shots I get today are much better than the ones I took a few years ago, even with the same equipment.
Yes, I guess I should have noted that if your painting is really large, 4 bulbs might not cut it. If your painting is smaller than 18×24, I would think it would have been adequate. Did you curve the foamcore to help control the bounce?
The foamcore I got is pretty rigid so I can't curve it, unfortunately. To make up for the dark spot in the middle I shined the third light off my low white ceiling. Not ideal, but it worked.
That + a slight tweaking in lightroom made it come out great.
Either way, it's much better than how I've been shooting before, heh.
THANKYOU
bless you , this was really helpful ive spent all day today trying to get it right with hot lights. will do strobes tmorow with greycard..sweet article..many thanks
I can't thank you enough for taking the time to post this, along with links and diagrams. I am setting up something similar for my own paintings and your level of insight is inspiring. Cheers to you!
You didn't mention positioning your camera so it is vertically centered with your canvas. This gives you a rectangular image of artwork. And since you take 3 shots to get the canvas, shouldn't you move your camera vertically each time so it is centered on the part you are shooting????
this is the best article I have read on this subject, very useful for me. Thank you for sharing
Do you use a card like WhiBal when you shoot to adjust, then copy to each shot? I assume you the settings of the camera so that every shot is the same so you use the same adjustments per image before you put them together.
I'm not the author, but yes, in the perfect world, you'd move the camera vertically for each of the shots. Or you could move the art vertically the same amount. By keeping the camera perfectly square (perpendicular) to the art at all times, you eliminate the possibility of converging/diverging vertical lines. In this case, that would mean the sides of the canvas. You want them straight up and down in all three images
Eventually, the moment a'girl'plus I just have been investigating diverse museums and galleries you took place to be able to find your girlfriend preferred must-see within native gallery. Once we respected plus spoken of any copy, I had created to indicate the forest for the reason that the best area of “most popular artists painters “.Not necessarily till your lady explore the terms plus requested'The reason anyone should add of which straight to the forest?' would your lady get started with to set the whole works together.
Wow, that looks amazing. I've been getting into interior painting here in Olympia, WA, and I really like the colors you used here. That black fox color is fantastic, I'll definitely have to remember that one. Good job.
black and white paintings
After all, it doesn't matter how beautiful the original art is, the Art Director is not going to be impressed if the cover it … framedcanvasart.blogspot.com
I work in oils, on a smooth untextured surface, with a decent amount of … framedoilpaintings.blogspot.com
After all, it doesn't matter how beautiful the original art is, the Art Director is not going … 2canvasart.blogspot.com
Getting a good photograph of your work is absolutely essential to the reproduction process, … framedartwork.blogspot.com
After all, it doesn't matter how beautiful the original art is, the Art … framedglassart.blogspot.com
Let us commence a journey into the much travelled topic of buy online scanners printers. I find my self constantly drawn back to the subject of buy online scanners printers. Indispensable to homosapians today, it is yet to receive proper recognition for laying the foundations of democracy
Birmingham, AL
I'm also visiting this site regularly, this web site is really nice and the users are genuinely sharing good thoughts. snapcouponsplace
So great this job. Some days ago i have fine out a this quality site and here has many online support
Wedding Videos in St. Augustine Fl
I got this blog site through my friends and when I searched this really there were informative articles at the place.Shree Vella Photography
Wow, they are absolutely gorgeous.
For all kind of Residential Painting service in san antonio. CertaPro Painters is the ultimate destination for you for best residential painters! Request for your house color consultation today!!! Call Us @ 210-606-4260
Thanks so much, Dan – I keep coming back to this post and getting more out of it! I was finally able to purchase a pair of 600 watts/sec strobes, but I keep running into bits of glare with them, especially in the darks (especially if there's any texture to the paint). Could you offer any advice on how to deal with this? I've got the lights at a shallow angle, and am using reflective umbrellas.
Great photography, thank you for your post.
Wireless DSLR
Wireless Photography
Event Photography
Which means when I do it, I'm usually strung out, on my 40th hour of being awake, trying my hardest to make a deadline, canvas printing cheap
These are some really solid tips on both general photography and for taking pictures of a painting. When I take a picture of a landscape I also use the rule of thirds and divide the scene into different sections. I think this really helps draw the eyes to certain lines and creates a more aesthetic picture.
http://www.artonage.com/product-category/landscapes/
3d Walkthrough Animation
Your blog is very informative and gracefully Certified Photography Courses
Be flexible with vediography and design please contact :- The photography classes best of things all associated with photography is step cases which will follow up with theoretical as well as photography tutorials practical classes. Making them and getting them on board may have been the best thing in the work as based on any photography tips work. Here is all that can be changed and give to parts. Here are many which follow in wedding photography the article.
Very informative and really helpful blog, need your photo as canvas painting contact picpainting and make your painting at very affordable price.
The importance of professional photography classes :-
The school of photography new generation photography classes are helping all individual get equipped on the art and carry it landscape photography out at ease. There are all new things with the intention of can help them to photography tutorials complete the work as per the directives. The role of the work has been all necessarily to make it get the new generation systems photography classes on behalf of use.
Thanks for the range of tips.
Hey,
Amazing article about the reproduction of different types of paintings. You can get some beautiful paintings at Indian Art Ideas, an online art gallery.
Excellent article from 2012. Very little has changed (well – technology has but the techniques haven't). Thank you very much.
Someone mentioned circular polarizing filters. It is worth mentioning these. If you can manage without than it is better. No filter on lens is always preferable. Sometimes though you have no choice. Yesterday I shot reproductions of original (very expensive) paintings of famous artists, and there was no way they would be taken out of their glass frames. The glass proved a big challenge with reflections. My circular polarizer filter was an absolute must. Sometimes you have to shoot such a picture at an angle, to minimize reflections. You then have to adjust perspective using software like Photoshop (unless you have a tilt camera lens or back, which I don't). This is not a good thing as you will have a lot of work to do and you lose sharpness. But with glass, it is sometimes almost impossible not to.
Great Article! I'm just wondering if you can give us a word on what type of light you paint in and how you adjust it as you're painting? (I paint with Acrylics on canvas)
Thanks!
Thanks for sharing your info. I really appreciate your efforts and I will be waiting for your further write ups thanks once again.
Art Gallery Store
Painting from Photo Photo to painting from photo 100% handmade in oil, charcoal, pencil or watercolor paintings from photos are unique personalized gifts by professional portrait artists. All of our portrait artists have degrees in fine art and years of professional experience. Every painting is examined by our senior portrait artists to ensure best quality. We only use premium quality specialized art supplies to create your painting. Contact us for custom made, high quality oil paintings at an affordable cost and quick worldwide delivery that allows you to express your creativity easily and make great art.
Okay…that is a great article and fabulous..
Online Business Directory
Nice graphical post regarding photography painting.
Thanks for it.
Print Arcade
Really informative, great thanks for sharing these tips regarding photography. This will be very helpful for the photographers.
I really feel very comfortable because of your way of explaining every detail, I can ask whatever it is because you make us feel that even if we do not know what a professional knows, we can achieve incredible results. Without a doubt my favorite Blog.
Thanks for posting this, Dan. I have referenced it on many occasions.
There are so many more great ways to photograph work and tricks to learn – thank for sharing
Informative post for the photographers, thank you for sharing this with us.
Hi Dan, do you happen to have an updated link for the lighting kit, or something equivalent?
With your delay on pressing the camera how many seconds is optimal without being too long?
Every painting is examined by our senior portrait artists to ensure best quality.
This post highlights the significance of photographing artwork for reproduction. It’s a valuable insight into the importance of this phase in the commission process and how it can impact the final result. The author’s acknowledgment of the need for experimentation to find the right method for each artist’s work is a practical tip. A helpful resource for artists looking to improve their photography skills for their artwork.
Keep it up!
Fantastic post.
Great post
Thanks for the beautiful explanation
Very impressive work!
Awesome read
Wonderfully laid out
Good post
nice
Perfectly structured