
I thought I’d pick up on Serge’s post last week about promoting yourself on the internet. Obviously, the most essential aspect of self-promotion on the web is having a personal website. If you’re reading this blog, I would assume that you’re at least serious enough to already have a website… but you never know.
I hear all sorts of excuses for why aspiring artists don’t have a website yet. Unfortunately, they are just that… excuses. There are so many options available to artists now, that there is no reason at all you shouldn’t have a portfolio online.
The simplest option of course, is to create a gallery on a website like DeviantArt or CGhub. The biggest benefit is that these galleries are totally free. The downside is that a potential client is just a single click away from a thousand other artists… meaning your work has a lot more to compete with.
Another free option is to create a blog.
I’ve seen a growing trend in artists who use blogs as their sole website. This works well for enticing clients to come back for repeat visits, as there is always new content. But it’s annoying when a client wants to view an entire body of work quickly, and needs to scroll through months of posts in order to do so. Ultimately, a blog is a nice supplement to a website, but rarely takes the place of one. This is simply due to a clunky interface. But there is a way around this, and I’m going to show you how.
In less than 10 minutes, you can turn an ordinary blog into a sleek, simple, and FREE website.
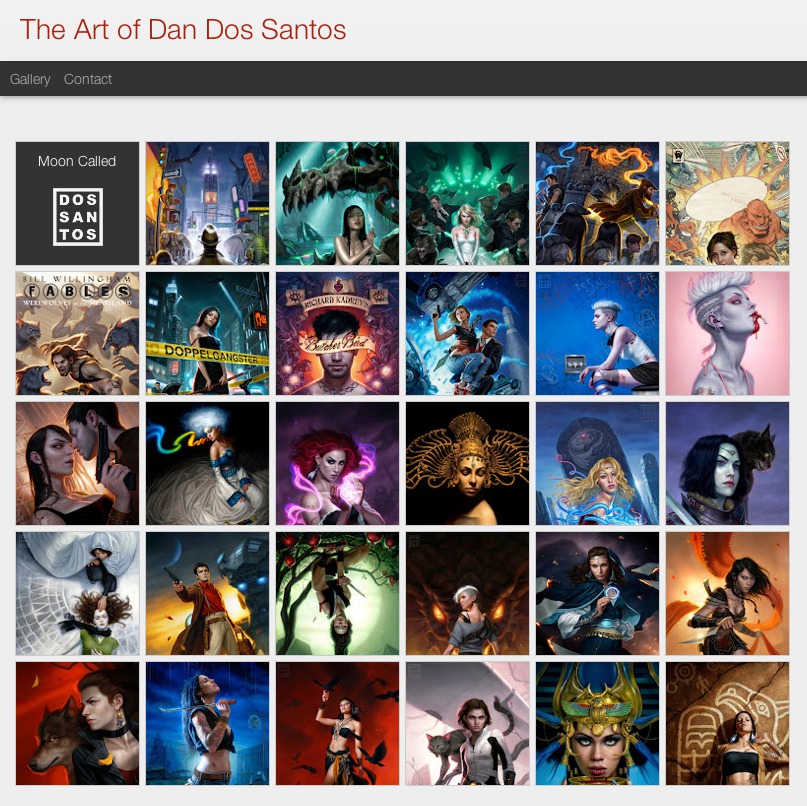
You can take a peek at a sample I made for you HERE.
Aside from a little bit of prep-work, all it takes is some coding experience. Lucky for you, I’ve already done all that for you!
So here is what you do…
1. Create a Blogger account.
2. Start a blog. The name of the blog should be your own name if available (I highly recommend doing this even if you don’t want a blog. If you change your mind in the future, at least you’ve reserved your name).
3. When choosing a template, choose either the ‘Dynamic View: Flipcard‘, or the ‘Dynamic View: Sidebar‘ options. Both are great layouts for a gallery, and allow the viewer to skim an entire portfolio very quickly.
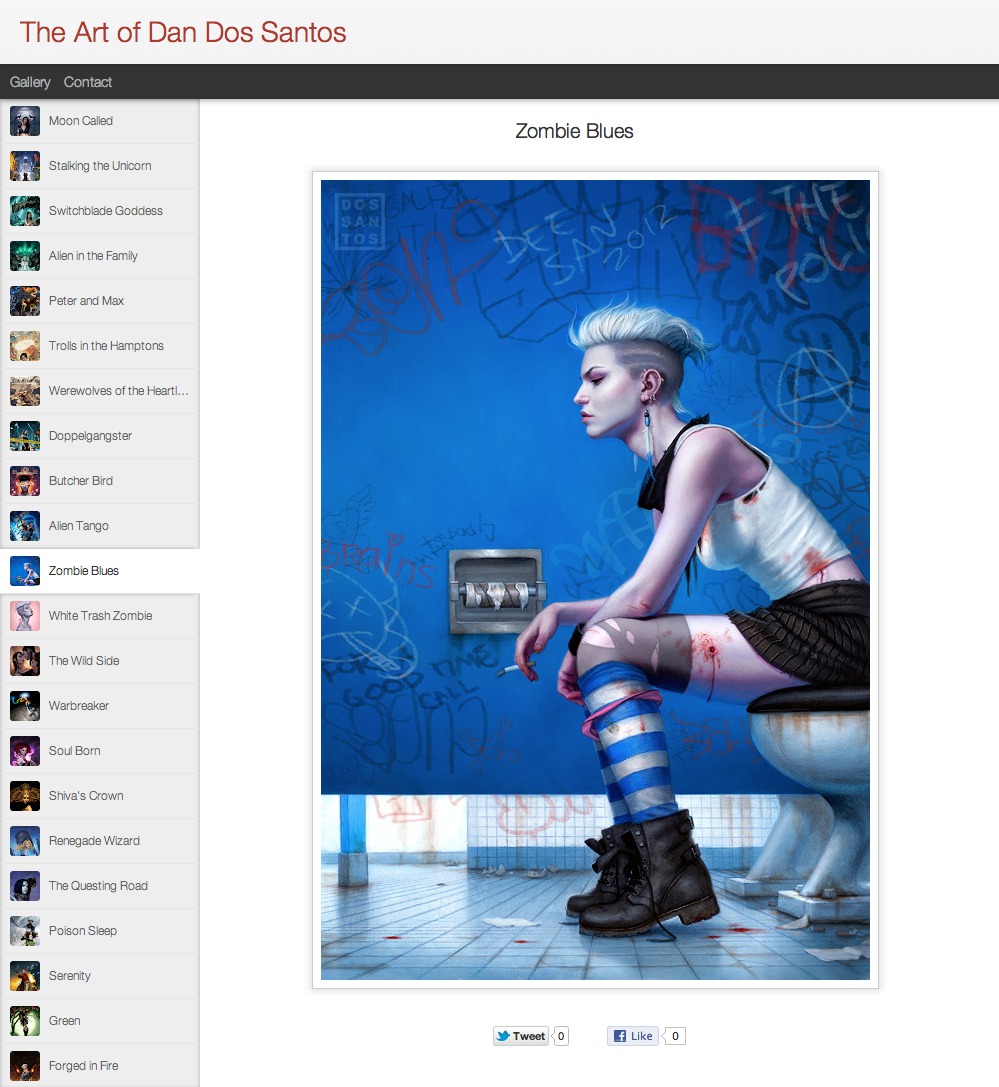
4. Create a new post. In it, paste a single full-sized image. The title of the post should be the title of the painting. Go to ‘post options’, turn the comments option ‘off’, then hit ‘publish’.
5. Follow Step 4 for every single piece of art you’d like to show in your gallery.
6. Create a new page. Call it ‘Contact’, and simply type all of your contact info there.
7. In the design section of your blog, add a new gadget. Choose the ‘Pages’ gadget. This will add a link to your contact page right in the header. Don’t give it a title, and change the name of ‘Home’ to ‘Gallery’.
At this point, your website is essentially functional. However, it’s really not that great. A lot of extraneous things you don’t need are still there, mucking things up. Dates, authorship and label info all appear next to each image. Additionally, the viewer can change the Dynamic View at will, totally destroying the way the gallery looks. This is the single biggest problem with Blogger Dynamic Views… limiting what the viewer sees. Further more, altering the HTML to the Dynamic Views template is extremely limited. There is a way around this though! By adding CSS code, you can bypass a lot of the HTML code that makes the Dynamic View so awful.
8. Go to Template Designer. Click on ‘Advanced’, and scroll down until you see ‘Add CSS’. Simply paste the following info into the ‘add css’ box.
/* Hide search */
.header-bar #search{ display: none !important; }/* Hide the google chrome feedback button */
a.feedback { display: none !important; }/* Hide the dynamic views options on the main page */
#views { display: none !important; }/*Hide the vertical bar before the first page link */
#pages::before { border-left-width: 0 !important;}/* Hide date ribbon */
.ribbon{ display: none !important; }/* Hide footer */
#footer{ display: none !important; }/* Hide google share */
.share-plusone{ display: none !important; }/* Hide recent, date, label, author */
.flipcard #controls{ display: none !important; }/* Hide date and author info*/
.publish-info { display: none !important; }/* Hide flipcard info */
.card .back .overlay .date { display: none !important; }
9. Be sure to hit ‘enter’ after the last bracket, or it won’t acknowledge the input. Hit ‘Apply to blog‘, and Viola! You’re done!
When you go back to view your blog, you should now see that it is extremely streamlined, and the viewer can no longer change it’s appearance. All of the dates and author info are also gone. I personally chose to leave the Facebook and Twitter options available, though you don’t have to.
See? Wasn’t that easy?!
The next time we do a crit-submit, I really hope to see more of you taking advantage of this.
It’s a fast, user-friendly site that costs NOTHING to maintain. Furthermore, unlike a lot of Flash-based ‘lightbox’ galleries, each image/post still retains a unique URL. Meaning that you can send a link to just a single image if you need.
One of the few downsides to this type of website is that the site’s URL is going to have ‘blogspot.com‘ at the end of it. Though, if you choose to, you can change this as well. If you purchase your own domain name, Blogger allows you to use that as your URL. This a very small, yet very worthwhile investment.
Play around with the layout. There is a ton of cool stuff you can do! For instance, on mine, instead of just omitting the date ribbon on the back of the flipcard, I decided to replace it with my logo. If you’re having trouble, just Google exactly what it is you’re trying to do… you’d be surprised at how much info is out there.
Please Note: I’ve personally tested this in Safari, Firefox, and Chrome, and can attest to it working fine. However, ‘Dynamic Views’ is a relatively new option on Blogger, and as such, has minimal mobile support. This means the site may look weird on mobile devices like iPhones and iPads. I expect this will be remedied in the upcoming months. As for IE, well… nothing seems to work on that piece of junk, including this very blog. Someone needs to put that horse down.
EDIT: 12.29.12: Blogger seems to have changed a few things. Pasting this text into the CSS box no longer seems to work. Instead, you need to paste it into the HTML, and it will then show up in the CSS box. Go to ‘Template’, click ‘Edit HTML’. Click ‘Expand Widgets’. Search the text for /* END CUT */. Place the above code immediately following the words /* END CUT */.


Cool post! I'm really enjoying these marketing related posts. Setting up sites is getting easier and easier and a lot of the options out there have such a variety of themes available that you can come up with a unique looking site pretty easily.
I had to laugh at your comment about IE – it really is useless. It's gotten to the point that it's not even worth trying to test on it. It amazes me that it has been around for so long and still has so many faults.
This is AWESOME!
I've been linking to my Blogger portfolio for a while now, even though I have a personal website. It's just so much easier to update, and now it can look every bit as sleek!
AWESOME POST!
Thanks Dan! I've been trying to figure out how to make a cleaner looking portfolio page for a while now. Just finished following your instructions, and hopefully this new blogger run portfolio will work for me until I can learn enough code to build an alternate.
Looks good, Lucas. Just make sure that the link to your other art blog opens in a new window, not the same one. Otherwise, it's difficult to get back to.
Surprisingly, 10% of our audience still uses IE. I sure hope Muddy Colors works on Windows IE, because it doesn't show up at all on IE for Mac.
Dan you're a genius. This is great!
Great technique, Dan. This is a very good starting point – relatively easy to create and the price is right!
My touchstone on this subject continues to be Irene Gallo's collected remarks about what art directors look for in a portfolio site. She stipulated the most important features as being the ability to save to or drag to the desktop right from the full image, and full-image previews. This solution only misses the latter. Is it possible to have full image previews with this technique, or does it crop them automatically in order to build that layout?
Also, one should remember to put one's name in the title of each image – as I see you've done with your test site!
As for IE – I agree with you… but then, I am sort of cross at the web situation in general. After nearly 18 years, they still haven't really sorted the basics.
I just wanted to say thank you so much for this post. I instantly followed your directions and am completely thrilled. Been struggling with websites for the longest time since I was about 16 and in 10 mins you cured several years of reading numerous how-tos and frustrations. Thanks again!!!
(Also, your work is amazing and you are definitely one of my favorite artists!)
What a fantastic post! Many thanks, Dan – I'll be having a play with this as soon as I've some time!
Thank you Dan, this is exactly what I've been looking for! I set up my new portfolio in no-time and it looks great. However, I still like the look and feel of my old blog, so I use the pages widget to link to this new portfolio-blog. Works like a charm.
Amazing post, Dan! I just left Serge a comment about building pages this way and was happily surprised catching up on posts to see this tutorial. WordPress has been my horse of choice, but I really like the way you can link to individual image pages, unlike WordPress' NextGEN plugin. I'll have to give this a shot!
I'll definitely be telling my friends about doing this.
Great post Dan. Thanks for doing all the legwork for us on this one!
Hello Dan!
First time poster and recent follower of this amazing blog.
First of all,thank you so much for giving artists a quick and easy way to make a simple portfolio. I followed your directions exactly and am excited to do more with it.
I used to have a blogspot a couple of months ago but deleted it and recently moved to wordpress all because I had trouble displaying a simple gallery much like this one and only because I wasn't good at coding.
Again, this is especially appreciated by me!
Good day,
KaShonna
Another solution is to getting married with a talented webdesigner 😀
Believe me it works.
You only have to whine if you want to update it.
It costs no money and your website is unique.
Just sayin':D
Blogger is generally simple to use, and you can't beat the (free) price. However, be sure to read Blogger's terms of service, and make sure you are comfortable with it. Also be aware that a Blogger site is not really yours, it belongs to Google, who owns and runs Blogger! I personally advocate getting a REAL website that you will have control over.
Thank you so much! I really did just make my own in about ten minutes without a sweat. Now if only I had more work to fill the site…
Dan, you are a saving grace! I've been struggling with trying to set up a wordpress account for WEEKS and you've simplified exactly what I have been trying to do… only one question? Is it possible to make a second gallery page to separate my different styles? Perhaps a sketches page? I've been trying to figure out how,but I'm an idiot when it comes to coding.
No, it makes the thumbnails automatically. One of the problems with full size thumbnails is that painting are not always a consistent size. So it's likely you'll always need to crop it at least a little. I know Irene's peeve is more about those cryptic thumbnails that show just a detail of the piece. So long as you can make out what it is you're clicking on, it's OK.
I'm glad it helped!
Yup, I noticed. Yours and Cory Jay's comments are what prompted me to do this post in the first place.
I'm happy you're making use of it!
Not with the Dynamic Views. You can only do a single post on a new page I believe. Though, in all honesty, you're probably best off just making a totally separate blog for the different style. Mixing that stuff up usually isn't good, and why not.. it's free, right?
Aw, man. You should have told me that 7 years ago!
You definitely should. It's actually pretty fun.
Thank you Mr. Dos Santos!
My site's done and I love it. =)
very clever! nicely done!
Thanks Dan! I am going to do this ASAP. The main reason I never got a website was primarily because I didn't want to pay a monthly URL fee or whatever that's called. I've had a blog for that very reason. BUT I WILL CHANGE THAT NOW!
Here's to cool artist websites!
-Will
Thank you Mr. Dos Santos! I'm still so green in this art thing that I'll wait (and work my tail off whhile doing so) before I establish any kind of a web presence. But in the near future, when I've cranked out enough decent pieces for a portfolio, I'm going to follow these instructions of yours.
Once again: Thanks.
-Juha
Thank you very much for this post Dan, it was really helpfull.
I have a little question: Is it necessary to add some type of copyright “thing” to the blog?
I've benn trying with “myfreecopyright.com”. I have to put a HTML code with the logo to show that the images on the blog are protected. I put the code on a HTML/javascript gadget, but it doesn't appear. Could you help me with this please?
Thank you,
Alvaro.
Juha,
I'd do it now, just so you can save your name.
You can set the blog to private, so no one can see it, and search engines won't find it.
If you really want, you could simply type a caption below each image when you post. Just click on an image in edit mode, and when then hit 'add caption'. In the caption box, just type “Image © whomever”.
Thankyou Dan! this method was too easy, couldn't procrastinate anymore haa
Thank you very much
Thanks Dan! I've been trying to figure out how to make a cleaner looking portfolio page for a while now. Just finished following your instructions, and hopefully this new blogger run portfolio will work for me until I can learn enough code to build an alternate.
henna tattoos
Thanks for stepping up with this!
This was a great post Dan! I was curious as to how you found out how to change the back of the 'flipcard.' I would love to be able to edit that to either an image or different text and google isn't helping me out.
-Tom
Lol! Yeah, that one was -REALLY- tough to figure out!
Basically, you can't hide the cardback info, or it will hide your logo too. Instead, you want to make the previous info impossible to see by making it small and transparent, and then insert your own jpg in front of it.
To do this, first remove the previous CSS code that hides it:
/* Hide flipcard info */
.card .back .overlay .date{display: none;}
And instead put this there:
/* Change flipcard info */
.card .back .overlay .date{color: transparent; font-size: 0px !important;}
.card .back .overlay .date:before, .ss{content: url('http://YOURIMAGEHERE.png');}
That one took me quite a long time to figure out, and I was super tempted to keep that secret all to myself!
Hah, it works on Windows IW
Thanks a lot Dan! Just applied to my blog and looks way better than before.
That's awesome! However, all the stuff you hid with CSS shows up i the mobile version. YOu think you need a second string of code for that, or is my mobile browser just ignoring the hide tags?
Been considering doing something like this for a while since blogger is slicker and faster than the cheap wordpress hosting I'm doing now.
The whole unique URL thing is great too, one of the main reasons I haven't installed lightbox on my own gallery.
This is fantastic!!! It actually did take me less than ten minutes as well. And registering the custom domain name cost $10. Admittedly it's still a little empty but I'll work on that as time goes by. Thank you so much.
Thanks Dan, that was so simple. I used to break my head trying to figure out how to keep a single dynamic view in blogger. Thanks again!!
This is brilliant, cheers. I'm guessing from what i've read it'd be impossible to have a separate page which acts as a blog of your sketches/updates. If that's the case i'll add a link or something to another blog.
Yeah, the mobile template is weird. I've tried disabling it, but it seems to give me inconsistent results. Once I figure out a solution (provided there is one), I'll be sure to post it here.
Fortunately, (if this blog is any indicator) mobile traffic accounts for only 2% of the overall traffic.
Incredible post. Instructions were straight forward for a newbie like myself. Process on my end was a little glitchy for some reason (cut and pasted your CSS codes but “Blog Archive” and “About Me”) still visible in Gallery.
Thanks, Dan. Your tutorial was very helpful.
Testing it on IE for mac is null and void.. that's discontinued software.
Hi Dan, fantastic stuff but I just wanted to warn everyone that I followed your steps and advice and even bought a domain name only to have it hi-jacked last night. I'm not sure how it happened but I've reclaimed it now. I bought the domain name at Enom through Google. Just thought you all should know. I was devastated but I'm back!
Hi Dan,
Thanks for the wonderful post.
But it does not seem to work for mine.
the date ribbons are still there.
Is it becuase i am using snapshot view?
this is my url:
ducollections.blogspot.sg
Hi dan,
It's alright. i have changed it to sidebar view and it's working perfectly. 🙂
thank you.
You could make a new page just like the Contacts page, call it 'Copyright Info' or something and then insert your copy right content into that..
Ian
I'm really late to this! I'm now setting up a new blogger page/site just for this. BUT, my name is so common that I'll have to set up new/different URL. Bummer. But, handy. And thank YOU for the tut!
deviantArt has a now somewhat new portfolio option that's free. You can easily add new portfolios/books for different clients, etc. Pretty sweet. This page here discusses plusses and the how-tos with samples: http://20after4.deviantart.com/journal/Portfolio-The-Awesome-Version-Now-in-Beta-214199618
Thank you so much for this offering, Dan!
I wonder though: is there a way to alter the CSS so that only one Page within the blog shows as dynamic views, while the rest of the pages under that domain (namely, the blog proper) remains in the classic view/format?
It would be great to be able to set up a gallery for the portfolio (like your example), while the blog section remains untouched. Is that even a possibility?
Here's another free website tool that allows creation of elegant and free sites: wix.com
Lots of cool options available. If I didn't already have two blogspot sites I might try it. Well-designed stuff.
Another good option, although not free, is Viewbook.com — I had a website through them for a year or so and it was awesome for displaying my art and design work. I got rid of it only to save money since I need to spend on my fam more than my art 😉
Great!! Thanks, that helps a lot, Dan.
Hey Dan,
Great tips! How would one go about eliminating the Twitter and Facebook buttons as well?
-JD
Nice. Thanks for the blog and the details provided thereby
Hey Dan, awesome advice and I've put it all into use. Thanks so much!
I am having a bit of trouble with inserting my flipcard image as you did. I can see half of my image but it's not centering in the flipcard box. Did you run into this…or anyone else? I replaced the HTML code you detailed above but with this “half” success. Thanks for your time and sharing the code, it's much appreciated!!
NM…took another look and saw that you didn't completely replace the image, just bumped your logo up against the title for each flipcard. Nice!