

In this article we are going to cover proper studio ventilation for the artist, with a focus on dealing with solvents. We will cover the various options for setting up a studio, and a few options you can use if no ventilation is possible.
Almost all illustrators working in oil use solvents. They are used for a wide variety of tasks: mixing, thinning, dissolving and cleaning paint as well as for making mediums, varnishes and so on. If you work in oil, you will likely be using them at some point.
Painters have been getting debilitating illnesses from solvents ever since they came into widespread use in the 1700’s.
What are the hazards of inhaling solvent fumes?
Initially, exposure to high concentrations of fumes result in forms of temporary narcosis, (dizziness, fatigue, loss of coordination, nausea).
But it is the slow, unnoticeable build-up of harmful chemicals within the body over time that is the true danger of solvents.
Long term exposure can lead to more aggravating conditions that are sometimes irreversible and sometimes fatal: Contact dermatitis, respiratory system damage, kidney and bladder disease, as well as chronic brain and nervous system damage. (Yes, I said, permanent brain damage. And yes, I have worked a great deal with solvents in the past. This may confirm some of our reader’s suspicions about me.)
Many famous artists in the past have fallen victim to illnesses acquired from the use and over-use of solvents. Their lives irreversibly damaged from it. There is no reason that with the knowledge and tools available to us now that we shouldn’t be able to take sufficient steps to safeguard ourselves and our loved ones from any such fate.
The first step is always to know the dangers of the materials you are working with and limit how much of them you are allowing into the air.
If you are pumping too much of a chemical into the air then you will encounter problems no matter how good your ventilation is. According to environmental hygienists, studio air should be replaced 10 times every hour. (Though some experts say that anywhere from 6 to 10 is permissible with 10 being the gold standard.)
The Studio Environment
The Basics:
Choose a studio space that has windows that you can open, and if possible, that has more than one window. In general, the larger and more open the room the better. This will help prevent extreme concentrations from developing in the air. Even with good ventilation, a closet may kill you.
If you ever begin to feel light-headed or nauseous, leave the room, go outside and get fresh air. Your studio is not properly ventilated and you need to reconsider either your materials, your method of using your materials or your ventilation system.
Always consider other people who work in or around your studio space, and wether your setup is going to adversely affect them.
There are 2 types of Ventilation: Dilution Ventilation and Local Exhaust Ventilation.
Dilution Ventilation does not eliminate the harmful elements and vapors from the air. Instead it attempts to lower their concentration by bringing in clean air to dilute the contaminated air.
Local Exhaust Ventilation attempts to trap the fumes and airborne elements at their source, before they can enter the air, and then vent them outside and away from the studio.
With that, I will discuss some options for studio ventilation that employ one of these 2 methods of cleaning the air.
OPTION 1:
An open door or window.
(Dilution Ventilation)
While this is a good start, it is not adequate to effectively dilute harmful elements from the average studio space. A single open window or door does not provide sufficient pressure to move or circulate air, so while there is new clean air coming in, or some of the contaminated air may be going out, there is not enough air replacement to prevent exposure.
You need to find a way of getting fresh air into a room, and the exposed air out. Which brings us to:
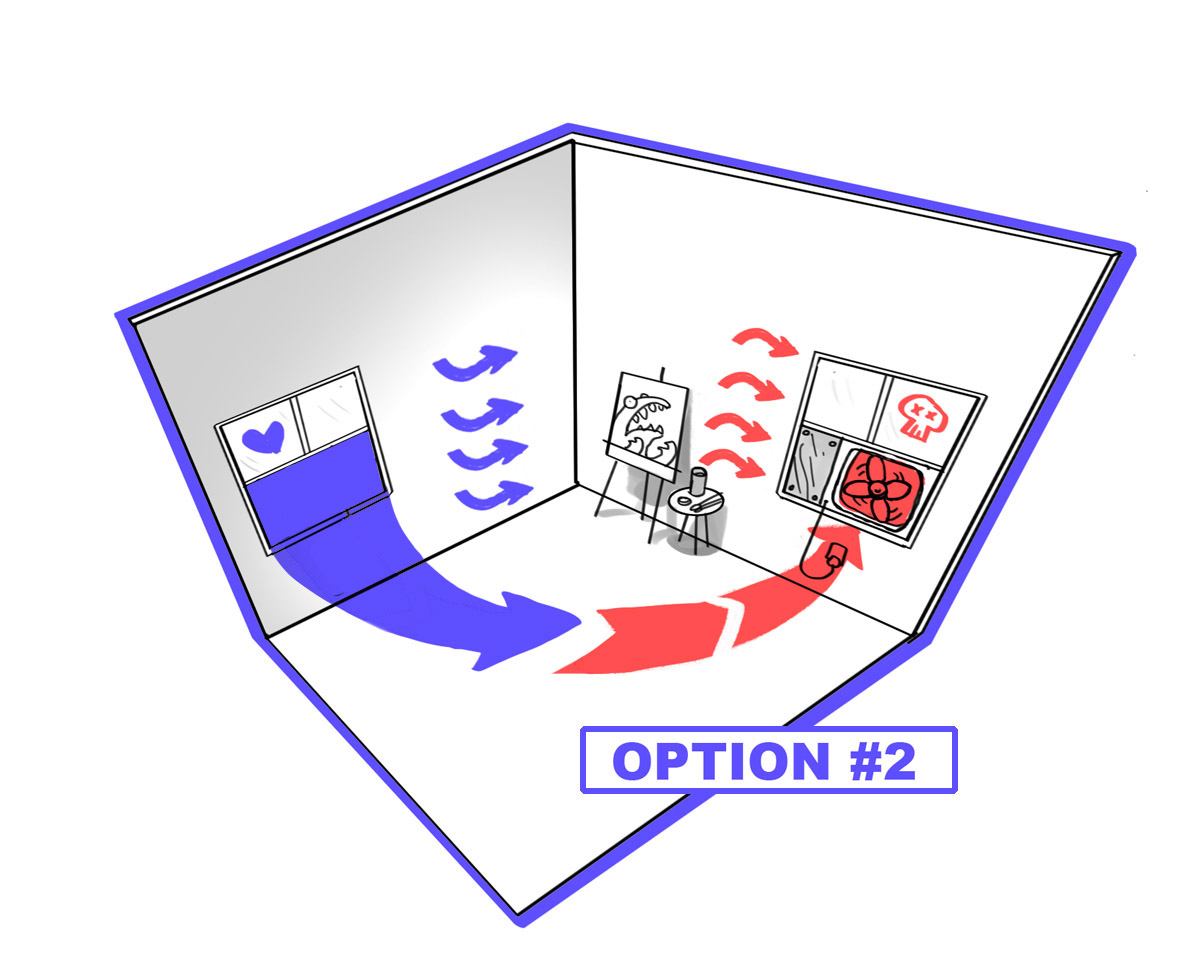
OPTION 2:
Open a second window and place a box fan in it.
(Local Exhaust Ventilation)
Opening more than one window provides a route for air to flow through a room. But this alone may not move the air fast enough in the studio to prevent a harmful concentration of chemicals from lingering long enough to hurt you or contribute to a long-term build-up that will be harmful down the road.
In one of your open windows, place a box fan facing out. This will act to pull air through the studio from the other open window and out again through the window with the box fan. This will refresh the air more effectively than just a single open window.
See below:
A few rules to follow when using this:
-Never vent into another room in the house. Always vent the contaminated air OUTSIDE.
-Always have sufficient (equal) clean air to replace the contaminated air you are removing. (If you have a fan in a window, always have another window of equal size open.)
-Do not recirculate any of the exhausted air back into the studio. (The windows shouldn’t be directly beside each other.)
-If you are using materials that are highly flammable, make sure your fans have spark-proof motors and fan blades.
OPTION 3:
Simple Continuous Ventilation system.
(Local Exhaust Ventilation)
While option 2 has been an effective solution for my own studio, it may not be practical for everyone. Some people live in climates that do not allow for this, or do not have access to 2 windows.
For a studio whose location precludes Option 2, a simple ventilation system may be a suitable alternative. And installing one may not be as terribly expensive or as time consuming as you might expect. Depending on the amount of air that needs moved, it may only require some 6″ HVAC ductwork and a 6″ duct fan from the local hardware store.
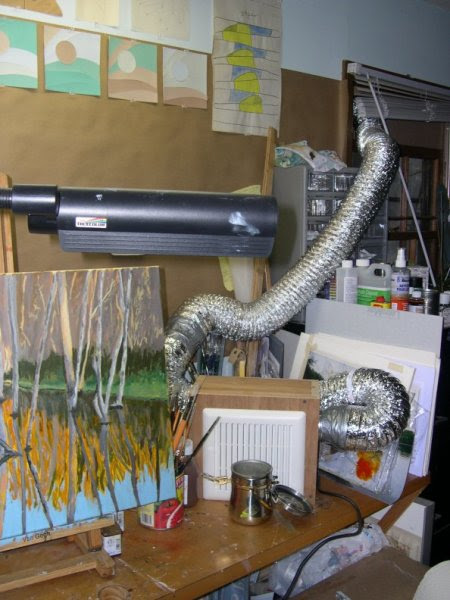 |
| Bquin from the wetcanvas.com forums shows his setup here. The fan captures the harmful vapors at their source, and forces them out and away from the studio |
Bquin from the wetcanvas.com forums shows his setup here. The fan captures the harmful vapors at their source, and forces them out and away from the studio.
OPTION 4:
Local Exhaust Ventilation
The hood. This is in essence, an industrial-sized version of the ventilation system seen above. You probably remember seeing one of these back at your school science lab. Local exhaust ventilation captures harmful elements at the source by the use of an overhead hood. It then transfers them directly outside through a duct system.
This is the ideal and most comprehensive solution… if you have piles and piles of cash lying around. They can be very expensive and difficult to install in the average studio space. But they are very effective at removing harmful elements from the air.
Here again, it is necessary to have a secondary source for replacing the air that is being vented outside. With some of these it may only require an open window. For others it may require an air or heat transfer system.
OPTION 5:
Air filter and Purifiers
(Dilution Ventilation)
Air purifiers take the exposed air in a studio and pass it through a filter, which captures much of the harmful material, and then releases the cleaned air back into the studio. While purifiers can help significantly reduce the amount of harmful materials in the air, they cannot completely eliminate the hazardous elements. Most of the models made for homes are excellent at servicing small jobs, but lack the power to handle larger projects.
My Austin Healthmate Jr. can exchange the air in my studio space almost 5 times per hour, just shy of the minimum recommended 6, and half the hoped-for 10.
-If you purchase an air filter, charcoal and active carbon are the best. A good activated-carbon HEPA air filter, such as the Austin Healthmate, costs about $600 with replacement filters priced at about $200.
OPTION 6:
A Respirator Mask
(Wait, wear a gas mask? …Sure, I’ll get right on that.)
A respirator mask is the absolute last line of defense, used only when all else has failed. If you cannot otherwise properly ventilate your studio, or you are deathly allergic to even a trace of the chemicals you are working with, then this would be something to consider. But if it looks like the job will require a mask, you really need to ask yourself if it is worth it.
There are artists who do work with masks and if you find that you have no other choice, then there are good ones available. Make sure the mask you purchase is OSHA or NIOSH approved and that it has an organic vapor filter cartridge. (Simple cotton filters will not suffice.)
Always consider the health of the other people in or near your work environment who are not wearing respirator masks.
OPTION 7:
Place a tiny little fan beside you that gently blows the air away from your face.
(False)
This option does not work at all. It merely stirs the air up, but does nothing to either dilute or replace the air in the room. The concentration remains. However, many people still seem to use it and believe that it works. They may tell you that it is a genius idea that Leonardo Da Vinci invented and that it makes you totally safe from everything. Do not heed their words. In that way lies destruction.
IN CONCLUSION…
If you are going to use solvents, you need to consider studio ventilation. For your immediate comfort, your long term health, and the health and comfort of those who live and share a space with you.
***Note!***
This ventilation described above is for dealing with vapors only. It is not sufficient if you are dealing with particulates (as with airbrushing or grinding paints). Be sure to research everything about all of the tools and paints you intend to use before setting up your own studio ventilation system.


…and That’s why I use waterbased media! 😀
What Ian said! 😀 Great article though, very important.
Do you still need to do this if you don’t use any thinning media when painting? When I’m working in oils, I don’t use any thinning agent… just use the tubes. To clean the brushes, I use a tub of brush cleaner and pour the waste into a container for the recycling center.
The only time that I do a lot of ventilation is when I’m actually varnishing the painting.
Nope, you’re good. Oils, unlike water-based media, do not evaporate… they oxidize. So it is not releasing any fumes or particulates as part of the drying process. In your case, all you need to worry about is accidental ingestion. Personally, I use a similar approach. I never use straight turpentine for any reason, even cleaning.
Great post! Can´t wait for part 2!
Thanks, Dan! Per your suggestion at IMC (last year), I’ve finally switched over from water-solubles to Rembrandt oils. Man! it’s amazing how smooth those paints are…. like melted butter.
I use odorless mineral spirits for brush cleaning, but very rarely as a painting medium. When I clean my brushes, I open a glass jar of spirit, put a small strainer that fits the opening of the jar in, so that half a centimeter or so of the strainer is below the surface of the spirit, then I quickly rub the most of the paint off the brushes against the strainer. I then wash more carefully with soap. During this process I hardly smell the spirit at all, but who knows what I have building up inside of me… The real problem is spray-fixing and retouch varnishing. Those things stink! I usually spray outside, but during winter that’s not an option.
Excellent!
I’m glad you posted this because I’m hoping to start setting up a space where I can oil paint more frequently in my house. I’m getting ready to start gearing up for IMC and I’m trying to get more familiar with my oil painting materials before I go, and gain confidence about the chemicals & materials I’m using. I currently draw & watercolor in a small room with one window. If I used solvents in here, it would probably be disastrous. I made the mistake of spraying charcoal fixative in here recently and the whole household was screaming for my head. While I know very little about oil painting as of yet, it seems that this concern about the safety of materials is absolutely justified.
Now, when I took my first oil painting class, they advised me to purchase Turpenoid, which claims to be odorless, yet still says on the bottle that the vapor is harmful. Is this really a good thinner to use? I know you’ve mentioned before about different thinners that you’ve experimented with, but would you mind recommending one that does the job without being too dangerous?
-Will
There are non toxic alternatives to turpentine for use with oil paints. I have normally washed my brushes in Dawn detergent and finish up with a dab of linseed oil to keep the brushes(natural fibers) smooth. No need to use any toxic materials if you are oil painting indoors. Plus no ventilation system is going to prevent you from getting exposed to toxic fumes as they pass by you.
Will, ALL solvents are dangerous. Some less so than others is all. Turpenoid is odorless, but it’s not particularly less harmful than many other turpentines. You just can’t smell it. And in many ways, that makes it MORE dangerous, because you are unaware of your exposure. Because I use it so scarcely, it doesn’t bother me. But if you plan on using it a lot while you paint, I recommend Gamsol. More on that coming soon!
Thanks Dan! I’m really trying to figure out this oil painting thing, especially so I can get more out of the lectures by you & others at IMC. These posts have been pretty helpful so far. I will definitely pick up some Gamsol next time im at the art supply store. Looking forward to hanging out in June!
Another danger of solvents is that they can penetrate the skin and carry cadmium etc. from the paint into your body. I use water mixable oils to avoid the solvent issue but am aware that they may not be as good as traditional oils. I have heard of users of traditional oils using oil itself as a thinner and no solvents at all. Is this viable? Presumably it would make It very difficult to paint fat over lean and in layers. Any thoughts?
It would be okay if the initial layers were allowed to dry a little before using the subsequent fatter layers of paint. The best idea for painting indoors with oil base paint is to park yourself in the garage! Open the garage door for fresh air. You wouldn’t want the air from outside blowing the fumes into your house so keep your door to the house shut.
This would greatly help illustrators that are using solvents. Regulating air ventilation in a studio is really important because some solvents, if inhaled, can pose health risks. In addition, room temperature can have an effect on some art work too, like if it’s too hot, some paint may melt and ruin the painting. So, it’s really a good idea for illustrators to at least have a device that can help ventilate the work space.
hello! thank you for this article, so much useful information! I saw the link to the website on how to make a continuous ventilation system, but was unable to find that specific post. Any suggestions? I paint with oil using gamsol and sometimes liquin. My painting/living space will be a little over a 1000 square feet of open space, tall ceilings and big windows, but only on one wall. I’ve become increasingly worried about the fumes. Do you think option 3 (continuous ventilation) will be sufficient? Thank you for your time.
Good tips. And I completely agree with you. Some artists always prefer to have their works done in a secluded, dark place to enhance their creativity, but this can also prove to be risky for their health, especially if they’re working with solvents. I think two choices artists can make is either have a studio that is light, airy, well-ventilated and in a wide space like maybe a sun room or a deck. Or invest in a really good HVAC system. As they say, creativity and productivity is tantamount to the health of the creator as well, so we must make sure we’re healthy first. Jeff Deem
I used baby oil for deeping the brush after used and at the same time proceed to cleaning, Wallnut oil is odorless & friendly to use. Baby & wallnut oil are enough for me to do oil painting…the safe way I know.
Walnut oil yes. Baby oil NO. It never dries. Put a drop on something and set it aside for a while. In a year, it will still be liquid.
So how do you clean your brushes, Dan? And if you’re switching between colors, do you just use different brushes?
Man these post are so important. Teaching artists alternatives to solvents and how to safely use them if they feel they have to should be emphasized all the time. I was effected by printmaking solvents early on and learned this the hard way. When I oil paint now I try not to use solvents at all but when I do I use Gamsol and cut it with safflower oil ( I think that idea came from Dan via an article about studio safety here). Has anyone used the water soluble oils? i just did my first painting with the Holbien aqua duo paints and was impressed at how well the water cleaned the paint! Not 100% sold on them but it is a great option.
I live in Minnesota. Opening the window can really suck. I use solvents all the time. What would you do if you were me? Thank you!
I want to know what in the world to do when it’s very hot or very cold outside, too much so to actually turn off the heating or air conditioning, and still have a great ventilation of outside air flowing through your studio? It appears from this article that to be safe one must endure the temperatures of the outdoors, no matter how cold or hot? …. I’m in the process of deciding whether to switch from acrylics to oils and using Liquin. The original article at the top of this page, frightens me.
…. joyce
Hi, im getting a backyard studio built. My main medium I use is epoxy resin making 5 foot paintings. I know resin VOC tends to be on the heavier side. I also know air needs to be pushed out and resh air coming in. Would option 2 be the best option for me? Im just wondering the proper ventilation wording to use yo tell my builder. Thank you so much.