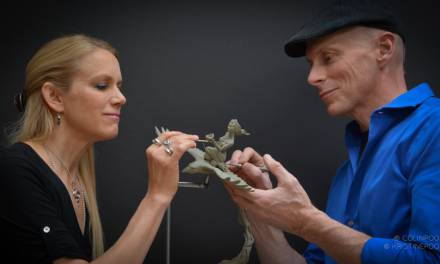
I’m starting off the new year with a chat with Lars Grant-West, who among other things is a fellow Magic illustrator, instructor at Rhode Island School of Design, and generous with his time (at least in this case) to a fault. I thought it might be interesting to both you fine readers (and me) to dig into his use of digital 3D models both in the creation of 2D paintings, as well as for finished illustrations (most notably for the covers of Jenn Lyons’ A Chorus of Dragons book series, as well as Kevin J. Anderson’s Wake the Dragon book series).
 Steven Belledin: Can you give me a bit a bit of your background? Schooling, how you got your start, that kind of thing?
Lars Grant-West: I graduated from the School of Visual Arts in 1990, initially planning on going into wildlife or children’s book illustration. I got some small freelance jobs, including a client who needed all different kinds of pre-press work done, from printing labels with rubber plates to product photography and retouching and making brochures and labels and stuff like that. I trained myself to use Adobe Illustrator, Photoshop and Dimensions (which was a vector-based 3D program that isn’t made anymore). This was a decade before YouTube tutorials but fortunately at that point there were still paper manuals. None of these programs are much like the versions we see today. This was back before Photoshop had layers, so functionally it was all very different.
SB: Oh yeah. I remember the bad old days of pre-layer Photoshop. Once they appeared it was like a relearning a new program.
LGW: Yeah, it really was.
Anyway, I eventually got a job at a local zoo—initially to help build and paint concrete rock-work. I ended up getting hired full time to help design and build exhibits…so that meant I finally had a respectable paycheck coming in. I was working under a great director who was very supportive of his staff. I met some really good people I respect a lot, and was happy to learn from. Meanwhile I started to pick up illustration work on the side.
 After about six years we started a graphics “department” (initially just me) at the zoo, where I did signage, layout and pre-press work (those old skills coming into use). This was nice because the work was less physical and I usually had some energy left at the end of the day to take on more illustration work after hours. It was a great job at that point in my life. I got to do a lot of fascinating things, like making foot castings of animals, do some skeletal preparation (a long-time hobby), casting and mold-making, lots of photography—it was one of those careers you don’t even consider in school, and that’s one of the things I think it’s important for students to remember. An Art career can be so many things. School should be about filling your skills toolbox, meeting interesting people, and expanding your experience. If you get locked into a career path too early, you start excluding options which actually might be more in tune with what you enjoy.
SB: Totally agree.
LGW: And in 2006 I went freelance full time.
 SB: I know you do 3D work because…well, I know you. But I don’t really see you advertising this kind of work, so I’m curious how it even came about that you got called for these covers. Can you tell me about that?
LGW: Greg Manchess and I have had several conversations over the years about weirdly niche stuff. Space craft, animal stuff, 3D photos (both the red/green type and the type where you have to cross your eyes). We’ve had several conversations about different kinds of reference building. I’d also played a little bit with a model made by Dave Seeley as reference for Greg’s Above the Timberline book. It was really just for fun…but a while later, Irene was commissioning a cover piece which called for 3D modeling. Greg dropped my name and Irene got in touch. in the end that turned into 8 pieces covering two series…So as far as how it happened, it was just a good friend making a very helpful connection.
SB: A lot of folks think networking is just about trying to make an impression with art directors, but in all reality, work can come from other illustrators and a lot of folks ignore that. I’ve gotten a ton of work from other illustrators’ referrals.
LGW: Oh yeah. It’s really important to create and foster those relationships.
SB: Of course in this case, you had specific skills that were needed.
LGW: Yeah…
SB: You’ve been messing with it for a while I assume.
LGW: I’ve used 3D for a long time. and in fact got fascinated with it back when I’d play Battlezone in an arcade back around 1980 or so. I sometime forget how long it’s been until I look back at older pieces. Early software couldn’t render textures, but it still let me look at virtual things I created from different angles. There’s always been a part of me that likes to make things, and this satisfied that part of my brain.
I used 3D software to build reference for several pieces over the years, but I think the first piece I where I submitted a digital rendering as a final for was Glimmervoid for Magic:The Gathering (2009 – Art director Jeremy Cranford and Jeremy Jarvis at Wizards of the Coast).
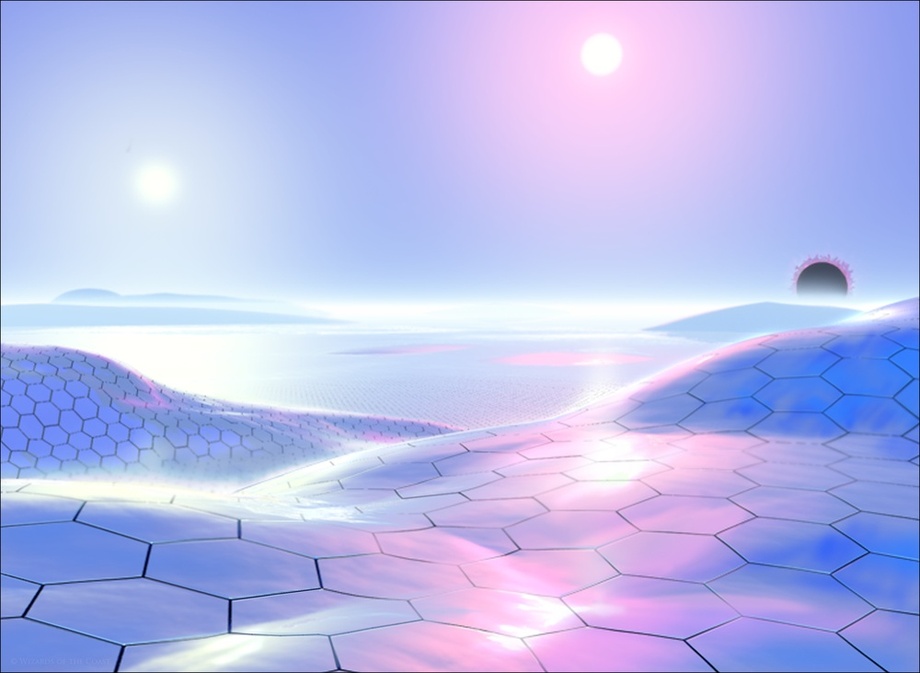
Glimmervoid for Magic: the Gathering.
To be clear here, by “rendering”, I mean the way the art was created was not using digital brushes as one would on a 2D surface, but building models in a virtual 3D space, defining materials for each object, setting lights and moving the camera around the screen – then letting the computer determine what the viewer would see. This assignment was kind of mind boggling to me – something like – “Show an otherwise featureless metal landscape of rolling hills, covered with a hexagonal grid, lit by the light of five suns”. The idea of traditionally rendering a hexagonal grid in metal, lit by four suns was daunting – especially considering reflections, bounce light, ambient light—it was nuts.…I knew I could fake it and make it work, but that twitchy part of me really wanted to know what that would look like, so I figured I’d try it in 3D. It would be an almost laughably simple thing for most 3D software now, but getting the computer to calculate all that stuff in 2009 software called Bryce took hours…then I’d tweak something and have to render again.
SB: And I assume those tweaks and the re-rendering would have represented a lot of time.
LGW: Oh yeah.
SB: What do your sketches even look like for 3D finals? Are they 2D?
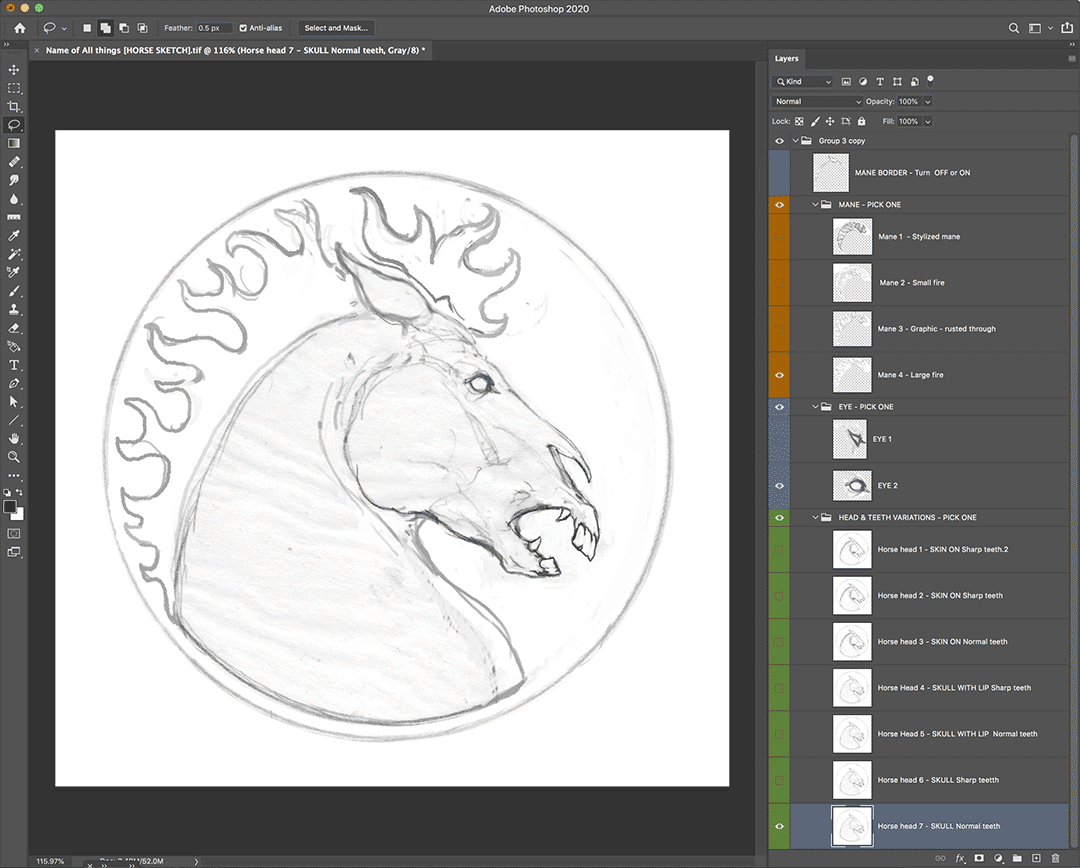
LGW: Absolutely. The interesting thing about one of the series was author Jenn Lyons usually had sketched an idea of what she wanted, so I had a bit of a target, and went from there. The vantage point was always straight on front view of an object which was a crafted sculpture rather than a real living thing – so there was some fun design work there. (Here’s a link showing another example of everything from the author,s sketch to the final cover: link).

Jenn Lyons’ sketch for the cover for The Name of All Things.
I love drawing traditionally, and if I’m being frank, I prefer the look of traditional pencil sketches over my digital drawings. Practically speaking though I’ve been seduced by the advantages of sketching digitally. It’s so easy to shift, bend, warp and scale objects to make refinements or corrections, and playing with value digitally that is so much quicker.
Sketch progression (click to see the variations).
So the sketches are 2D—though sometimes some elements may have been modeled in 3D (generally very simply), and drawn over. This lets me create a repeating object and quickly show it at several different angles. I’ll photoshop modeled elements together and draw over them to unify the sketch.
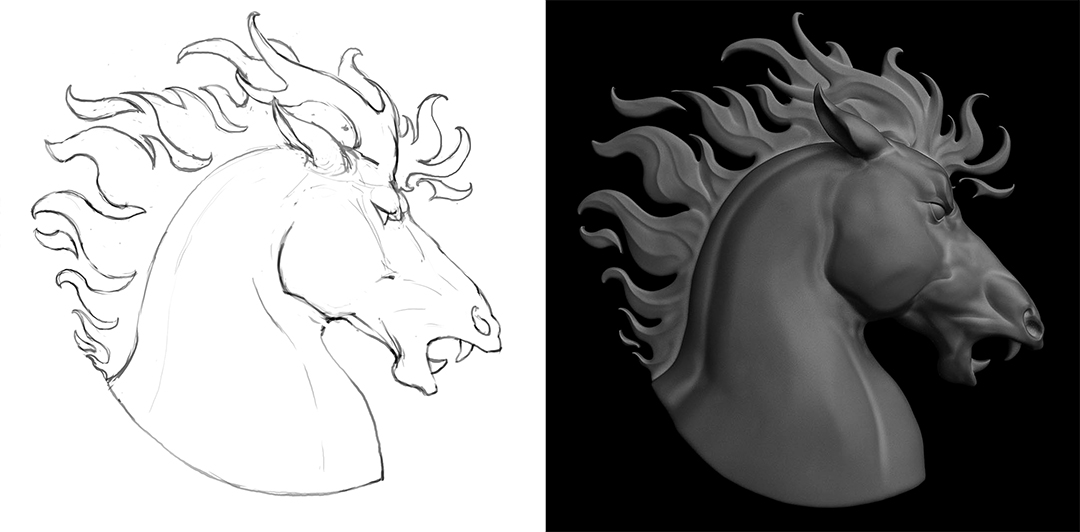
Final approved sketch and the digital sculpt.
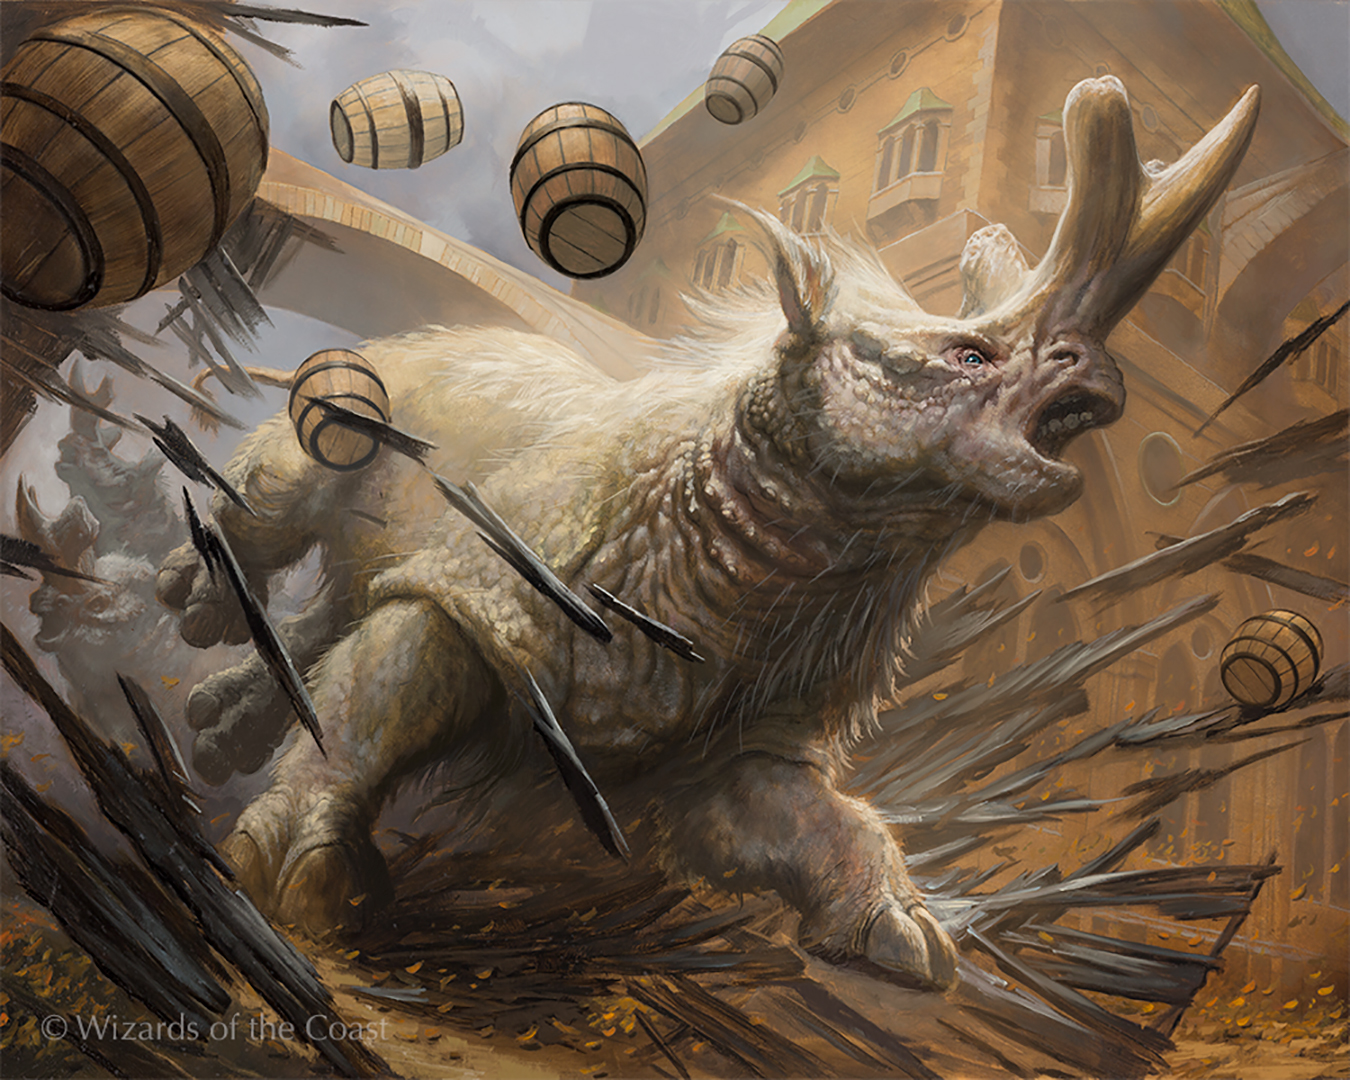
But for more complex images, I’ll use a big mix of 2D and 3D. The process I used for Ceratok Pathbreaker (again, for Magic: the Gathering) is a good example.
The cartoon (which is the actual full scale printout that gets transferred to the board using graphite transfer paper) is cobbled together from several sources.
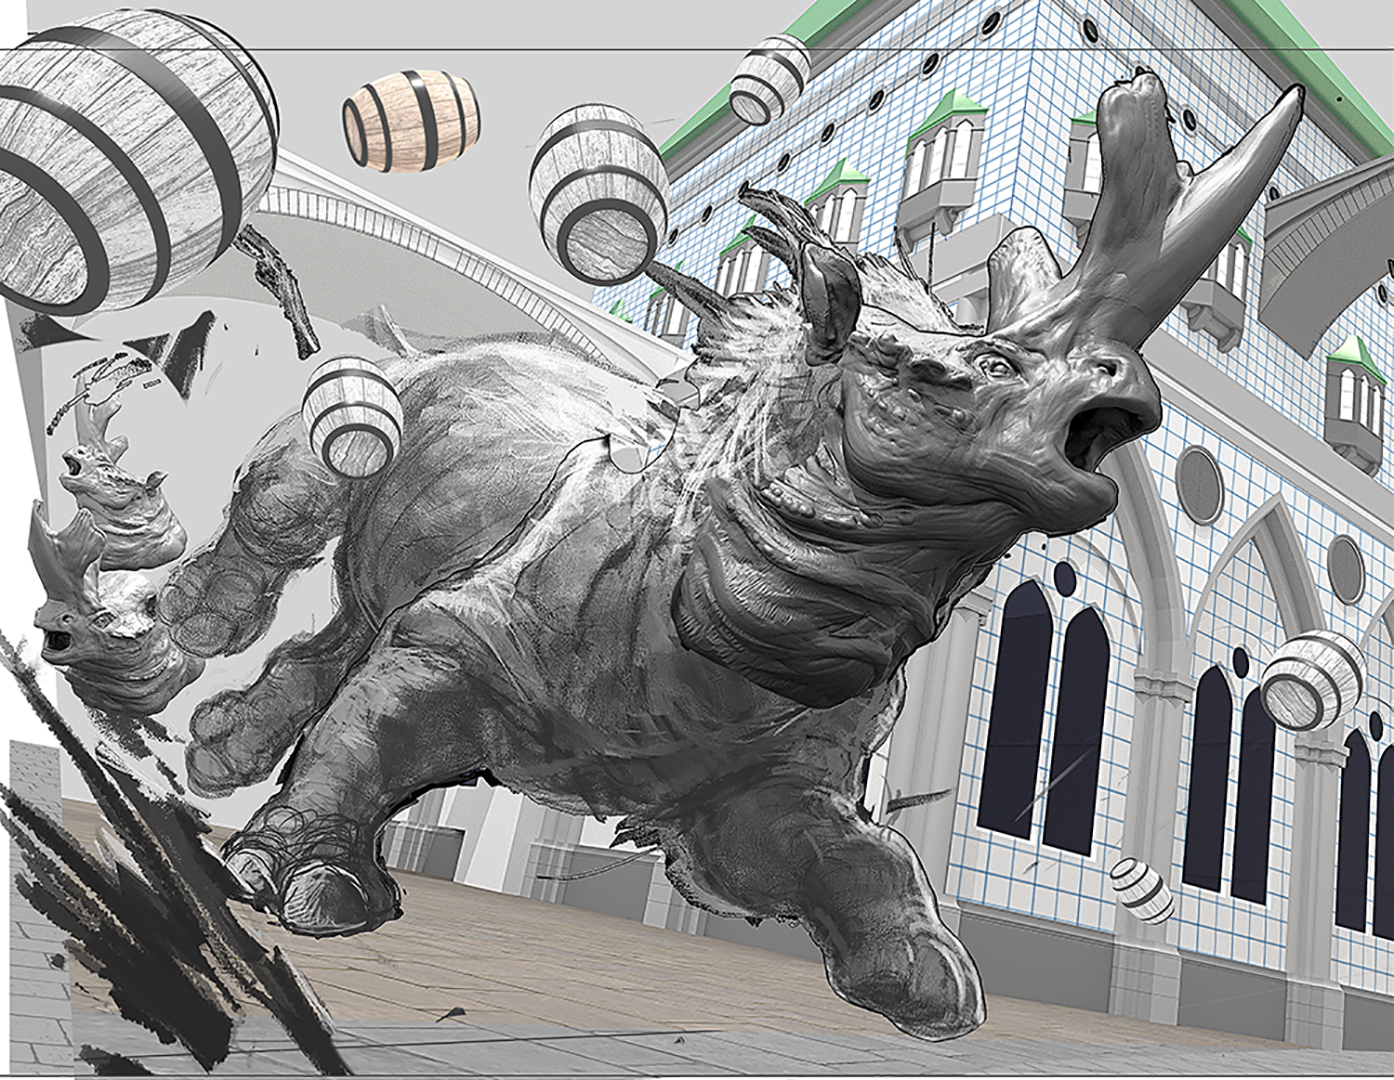
Ceratok Pathbreaker cartoon utilizing 3D elements.
- The barrels created and flung about in Blender.
- The architecture was created in Blender as well. I’ve created a grid material which I can use as a rough aid in perspective to draw in some brickwork here and there as added detail. I’m not actually drawing all that brick texture into the 3D model. I’d just be drawing it twice.
- The main Ceratok is a large side view of the model, with the body sketched in freehand. Details like the hair, in the final, are made up as I’m painting. There are a couple of other Ceratoks in the lower left in the background. (Here’s a link to a turnaround of the Ceratok’s head: link).
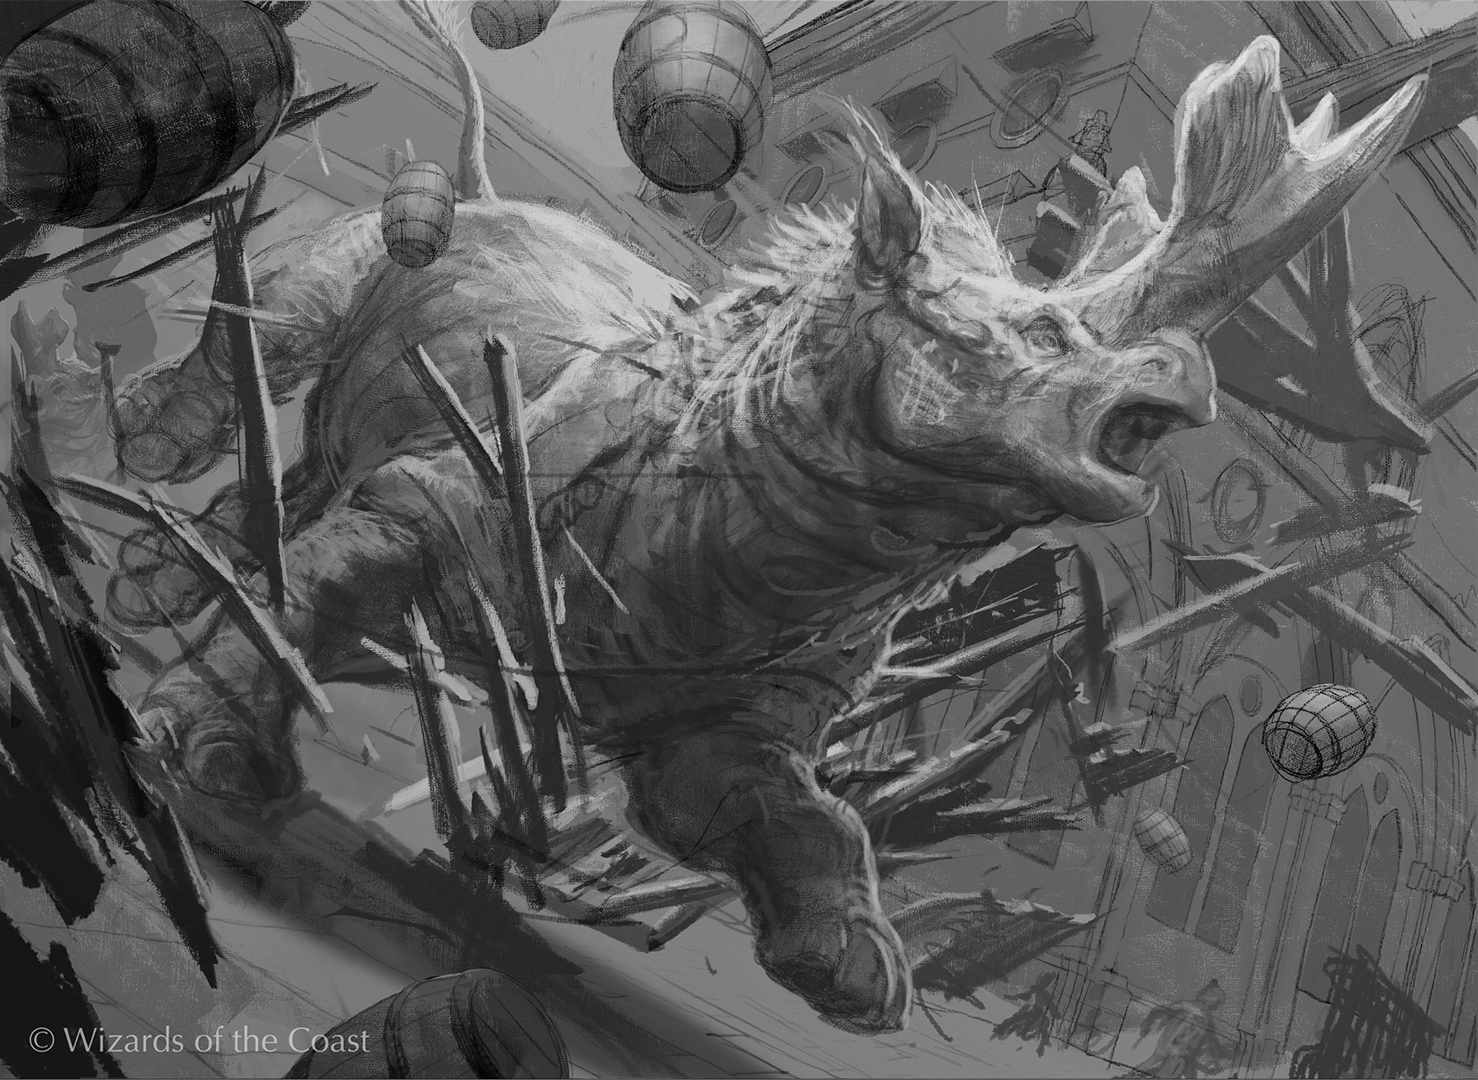
Ceratok Pathbreaker sketch built on the cartoon above.
For traditional work, the transfer process removes the sense of digital precision. I use a red ball point pen to transfer the drawing by hand, so straight lines don’t tend to remain perfect.
Ceratok Pathbreaker final painting.
I end up with a simple line drawing on the board. As I start laying in paint I have my renders, my sketch, a 3D print of the head, which I can light in the real world, and whatever photos I’ve collected as reference.
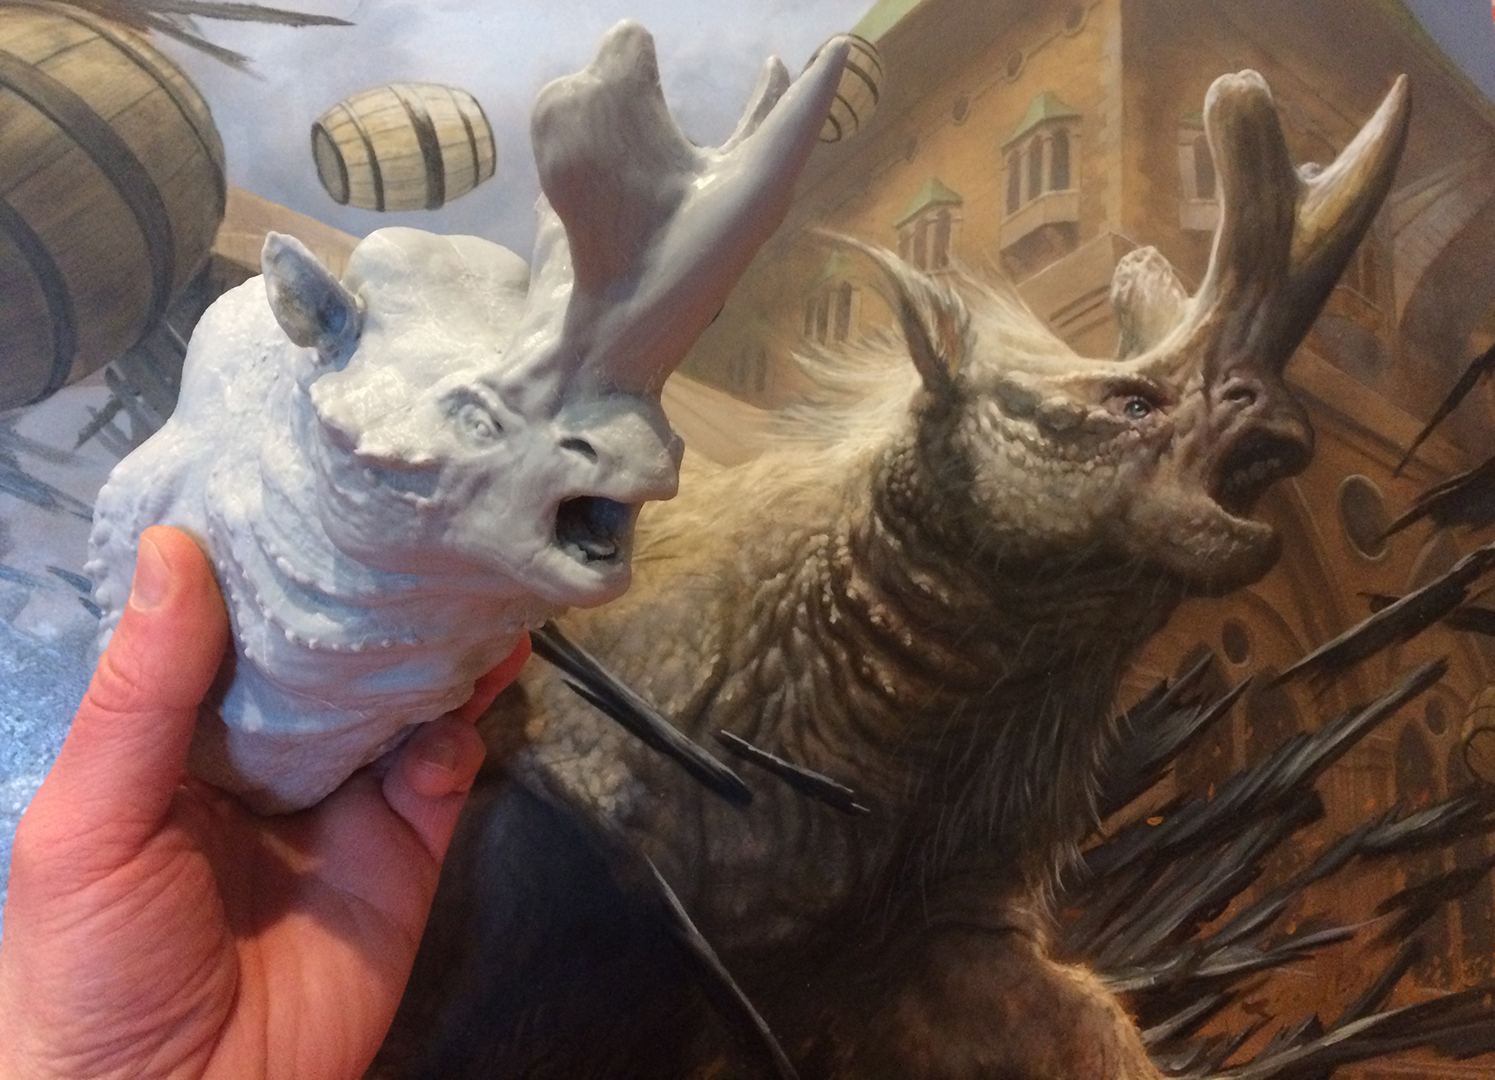
Ceratok Pathbreker painting with 3D printed sculpt.
SB: That gives you a lot of tools to draw from.
LGW: It does, yeah.
SB: Once you’ve got sketch approval, are you updating the AD with progress allowing for tweaks and changes as necessary? Or are have you been pretty much left alone to do the work as you see fit?
 LGW: It depends on the job. For the book covers, the development process is more involved than it tends to be with traditional art. One of several sketches gets approved, I make a model, then the model gets tweaked if needed. Then I give material and lighting options. At each step, the Art Director has to run it by the author and editors, and there are tweaks and revisions that need to be made. Admittedly, I may be overcomplicating things – but there are just so many options. Even so, I still send the Art Director a pile of layers that they can turn on or off that do things like push or pull back reflections in metal, for example.
 With traditional illustration, it’s the much more familiar process of sketches – sketch approval or revisions, finish, finish approval or revisions.
SB: What programs are you doing this stuff in and can you tell me a little about your process?
LGW: The process I use for this kind of work is a bit strange, and depends on how I’m incorporating 3D, and what kind of finish I’m trying to create.
For a traditional finish I’d use 3D modeling to generate reference. In that case I’m using it the same way I’d create a clay or polymer clay maquette, or hire a model to pose. It becomes a tool to determine lighting, and sometimes to help view a scene from a variety of camera angles. I might also make a 3D print to use the same way. A lot of times my reference is from a combination of these sources.
I’m using several different programs to do this. A lot of the more organic digital sculpting is done in Zbrush. More hard surface stuff (architecture, for example) happens in Blender. Lighting and final rendering is also done in Blender.
If I’m doing a traditional painting, I’m intentionally leaving models a bit crude. Any detail I put into a sculpt becomes something that I tend to try to replicate in paint – so I try to keep things on the simple side. It’s absolutely possible to add every scale and eyelash to everything, but at that point there’s little point in dialing it back for a traditional painting. I do like drawing and painting, so I find it’s best to leave myself some freedom for the final.
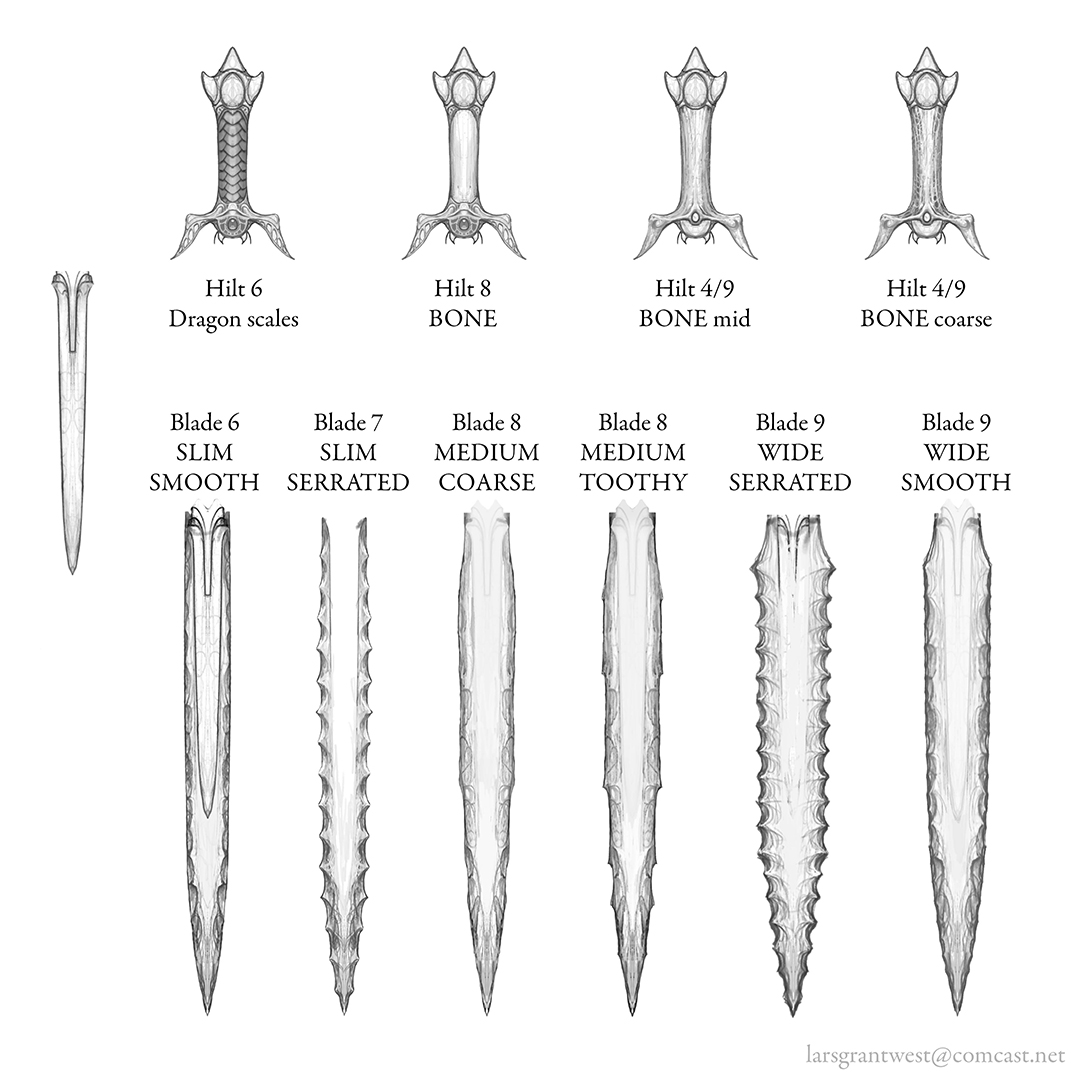
Sketches for the sword design for the cover of Kevin J. Anderson’s book, Vengewar.
For a digital rendering, I build the models the same was as before, apply materials/textures, usually using Blender and/or Substance Painter, put all the elements together in a scene in rendering software (I’ve used Keyshot, Marmoset Toolbag and Blender for these), move the camera around, set up lights. and start rendering. This software takes all these elements I’ve set up and lets the computer do the math. I usually do a pile of renders, then drop them into photoshop to composite the layers in different ways. For me it’s a much more involved, far less intuitive process.
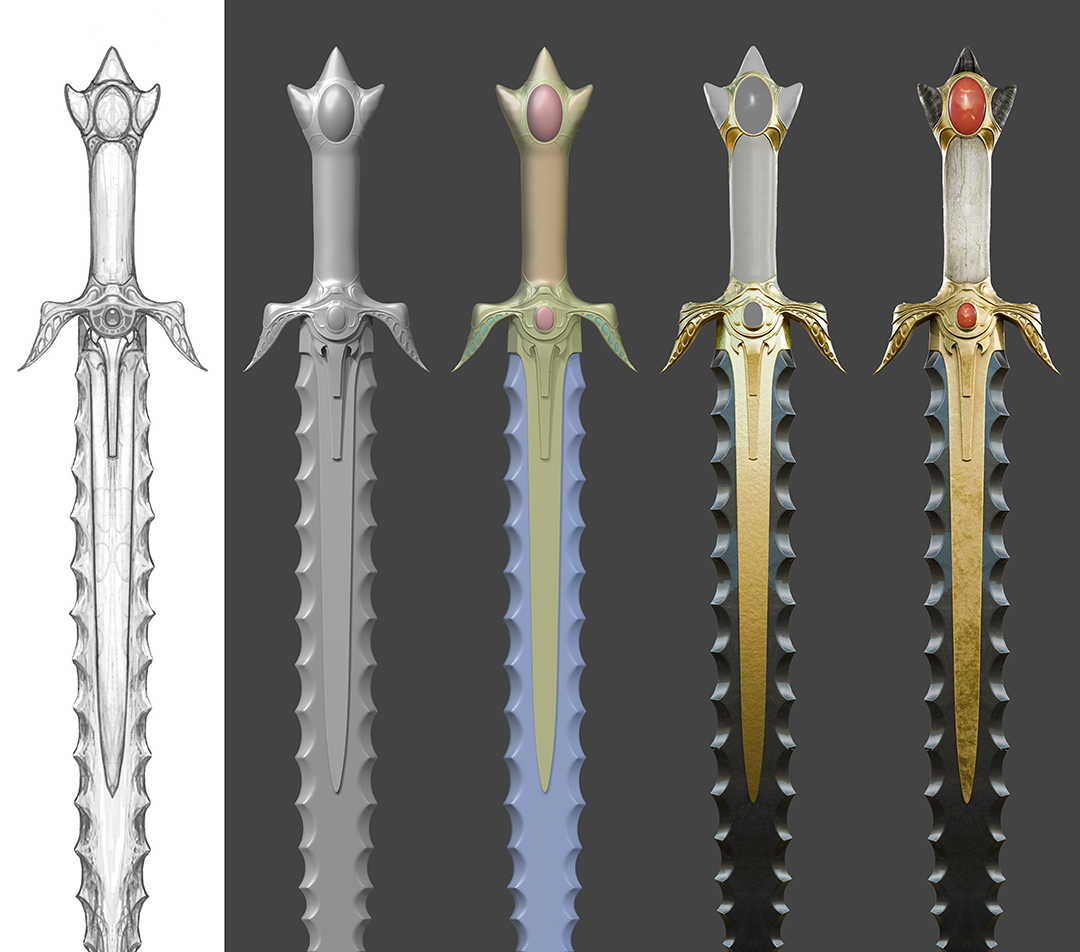
From left to right: 1) approved sword design, 2) sword modeled, 3) mesh divided into material regions, 4) digital materials rendered, 5) photo textures added – (mostly horn and bone Lars had in the studio) overlaid on digital model.
The thing I really like about this is it keeps me interested. Each of the book covers I did gave me a chance to learn some new aspect of the software….and I try to look at my initial reference hunt before each job as that kind of opportunity to learn as well.
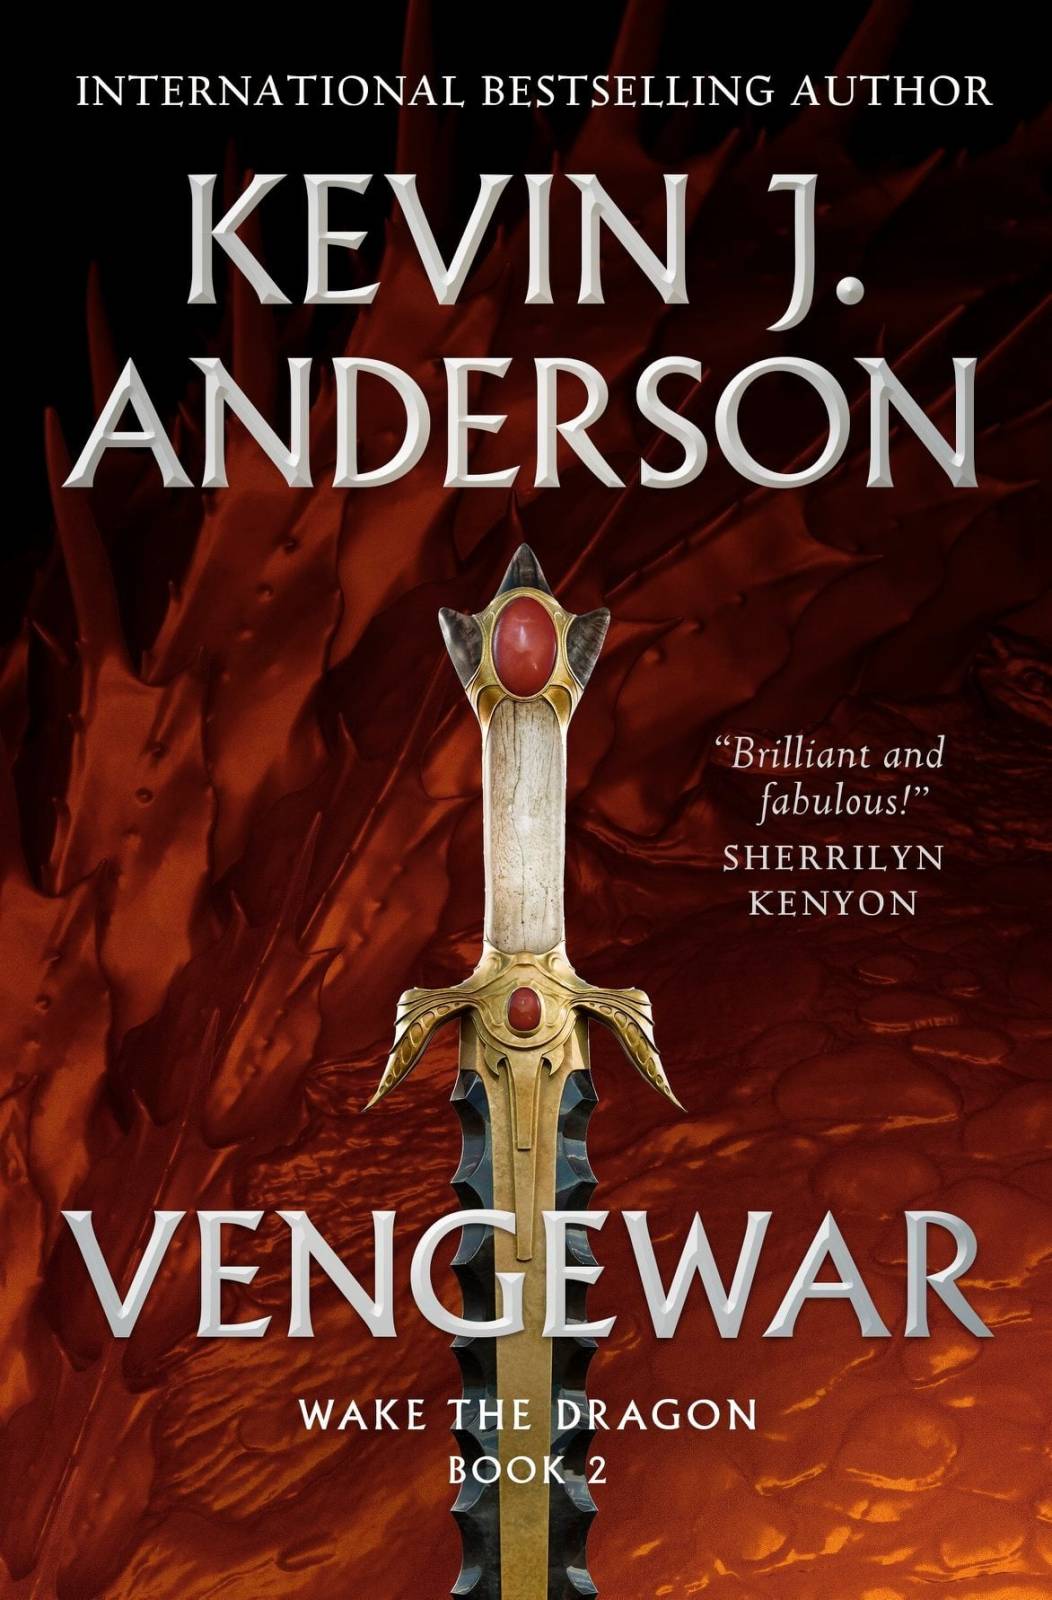
Final book cover.
SB: As far as the final renders go, I assume then that you’re agreeing on the materiality up front? Like this is thing is definitely going to be metal. Or are there occasions where you’re sending in various options—wood, marble, metal and so forth?
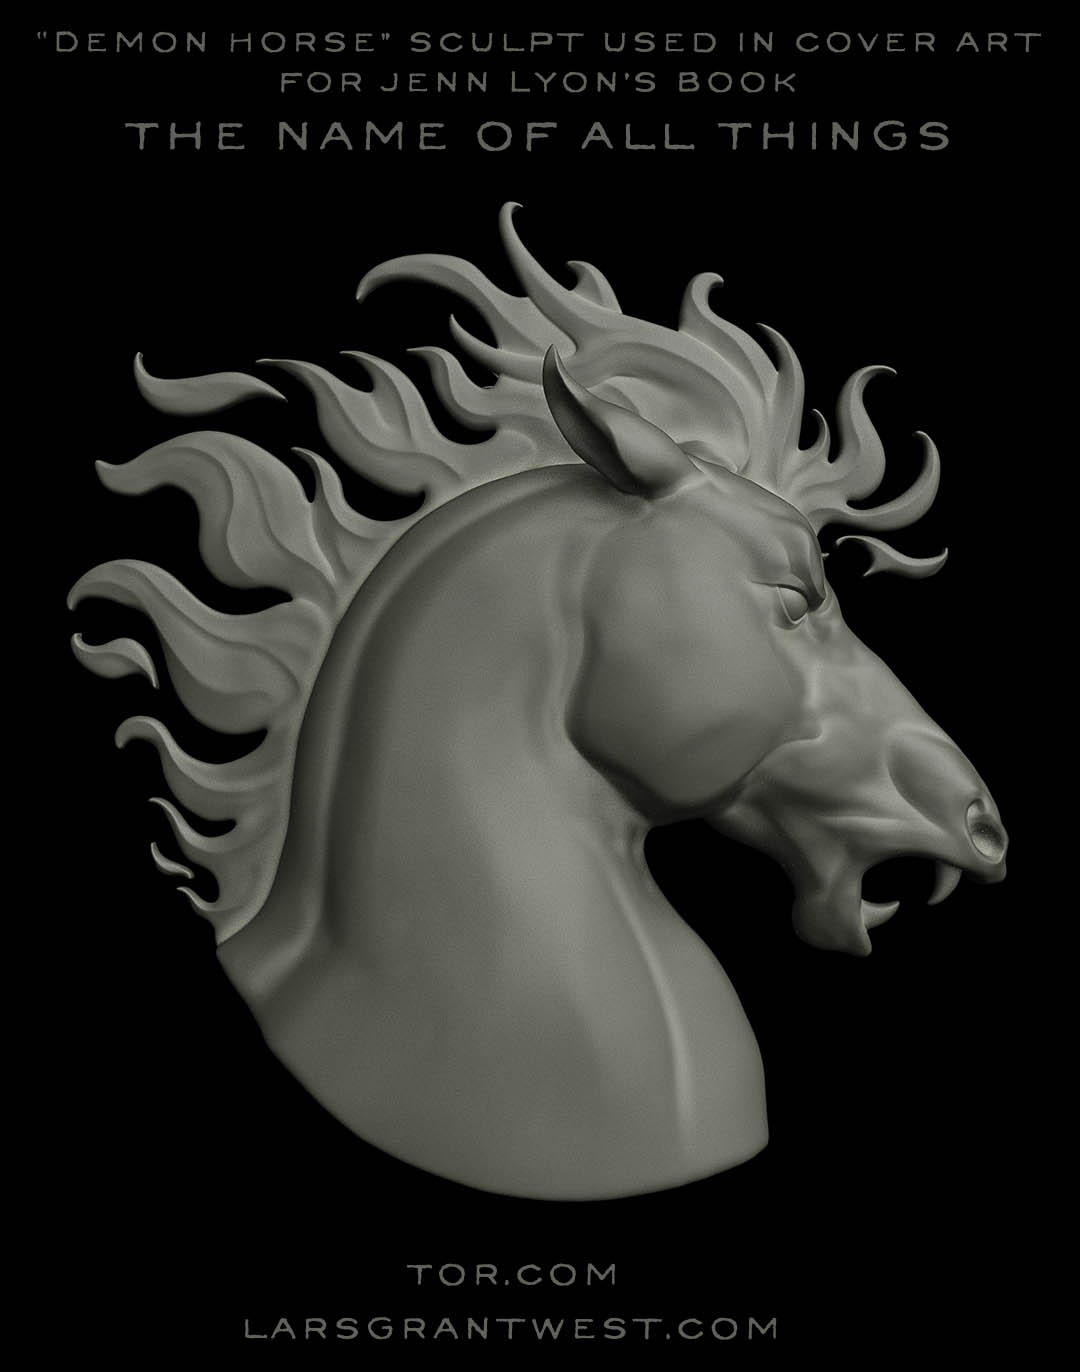
Final sculpt for the cover of the Name of All Things.
LGW: There’s usually an idea of materials from the beginning; This kind of metal or that kind of stone – but there are just so many options. Once the object is modeled I do need to get someone else involved because what I like isn’t always what the client needs. With software you can tweak things forever…which can be a trap – particularly if you’ve spent a lot of time staring a the screen.
In a situation where I’m delivering a final render, there’s material color, any wear to the surface, any passage of light through an object….on and on. When working traditionally, That’s the stuff I leave to traditional brushwork.
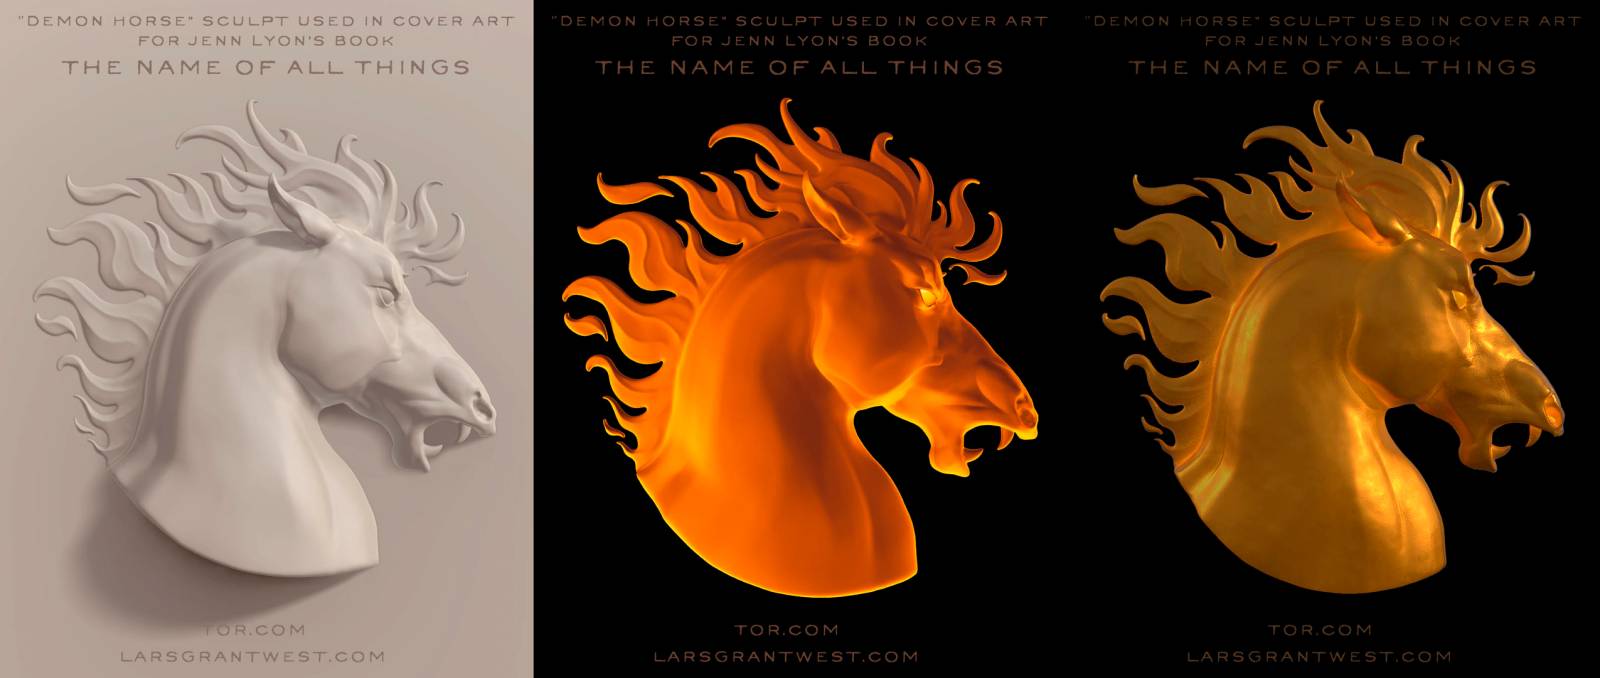
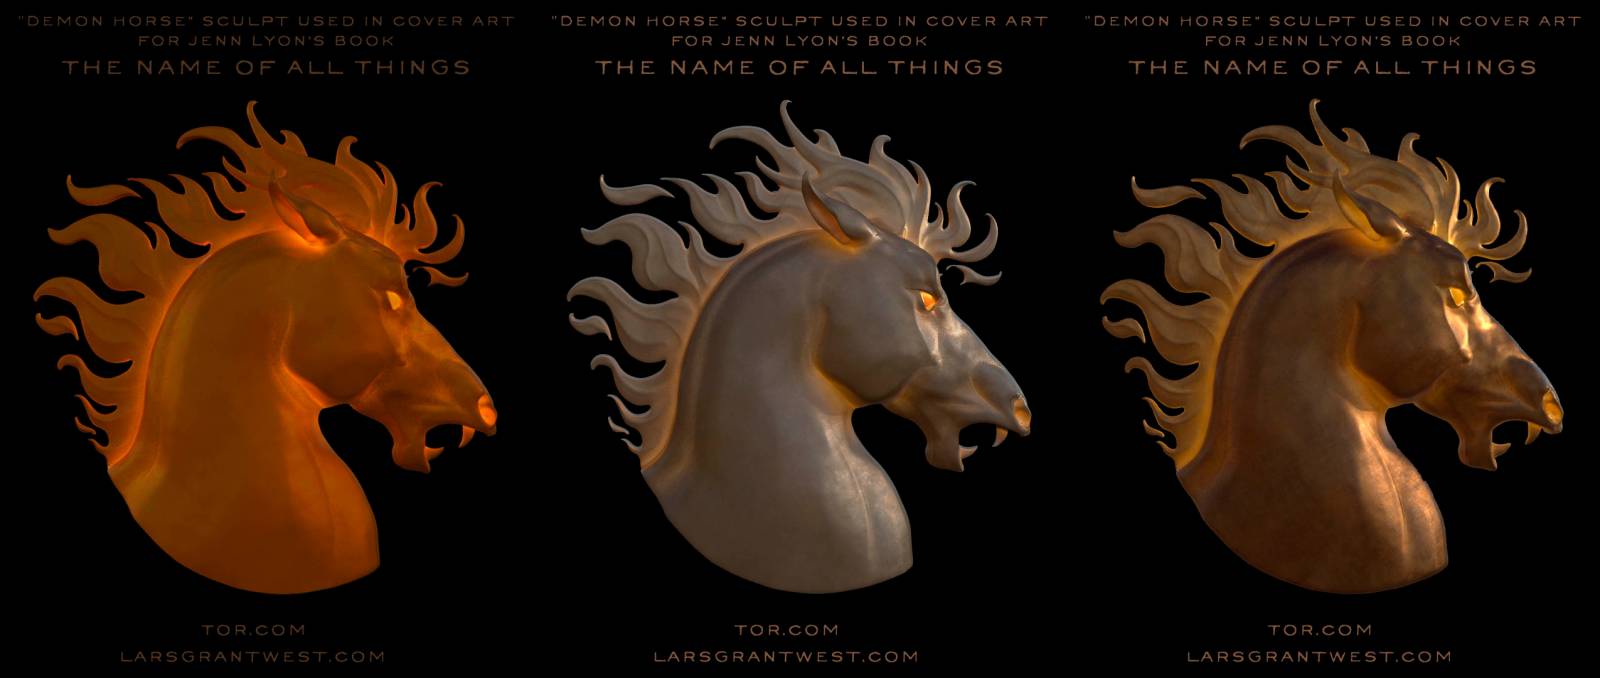
Various material options for the horse on the cover of The Name of All Things.
SB: Makes total sense. Tweaking all those fine details would probably be a huge time sink for me. I’d imagine that while sometimes that stuff is easier to do in the 3D programs, other times it’s easier to just pull the image into Photoshop and make tweaks there. Is that something you do?
More material options.
LGW: There’s always at least little bit of photoshop on top. I wouldn’t say I’m an expert modeler, so there are little things that need fixing or textures that need to be added.
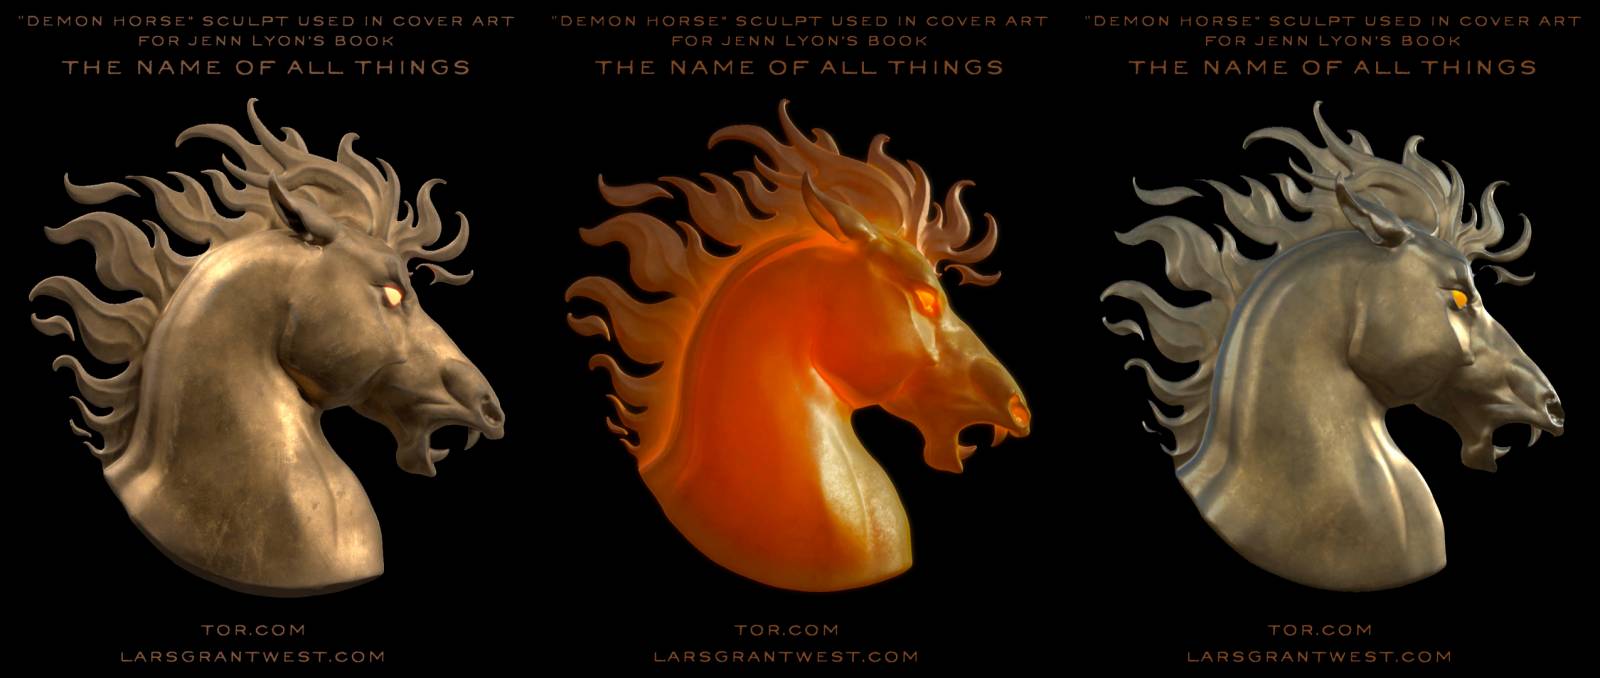
Still more options.
Some do have more direct manipulation, so some end up with less Photoshop work than others. And that includes everything from color tweaks to things like creating depth maps that allow me to add atmosphere. (Here’s a link showing an example of this kind of thing: link).
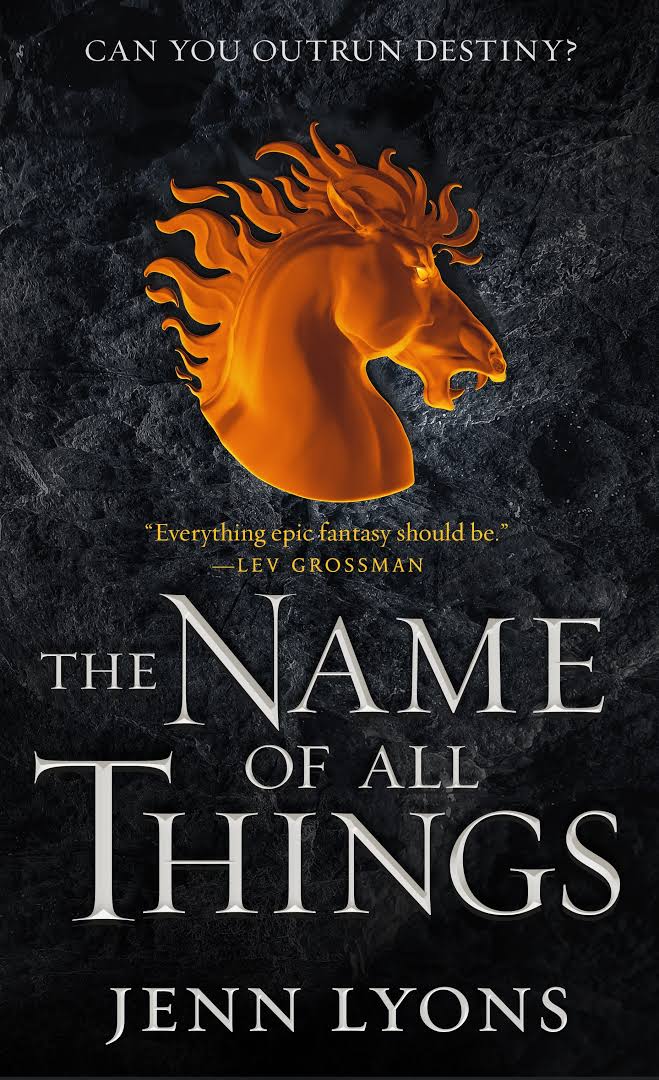
And the final cover.
SB: Do you enjoy doing these 3D images as much as your traditional work?
LGW: Each satisfies a very different part of my brain, and I’ve yet to find a perfect balance. The digital stuff is very technical, while the traditional work is usually much more intuitive and a reaction to my mood.
I really enjoy digital sculpting. It’s an interesting parallel to traditional sculpting. Certainly akin, but different. In Zbrush you can have brushes that extrude a scale – not an image but a 3D shape – or apply wrinkles or rivets to a surface instead. There’s a novelty to it that fascinates me.
I can sculpt a digital model about as quickly as I can sculpt one in clay – but refining and adding detail is time consuming. There are people who can blaze through that stuff, but I’m not one of them.
The range of material possibilities comes after quite a bit of effort goes into model building, but at that point lighting, atmosphere, colors – all are almost infinitely malleable. The fundamental difference in plan of attack for me is that the stuff you tweak towards the end in of a digital render is the stuff you usually plan from the outset in a painting.
SB: That’s something I hadn’t even thought of, but it makes a lot of sense, and that feels like a shift that would be hard for me to make. You seem to be able to switch back and forth fairly easily. Was that a natural progression? Or was it something you had to push to make happen and really hone?
LGW: 3D is really a very different animal for me than traditional painting…and if I’m using 3D to make reference there’s a point where I need to switch from that analytical side to something more intuitive, because for me the image making process is almost completely opposite.
With digital models, I feel a little more like a photographer – building a model and then moving around it to find an angle I want to shoot it from. This is often the point where I’m finding an angle I like, then locking that camera down and adding a new one and searching out other interesting angles. Incidentally, the process is often the same when I sculpt a clay model. I always have a basic idea of what I want to create, but after it’s made, I might explore other angles or lighting scenarios. It’s like having a human model from you and being inspired by their pose. The physical/virtual object brings with it some serendipity
When I work traditionally, say just working from scratch with an oil paint stick and no sketch, I’m starting with a composition and refining the elements. Cyberdragon, though very old at this point, is still my best example of when that process works well.
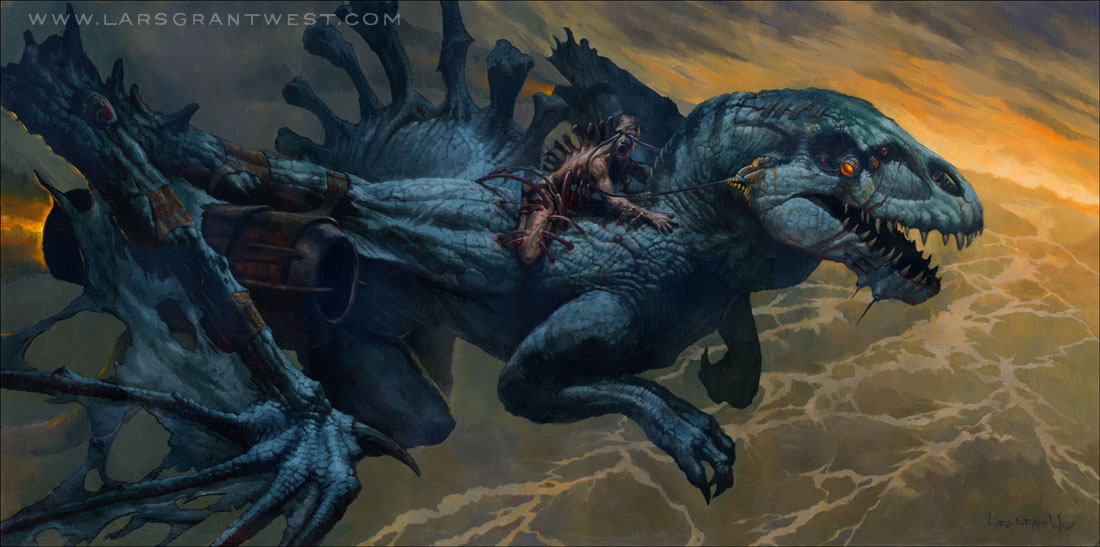
Cyberdragon
For digital renders there’s absolutely a higher level of finish because every bit of it matters. There are no intentionally unfinished passages or beautiful tool marks unless they’re created after the fact with Photoshop. If you don’t make a model right, it just looks messed up.
SB: Huh. Yeah, I can see what you mean. If someone wants to dip their toes into doing this stuff—even as preliminary images for 2D art, what program or programs would you recommend, and are there any tutorials that you’d recommend they look into?
LGW: Hmmm… there are a bunch of options. In (rough) order of complexity:
Zbrush CORE mini – FREE
Really geared towards simple models and 3D printing. I’d give this a try if you just want to see if you like 3D sculpting. You need a graphics tablet or something like that to sculpt on a virtual 3D sphere, but you can build a surprising amount of complexity into it. You’ll start to get the fundamentals in minutes.
https://zbrushcore.com/mini/
Google Sketchup (free with paid versions/subscriptions)
More geared towards architectural modeling, Sketchup is very straightforward to learn. Using online videos you can be up and running at a reasonable level in less than an hour. I liked the software a lot, but stopped using it after a while because I bumped up against needing a pay version to export in the OBJ format I was using when I played with it. Still, a great piece of software for models. It doesn’t have all the material sophistication, but you can export models and import them into Blender fro much better renders.
https://www.sketchup.com/plans-and-pricing/sketchup-free
There are people who bring Sketchup to extraordinary levels – notably the previously mentioned Dave Seeley.
Zbrush CORE – $162 or monthly subscription (price can be put towards full version of Zbrush)
This is a stripped down version of Zbrush. It’ll do a lot of the sculpting functions, but without some of the higher level functions Zbrush permits. – but you can still make amazing models with this software. If you’re unfamiliar with 3D, you won’t miss the things that aren’t here. I’m pretty sure you can count the price towards an upgrade to the full Zbrush package.
https://zbrushcore.com/index.php
Zbrush – $895 or subscription
The big dog. Probably the best hi-poly app out there.
https://store.pixologic.com/zbrush-2022/
Nomad sculpt – $15 (Yup. That’s right.)
if you have an iPad pro with apple pencil or tablet that uses google play. You’ll want a pressure-sensitive screen/stylus
Mind blowing modeling software for the price. Not as fully featured as Zbrush, but still insane at the price.
Blender – Free
Amazing open-source software. Very fully featured and constantly being worked on. Good for box modeling, does organic stuff as well, though it doesn’t have quite the power behind it that Zbrush has with dense models…it will still do it. Does everything from modeling to full renders to animation. This and Zbrush are my mainstays.
There’s a steep initial learning curve, but tons of tutorials out there to get you going.
This is far from a comprehensive list, but Blender and Zbrush are two of the big hitters out there, and you can get a pretty good start without spending a lot of money (Zbrush being the exception there).
SB: Awesome. I really appreciate you taking the time, Lars. A lot of good stuff in here and I appreciate you being so generous with your time and images.
LGW: No problem.
SB: If you want to see more of Lars’ work check out his website LarsGrantWest.com or check out his Instagram page here.

Recent Comments