
Packing and shipping…well, isn’t today’s topic just too sexy for words? Having just come back from our first in-person convention in two and a half years, transporting art is very much on our minds. Our first time exhibiting at Monsterpalooza was a whole lotta fun and featured terrific people-watching. The attendance was insane, with lines around the block that started forming at 4 am – those are some devoted fans.

Let’s Pack It Up
To the topic at hand: despite the fact that packing and shipping often indicates an artwork going to a new home (very exciting), this is one part of our art business that can cause a bit of stress (not so exciting) and is generally not our favorite thing to spend time on. But it is very important to pay attention to details to insure your work arrives where it’s going in one piece.
We’ve tried many alternatives for getting sculptures there and back safely (with widely varying degrees of success), including wooden crates, double boxing, bubble, foam, custom expanding foam cavities, fiber fill and more. We have settled on a few options that seem to work best for various types of sculpture and transport situations.
I divide packing into two categories: 1. someone else will be unpacking, repacking and shipping it or 2. we’ll be transporting it ourselves.
Packing for Others
If someone else on the other end is going to be handling our artwork, it’s a completely different conversation than when we’re doing it ourselves. It’s a good business practice and also a basic courtesy to the people receiving the work to not make unpacking your work challenging, especially if they will also have to repack it.
We always emphasize the importance of saving our original packing materials and boxes, as we selected them to best protect our work, plus the materials can be pricey to buy and time consuming to prepare. Despite this, on numerous occasions, we’ve had pieces returned in unfortunate manners, including one bronze that came back from a museum wrapped in a table cloth with part of it sticking out the side of the box. This, even though we called the curator the day before shipping to confirm that he had all of our original packing material. If he had mentioned that they had lost all of it, we would have sent them new packing supplies appropriate for shipping a bronze sculpture.
Just recently, we were at a high end gallery where they were unpacking paintings from a wooden crate. The crate was clearly labeled “open here” on the side with screws, but the writing was quite small and not in an eye-catching color. The staff had ripped into the opposite side of the crate with a claw hammer, which was nailed and glued together, destroying the crate (but fortunately, not the artwork).
Inevitably, when our work is re-packed in another artist’s box with different materials, it returns damaged or broken. Bad packing stories are ubiquitous and cringe-worthy, but good packing that’s well-labeled and easy to deal with is also memorable. At Monsterpalooza, a pair of gallery owners that we did a show with over a year ago stopped by our booth. It was our first time meeting them in person and they were effusively enthusiastic and grateful for the way our works arrived for their show. Good packing leaves a professional impression. The idea is to make everything as effective and easy as possible for everyone concerned.
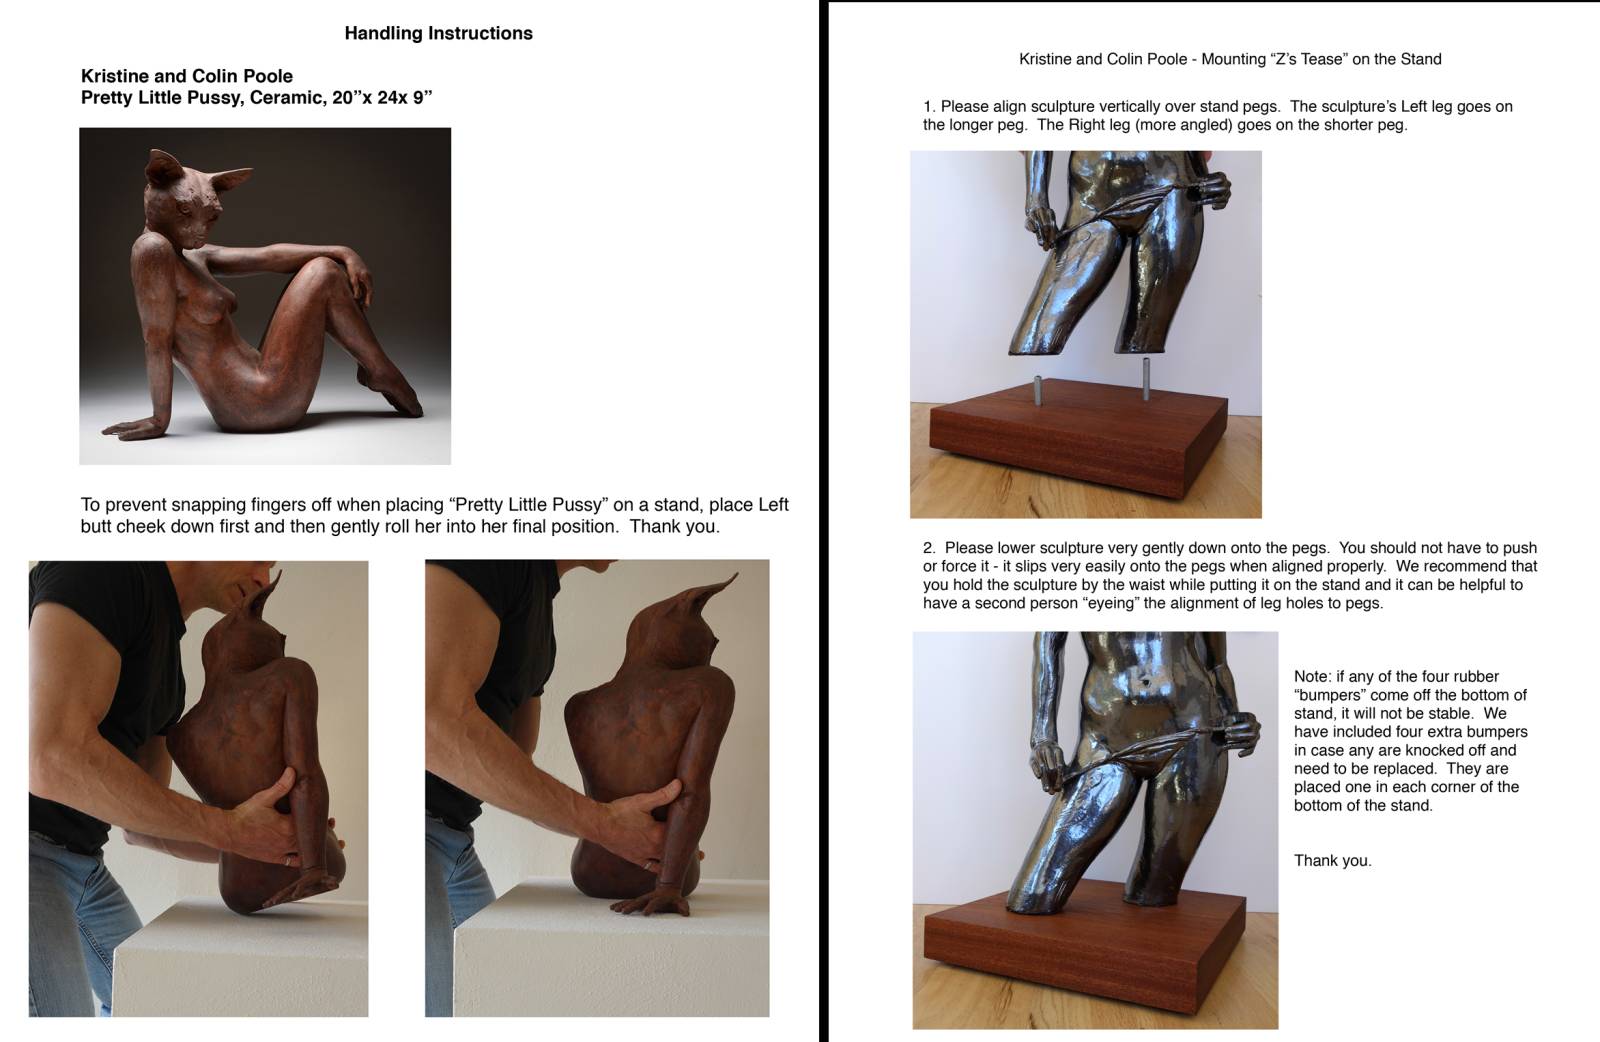
Even with things that are so obvious it might seem silly, we include simple instructions printed clearly in a location they can’t miss. You don’t know that the person who unpacked your work will be the one re-packing it. Being certain there is no confusion on how something fits back in the packaging helps if someone didn’t get to see how it came out.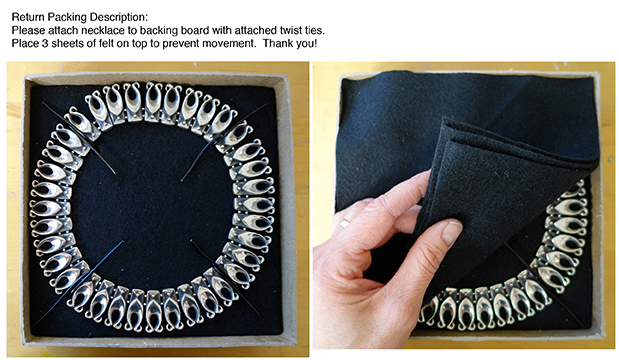
We generally ship big works with an art delivery service. When we’re dealing with FedEx or UPS for medium to small size works, we presume the package is going to get thrown around a fair bit and turned just about every which way but loose, regardless of any arrows or fragile signs we put on the box. We’re familiar with the urban legends about packages labeled fragile getting harsher treatment out of spite, but we disagree. Fragile stickers are useful and can help in making an insurance claim if necessary and occasionally, the delivery person may pay attention to it.
In the past, we used a fair amount of bubble with our ceramic pieces – that’s often what is recommended by shippers and museums. However, we’ve discovered that being at 7000 feet elevation, bubble wrap is not a great choice for us. When it goes from us to lower elevations, the air shrinks a bit, allowing the piece to move around more than it should. When it comes to us from lower elevations, it expands and can put stress on delicate parts of the sculpture. It’s also complicated to insure that the person doing the re-packing will wrap the bubble with the proper amount of tension.
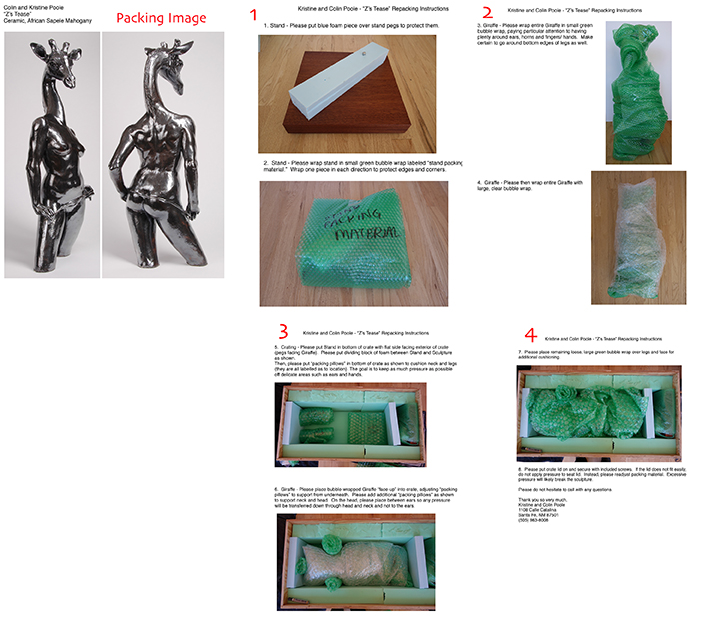
You can imagine following these instructions for repacking could get pretty complicated in a hurry, plus, there’s a lot that could go wrong. It’s a good thing we’ve moved beyond this version of packing!
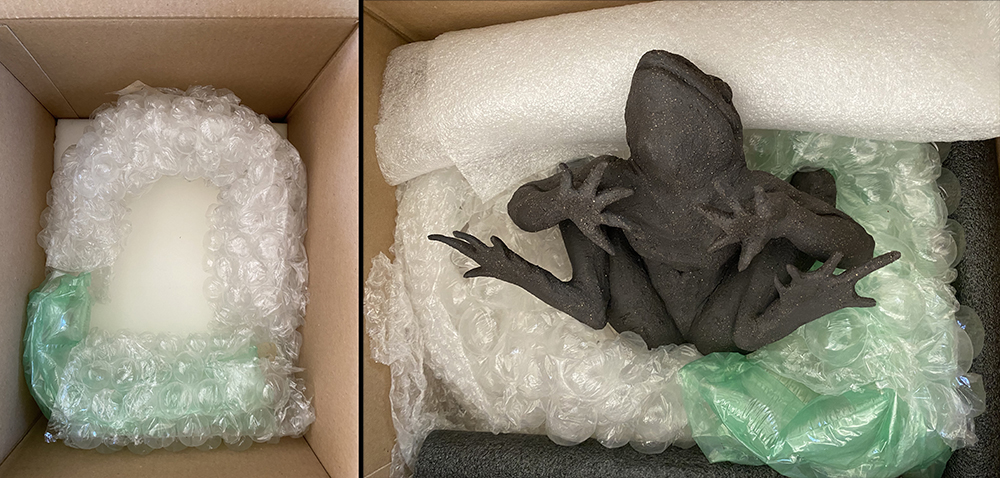
In any cases like this where the sculpture is obscured by the packing materials, we always include an image of what is packed in the box, so whoever unpacks it will have a sense of where the delicate parts are and hopefully, not grab her by the ears or fingers.
Packing Fired Clay – A Better Way
All that said, our latest preference for packing and shipping ceramic works is upholstery foam. It takes more effort to put the package together at first, but is fabulously successful for safely shipping works and having them returned packaged properly.
We’ve been using FoamTouch Upholstery Foam (2″ x 24″ x 72″ High Density Cushion), about $40 through Amazon. Sure, it’s more expensive than bubble wrap, but hugely less expensive (and less irksome) than having the piece sent back to us for repairs then paying shipping again to return it to the gallery/client.
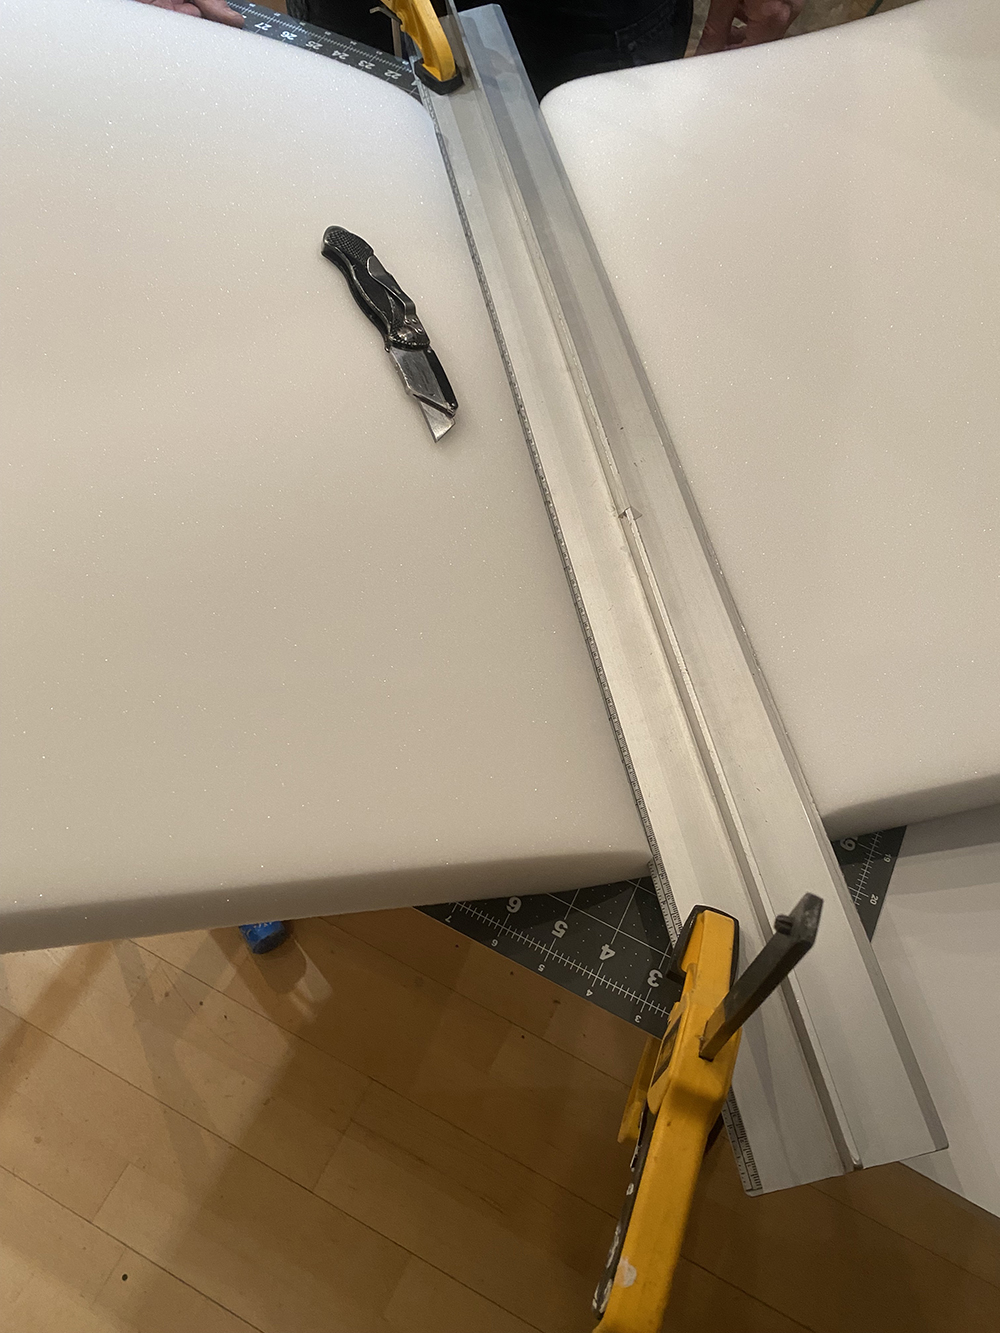
We cut the foam layers to size with a box cutter, using a straightedge clamped to a table with a cutting board on it. It makes a very tidy, consistent cut for a neat stack of equal foam pieces to work with. Hot tools can also cut this kind of foam very quickly and cleanly, however it produces a seriously noxious gas and leaves all the cut edges with a greasy film that makes it unusable. Although we haven’t tried it, those old timey electric carving knives with two side by side serrated blades that slide in and out may work brilliantly. If you do a whole bunch of this you can invest an upholstery foam cutter the works on the same principle.
Then, piece by piece, we pluck out bits of foam to create support for the sculpture on the sturdy areas and actual voids on the delicate parts, so things like fingers, toes and hair ship without being in contact with anything at all. We use box cutter blades and occasionally scissors but we stay away from hot knives. We label each layer, both on the foam sections and on the inside of the box, noting the direction and key parts.
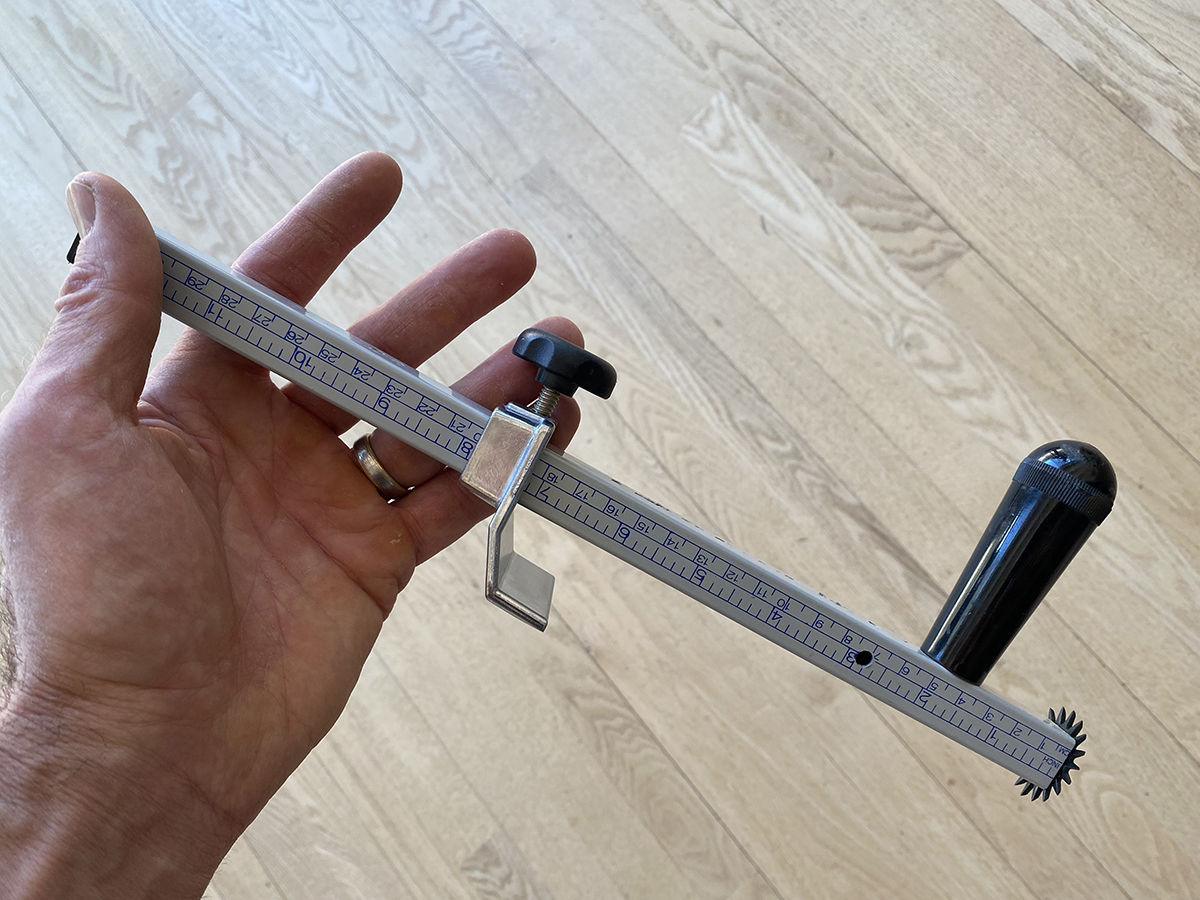
We put this inner box in an outer box with packing material, usually Styrofoam peanuts, and have a very durable container. We size the outer box to have 2” of space around the inner box on all sides. An inexpensive, simple and very effective tool for this task is the U-line box resizer H-101, shown below.
 Nobody has much of a fondness for packing peanuts, so we do what we can to make it a little bit less of a mess. We include an empty plastic bag so that whoever unpacks it has a place to put the peanuts. This also ensures that the same amount of packing peanuts get put back in the box for the return journey.
We always attach a business card (with our contact information facing out) to both inner and outer boxes.
Our habit has always been to supply extensive written and/or video instructions and also to check in before the work arrives and again before they re-pack the work to return it (or send it on to its new home) to be sure they still have all the packing materials and see if they have any questions. We often re-send our packing video at this time so they don’t have to dig through their emails to find the information we originally sent.
The outer box takes a beating and is replaced for future shipments, but the inner box with all the labeling remains in good condition for reuse.
We like that the materials can be reused over and over. When the sculpture goes to its forever home, we let the collectors have the option to keep the box for future moves or return it. We reuse the inner materials (while each foam interior is customized to a sculpture, we can chop the foam into smaller bits and use it in place of packing peanuts on future projects).
We also include brief instructions on how to hold and place works in case the recipient is unfamiliar with handling ceramic sculptures.
For smaller ceramic pieces that we’re delivering ourselves, we use a quicker method of boxing them. We put a piece of foam in the bottom of a box, then create bolsters to support the beefier parts of the sculpture, so no pressure is on the delicate bits. We support the piece so it can’t roll, but still has freedom to “jiggle” a tiny bit. When ceramic sculptures are held too firmly in place and you go over bumps, the percussive action can radiate through the sculpture, causing parts to break.
 We’ve also transported life-sized ceramic sculptures across the country multiple times using this method, with no casualties to the work or ourselves. With the large sculptures, we use big cushions and pillows to support the pieces on the most durable parts. It’s not pretty but it has worked flawlessly. The key here is that we ourselves are doing all the handling of the sculptures and the driving, so we know the work will be handled gently. We would not do this if someone else were handling the work. Again, if the work were being shipped to a collector, we would work with a professional art delivery service who would crate and insure the piece, as well as be the only responsible party handling the work through the entire process.
Packing Bronze
For bronzes, the process is a bit simpler. We pad any sharp, sticky-out bits with small squares of foam, put a plastic bag over the sculpture (this helps the patina avoid abrasion and damage), wrap the whole thing in dense foam secured with plastic packing wrap. We put this in a box lined with pieces of high density foam, then double box as before. One note: often with bronzes, due to the weight, organizers specify that it needs to be crated. In this case, we line the wooden crate with insulation foam, then the softer foam pads, then the sculpture wrapped as above. It helps to draw a circle with an arrow pointing at the screws on the side we want them to remove, so they don’t destroy our crate opening the wrong side. Not ones to leave anything to chance, we also often use Phillip’s head screws on the side that is to be removed and seal the other sides with torx or square-drive screws to encourage removal of the proper side.

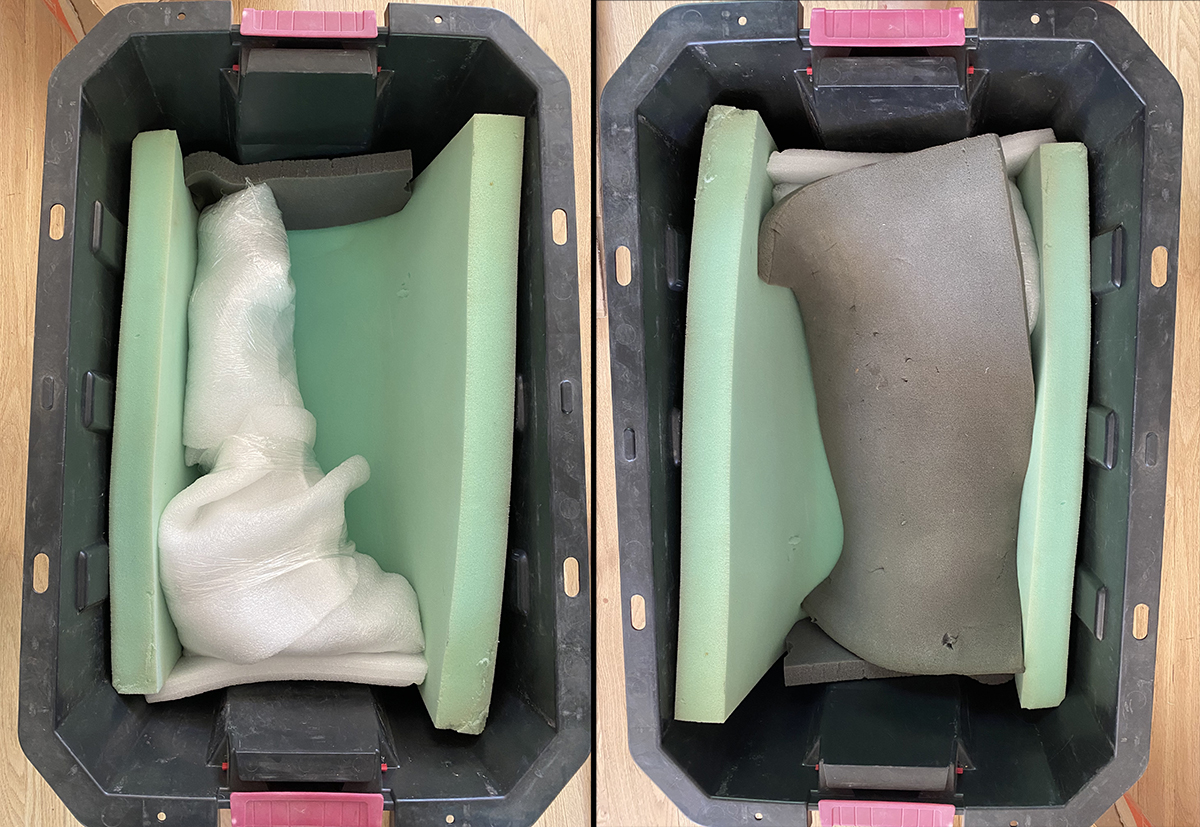
For conventions, we wrap the sculpture the same way, then pack it into a plastic crate with a sheet of foam to pad it from the next sculpture which will be put in on top of this one. Since we are the ones moving the sculptures, we know they’ll be handled gently and don’t need to all go in separate containers.
Bronzes usually have nuts welded into the bottom for mounting on bases. For sculptures with delicate bits, the sculpture can also be bolted onto the bottom of the crate. If it will be un-crated by someone else, you will want to inquire if they have a ratchet and the correct size socket. If they don’t have it on hand, be sure and include it in the packing. You definitely don’t want them to get out the claw hammer and crowbar.
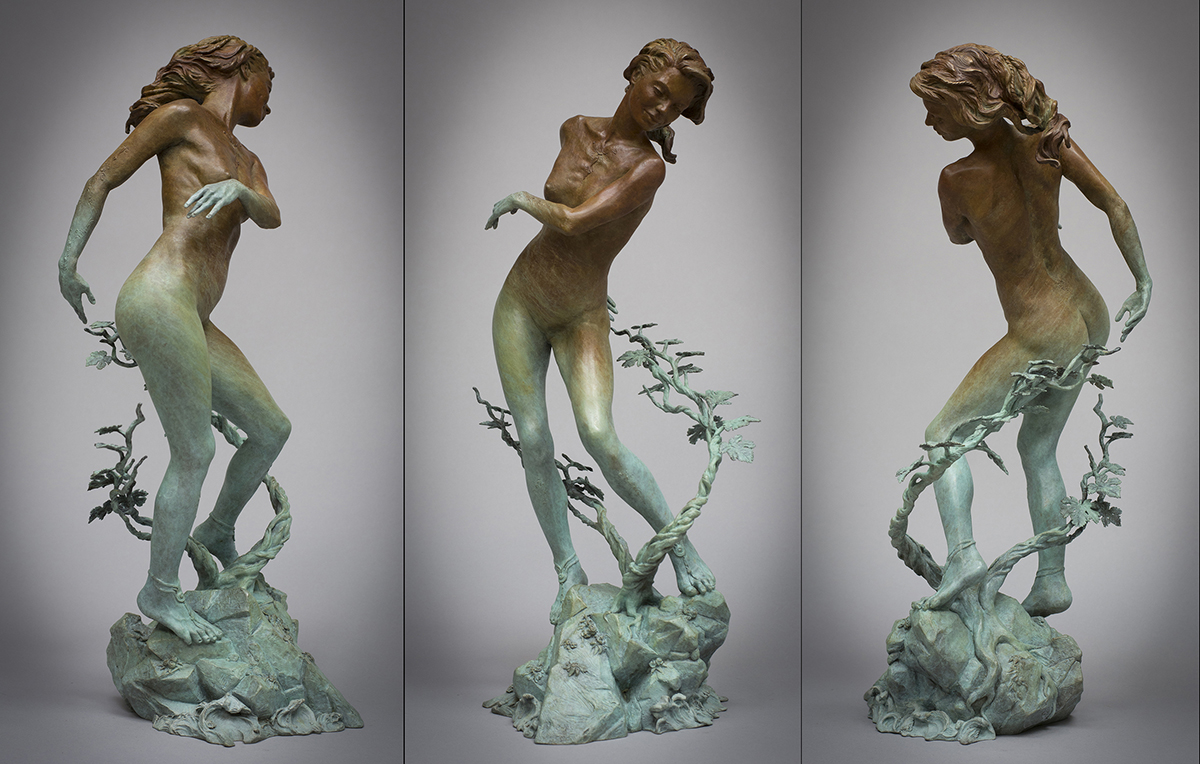
“The Vine Dance of Blómai” has so many delicate pieces, it would be difficult to pad it in any reasonable way for shipping, so we attach her to a board at the bottom of a crate, with a reinforcing support bar at her mid-torso. She basically ships in air.
To transport Colin’s 3/4 life-size “Wind in the Waves” sculpture safely to Monsterpalooza, we bolted her to a board, then screwed that board to a sheet of plywood that ran across the bottom of the van. The birds are wrapped in foam and secured to her legs with plastic packing wrap to keep them from jiggling through the drive, which would cause the welds to work harden (this would be bad). Anyone who’s driven on the Arizona interstates knows there’s a whole lot of rough road you have to cross to get where you’re going.
 A Few Quick Ideas on Paintings
There are a multitude of approaches to shipping paintings that are often a bit simpler than sculpture, but some of the basics above still apply. Try make it as easy as possible for the people on the other end to open up the work without damaging anything and repack it without effort. You can buy custom shipping cartons specifically for shipping paintings or you can make your own.
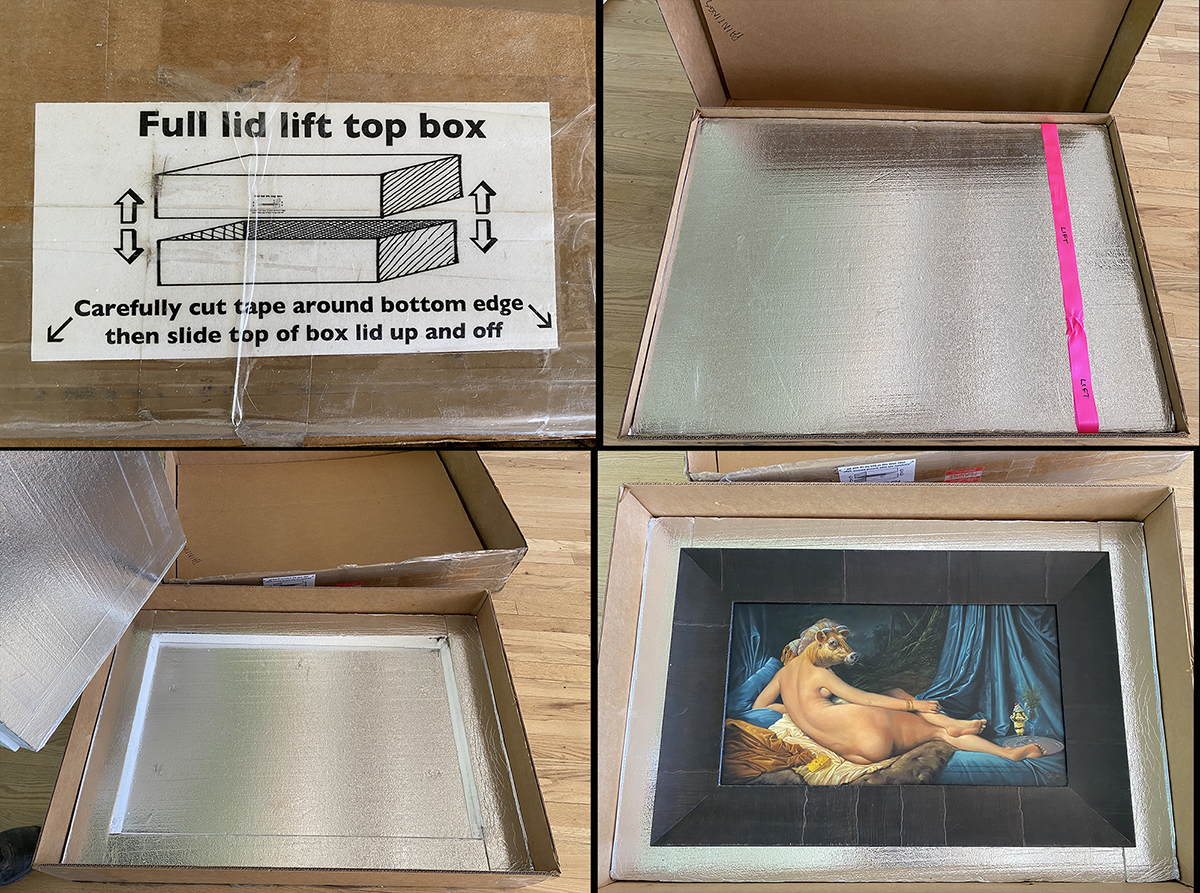
This is one approach we did with a piece that needed to be shipped to multiple places. We made a custom size box out of a flat sheet of corrugated cardboard (available at your shipper supply store). To make it easy to repack, we did a clam-shell and labeled it carefully so that whoever unpacked it didn’t destroy the clam-shell by opening one end. We bought a big sheet of insulation from the hardware store (this one had a foil lining on one side which didn’t make any difference to us for this purpose – it’s just what the store had at the time we needed it). The painting fits snugly in the cutout and can be re-packed in less than a minute. The packing material only touches the frame and nothing touches the surface of the painting itself.
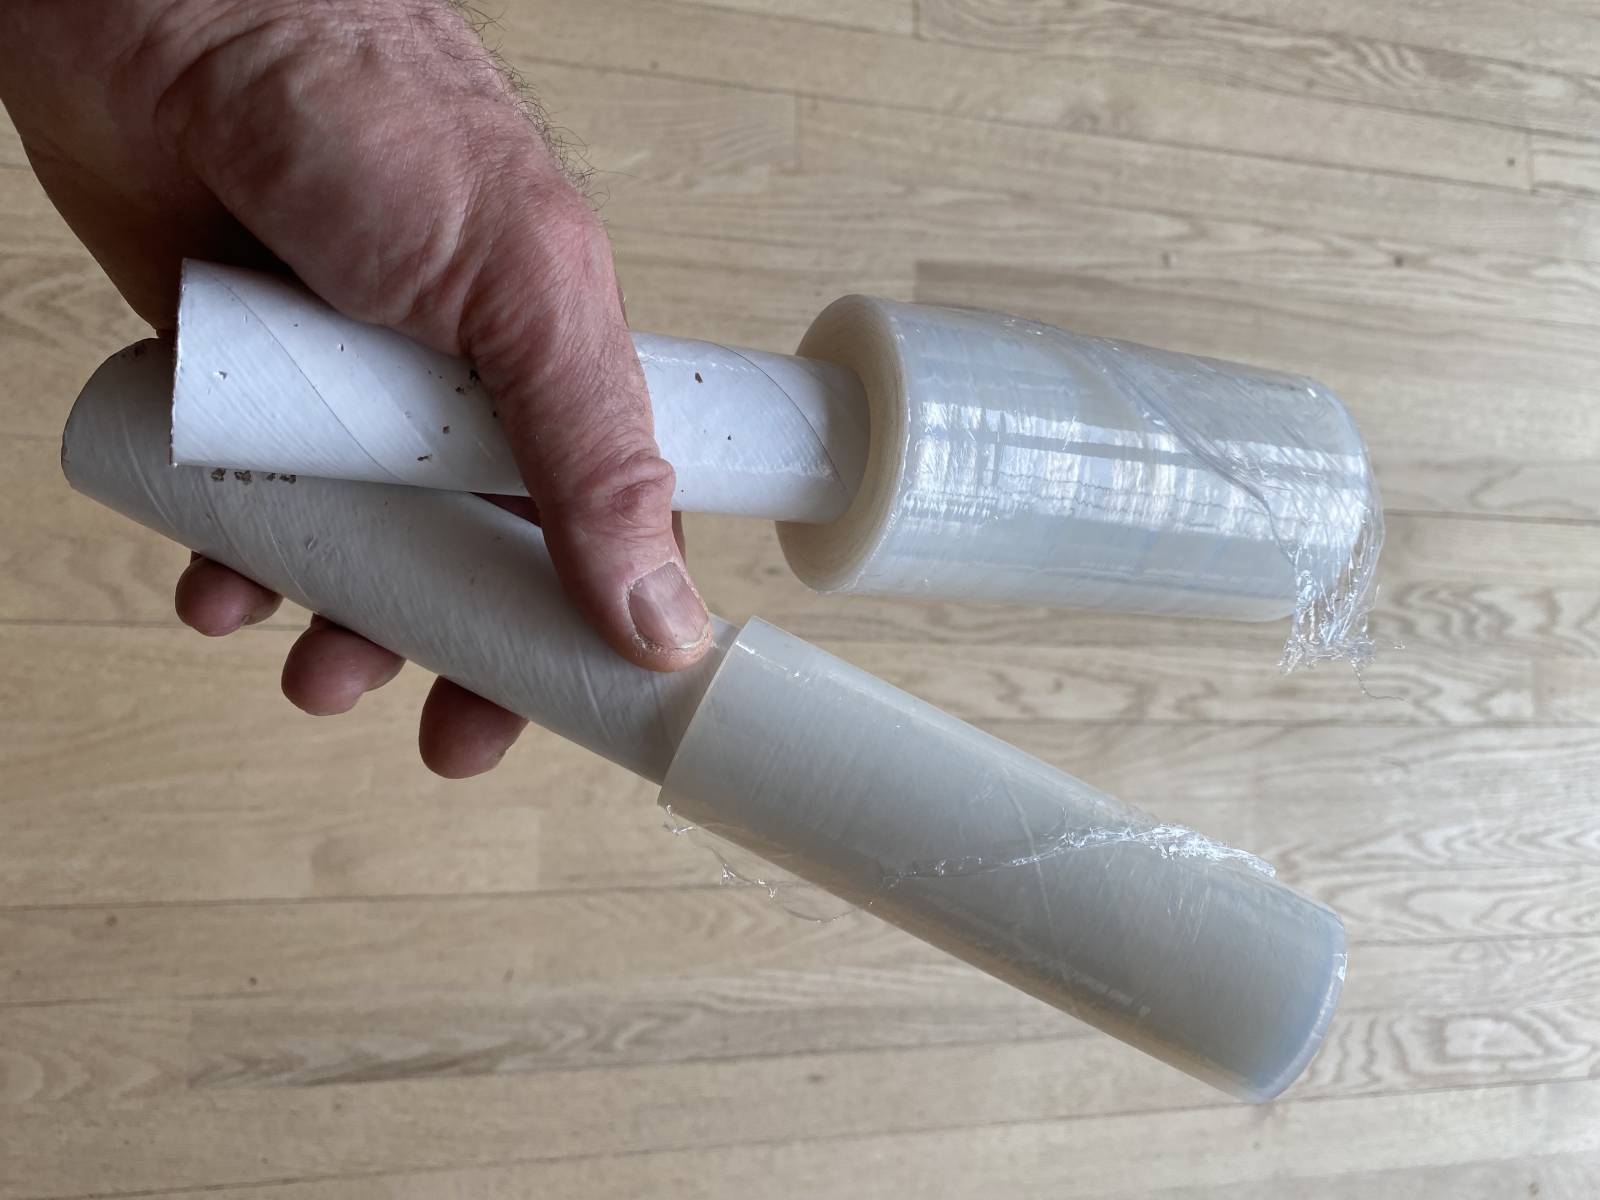
 We often wrap just the frame with stretch wrap film so that even the frame doesn’t touch the packing. We love this stuff and use it all the time.
 When we are transporting large paintings on stretcher bars to conventions or shows and the length or height of one painting matches the other, we use this approach. The paintings face each other and the brackets (hardware store or building supply) screw into the back of the stretcher bar. The brackets keep the paintings from touching each other and also keeps them from touching the floor. We can strap these to the side of a van and if we have several paintings we will separate each set of two paintings with a sheet of cardboard. Be careful to select the proper size screws so they don’t go through the stretcher bar and into the canvas on the front. Be sure to bring a screwdriver or drill driver with you for when you’re unpacking and repacking.
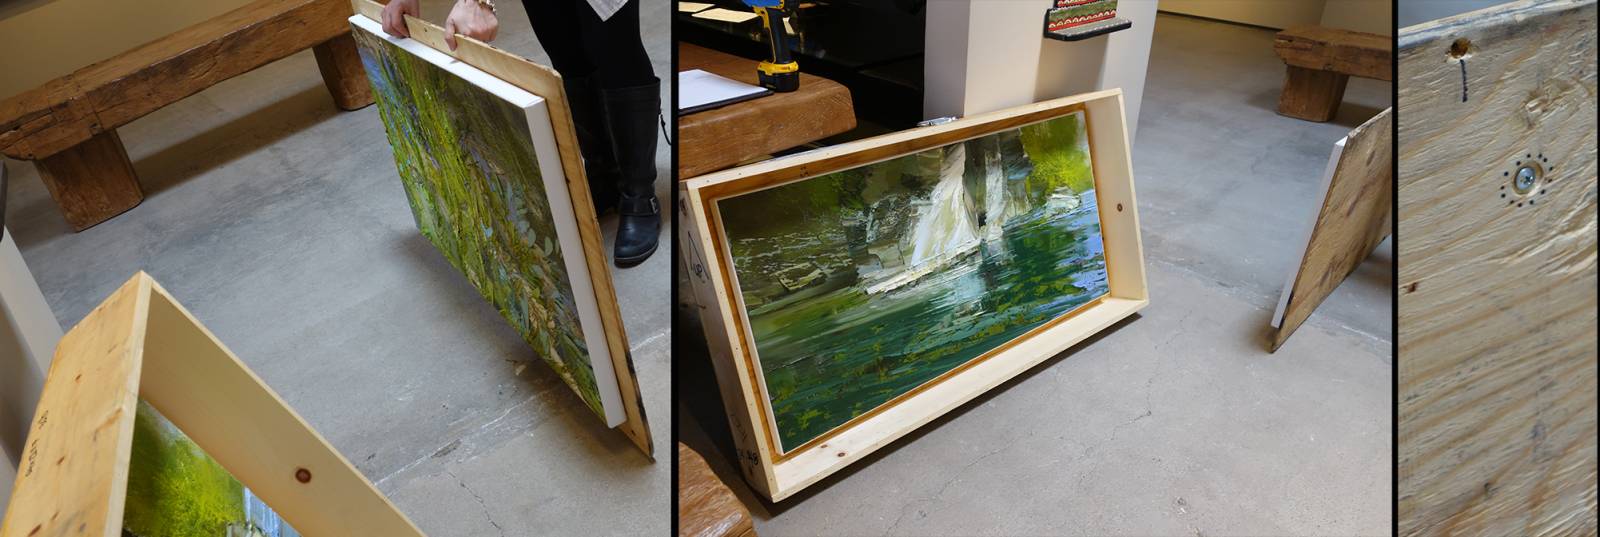
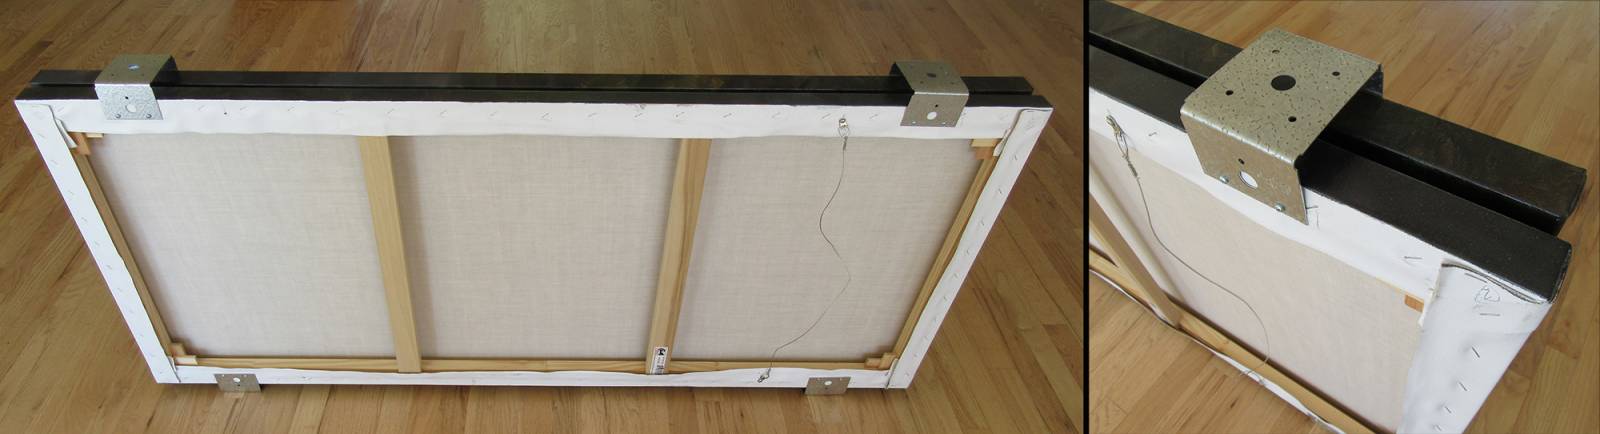 One other method: Lynn Boggess attaches one painting directly to each side of a wooden crate. This way, they don’t touch and they don’t move. Notice that he has highlighted the screws to be removed on the crate. For those who are pushing the last minute, this method would allow you to ship paintings that are still wet, but you should check with the gallery first whether that is acceptable.
 A Few Extra Thoughts
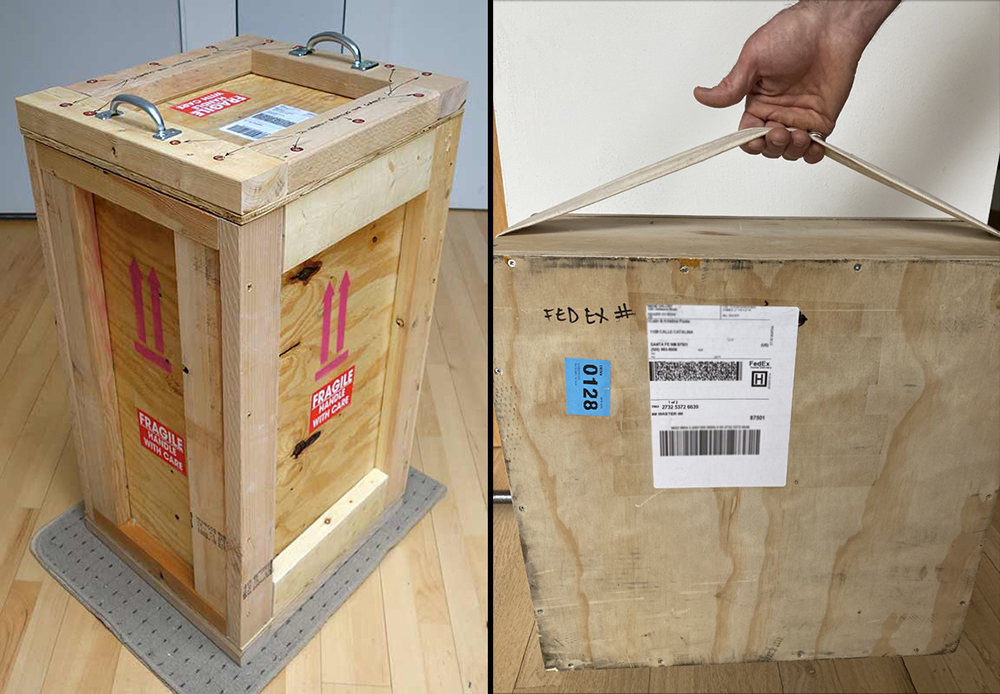
Little tip: If it’s awkward to waddle out of your studio with your box, it’s likely that your shipper will take out their ire on your “precious.” Putting a handle on the top so that it’s the obvious and easiest way to carry it can make it less difficult to manage. This also helps if it’s important that your box or crate be oriented in one particular direction. We have made handles out of wide variety of things like pieces of old leather belts, heavy-duty webbing and regular hardware store screw on handles made for gates and screen doors. The down side to this method is that it is possible for the straps to get stuck in automatic package processing systems.
 Little tip 2: Be conservative about using tape on the inside of your packing or avoid altogether if possible-it often turns into a sticky mess. It can sometimes be a challenge to unpack even if you’re using painters tape and in the haste of unpacking there can be a bit of tearing and pulling or the dreaded box cutter wielded by and impatient and less than skilled hand.
We’ve seen many other interesting and effective ways of packing multi-media sculptures, including Sculpey, Fimo and Air-dry clay. If you’re new to packing your work, it’s worth taking a few moments to reach out to someone who’s worked with your medium before to ask what they’ve found works best. It sucks to have to learn these particular skills the hard way. Happy packing!


This is such a great post, there’s surprisingly little comprehensive info out there on the web, thanks!!!
My pleasure! It’s not necessarily a very exciting topic, but it sure is helpful to learn from others’ misfortunes in shipping 😉
Update on the packing sculptures with foam: we got an electric carving knife (like what is used for carving turkeys at Thanksgiving) and it works excellent for cutting the foam easily.
Informative post! This is a great share, thank you