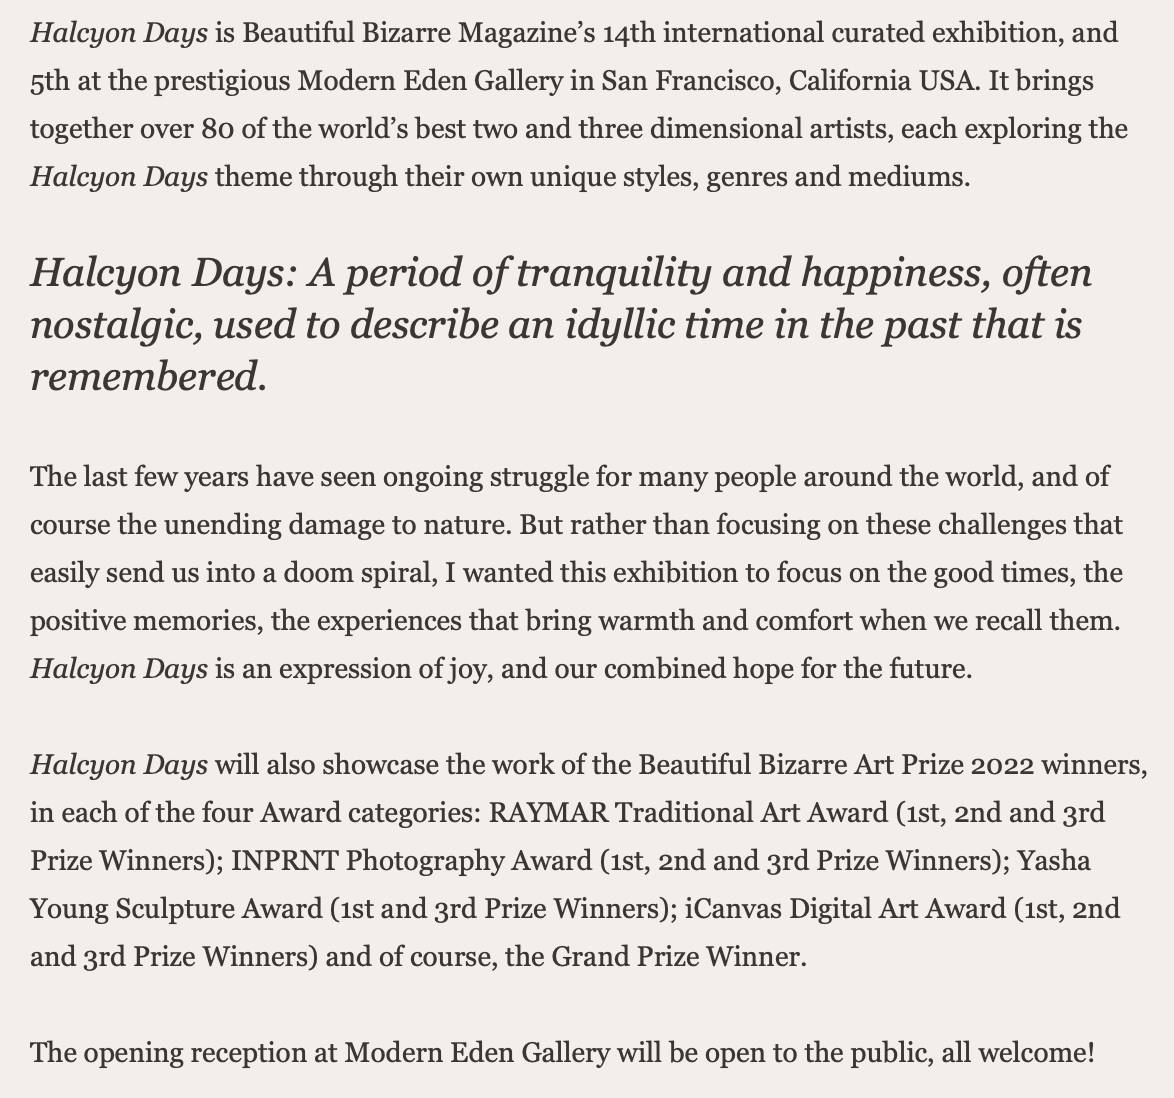
Happy almost Hallowe’en! An upcoming event we’re very excited to be part of is the Beautiful Bizarre Magazine curated exhibition “Halcyon Days” opening November 5 at Modern Eden Gallery in San Francisco. So, today, I’m going to show an overview of the process of making “Dove Dreams of Flying,” our sculpture for the show. At the end, I’ve included information about the show, plus a list of participating artists and a few sneak preview works that will be in the exhibition.
Developing The Pose with Our Model
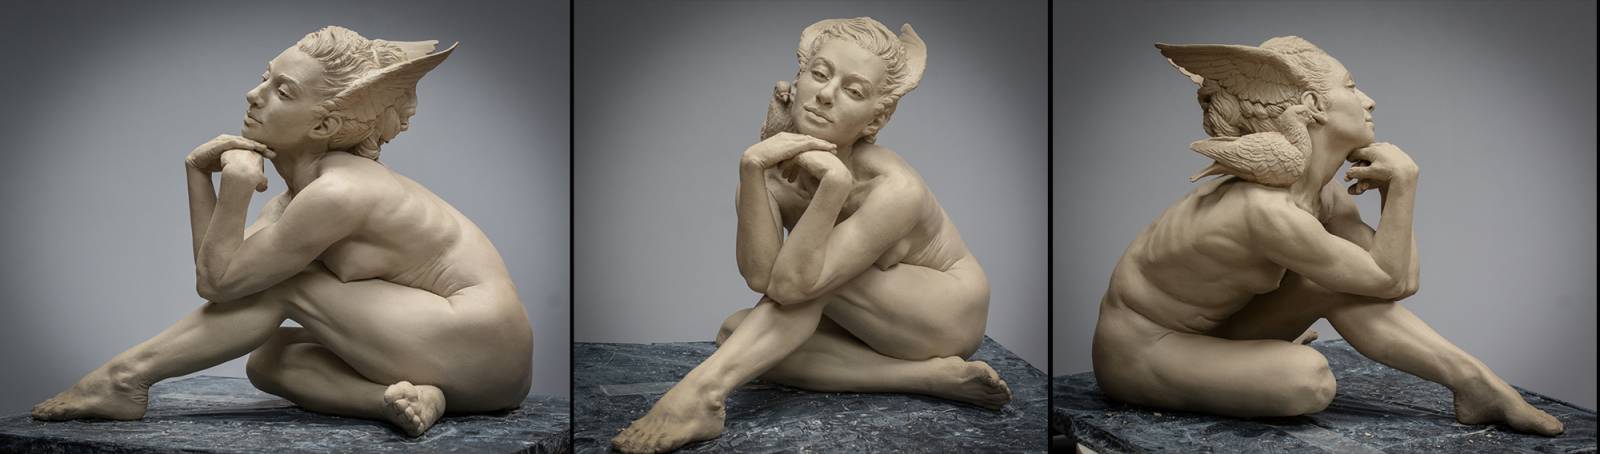
We liked the emotive qualities of the standing pose our model, Emily, created in the first image, but wanted something seated. She tried a couple poses with compact and twisted leg positions with her torso tilted first to the left and then to the right, neither of which quite created the feeling we were looking for (center two images). Then she relaxed naturally into the pose at the upper right, and we immediately had a sense of introspection, dreaming, memories – it was a very soft and beautiful pose and we knew this was the one. 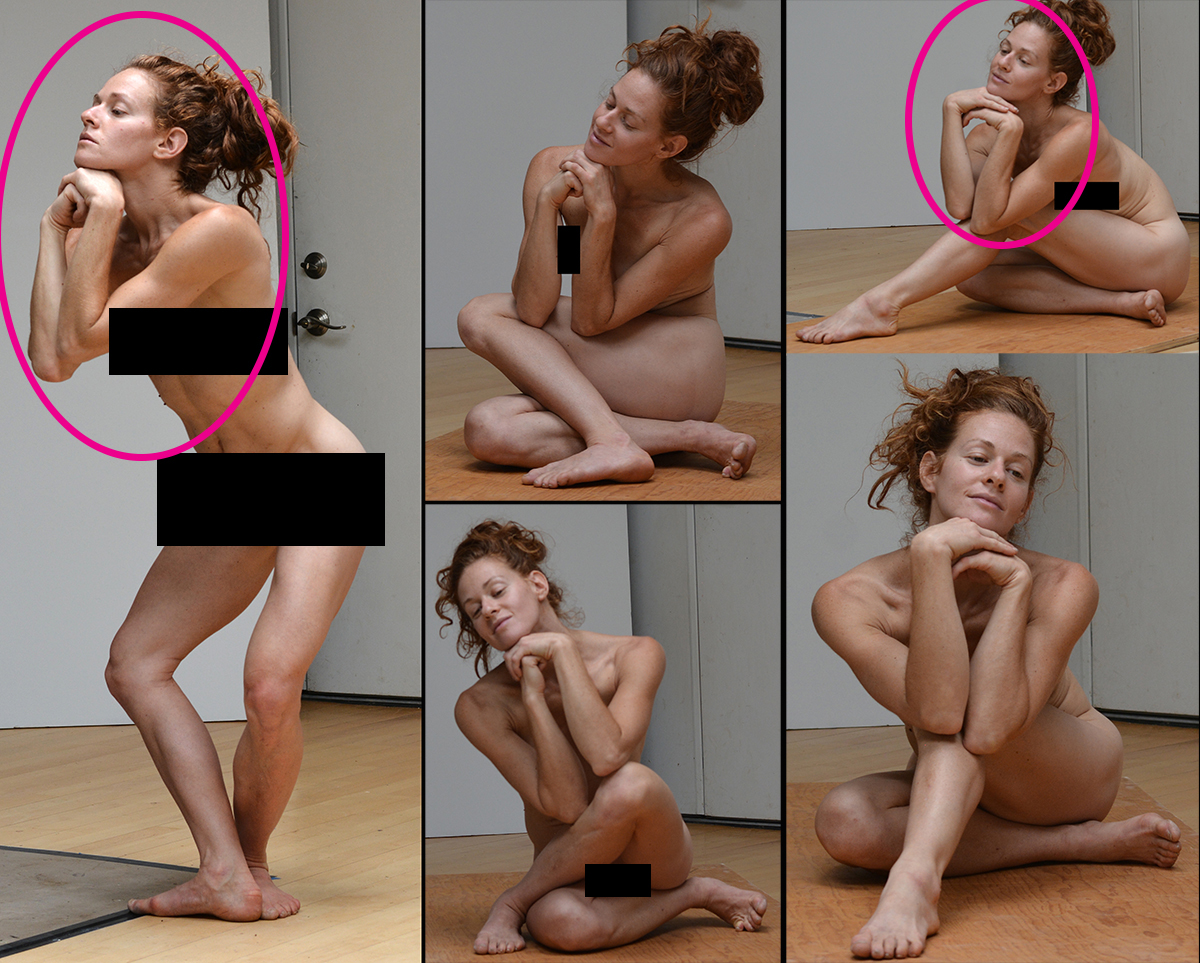
Roughing in the Lower Body
I decided to make the sculpture at 60% life-sized, knowing it would shrink through drying and firing to about 50-55%, which is a comfortable size for a sculpture. I used Laguna Clay’s WC-394, Buff Sculpture Body, a very groggy and sandy water-based clay body that works well for larger scale, hollow-constructed sculpture.
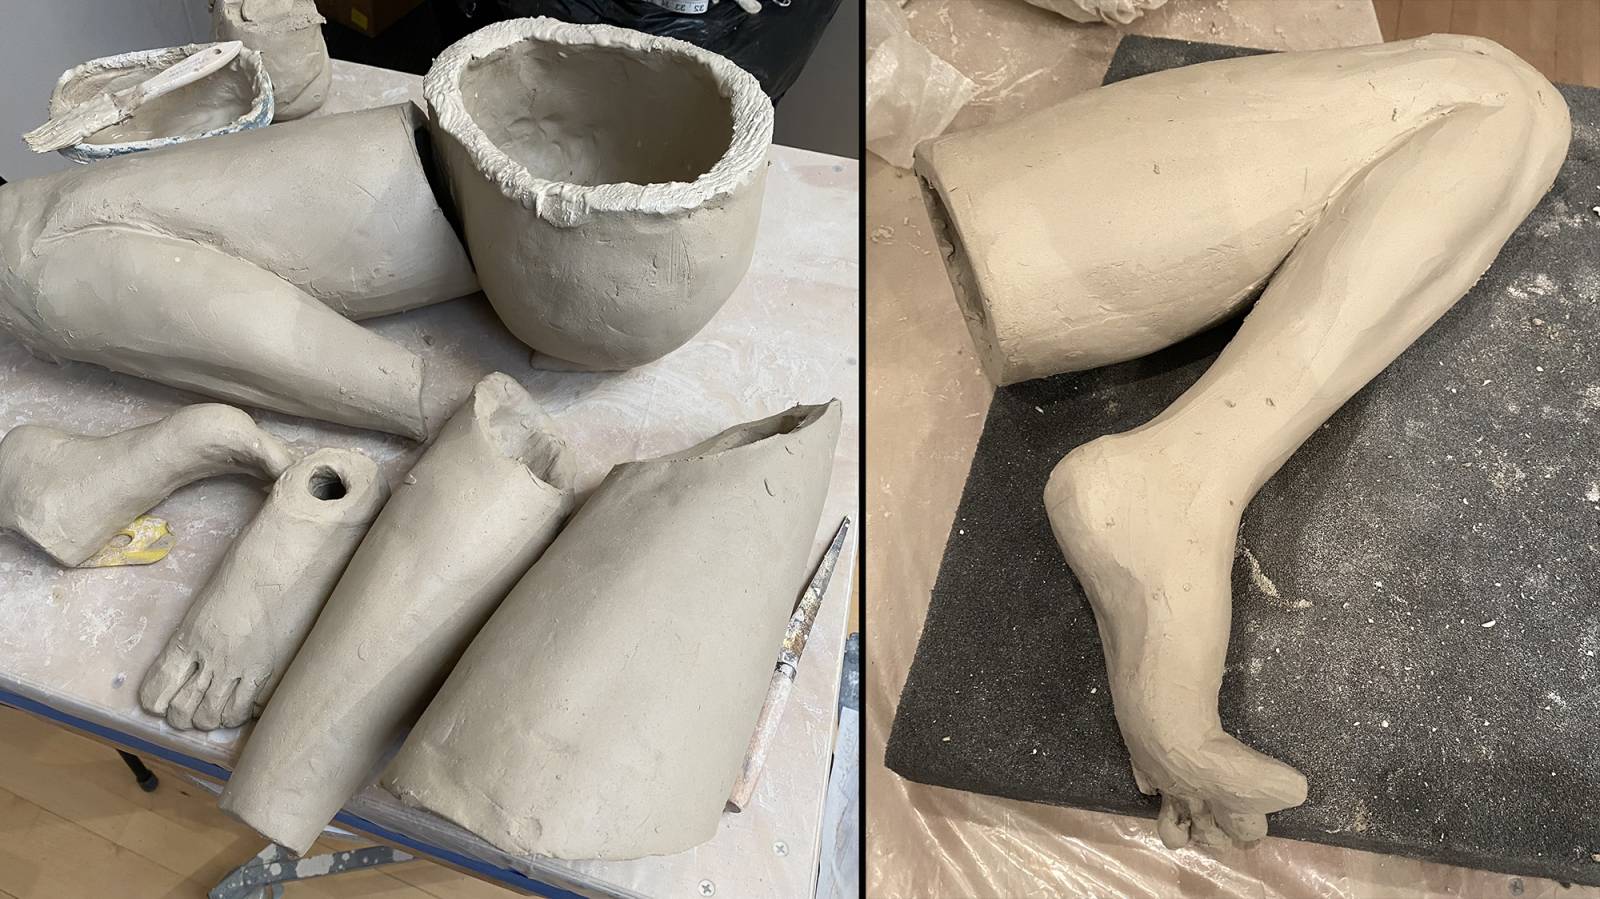
I consider the pose and weight distribution carefully to determine where the stresses will be in the sculpture and also to try to foresee any construction problems that might come up. I began as I usually do, by rolling slabs and forming them into tapered cylinders approximating the size, proportion and forms of the upper and lower legs. Of course, all seams are made securely by scoring and slipping to create a strong join. For the thighs, I’ve curved the upper parts of the cylinders which will allow me to form them into the knees.
In this method of building, I have to create all the parts of the lower half of the body in roughly the correct scale, proportion, form and volumes before I can begin to assemble them, so it involves a lot of getting parts “in the ballpark of” where they need to ultimately be. Through much of these early stages, it’s hard to imagine the sculpture will actually turn into anything at all! It takes a whole lot of envisioning to get to the fun parts later on.
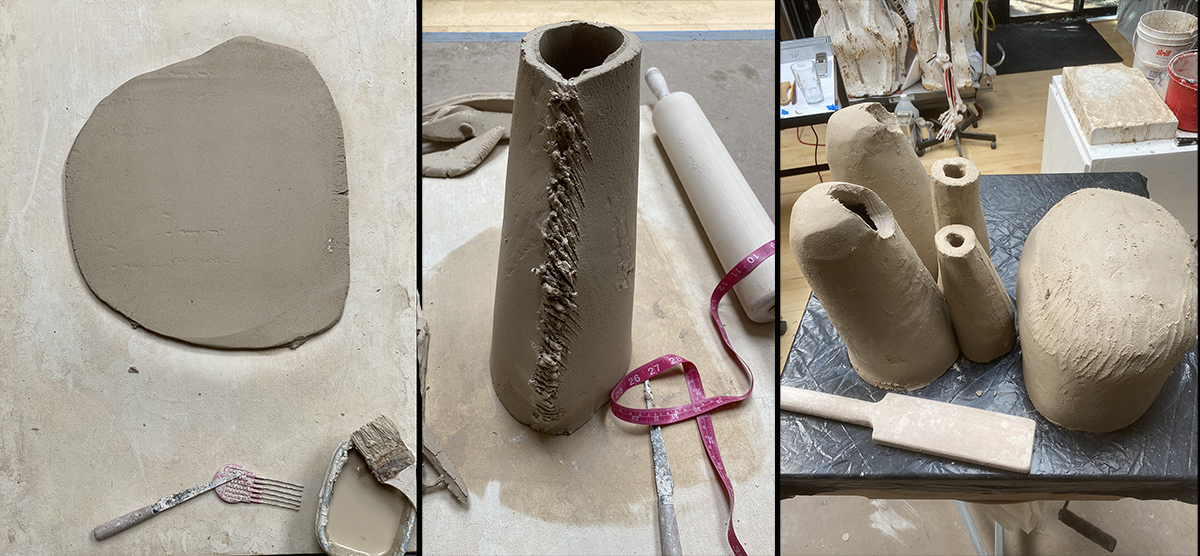 To create the foundation form of the pelvis, hips and butt, I made a large cylinder about the circumference of her hips, then attached another slab which I cut and formed to meet up with the front wall of the cylinder. I then paddle the forms to give a rough indication of front and back of pelvis and the muscle forms.
 For the legs, I push out forms from the inside of the cylinders that roughly approximate the musculature. I won’t be able to get my hands inside once the parts are assembled, so I try to do as much work as I can before assembling them. At this stage, I want to be able to see a general idea of calf, shin bone, quads, hamstrings, adductor group and fat pads so that when I look at the “leg,” I immediately know which one I’m looking at. If I assembled the parts as straight cylinders, I would have to add too much clay to the exterior to created the needed forms. Thick and uneven walls can create many problems with water-based clay sculptures, so it’s best to keep wall thickness as uniform as possible.
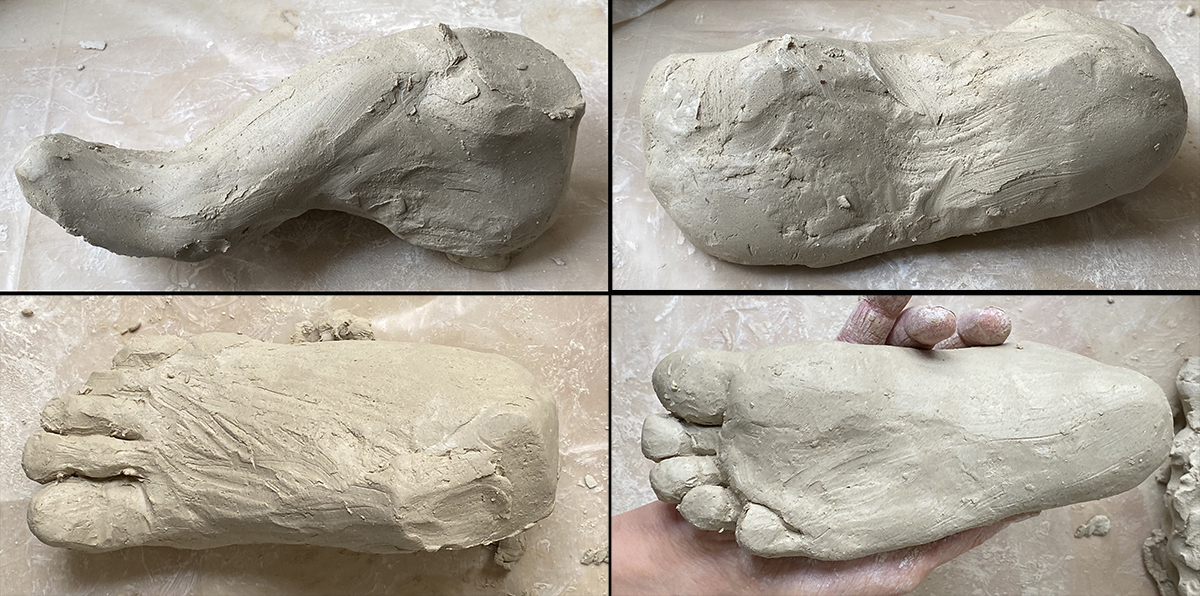
 Before I can assemble the legs and pelvis sections, I also need to rough in the feet. Even if the bottoms of the feet won’t necessarily be visible, I still sculpt basic toes and flesh pads. I construct feet (and hands and heads) solid and then hollow them out as it gives me more flexibility with establishing the forms for these more detailed areas.
 Once I have all the parts roughed in, I dry fit them, adapting the measurements and proportions as needed. When I’m confident I’m quite close, I attach the feet to the legs and that whole construction to the hip/pelvis.
Constructing the Torso, Neck and Head
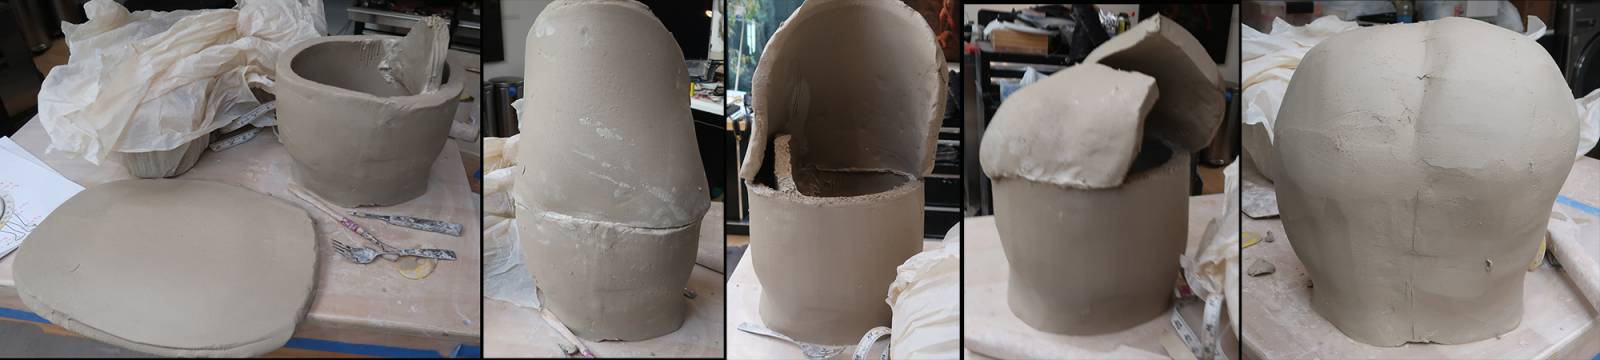
Jumping ahead in the process, I’ve added more anatomical information to the lower body. I attached a cylinder for the rib cage/torso in the same fashion as I did the earlier parts, beginning with the basic geometric shapes and pushing preliminary forms out from the inside to indicate breasts, spine, rib cage. Generally, at this stage, I want enough information for my eye to “read” each area without getting into adding much detail. I connected the top edges of the cylinder and added indications of traps and shoulders.
Another cylinder forms the neck, again approximating the major musculature forms of the neck. The head is originally constructed solid with basic shapes and volumes, then hollowed out and attached. Though you can’t see it here, the upper back of the head has not been firmly re-attached, so I was able to create a solid join both inside and outside between the head and neck.
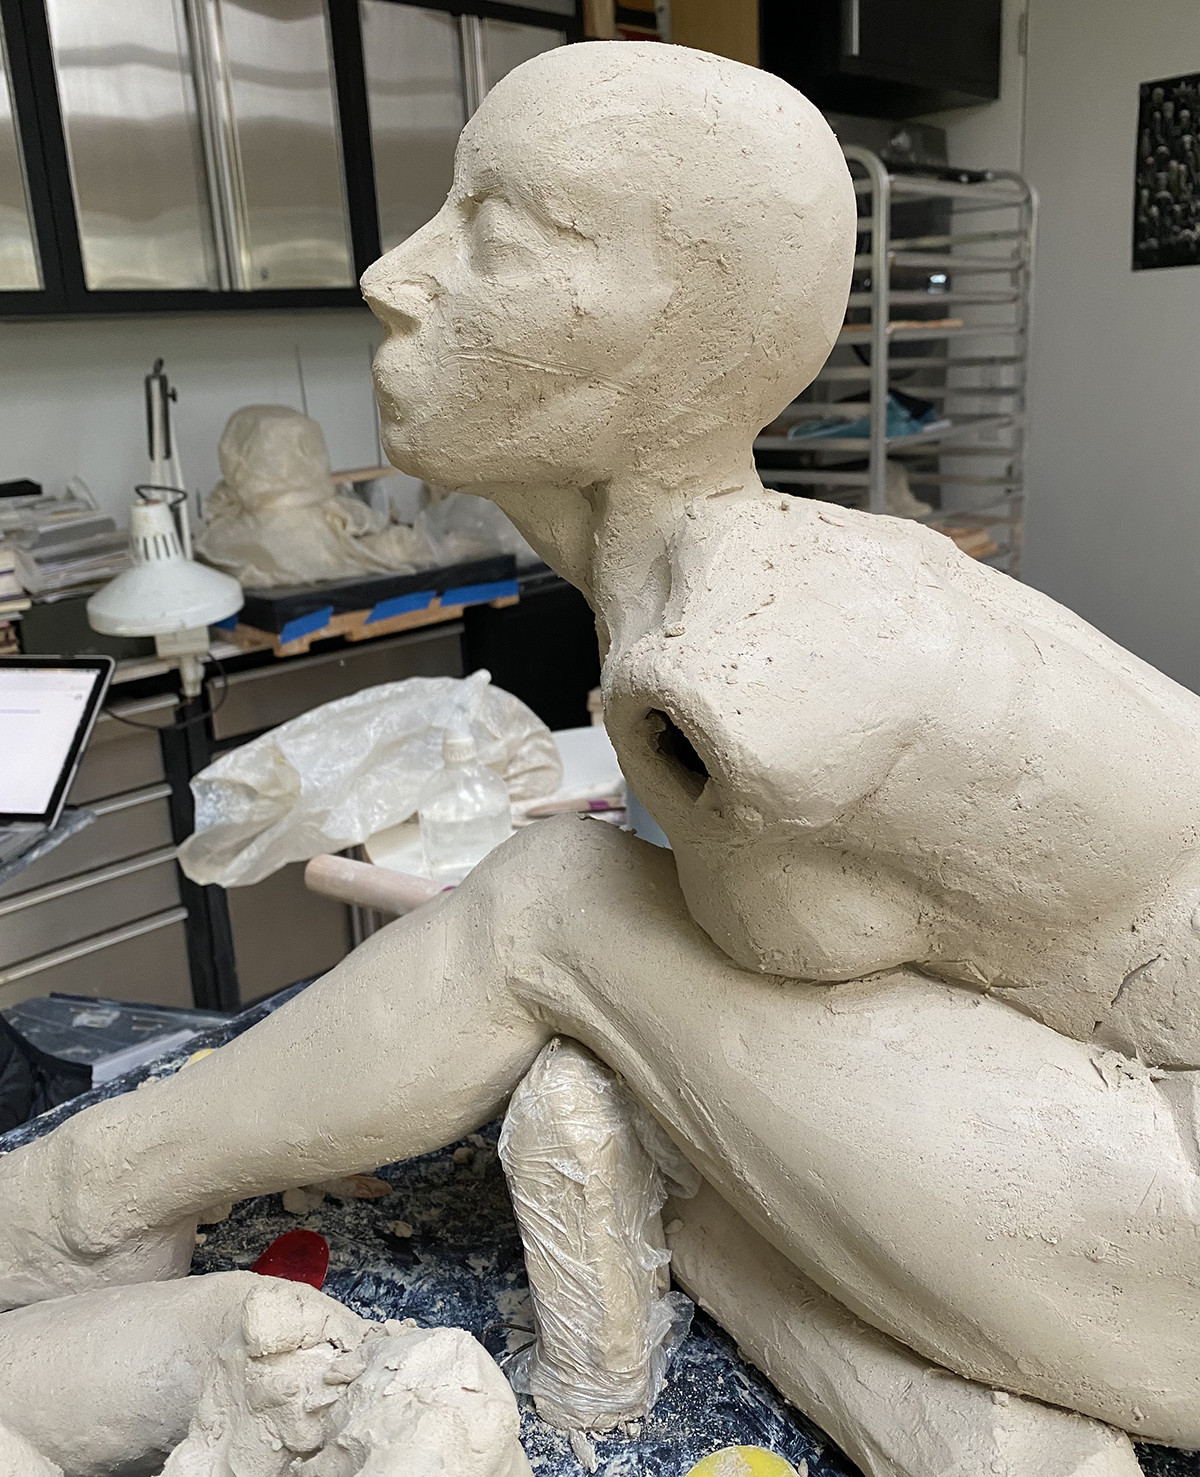 Just as I did earlier with the legs, I’ve again used tapered cylinders to rough in the basic shapes of the arms. The hands at this stage are like mittens – no detail yet. Just working to achieve the gesture and relationships between the parts.
Hands
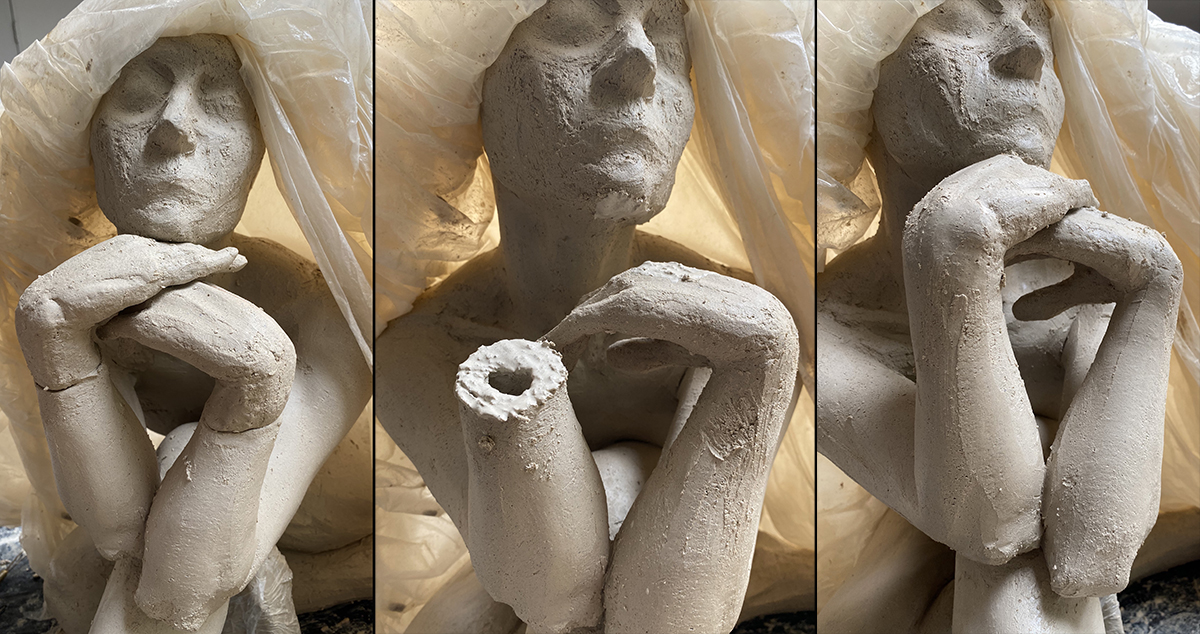
Once I see that all the parts fit together in generally the correct proportions, I cut the mitten-hands off and begin to sculpt in some details. Given the compressed and overlapping nature of the pose, when all the parts are finally assembled, I won’t easily be able to reach many of the areas of the fingers and palms, so I do add a fair bit of detail at this point.
I sculpt the general volumes first, then articulate the fingers, being careful that they bend at the joints – no boneless, spaghetti noodle hands!
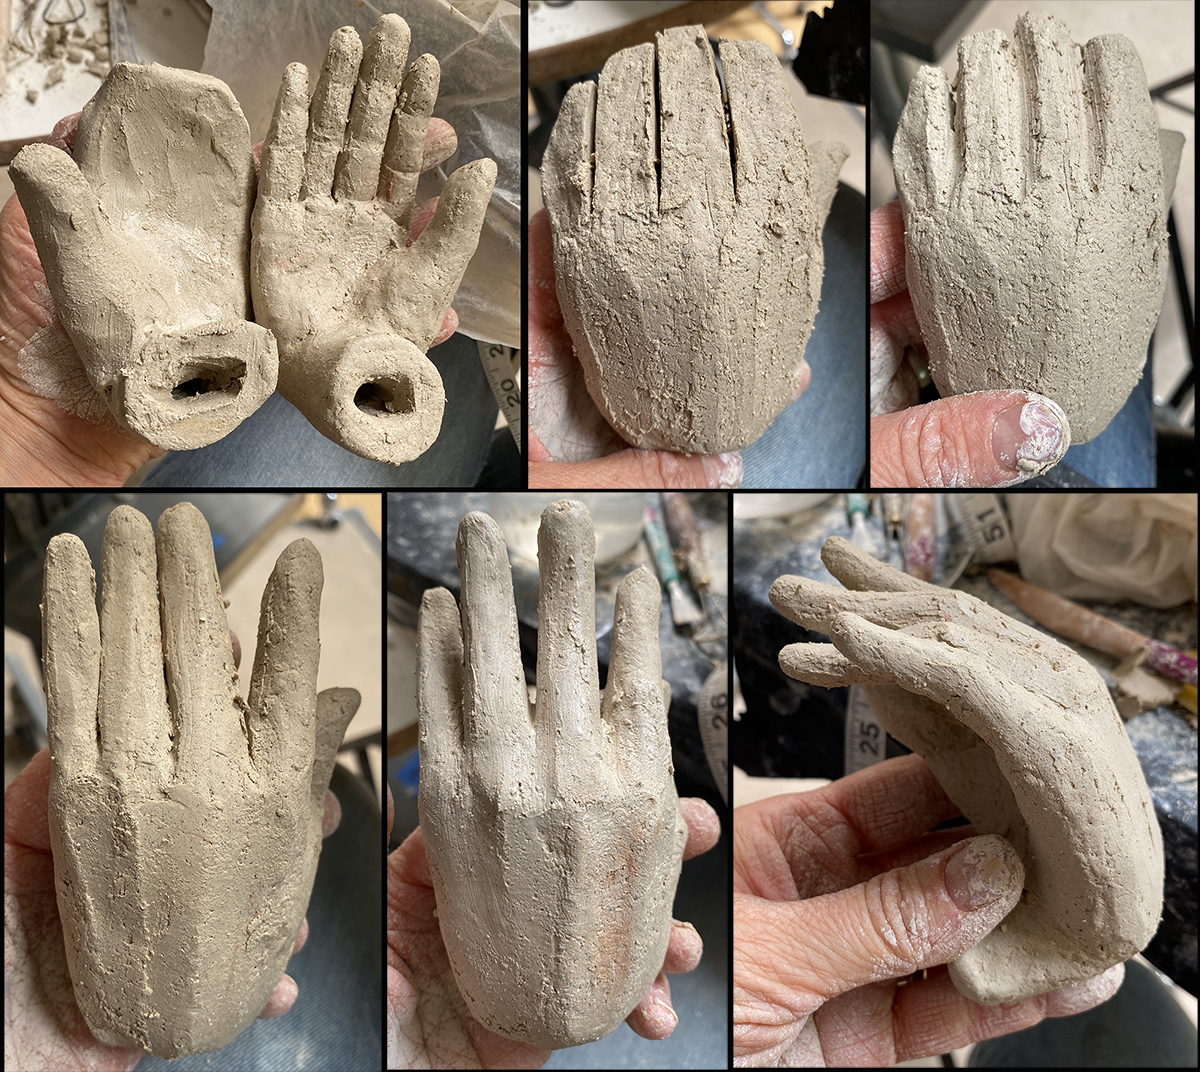 Since a good deal of what attracted me to this pose is the interaction and shapes created by the head and hands, I pay particular attention to how this area of the sculpture comes together. I dry-fit the hands, being careful not to knock off any fingers, make adjustments so the parts interact with each other and the head in the way that, even at this loose stage, creates the gestural feeling of the original pose. When it’s close, I attach the hands to the arms, each other and the head. While having all the parts of the sculpture touching in this way creates a solid support structure for the weight, it also presented certain challenges in getting the parts to fit together properly, as we’ll see more of shortly.
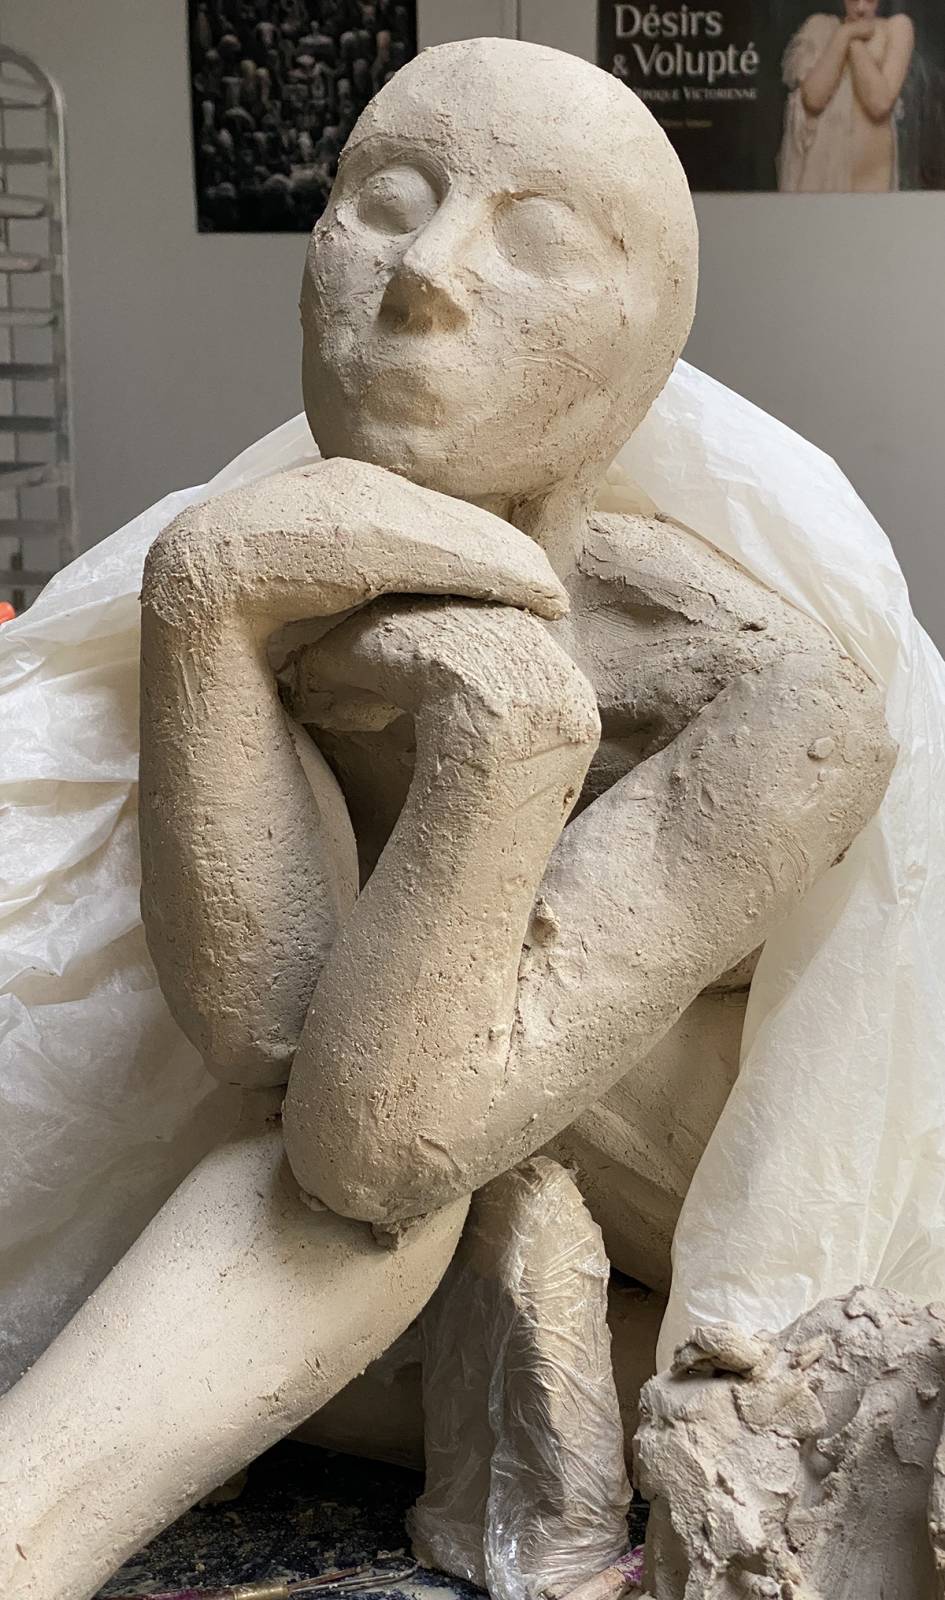
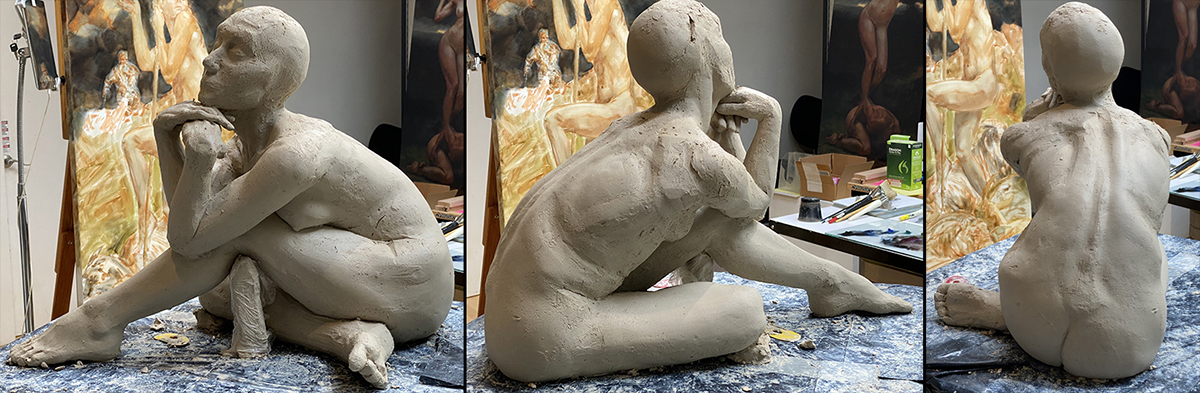
 Here you can see the full sculpture in its roughed in form. All the work up until this point was just establishing the foundation of gesture, contour, line, form, shape and volumes. Even at this rough stage, with little detail, the sculpture should still capture the original feeling and gesture of the reference pose. Up to this point, it’s more or less dealing with technical clay construction. Now that I can see all the parts in relationship to each other, I can actually begin sculpting!
Preliminary Refinements
Using mainly rib tools and rake tools, I begin to break apart the larger foundation forms, with rough indications of landmarks like ribs, vertebrae, flesh folds and large muscle groups. Notice she also has rough forms of ears as well. From this stage on, I try to keep developing all areas of the sculpture simultaneously and continuously look at the parts and proportions in relationship to each other (her hair is coming soon, honest). If something catches my eye and bugs me at this stage, no amount of detail is going to fix it – now is the time to make major adjustments if they’re needed.

Sculpting the Face
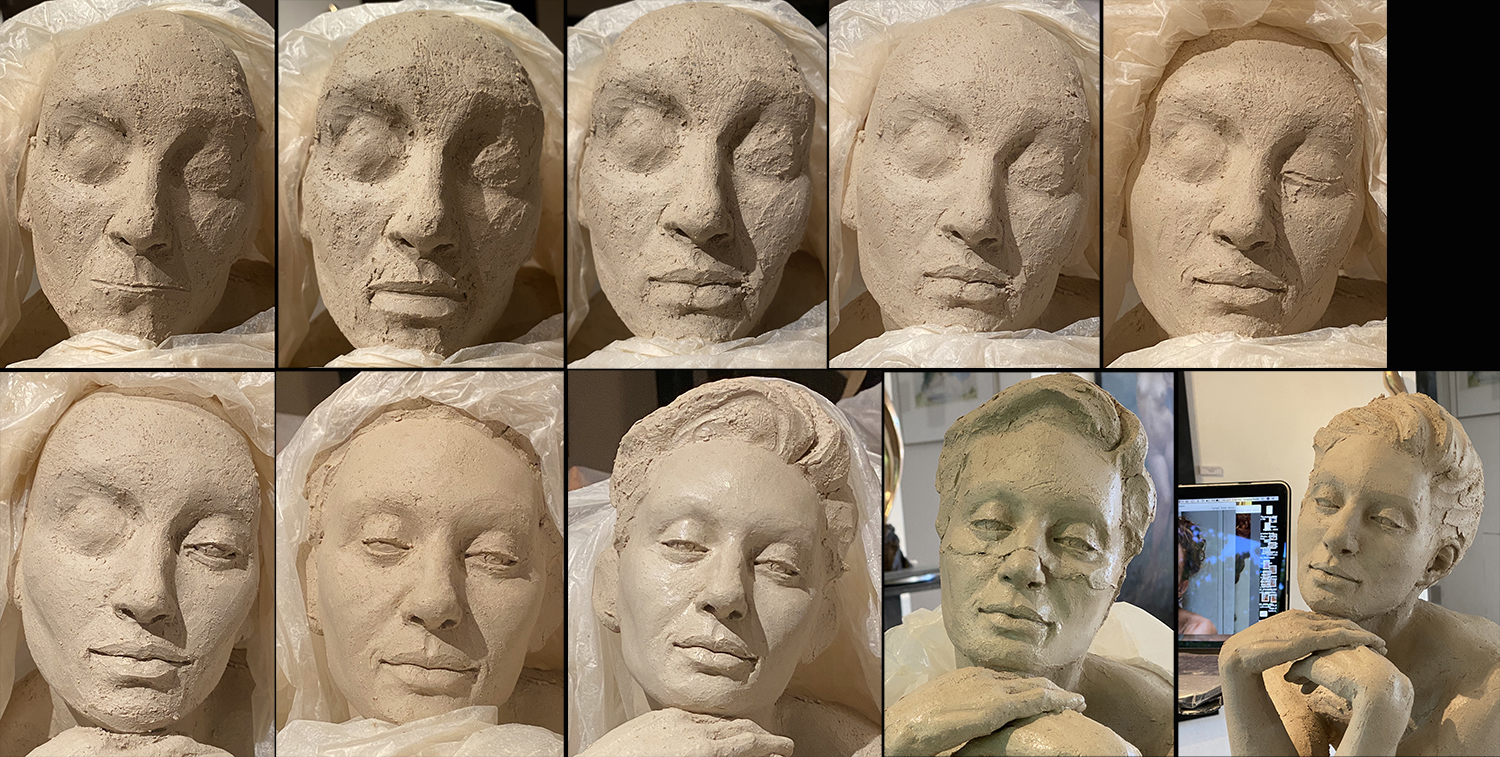
The face now needs to be brought up to the same development level as the body at this point so I can confirm the relationship and angles between the head, neck and hands. Each step in developing one area allows me to reassess the whole of the sculpture.
I have already established the basic shapes and planes. I sketch in the forms of the lips, then adjust the planes and volumes of the face. I always start with the eye on my right as I’m right-handed. I find it’s easier to sculpt that eye and then use that as the “pattern” to match for the eye on the left. You can see that as I develop the eyes, I’m also developing the forms around the nose and mouth. I wanted her to have a subtle smile and the smile needs to impact not only the areas around the mouth and nose, but also extending up into the flesh pads around the eye area.
You can see that during this phase of focusing on her face, I also added rough volumes for hair, again developing an entire area simultaneously. In the second picture from the bottom right, you can see that at one point I decided her nose was a touch too long, so I cut out a wedge of clay across her face, gently pushed her chin up, and cleaned up the join. This way, I didn’t have to re-sculpt the details of the nose. I’m always referring carefully to my reference throughout this whole part, whether photographic or a live model.
Making Adjustments to the Gesture
Once I’d added this information to the head, I could look at the gesture of the sculpture again. It seemed that the sculpture wasn’t quite capturing the dreamy look of our model. I decided her head needed to be tilted back and angled a touch further or her forearms needed to be lengthened… or both. Never hesitate to cut sculptures apart and make “major” changes. If you see it while you can still fix it (i.e. before it’s fired), it’s a grand opportunity. To angle and tilt her head, I cut a wedge (or dart) out of her neck and gently rocked her head back into the position I wanted, then re-joined the clay. To lengthen her forearms, I cut them and added a coil of clay to each.

That’s Quite a Head of Hair
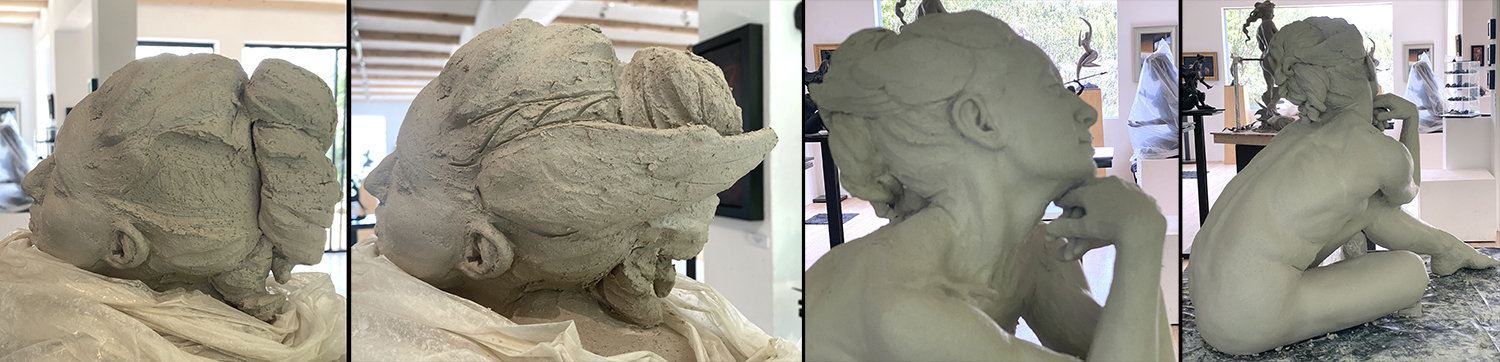
Now to her hair. You can see how I sketch forms into the hair to determine the flow and design. I wanted to mimic Emily’s beautiful curls and about this time, we were talking about the myth of Alcyone and Ceyx – how the gods turned them into birds. We originally started with smaller wings, thinking the tips could support the upper portion of her hair in a way of integrating them into her hairstyle (so they wouldn’t appear to be “stuck on” as an afterthought). When we looked from further away, we felt the wings got a bit lost and if we were going to add an element like this, it really needed to make an impact, so we lengthened the tips as you can see in the roundabout videos below. We also added elements to the front of her hair that blended in with the wings so they look like they’re emerging and a part of her.
Finished Clay Sculpture Before Firing
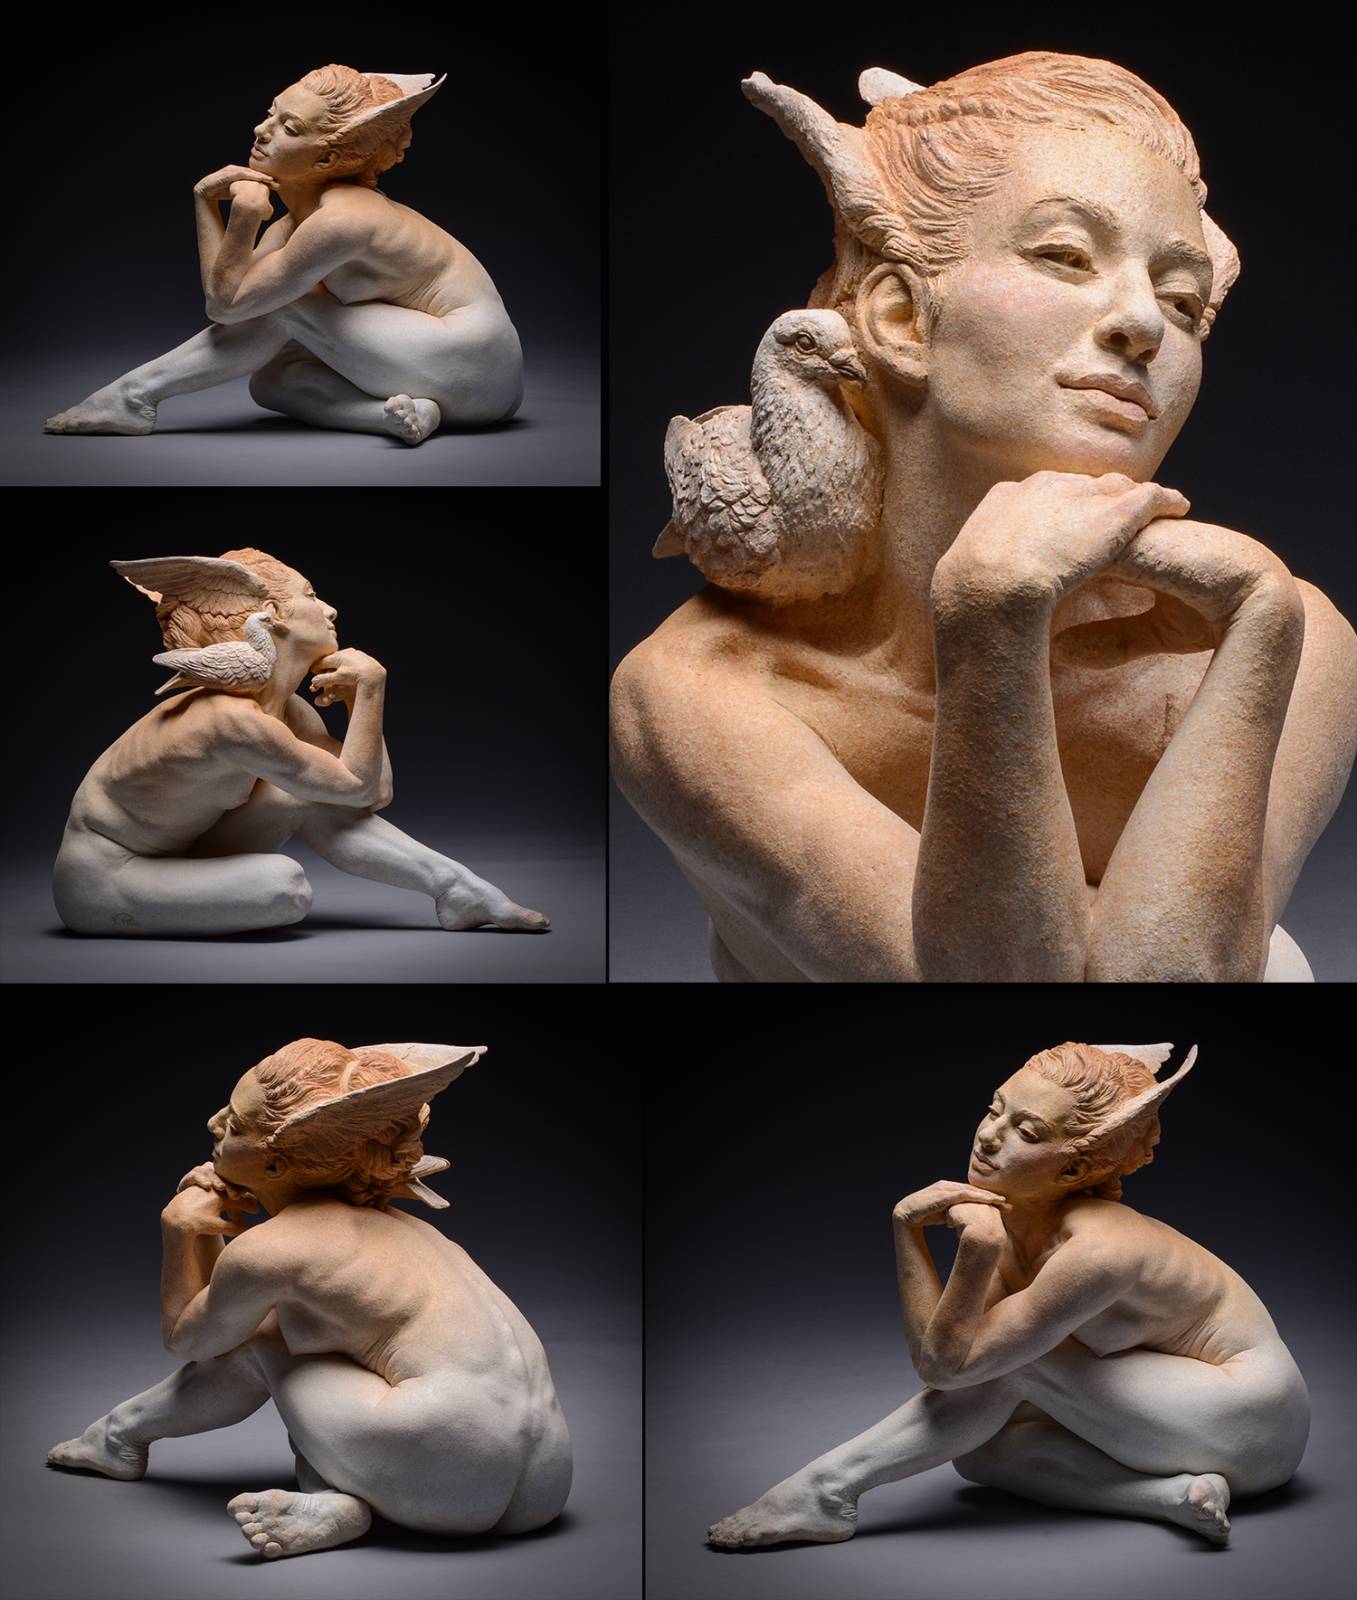
And the finished clay sculpture: Colin and I raise exotic pigeons. We named the girl in the sculpture “Dove” after Colin’s first bird that he raised as a child. One type in our aviary, called Damascenes, are beautiful white birds with accents on their wings. We have several of these that visit us frequently in the studio as we work. We decided to add one of our little birds to the sculpture as Dove’s companion. This is Zozo, one of our favorites that you could often see sitting on our heads or shoulders in photographs.
Here, perhaps Zozo shares a story about what it’s like to fly and Dove begins to daydream. Or perhaps the bird represents the inner self, when we launch off into an unknown direction in life, whispering in our ear, “You can do it! You’ll find your wings… I promise!” And sure enough, we do.
The Finishing Touches
The following video is from a couple Instagram live sessions we did documenting how we finished the sculpture after firing her in a kiln. We used acrylic paint and go into detail about the various ways we applied the finish and why we made the aesthetic choices we did.
And here are images of the finished sculpture, “Dove Dreams of Flying.”
“Halcyon Days” at Modern Eden Gallery
And finally, a bit of information about Halcyon Days! If you’re near San Francisco, please do stop by Modern Eden Gallery to see the show.


0 Comments