-By Ron Lemen
Hello all, still going on those color theory portraits, I have a few more portraits to finish for the series of skin tones and then I will publish it, I expect it to be a few more weeks before all the portraits are completed. I was looking through the reference for the white skin and I thought about a technique I learned from an amazing portrait artist Adrian Gottlieb many years ago, and how appropriate it is for this kind of flesh painting. The technique is called Verdaccio, but the layer I am interested in painting here is the Piambura layer. It is a wonderful way to build up form and the buildup is done in nothing but white paint.
So, I am taking a quick break to reflect on this technique and share it with you using an exercise I made for someone I am mentoring online on techniques in painting and the various color theories corresponding to them. I also need a short break from all the direct painting that I am doing, and this technique is an extremely refreshing way to do just that.
Verdaccio is a layer in the underpainting of a canvas. The verdaccio stage is also called the “Dead Color” layer as it replicates the flesh of a cadaver in its yellow/greens and green whites, blues and purples through a blending process called “turbid mixing”. There are many different approaches to doing verdaccio painting, as it was a favored technique all throughout Europe during the Renaissance and beyond, each country and its art culture applying their own take on the approach. Verdaccio painting originated from Italian fresco painting in the early Renaissance. It is said that this dead color layer started as a way of cutting back the intense orange and red hues used in flesh, but parallel to that concept I also believe that the Italians understood their own skin by coloration well enough to see the green undertones in it and using this cold temperature under painting was a correct representation of turning the form and giving it these additional cool hues balanced the look of Realism.
I am painting with the Piambura stage in mind. Adrian Gottlieb invented the term and here is a link to the piambura story and its origin. This is my favorite stage of this painting process, it is beautiful if done with control and if applied with just the right amount of transparency it also produces an amazing array of cool temperature “turbid” hues, ranging from blues and purples all the way over to the green family. Turbid means cloudy and the turbid hues are a result of the white cloudy film enhancing the dark hues and bringing out their “hidden” characteristics and exploiting them, like burnt umber having a blue to blue purple property in its composition.
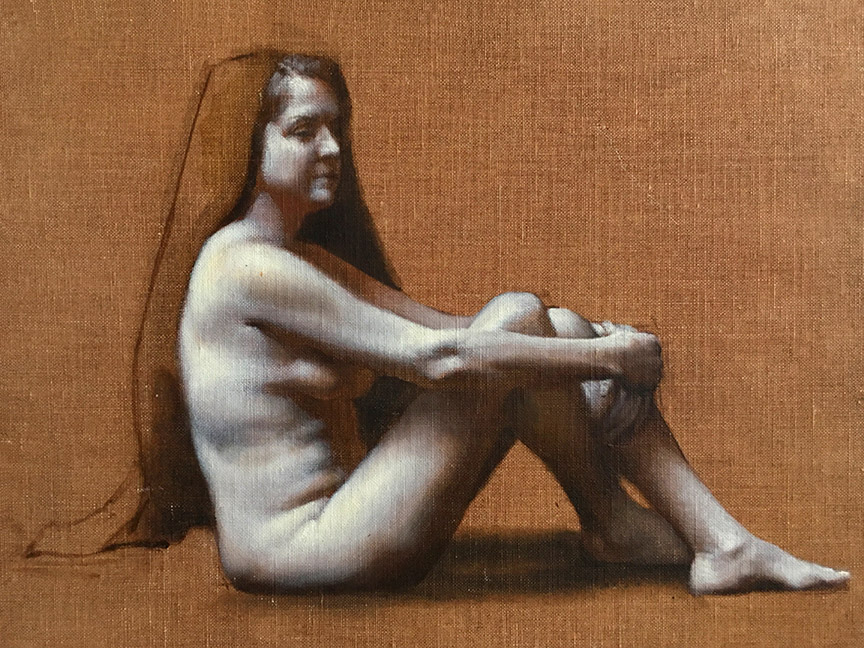
This is one of my examples of a figure painting using the technique. The camera has a very difficult time picking up the subtle changes of hue in the piambura stage because of the laying effect and its optical mixture that this illusion is best and sometimes the only way to see the turbid hues. Forgive me if I amp up the images a little in Levels and Curves to enhance the hues that are there. Also, one must come from the school of color theory that suggests there are no true grays in nature, that all colors as dull as they may be come from a root hue of some sort.
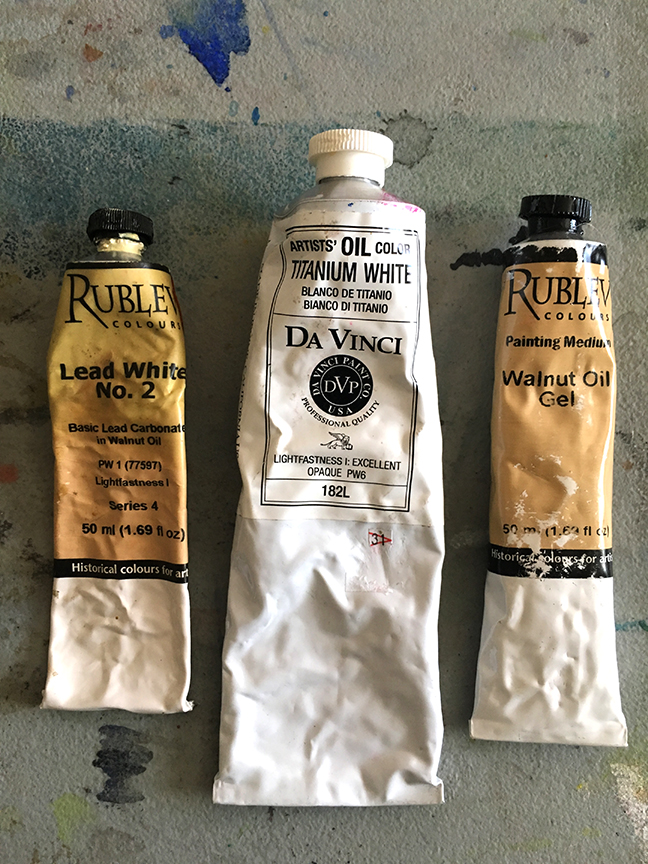
These are the paints I used. I have titanium white and Lead White no 2 by Rublev. The lead white is transparent and the Titanium white is opaque so most the painting is done in lead white with only the brightest and lightest areas mixed with titanium to flatten and brighten the space quicker than the many layers it would take with the lead white alone.
I also have this Walnut Oil Gel by Rublev and use it as my medium, brush cleaner and sharpener, as well as my paint eraser when the white gets out of control.

The brushes I am using are of three different grades of hair, a sable on the left, a badger hair in the middle and a bristle on the right. Each is used for its characteristic of handling paint, the sable is for fine and soft blends, the badger hair is in between with a soft firm feel that pushes paint around better than a sable but does not have coarse hairs so it does not chew up the clean gradations I am attempting, and is the brush I do most of the painting with. The bristle brush is the pick and shovel of the three and can pile on the paint or scrape it off with ease.
Before I start the white layer, the canvas needs to be keyed. This is called the imprimatura stage and is done with a combination of burnt umber and burnt sienna to balance the temperatures between them, one being cooler and the other warmer. If I want to see more blues in the turbid mixture I will use more umber and if I want to cancel out the temperature shift in the blending of light to shadow I will use more sienna in the imprimatura layer.
Next comes the drawing which is done in one color and is done in one pass with all the shadows filled and gradated out past their actual terminator so that when the white is painted over it there is much greater chance of a cleaner gradation between the lights and shadows. The drawing is done in a burnt umber and thinly applied. If the drawing stage is applied to thickly the drawing will catch light on its recorded edges as well as throw cast shadows into the mix. Because of this the darks become a distraction which can be difficult to look at.
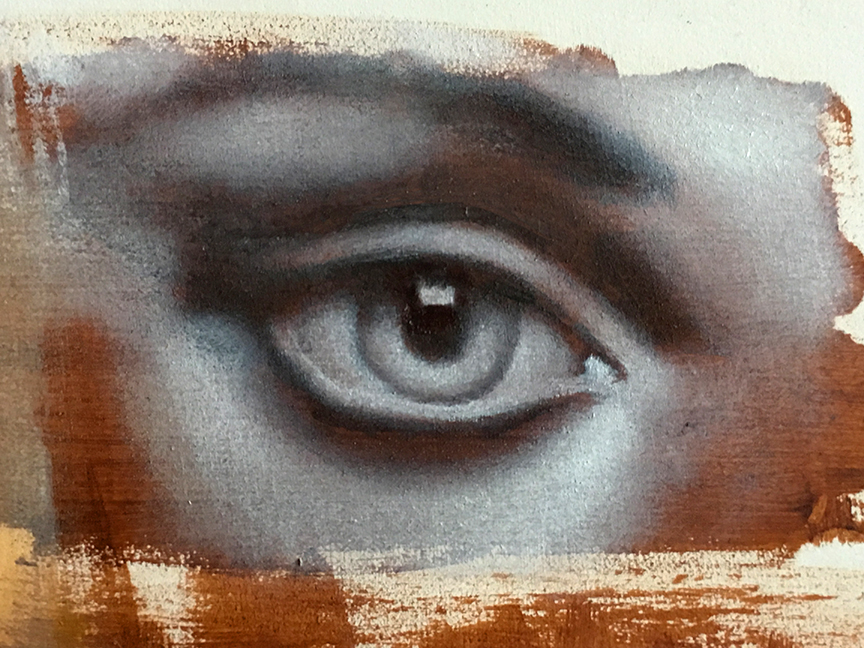
The drawing stage is thoroughly dried before the Piambura is applied. This stage is an “all white” painting stage. It is a strange feeling to build up form only using one color. I am used to turning form through various recognizably mixed values and using just one to do the same thing was a bit baffling to my senses, but the more I worked with it the more enjoyable it became. Most of the painting process is done with a Pouncing application, or Sfumato by its Italian name. It is a very relaxing way of painting compared to direct approaches and feels very Zen to me at times.
The paint is applied starting where the light is the brightest and is softly blended out from that point.
By applying the paint in this manner the paint remains extremely thin, as well, porous, or broken up into scattered dots of paint, not evenly brush stroked on and the light is correctly balanced by building out from the highest lightest point first. The paint is extremely dry which also makes it much easier to apply the paint this way. Because of the delicate nature of the turbid blending this stage is built up in layers, several, maybe up to half a dozen if necessary to achieve a precision gradation between the lights and the shadows. And if this process is done with only lead white then many additional layers are necessary to achieve a pure white quality at the highest points of light.
Since this is an underpainting technique that will have glazes and scumbles built up over it to complete the form and color, the underpainting needs to exceed the light that on the model perceived by eye. Glazes have value to them and when painted over the underpainting will darken it by nature, which is also why the scumbles are equally important balance to the process of turning the form with color and achieving the correct brilliance of lit flesh.
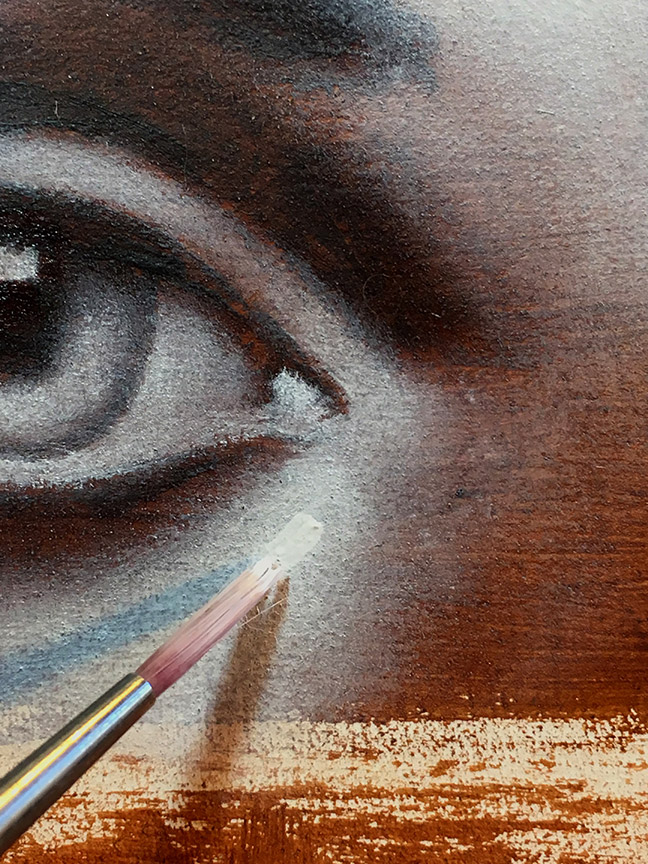
This example of the eye is on its second layer of paint and I have one more to apply on Tuesday after this layer has set and dried. I am fairly certain that 3 layers is all it will need to exceed the brilliance necessary for the glazes to work, IF I were going to glaze it.
Here are two videos showing the application of paint and a different view of the brush as it strikes the canvas while I am pouncing(sfumato) with it.
[youtube https://www.youtube.com/watch?v=QDKZiyaytDg]
[youtube https://www.youtube.com/watch?v=2cJzfzruudo]
Okay, heading back to the easel now to complete that series of portraits. Take care and happy arting.
Great info thanks for the share! Will try this.
Fantastic information – I was merely using the piambura white layer as a very crudely and quickly painted single-layer base on which to apply the grisaille layer(of between 5-9 grey values)later and then colour glazes.
But your piambura is beautiful(tempting to leave the painting at this stage as finished!) I must try and take my time and refine it as you have done.
Thanks for the quality infoormation!
Paint application and demonstration's not found in abundance with exception of two or three ways (like impasto or scumbling)in books or videos and those just lazily introduced. Everyone just assumes you just take the brush and slash at the surface and then when the paint doesn't stick, won't go over a previous layer or scrapes off the layer below instead of covering it, one has no idea what to do, only wonder just how some results are achieved. This has provided much insight!
What an interesting post! I am learning to paint abstractly and will be experimenting with this technique applied to abstract art.