If you’re anything like me, you probably don’t know half of what Photoshop can do, despite having used it for decades. I’ve been oil painting way longer than Photoshop has been around, and as a result, I tend to think of Photoshop with a ‘physical media’ state of mind. That is, I want a brush or palette that imitates the way I work traditionally. So when there is a tool or filter that doesn’t really correlate to a real world equivalent, I often ignore it to my own disservice.
One such tool that I went WAY too long without knowing how to use was the Gradient Map tool. This tool is unbelievably helpful for any artist that starts off working monochromatically. In fact, it’s such a popular way of colorizing digital art these days, that you’ll probably recognize its style even if you didn’t know what it was.
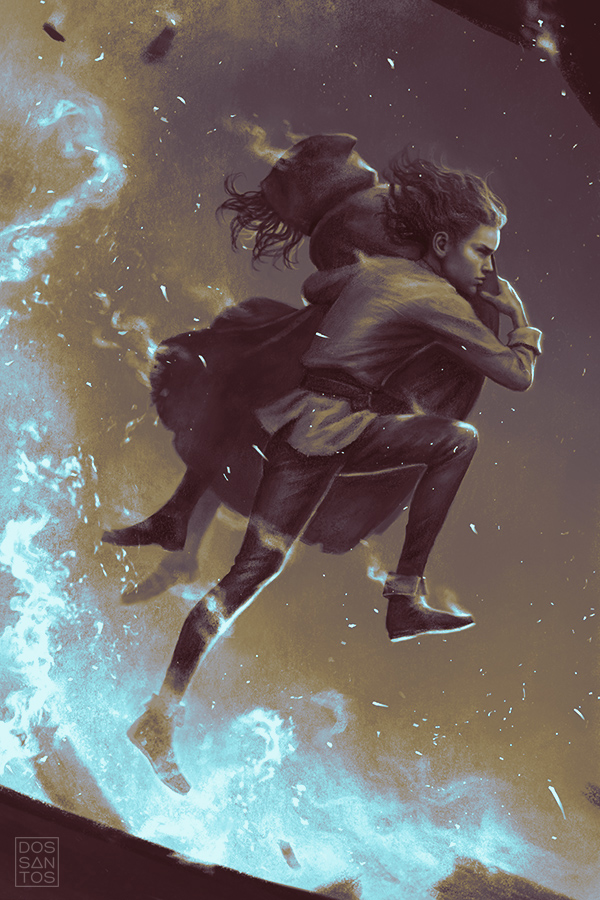
Simply put, with the click of a button, the Gradient Map tool can convert a greyscale image from something like this…

into something like this…
Now, it by no means finishes your art for you. But if you’re trying to add a little bit color to spice up a black and white sketch, it doesn’t get much easier than this.
I had known that a lot of artists used this method, and was curious to try it for a long time, but I didn’t really understand how. I always seemed to get something wrong, and usually would fall back to my tried and true methods, or just abandon it completely. But eventually, I took a little time and researched it so that I could better use it.
For those that want to just jump right in, here is a ‘quick start guide’ of sorts…
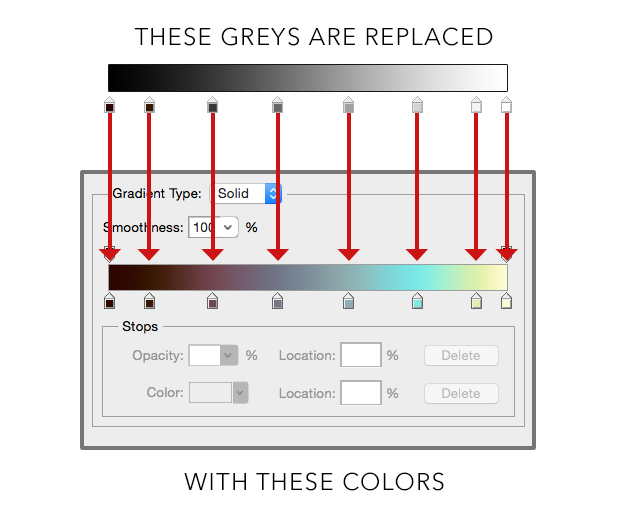
In a nutshell, the Gradient Map takes any specified grey in your piece, and replaces everything of that value with the color/value of your choice.
Thanks to half the world self-quarentining, there have have a TON of instructional videos going around, and a few good ones on Gradient Mapping popped up lately. I figured this would be a great time to introduce some of you other stubborn traditional artists to the concept!
This first video, by Marc Brunet, is a popular one and the first one I found on Gradient Mapping. It was probably the most helpful in explaining the actual process to me. It’s a great overview and very comprehensive.
These next two videos are quite new, and really struck a cord with me! I had always used the Gradient Map tool for just that, gradients. But these two videos by comic artist Matt Hollingsworth, helped me realize how versatile they could be, and actually help produce a strong, graphic quality! Plus, you can tell Matt is a professional artist, and so the video really accentuates the facility and ease of workflow that the tool provides.
Lastly, this video, also by Marc Brunet, helps showcase WHY you might want to use Gradient Mapping, as opposed to other means of coloring, through the demonstration of a helpful side-by-side comparison! Marc paints the same character twice, using two different methods, and takes time to show the specific differences in the results.
So if you’re unfamiliar with Gradient Maps, take a look at the videos above. You’ll be glad you did! Though, ultimately, making good art with them comes down to practice just like anything else. I am by no means an expert, but in my own trials, I have come across a few helpful tips that you may want to keep in mind…
Tips for Using Gradient Maps
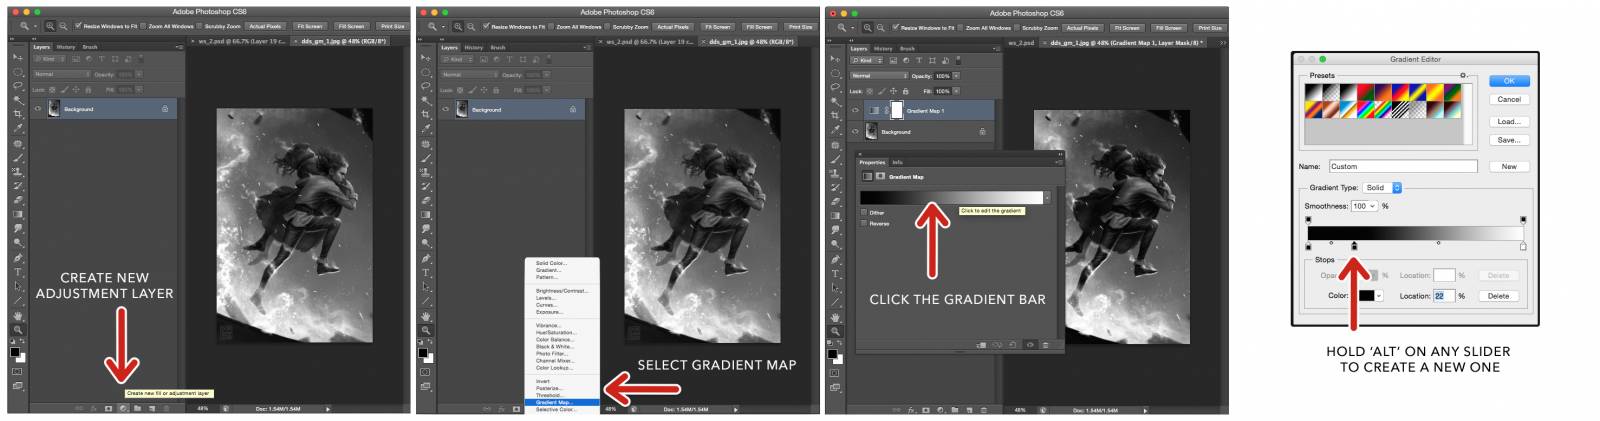
- Do your Gradient Map as an ‘Adjustment Layer’, not an edit. This will let you fine tune it repeatedly.
- Use Warms and Cools! Don’t just shift your gradient’s value. Really try to focus on creating a temperature and saturation shift as well.
- It takes finesse! The difference between a really garish palette, and a truly stunning one, is EXTREMELY subtle. Take your time to really get it right.
- Restrain! I try to reduce my blacks and whites just a small bit, as to allow the color to really shine through in those areas.
- Be careful of Value when selecting colors. Try to pick colors whose native value corresponds well to the grey you’re replacing.
- Research! I spent quite a bit of time using the eye dropper tool on other artist’s work, trying to figure out how they did it. Seeing their process helped me better replicate it, and appreciate the subtlety involved.
- Collect! Any cool Gradient Map you make can easily be saved for use again. Eventually, you’ll create a whole library of interesting palettes, that you can quickly cycle through and use in the future.
That’s it! Go arm yourselves with new artistic ammunition, and explore!


Thank you so much for this. I’m not at ease with colors and I much prefer a B&W approach for first steps. That’s exactly the post I needed, very useful.
Stephan, I was much the same. I always start with values, and this is a really nice way to get comfortable with color.
Well Dan,
Having gone through this, I think I might give this a spin myself.
Do it, Christof! Good luck!
Never could figure those out either! Great post!
Right? I was perplexed by them for years. Yet they’re relatively simple to use.
Dan, thanks so much for sharing this. I’m definitely going to try it out!
Ps. awesome painting!!
Thanks Dan! I’ve been struggling to understand this tool and never focused on it, your guide is very helpful!
Thanks for sharing this amazing and informative post. keep sharing with us.
My Wrist Wraps make the best quality wholesale customized fitness products on the market for all your fitness needs and customize it.
thanks for sharing great information.
Leather Fashion Jacket & Gothic Alternative Clothing & Kart Racing Store Online.
thanks for sharing great information.
Go Kart Racing Store Online.
Welcome to our services, where we specialize in giving expert help with setting up your WiFi extender via the user-friendly website mywifiext net. Our committed team of professionals will walk you through the whole installation procedure, assuring a smooth and trouble-free installation.
We offer expert assistance for Netgear WiFi extender setup. Our team guides you through the process, from placement to configuration, ensuring seamless connectivity and extended coverage. Experience optimized WiFi with our dedicated support.
Welcome to our dedicated support service for mywifiext.net, your partner in achieving seamless connectivity and network optimization. Our expert team is here to guide you through every step of the process, whether you’re setting up a WiFi extender, configuring network settings, or troubleshooting issues related to mywifiext.net.
thanks for the information nice website for me
very nice Post
very good and helpful article
very nice article thanks for sharing
awesome post sir
Excellent article! well-written and insightful. I admired the distinct viewpoint. Anticipating more content along these lines. Bravo for the writer.
this article is a very nice …
few words mean two third of the story this is a division of climbing image. look through a two hinged fan shades.the articles looks to make a lot of plans provided the collision.thank you generating a stage
very very good post sir
awesome work
informative blog article thank you for share an article with us.
Although I like your viewpoint, I’d be interested in learning more about this particular topic. It appears as though there might be more to take into account. Anyone interested in learning more about tplinkrepeater.net can visit our website and get advice from our knowledgeable staff.
I’m grateful for the work you put into producing instructional materials. Learning new ideas is constantly made far more fun by your blogs. Anyone interested in learning more about the www blinkforhome setup can visit our website and get in touch with our professionals for more help.
Discover premier landscaping services in Mississauga tailored to elevate your outdoor space. From stunning garden designs to expert lawn maintenance, our skilled professionals are dedicated to bringing your vision to life. Transform your property into an oasis of beauty and functionality with our comprehensive landscaping solutions. Explore our range of services today!
This post is excellent. The effectiveness and speed of mobility are essential to the success of enterprises in Australia’s wide landscape, where distances between large towns and isolated areas can be considerable.
I was thrilled to discover this website.For taking the time to read this fantastic book, I wanted to thank you! I’m loving every second of it, and I’ve bookmarked your blog so I can see what fresh you post.
This post is quite good. Because of Australia’s large size and the sometimes great distances between major cities and isolated areas, businesses depend heavily on the effectiveness and speed of transportation.
Excellent post. Every day, I come across websites that teach me something difficult and completely new. Reading through other authors’ writing and utilising material from other websites will always be fascinating.
Finding this website made me very happy.I wanted to say how much I appreciated this great book and your time! I’m thoroughly loving it, and I’ve bookmarked your blog so I can see what new content you provide.
It’s a worthwhile post. Efficient and quick transit is essential for commercial success in Australia because of the country’s large size and the often great distances between major cities and isolated areas.
Nice post. Every day, websites I come onto teach me something completely new and difficult. Perusing other authors’ work and utilising resources from their websites will always be fascinating.
That I discovered this website made me very happy.For this fantastic read, I wanted to express my gratitude for your time! I have saved your page so I can check out the new content you provide. I’m definitely enjoying every part of it…
That post is excellent. The effectiveness and speed of transport are vital to the success of businesses in Australia’s vast landscape, where distances between major cities and isolated areas can be considerable.
Fantastic post. Every day, I come upon websites that teach me something difficult and completely new. Reading other writers’ work and making use of their websites’ content will always be interesting.
Incredible job! Punctual delivery and outstanding results. An absolute pleasure to work with. I highly endorse!
Cefuroxime Axetil Tablets IP 500mg are commonly used to treat a variety of bacterial infections, including respiratory tract infections, skin infections, and urinary tract infections. This medication works by stopping the growth of bacteria, helping to alleviate symptoms and promote recovery. It is important to follow the prescribed dosage and duration of treatment to ensure the best results and minimize the risk of antibiotic resistance. Cefuroxime Axetil Tablets IP 500mg are a reliable option for those in need of an effective antibiotic treatment for bacterial infections.
Alencure Biotech is a leading name among the Top Medicine Exporters in India, offering high-quality pharmaceutical products for third party manufacturing. With a strong reputation for excellence and reliability, Alencure Biotech is the ideal partner for companies looking to outsource their manufacturing needs. Contact us today to learn more about our services and how we can help bring your products to market.
Etoricoxib and Paracetamol tablets are a combination medication used for pain relief and reducing inflammation. They are commonly prescribed for conditions such as rheumatoid arthritis, ankylosing spondylitis, and osteoarthritis
SEXTOYS INDIA at CupidBaba offers a wide selection of adult toys, including vibrators, dildos, and lingerie. Enjoy discreet packaging, secure transactions, and fast delivery across India for a private and pleasurable shopping experience with high-quality products.
This is an incredibly useful tool for any artist that works in monochrome initially.