I’m working to finish up our discussion of chimps and gnats for next month, but since it isn’t ready yet I thought we’d take another look at reference photography: specifically, the nuts and bolts of creating reference photography to be used for illustration work.
Recently I had the pleasure of illustrating an omnibus edition of The Murderbot Diaries for Subterranean Press, and in the process of sharing some of the finished paintings online I got asked something like: “how did you even reference these?” So let’s look at exactly how one of the paintings from the omnibus went from sketch, to reference, to final, as a way of answering that question, and hopefully shedding further light on the simple fun of dressing up in costumes and parading around the house as adults.
Step 1 – The Sketch
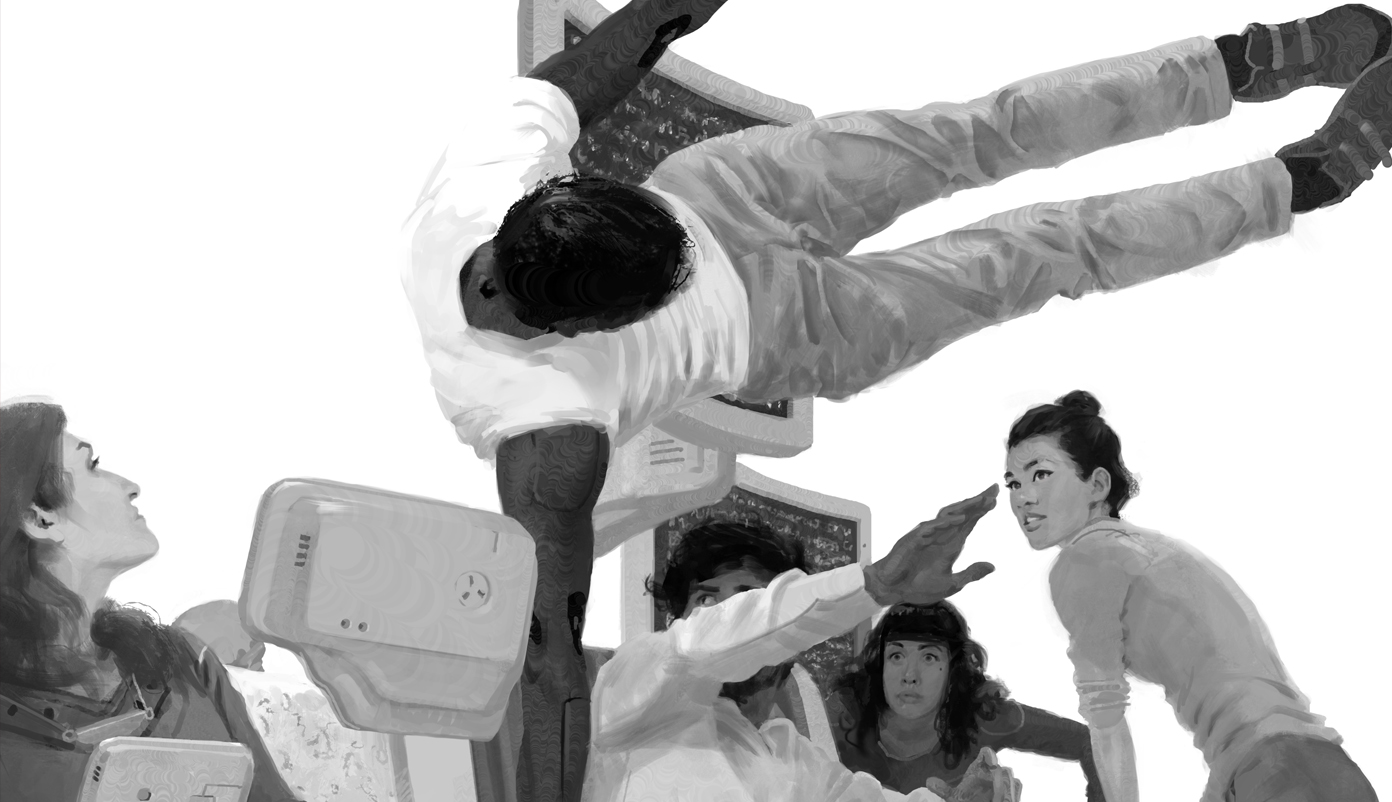
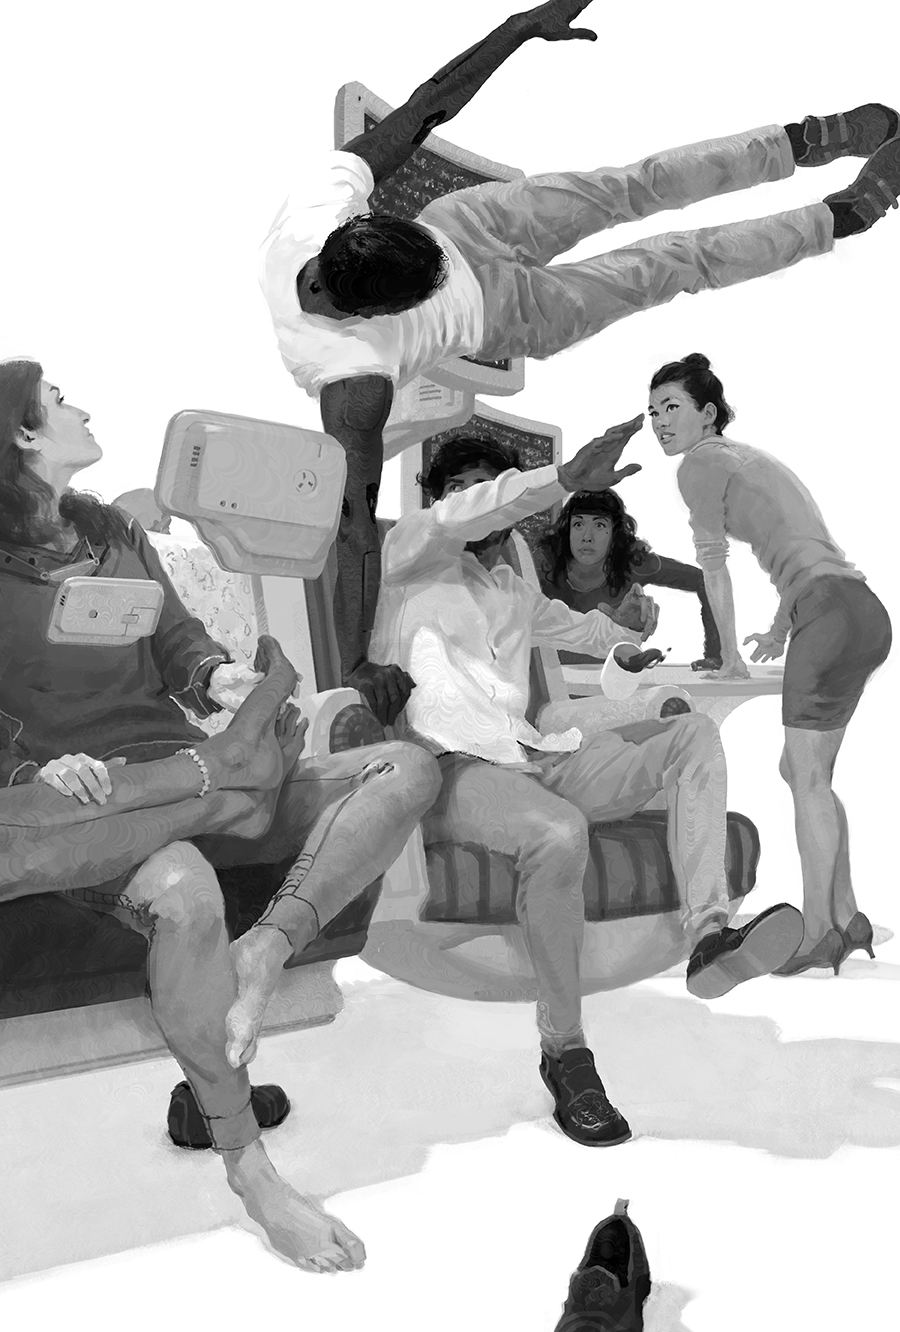
Interior Illustration: Artificial Condition – Sketch
The sketch is done without visual reference of any kind, not to be macho but because if I rely on reference too early in the process I’m sure to bow to it. My reference should serve my vision, not supplant my vision. I need to know what I’m trying to make, and provide reasonable proof to myself and to the client that it can work and be visually striking. Working without reference at the beginning also makes sure that my piece reads well without much detail. This forces me to be a good designer, and saves me from having to be a “good renderer” later to “save” the painting.
While sketching, I don’t think about how I will reference the poses or costumes I draw. I don’t let fearful, future Tommy dictate how cool of a thing I’m allowed to draw. I am drawing cool stuff, and future Tommy can suck it up and figure it out – he always has before.
Step 2 – The Photoshoot
Oh, crap.
Nah I’m just kidding – this is actually a pretty simple sketch to create reference for, despite how it may seem! Most of the figures are standing on the ground, and the costuming is all pretty much run-of-the-mill coats and pants that anyone would have in their home. We’ve got that one backflipping figure 5 feet in the air to worry about, but as you’ll soon see there are easy tricks for things like that.
I think a big fear many of us have before setting up in the reference game is that “photography is so expensive and just a lot to learn.” On the contrary:
- Everything you are about to see was shot with a camera I bought used, over 8 years ago for $150. In many ways it’s inferior to what you probably have on your phone, but I’m used to it.
- The light kit we’re using is $55 on Amazon, and even that is a luxury we could have easily done without (and did, at some points).
- The mental skills needed to match camera lines and obey perspective are already something you’ll want to have learned to be an illustrator, but if you don’t have those skills yet you can just read this free PDF of Perspective Made Easy and do the exercises at the end of each chapter. And BOOM, now you know!
- You don’t need to hire models if you don’t have much of a budget. Use your friends, family, and/or classmates! You’ll learn a lot by posing for each other and experiencing what sorts of motions really go into the poses you draw. Even with a great budget, I often prefer to shoot with friends and fellow illustrators in humble spaces. Generally, the less pressure we put on ourselves, the better our results will be.
Speaking of: big thanks to fellow illustrator, podcast co-host, and best bud Micah Epstein for helping out with this and many other shoots. We shot every piece of reference for the omnibus in a single work day in one living room – it was about 20 poses worth of material, for use in seven different paintings. We had help from a few good friends as well, and afterwards I bought everybody shakes and burgers. Good day.
So, here we go!
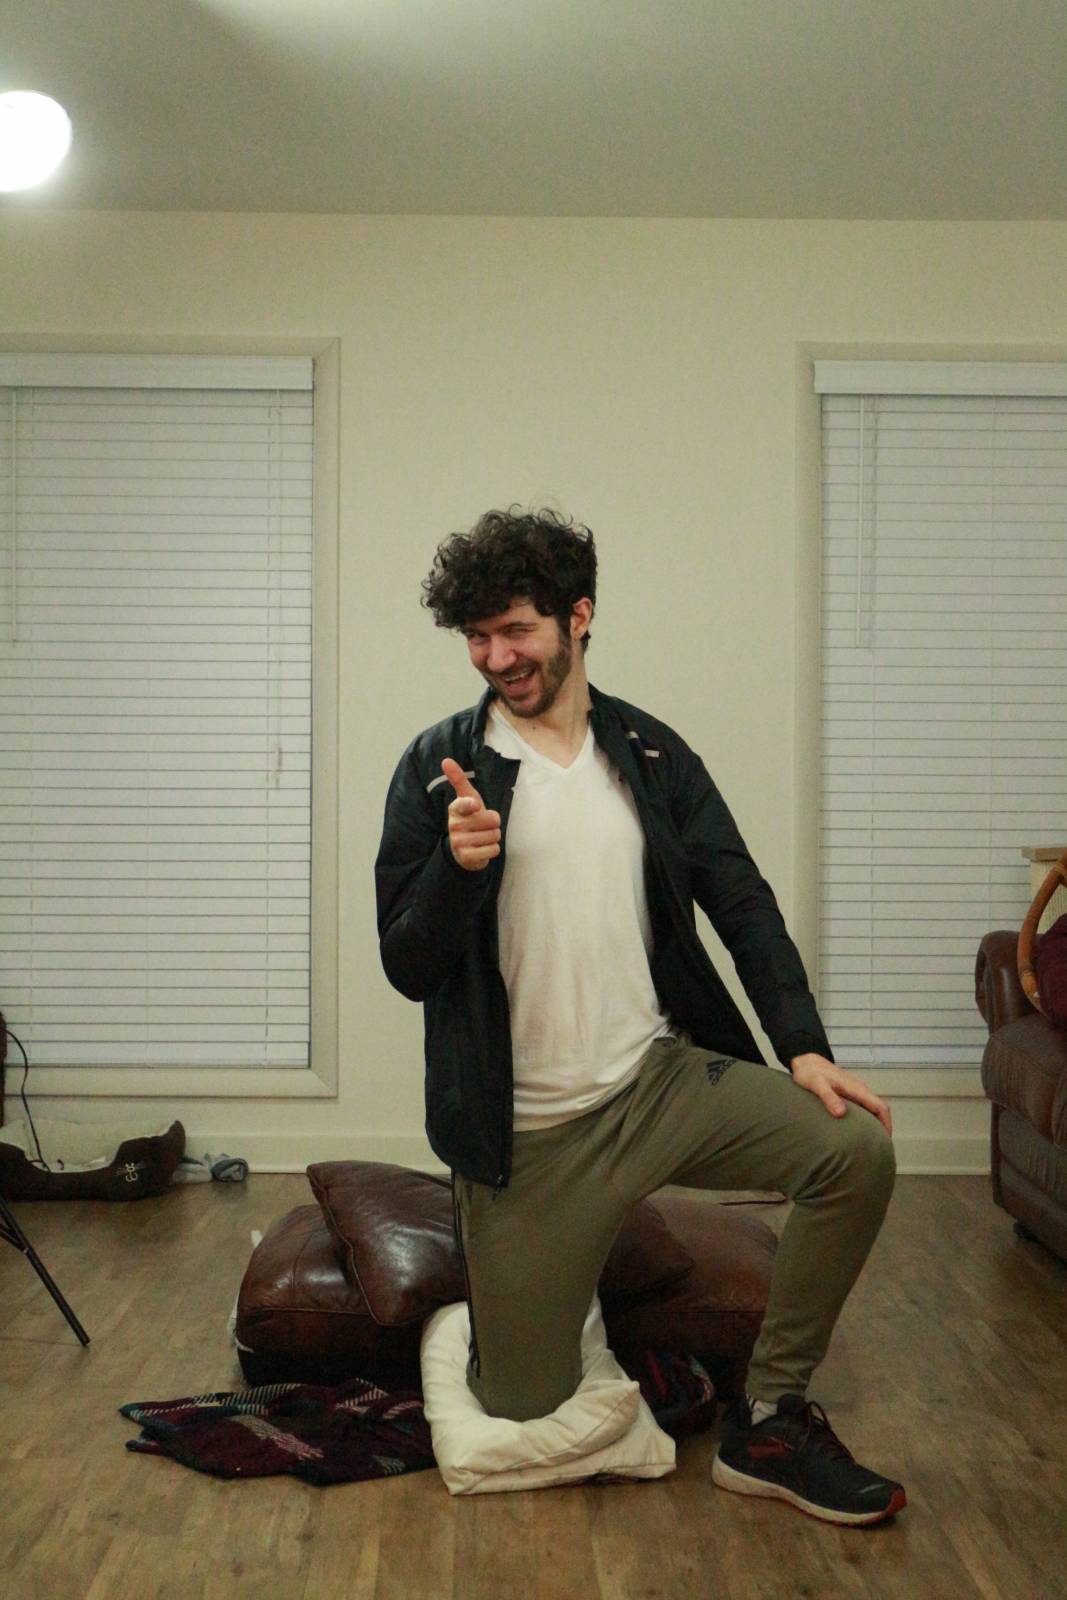
Obviously, step 1 is to have fun, and Micah is killin’ it! Norman Rockwell best described why this is so important in Behind The Camera:
“Directing models so you can get the right poses for your pictures is an art in itself and is somewhat akin to the motion picture director’s job. First, you must discard all your own dignity and vanity and ‘get into the act’ yourself in order to induce your model to lay aside his own dignity so he will feel and express the emotion which you want to convey in your picture.”
Well, Micah is an illustrator so he and I both come to shoots sans dignity already. Still, I went through the sketch with him and had him take a few shots of the motions I was after as I moved through them slowly:
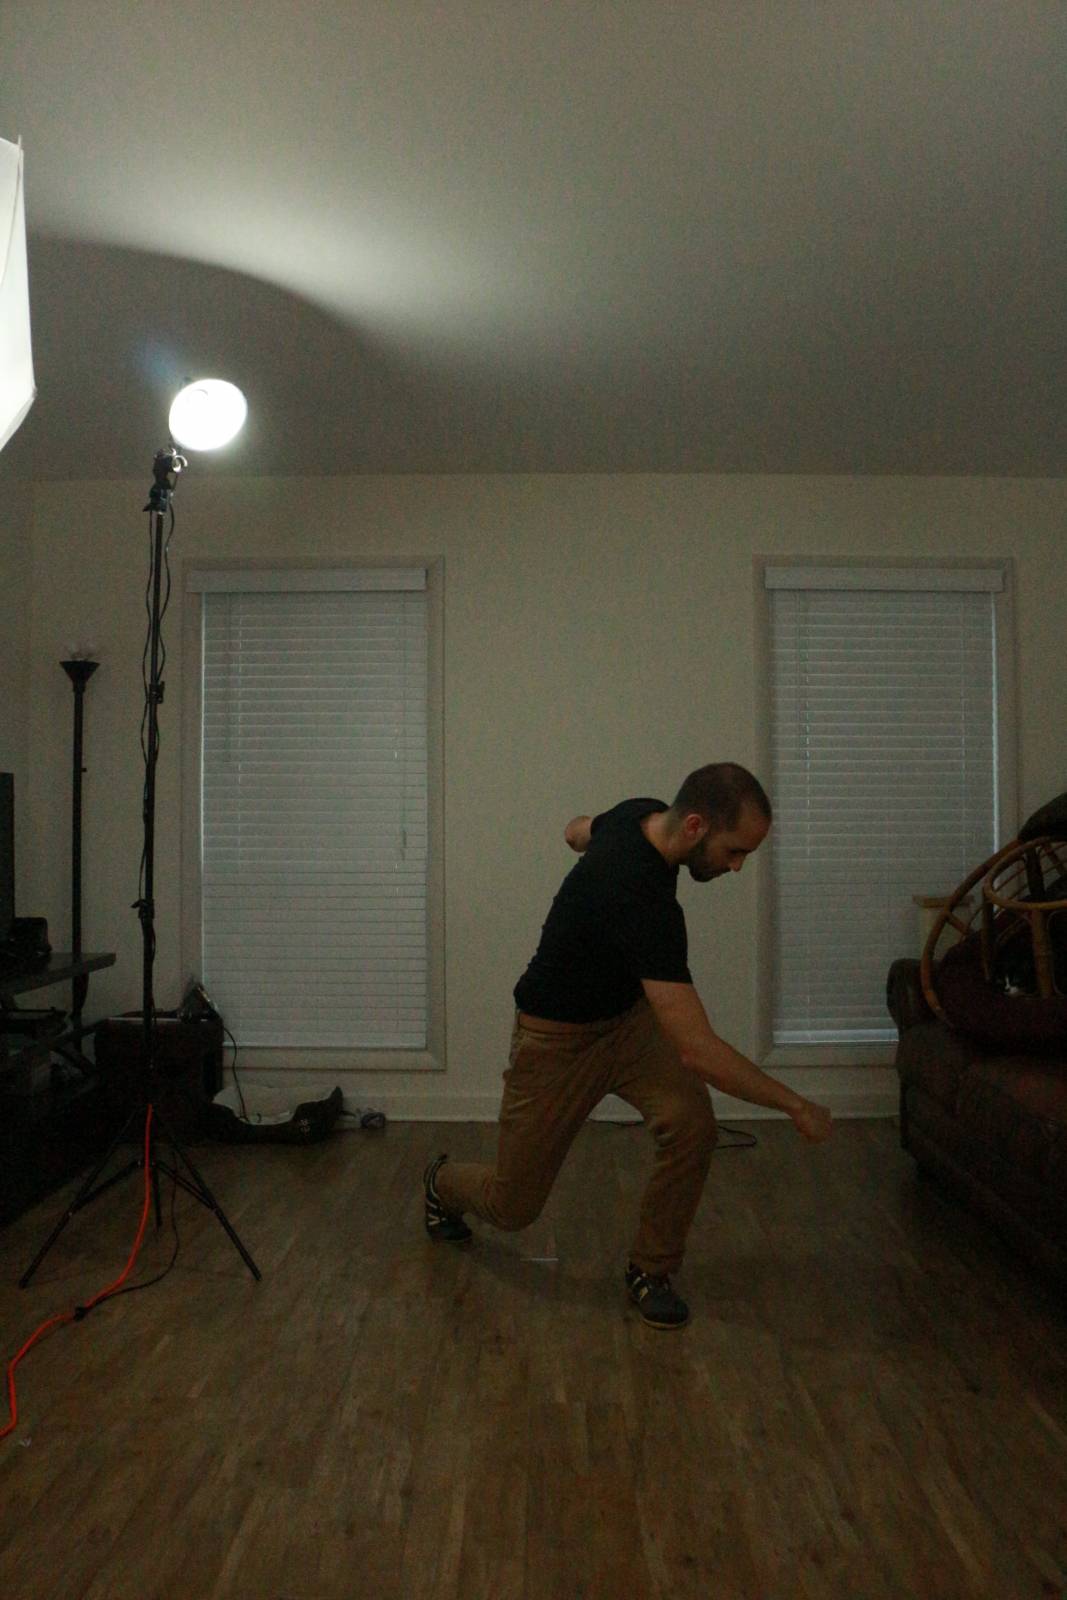
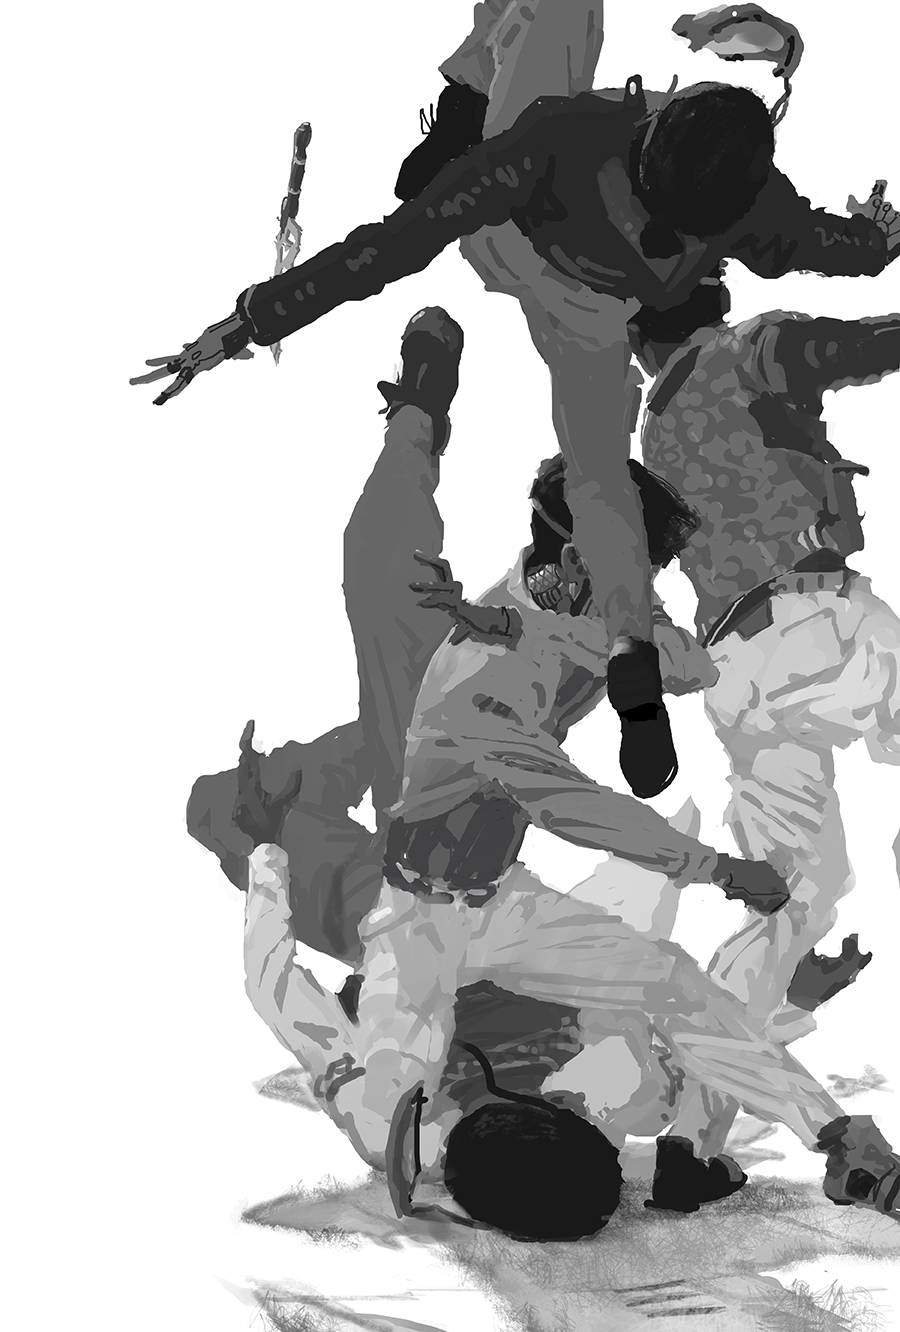
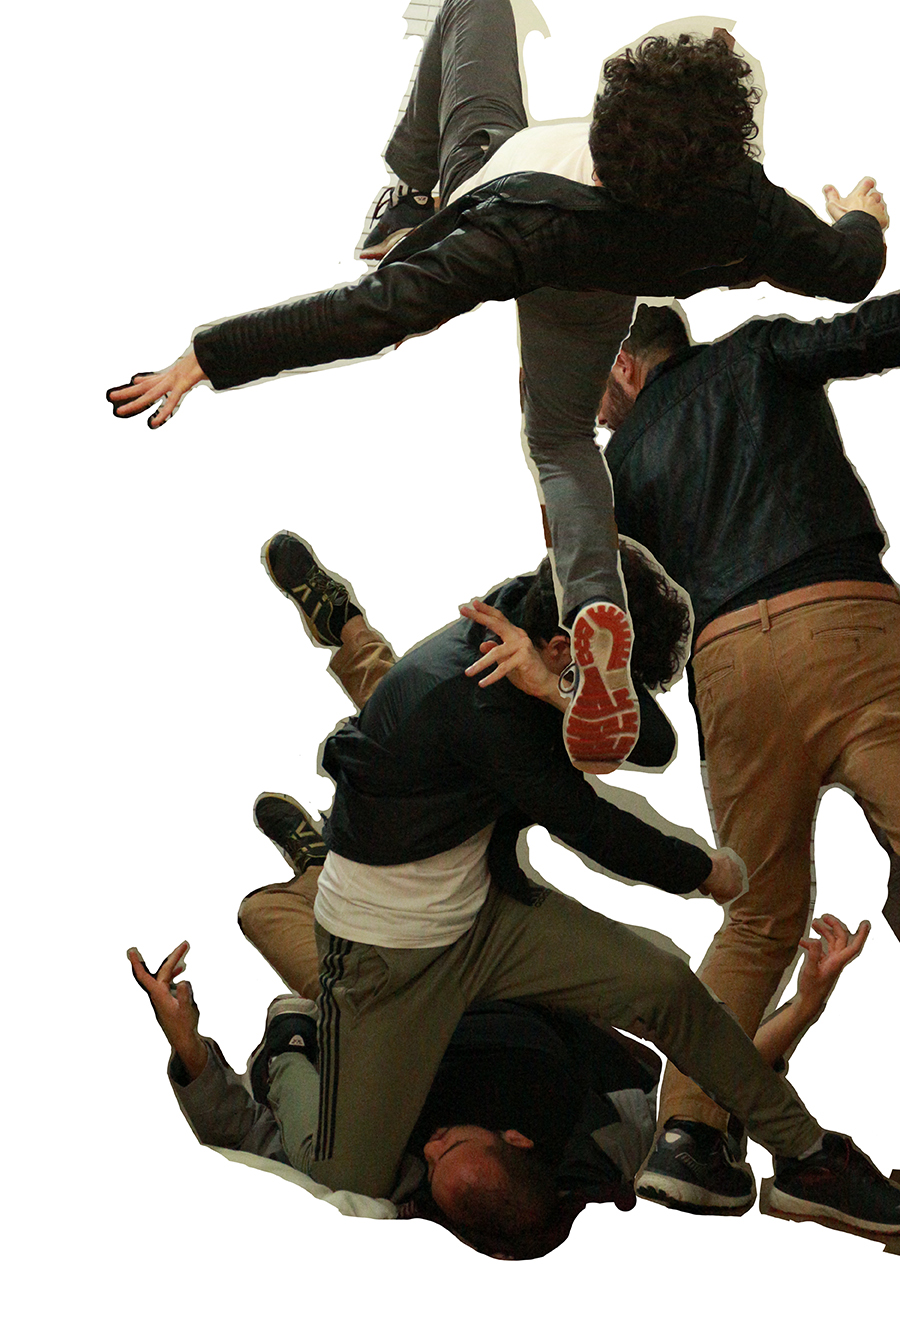
We also used this pass to dial in the lighting, since as you can see it started a little dark. After fine-tuning the camera settings we built a little pillow fort on the ground and got started on shooting the main action of the sketch: Murderbot punching backwards into a fibula while knee-slamming another dude to the ground.
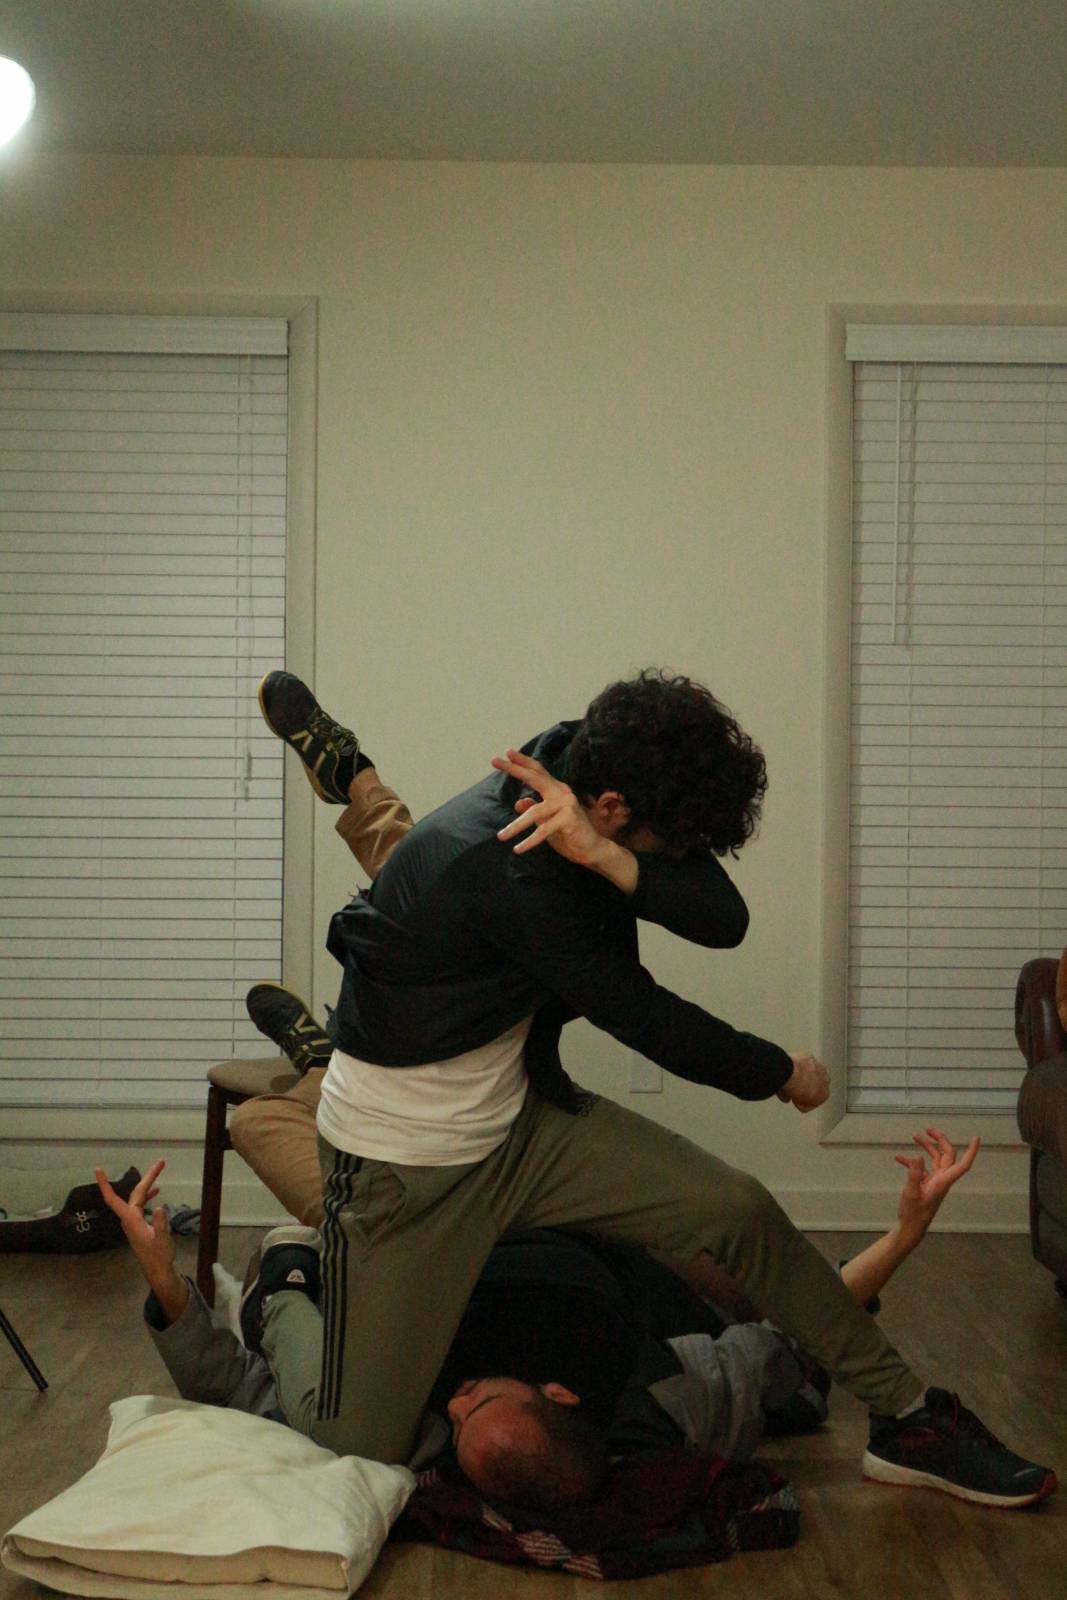
I work by holding down the trigger and letting the camera shoot continuously, so that I can focus on directing the models and not on getting “the shot.” Again, you want to avoid working in ways that up the pressure. We don’t need “the one great shot.” You’ll barely ever get it all in one shot anyways, and you’ll drive yourself crazy going after it. By shooting continuously, I catch all the subtle little in-between poses, gesticulations of hands, and even the disparity in chest broadness that comes from normal model breathing. I sort through all the pictures later in Adobe Bridge, and by shooting this way I end up with more options to choose from, and have a lot more to work with when comping material together than I would otherwise.
In this case I was in the shot, so I directed Micah into position and then had a friend of ours hold down the shutter while I flailed around and breathed heavily, due to having a grown man sit on my chest. Look at how red my head is! We propped my legs up on the back and seat of a kitchen chair to get the “falling backwards” feeling, and I think we used an alligator clip to hold back Micah’s running jacket into the “punching” shapes I wanted. After a few minutes of shooting on and off so that I could A) breathe and B) review the photography so far, we got what we needed!
As a brief aside: I’ve found that when you have multiple figures in a scene and they aren’t touching, it’s often best to shoot each one alone. When you have figures interacting or touching, it’s often best to shoot them together. Humans are soft and their physical interactions are complicated, and can be hard to predict accurately. Do yourself a favor and shoot the actual interaction; this is a huge timesaver.
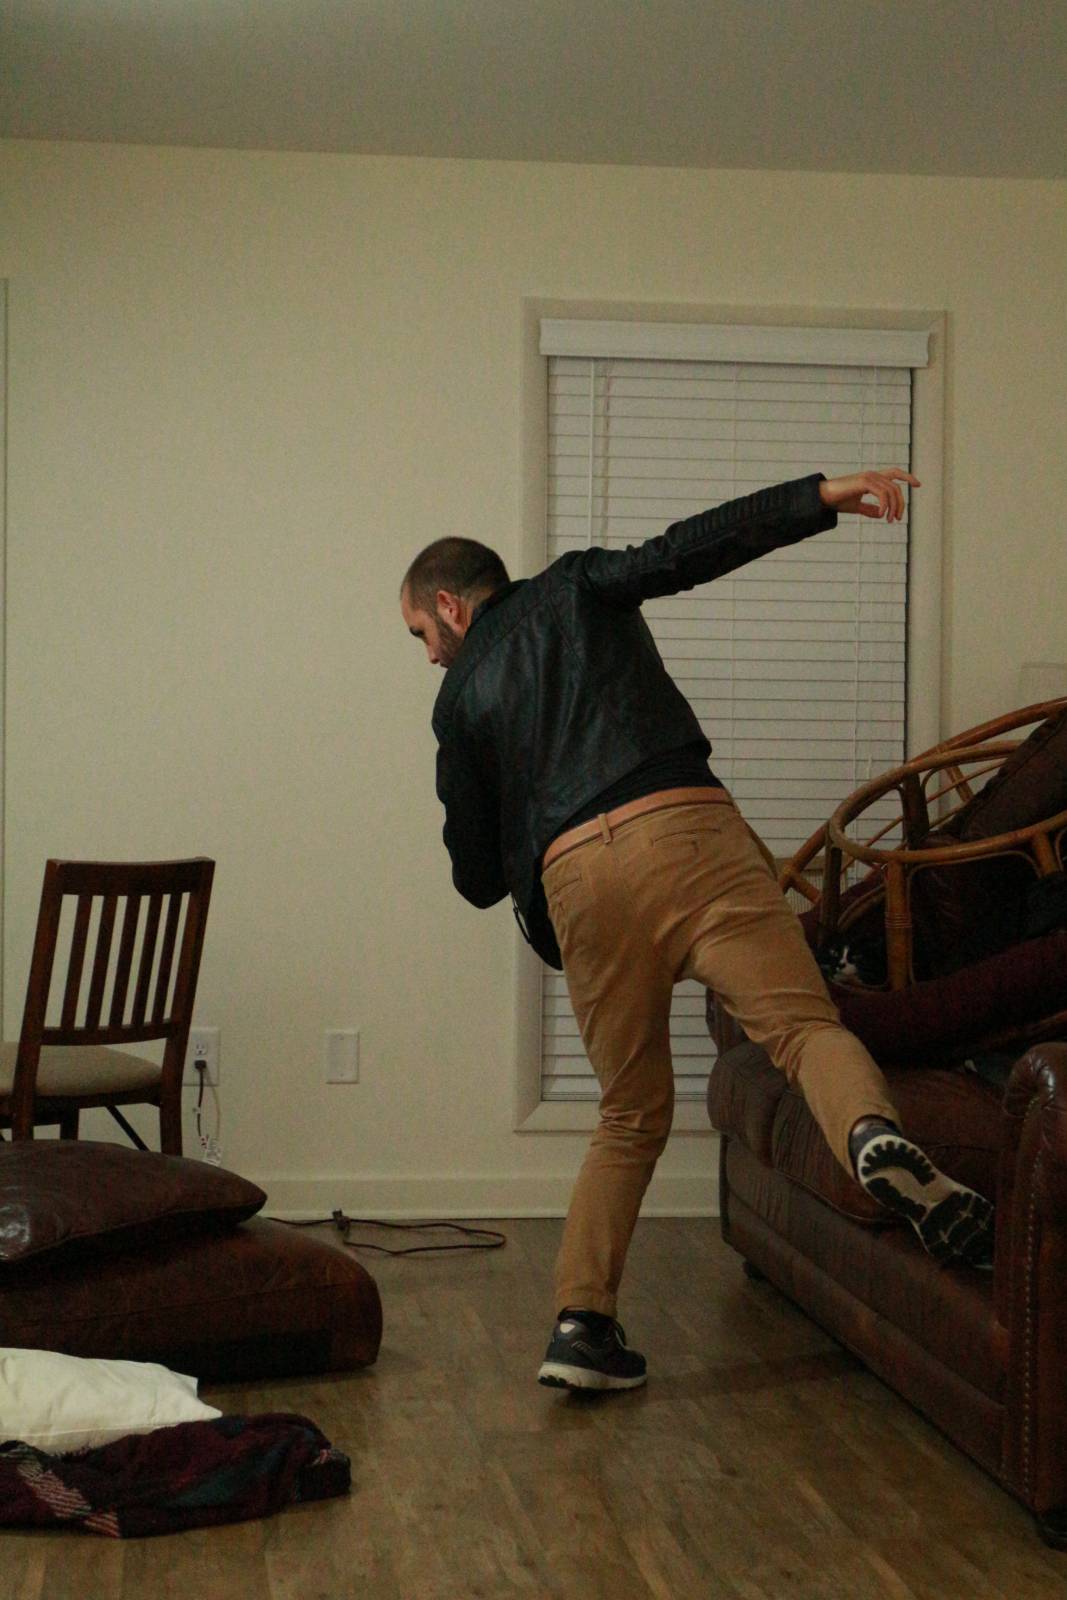
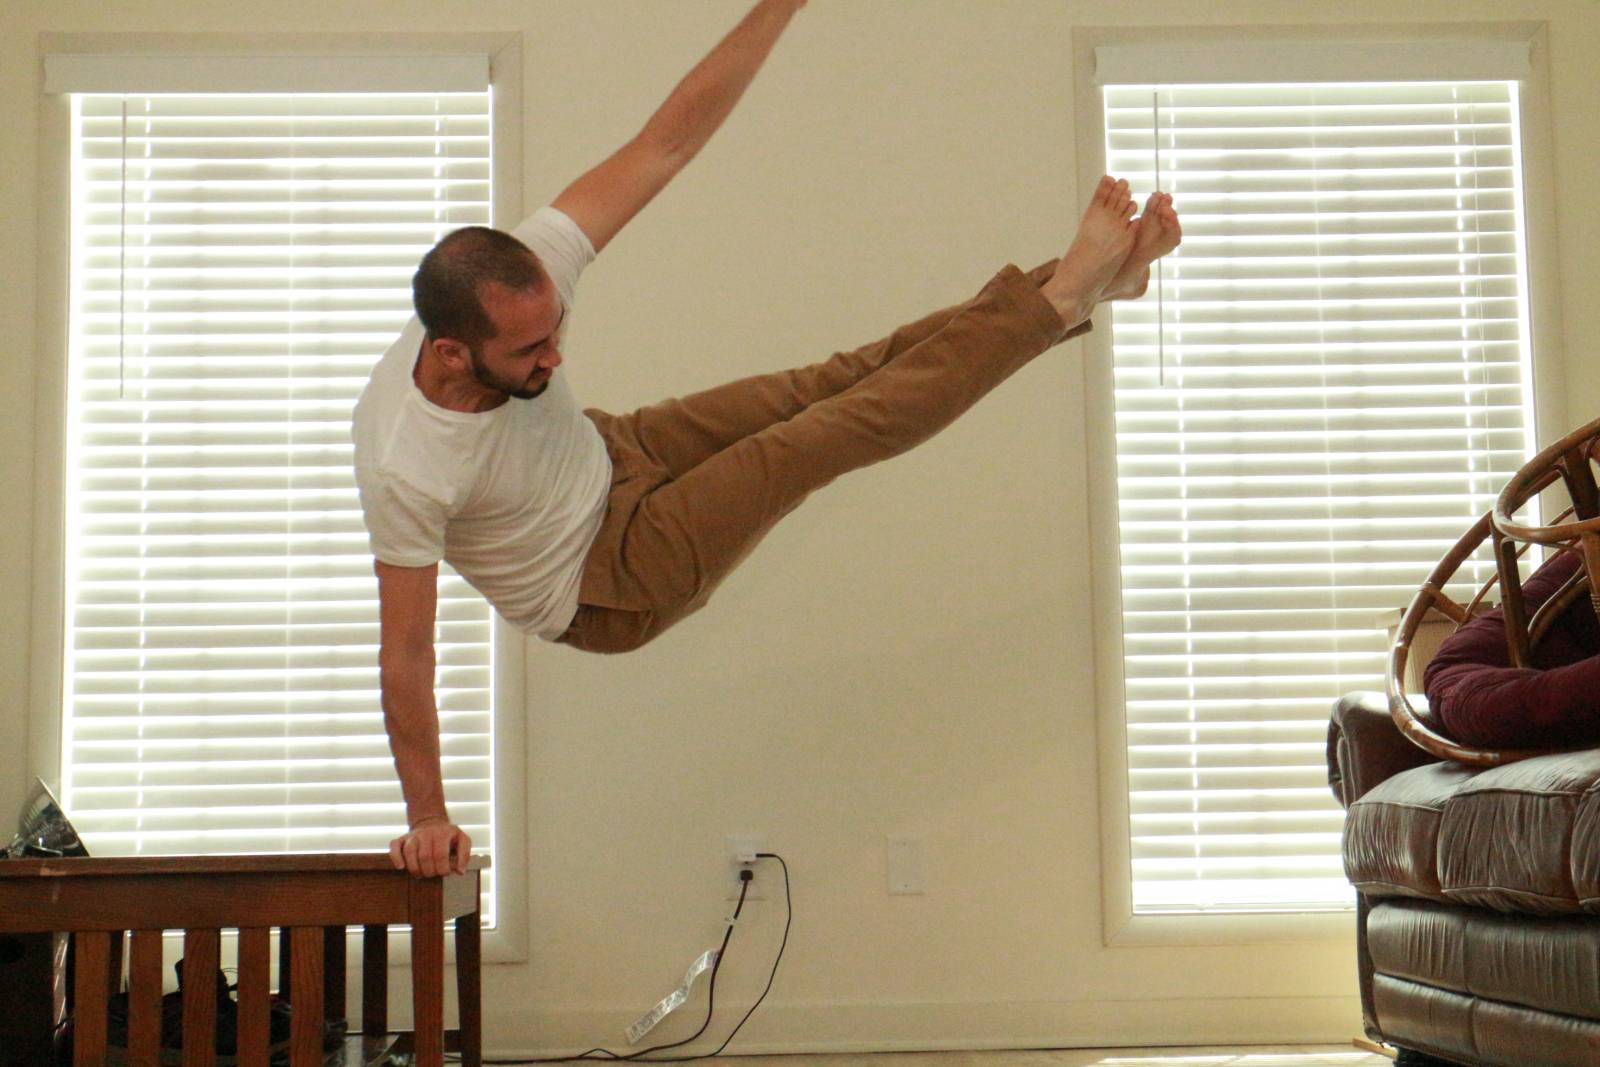
While we still had the pillow fort on the ground to reference for position, I popped on a cheap leather jacket from Target and flailed around some more (lots of that in this piece) and balanced on the edge of the couch while Micah held down the shutter and gave direction based on looking at the sketch. This pose was really simple to shoot; no big surprises here.
Lastly, we needed to shoot the guy who got punched so hard he’s airborne. Up until this point I haven’t moved the camera in physical space at all. It’s resting on the same cameral line that I used in my sketch: right through Murderbot’s head, somewhere around 3.5 feet off the ground. If I want to shoot a picture of Micah as though he’s flying 6 feet in the air, for use in the same painting, and I can’t raise him to that height: I can lower my camera 2.5 feet beneath Micah, and the effect will be the same. Make sense? It’s clearer in visuals:
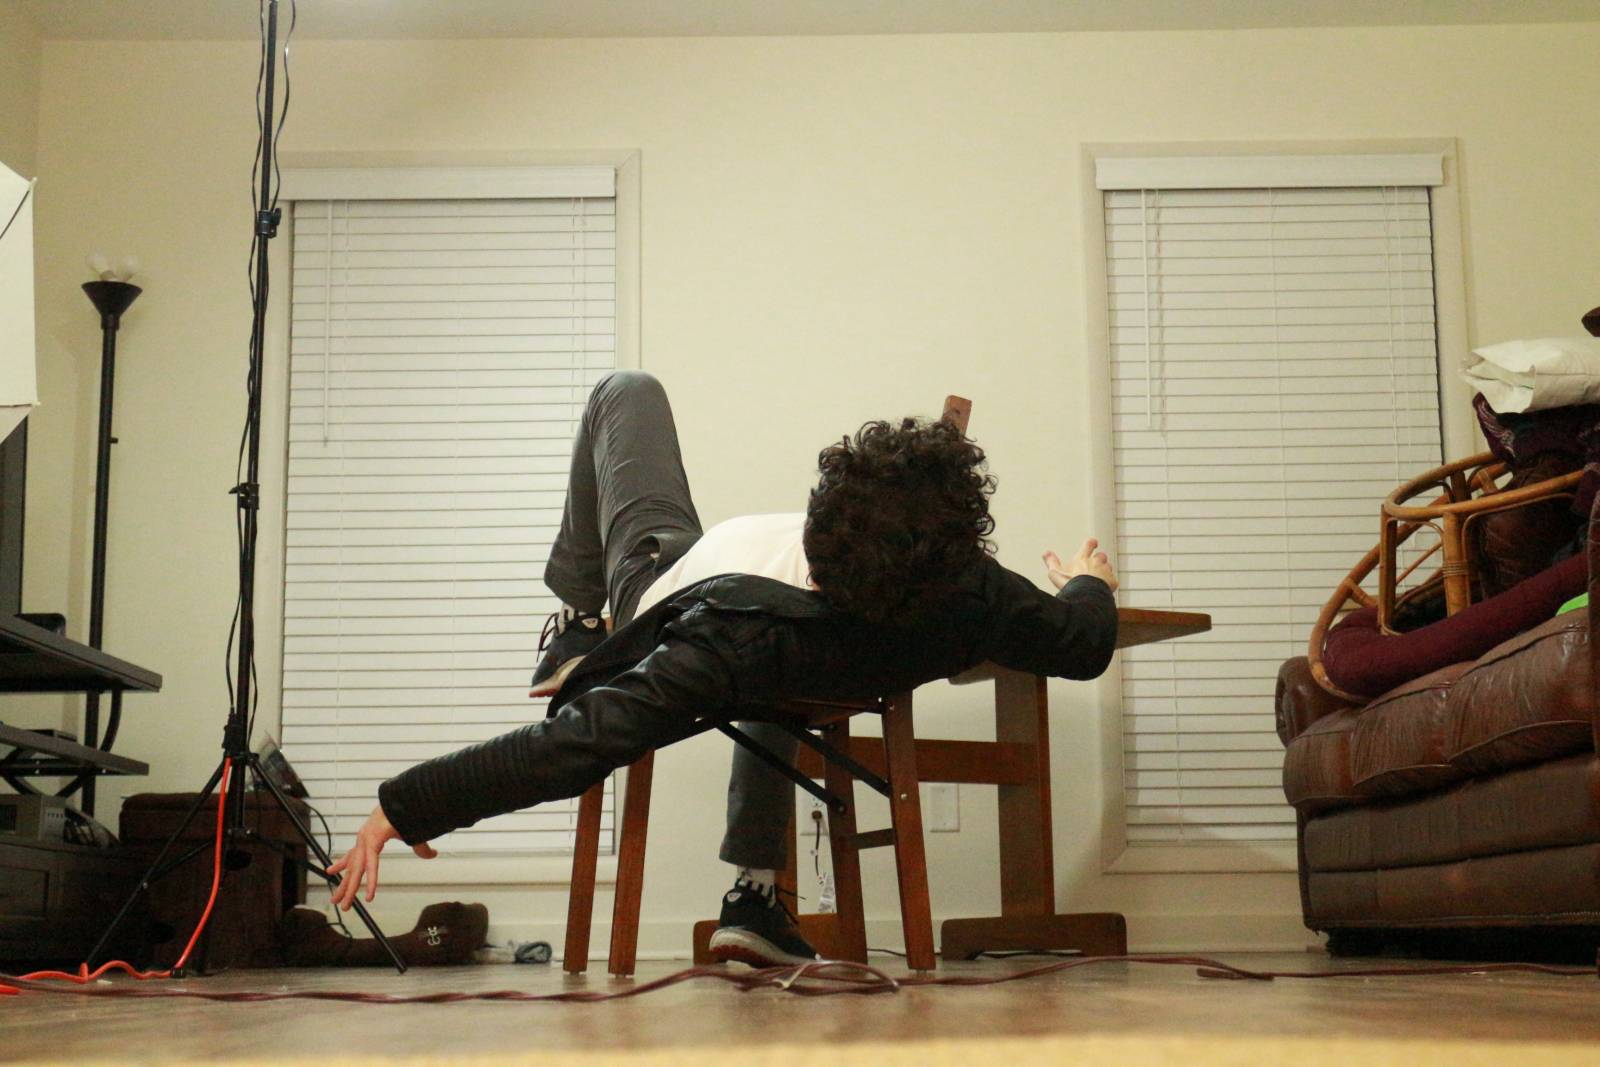
Now my camera is resting on the ground, and Micah is feeling certifiably airborne. With Micah lying on his back, draped over a chair, we were able to photograph all the major elements of the pose except for the extended lower leg. Then we changed the setup again to shoot the right leg, like so:
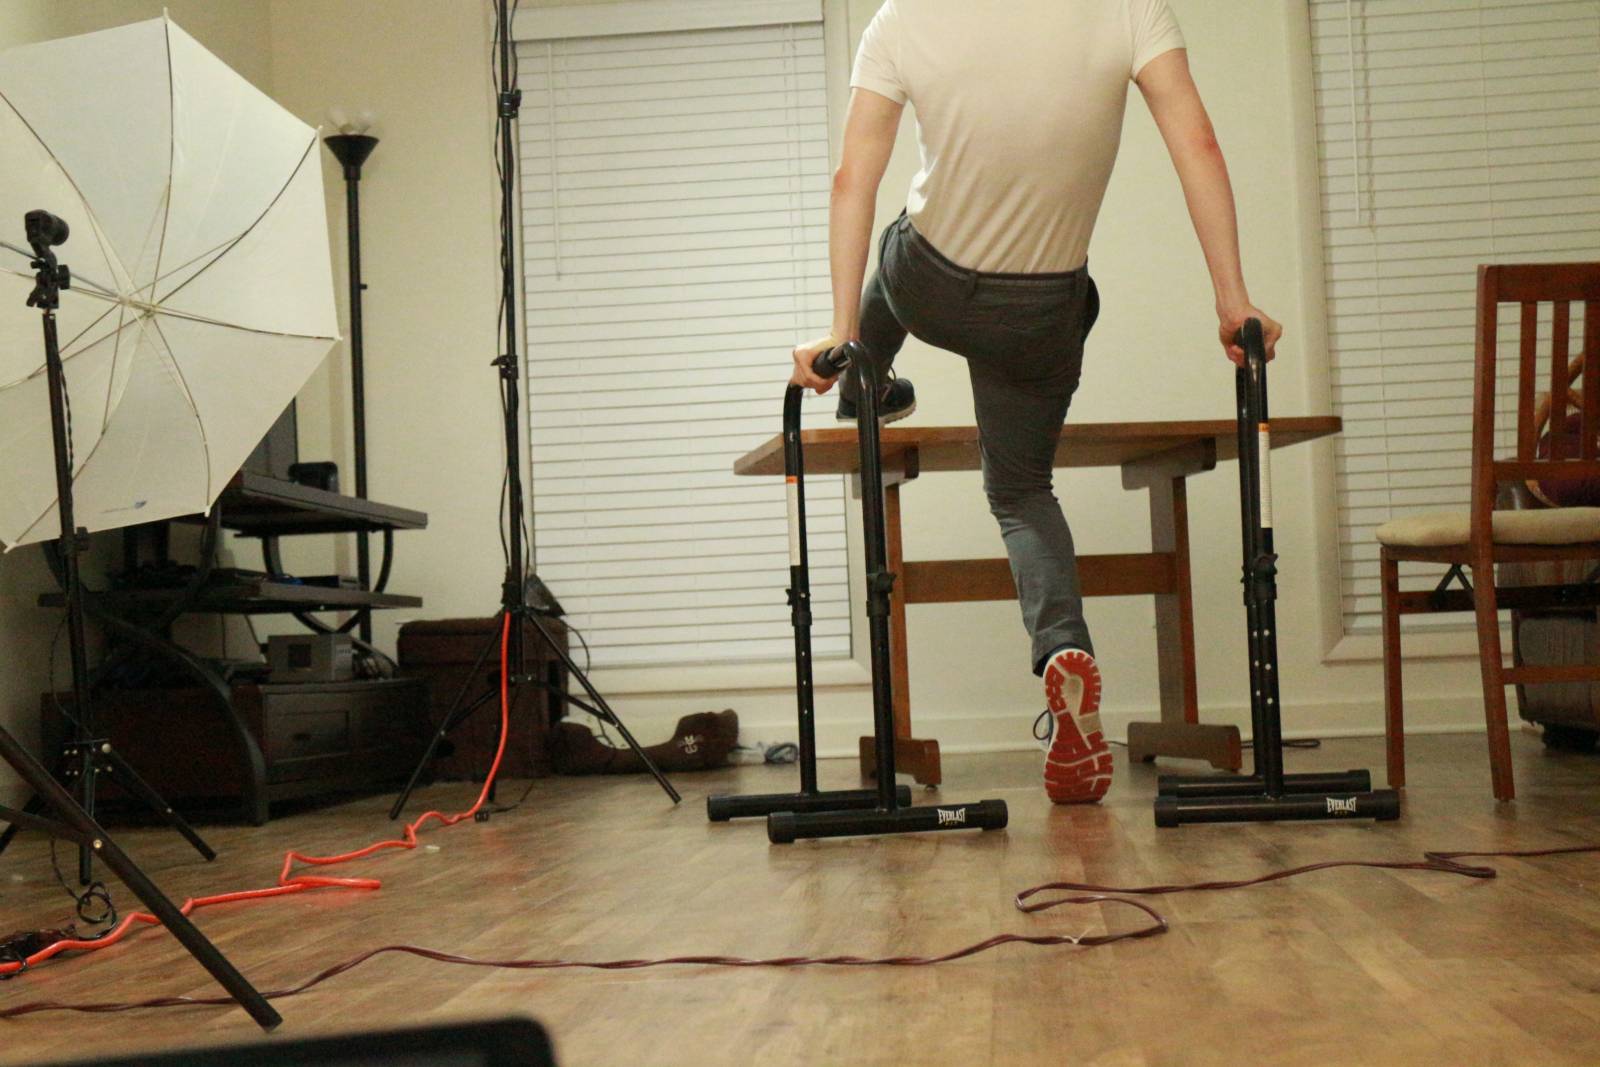
You can see that I’ve raised the camera up off the ground a bit to keep up with Micah’s rising position. Working to harmonize the camera line of each photograph with the camera line of your sketch is the key to combining all the necessary photography into one visually cohesive composition.
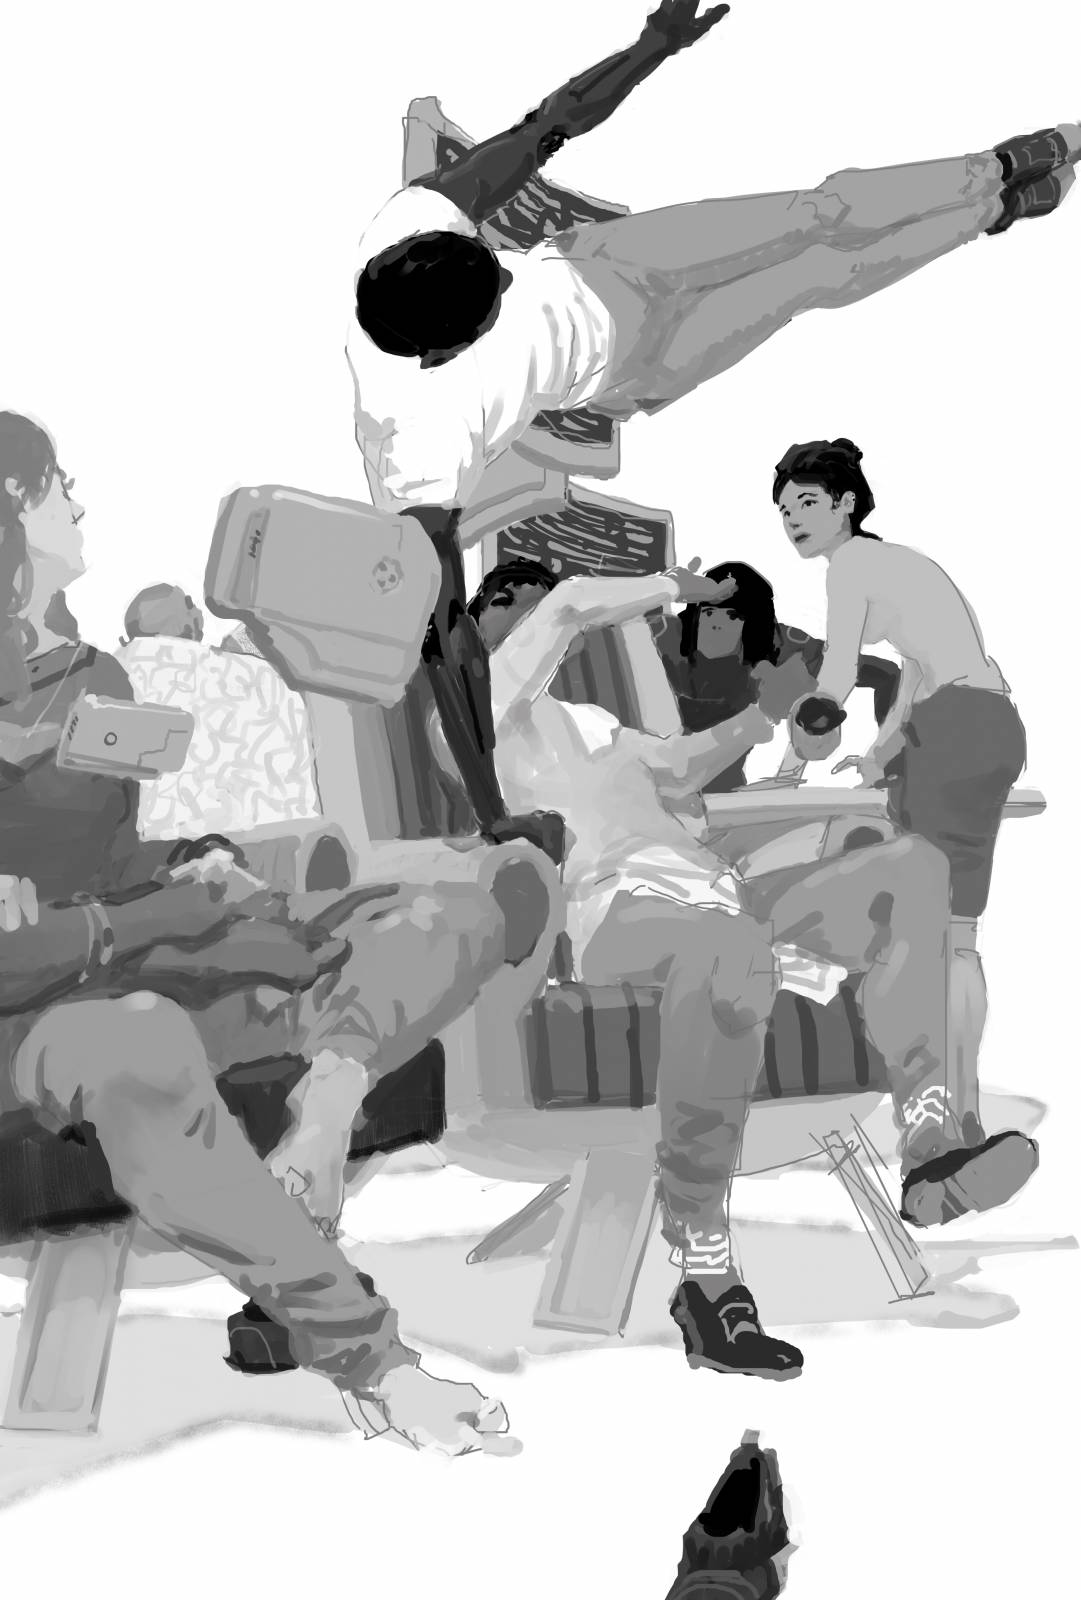
In the end I comp everything together in Photoshop, right in my painting file, just like I explained last time:
Overall I was lucky not to need to make too many changes here, but you can see how I grafted on that right leg and butt cheek to the “flying Micah” body, and it looks like I swapped out his hand too. I’m always willing to draw with my reference, to make whatever changes are necessary to serve my initial sketch – that’s my vision! These are just pictures. Mangle them, cobble them, do what you’ve got to do but never bow to them.
If you find yourself focusing on the seams between information, on “making sure everything connects,” the reference has you under its spell. We don’t need smooth transitions between the reference comp elements, because the reference comp isn’t our final product – a painting is. Instead, think of your photographs as raw material to be manipulated, and stay focused on the holistic enterprise of drawing. These photographs aren’t reality; they’re aren’t “right.” YOU are an artist with vision, and these pictures are just your tools.
Step 3 – The Final Painting
From there it’s pretty simple: you just begin to paint, using what’s good from your reference and combining it with what’s important about your sketch, making little adjustments where necessary. “How to paint” doesn’t really fall within the scope of this article, but hopefully you can see that we’ve set ourselves up with a massive advantage in the painting process by taking a quick 45 minutes (seriously, that’s all this took) to shoot some pictures. Here’s how the final painting turned out:

Interior Illustration: Artificial Condition | The Murderbot Diaries, Subterranean Press.
A Few More Hot Takes

Interior Illustration: All Systems Red – Sketch
But surely this set of poses would need to be shot separately, right? Actually…remember that bit about shedding dignity?

Micah was a champ and let me sit on his chest while his girlfriend took these pictures of us wrestling. She put “F*ck Her Gently” on the iPad to really set the mood, and we almost died laughing from embarrassment, but after that it just became normal, and we got some really great shots of exactly the information we needed.
Interior Illustration: Home – Sketch
And what about this crazy pose? I’ll admit I was having trouble nailing it in the house, without room to run and set up into the vault, but I tried:
After this we decided to just go outside and try to get the shot where we had more room. The lighting wasn’t important, just the body mechanics. Even with a running start, I wasn’t quite getting it:
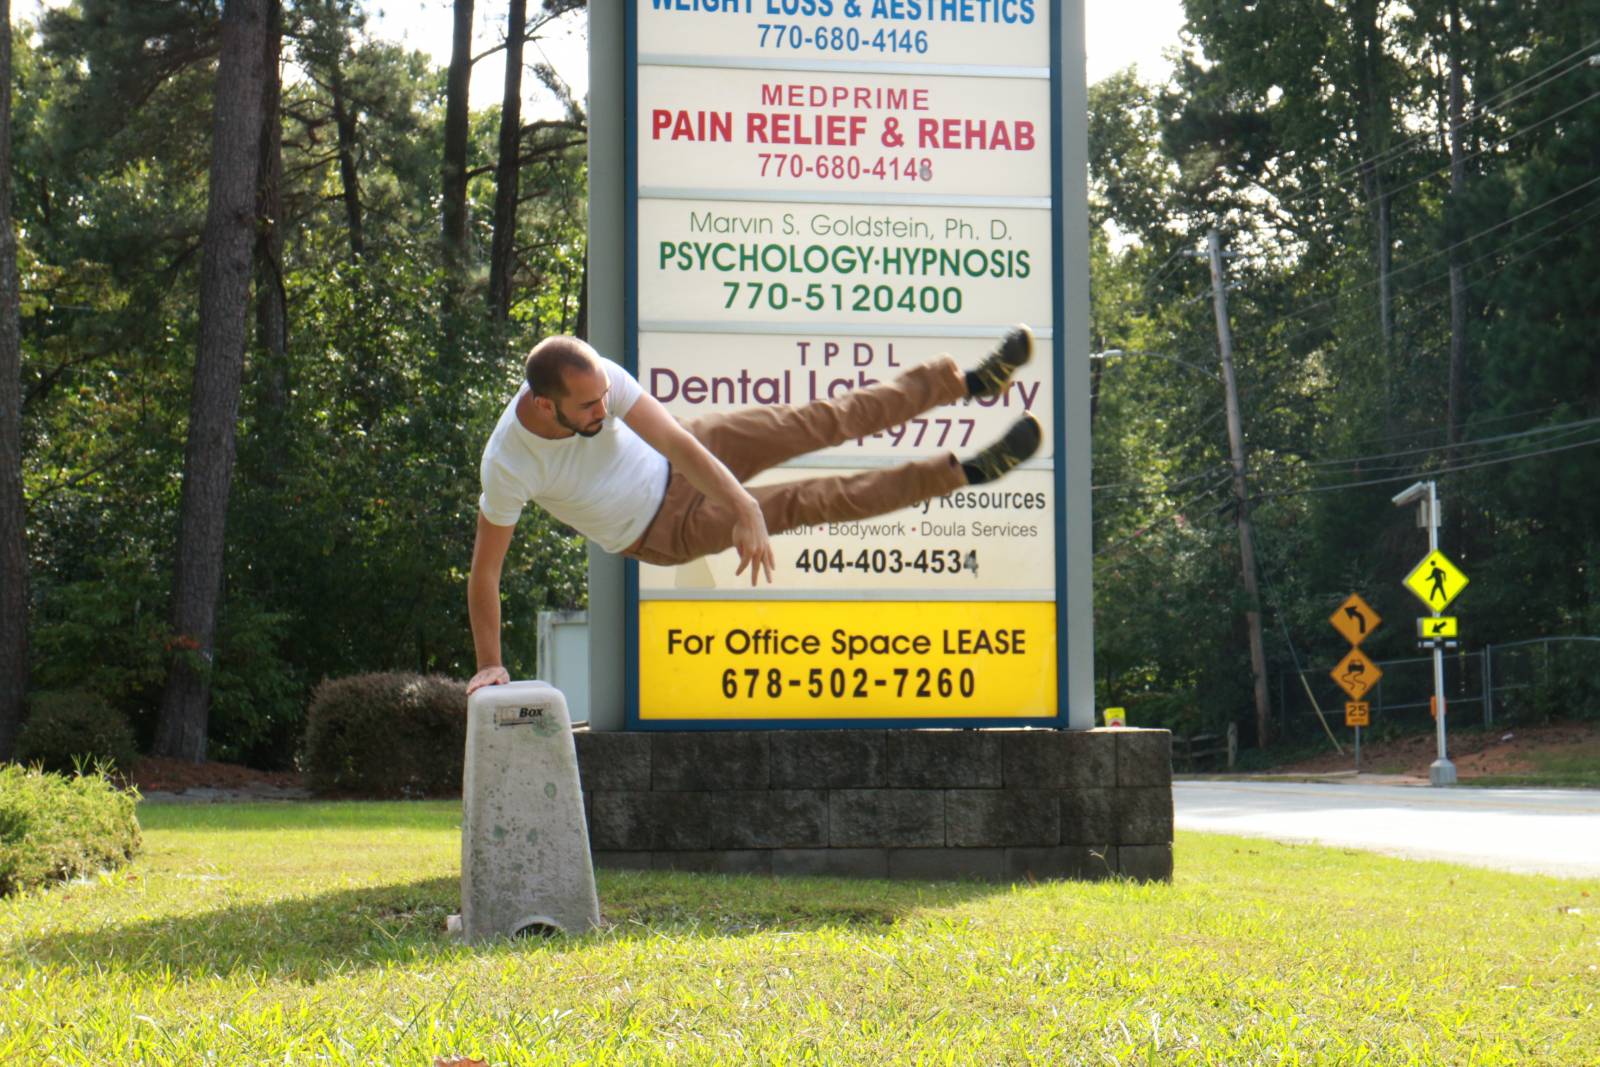
In the end, we re-used the “camera lowering trick,” and I just planked on the damn electric box:
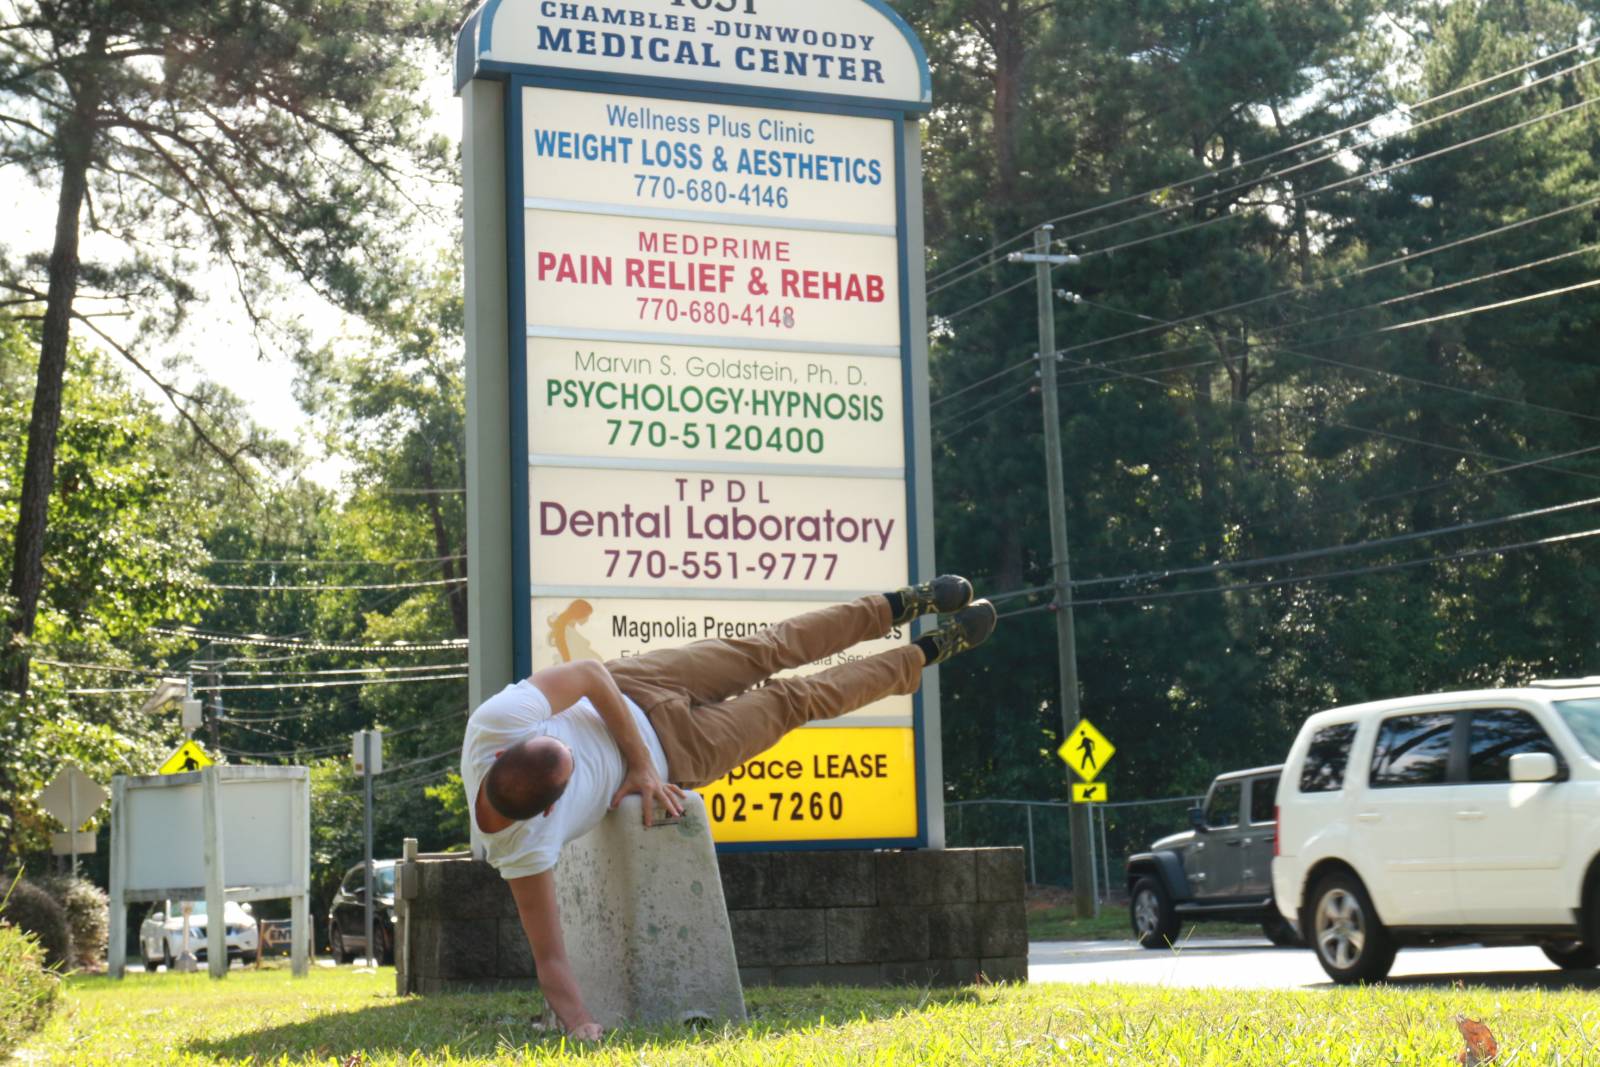
I have no idea what passing cars thought. They probably just shook their heads and muttered “millennials…”
Later on I was able to comp a shot like this together with some separate shots of my arms to produce the desired reference. Here’s the full reference composite in the file:

And here’s the final illustration:
Interior Illustration: Home | The Murderbot Diaries, Subterranean Press.
In case it’s not clear: seriously, this can be really fun. Reference photography doesn’t need to be onerous to be effective, and one of the main reasons I write about reference photography and showcase my own so openly is to make clear that useful reference can be quickly and easily obtained without a “big photography production.” The amount of time and money you spend producing reference bears no relationship whatsoever to the usefulness of the reference you produce. To serve your vision and make great art, the only tools you need to hone are the willingness to do what is necessary, and the knowledge of artistic principles that will let you operate with freedom.
___________________
For further information on creating reference, and for an expansion of many of the details I summarized here, you can check out the podcast Micah and I recorded on the subject: Black White Grey, Episode 6: Creating & Using Reference.


Oddly I just finished reading the Murderbot books. Holy crap they are amazing!
Awesome post! I could look at sketches v finals all day, and to add the reference photos just makes this one sweet deal. Great tips on getting those aerial photos. As an aside, I love the lack of faces.
I love this! That blows my mind how easy it can be
I am squealing to have found this. I love your art for this story so damn much. I am devastated to have missed the illustrated Murderbot book. But I’m so
happy to see your art for it. Thank you SO so much for sharing. Seriously.