I’m working on a complex project, a graphic novel that has several POV’s, each distinctly different in its look and feel, but all need to retain a certain level of grittiness that fits the storyline. I’ve managed to work out two of the three style choices for two of the POV devices, but the third look has been alluding me for some time. The POV is from a camera shared by many people, so I want things to look and feel a little more film-like in the final look and feel. I need a clear distinction between each look and everything I have been trying falls short of looking gritty and different enough to look like someone else’s point of view.
I also want each medium to be completely different so I don’t get beat up from the work repetition for the next many years. I want gritty and textural, dimensional, and it sounds like I am biting off more than I can chew.
Textures are fun, but are mostly sacrificed on the macro level to the deadline many times more often than not. When I take photos of surfaces that have textural properties to them, regardless of what they are, there is a certain grittiness to them due to the contrast nature of the values. If I can find a way to replicate those textures without sacrificing too much time I would be very happy.
I keep going back and forth with 3D as a tool for illustration. Most of what I have done up to this point was a work in progress to try the medium, but nothing that really showed me the signs that this would be an additional drawing tool to add to the tool bag. Most of the programs are so steep in the learning curve that I just didn’t see it working out.
Then Blender happened. Thank you “Oh mighty art Gods”, for blessing us with such an amazing tool box of potential, and super easy to learn. Open source is an amazing play space supported by a very sharing and caring community. Because of all the free content online, I learned Blender fairly quick, where I don’t feel it took up too much of my creative head space and no problem was so frustrating that I wanted nothing more to do with it. The third POV has been found and proven.
![]()
Below is the description for this particular panel, and below that is the process that led to this finish in brief notes. I won’t bore you with the details, you are all well versed in what to do.
This illustration took me about as long as it would take me to paint in digital, and more convincing in many ways. I have a lot to learn about the medium, but I have to say that it is one of the best additions to my toolbox that I could have ever learned. It is so forgiving, easy to use, and the results of your hard work are instant.
The Description:
Panel 1:
The day was drawing to an end, and so was the long-needed rain. The clouds parted as the sun set over the industrial sprawl. Crammed between modern warehouses pushed up against the LA River sits Nestor’s Auto Dismantling and Import Parts oddly out of place. All the way to the back of the filthy, oily lot, hugging an aging chain-link fence topped with barbed wire, amidst stacks of rusting carcasses and innards of old vehicles, the sun sets on a vintage restored Geographic Model X Holiday House Trailer, foggy windows glowing red and covered in an old sagging blue tarp.
Approaching the trailer, there is a faint sound of white noise seeping from a busted window. Rhythmically, we hear another sound cutting loudly over the steady static several times before it stops, the trailer shakes and squawks on old rusted shock absorbers, settles deeper into the mud, and the sound of sawing logs continues, steadily picking up volume.
1. Thumbnails are the starting point of any idea. Just because you can “think” of a good idea does not make it one. An idea begins with first seeing it, then understanding what we are looking for makes it easier to “find it”. Words paint pictures in our heads, but what do we really see? Until it materializes in some physical form it’s nothing more than words in print.

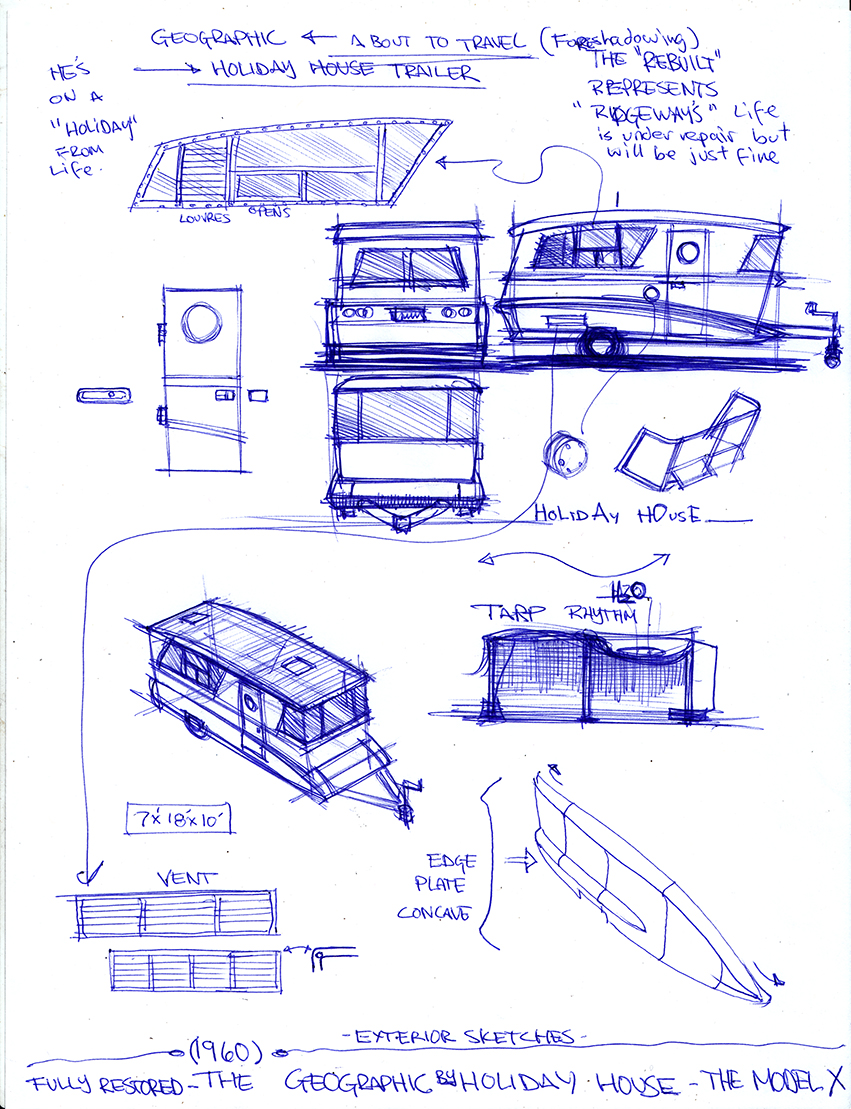
2. Once the idea is found, familiarity with the subject matter is important if the picture is to have any feeling beyond the technical wrestling match with subject matter never before drawn or painted. Here the sketches are establishing a “volume” in the artists head until the volume can be constructed from any angle because the form is thoroughly studied in a simplified geometric state.
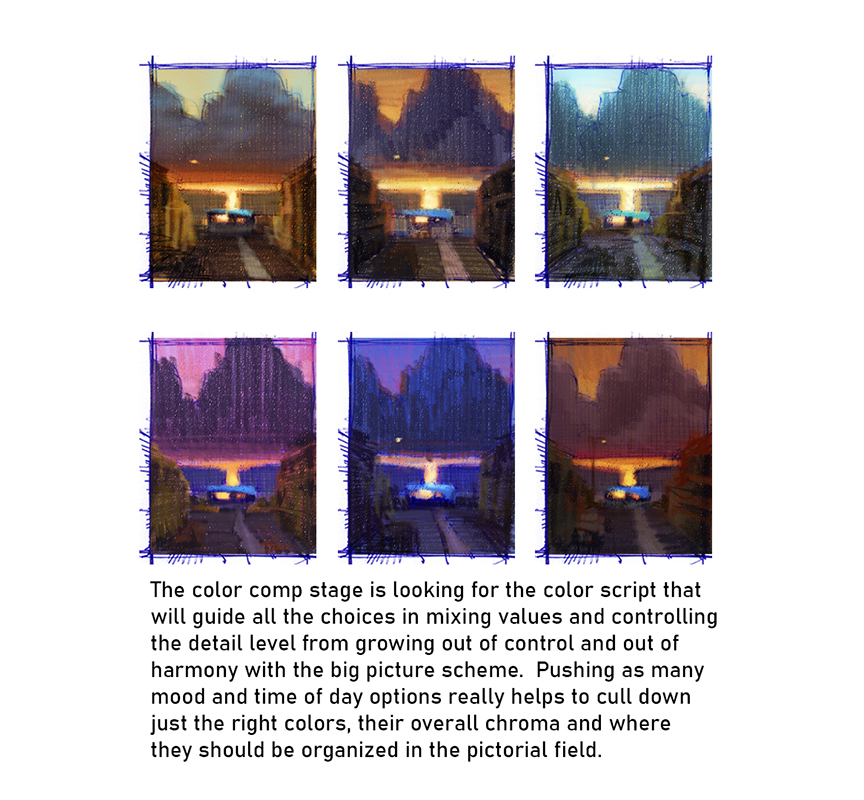
3. Color comps are then developed for a sense of time and place, and most importantly, to help establish a mood and set the tone for the story. Several ideas are attempted before settling on the one that best fits the script.
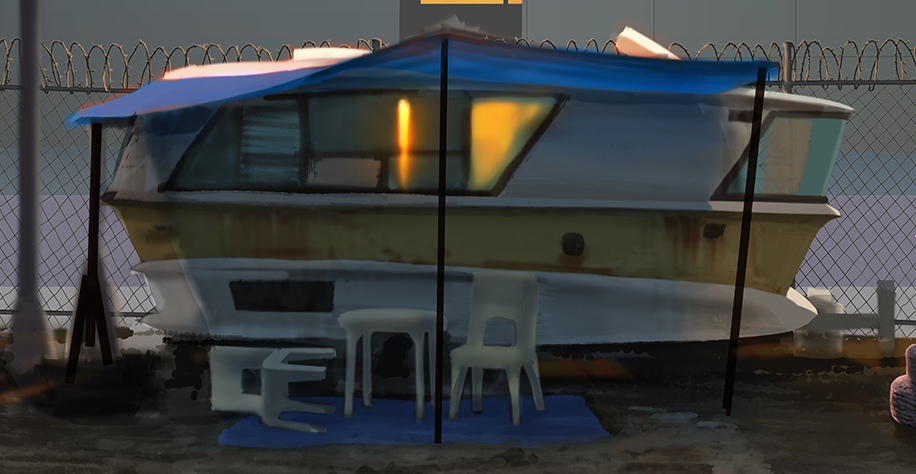
4. This loose rough painting was next, to get a foothold on the spaces I would need to flesh out with details. I didn’t need to get too caught up in painting the details since they would be taken care of in 3D. I did mess around with a few surfaces just to get an idea of what I might try to model up. The clouds were also designed enough to give me inspiration when sculpting them into shape.
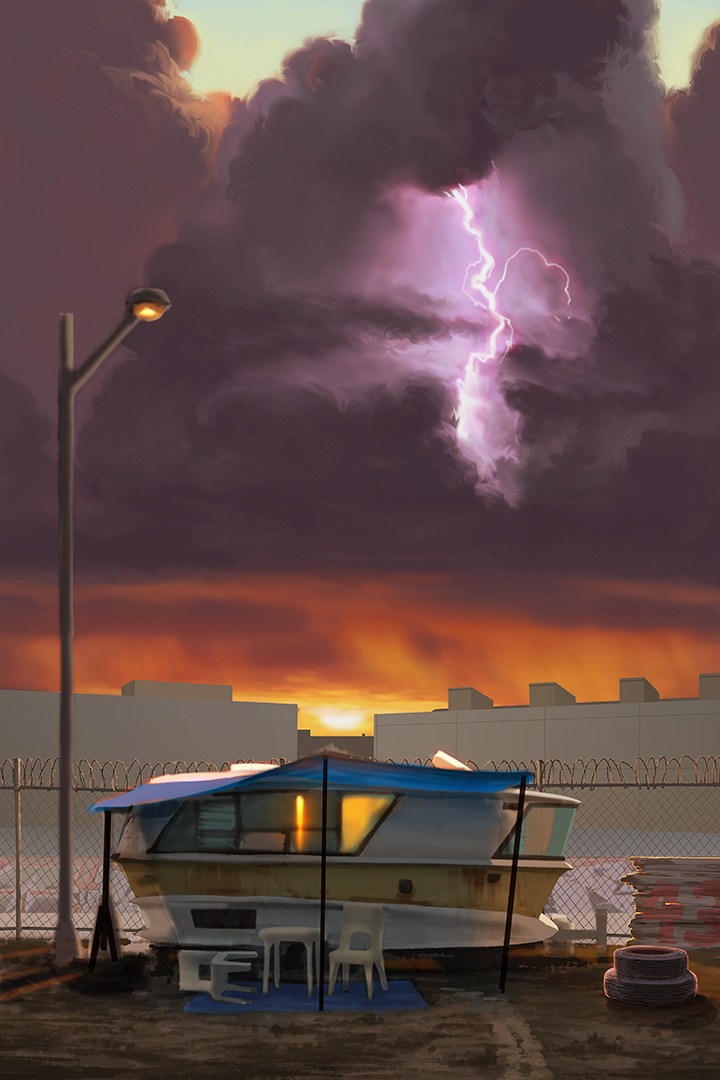
5. Once I was happy-ish with the rough painting, I moved over to 3D. It took 3 days to model everything, 2 days to texture, and a full day to set up the lighting and effects. I am still not totally happy with the ground or the clouds but for a first run it came together pretty fast and full of detail.
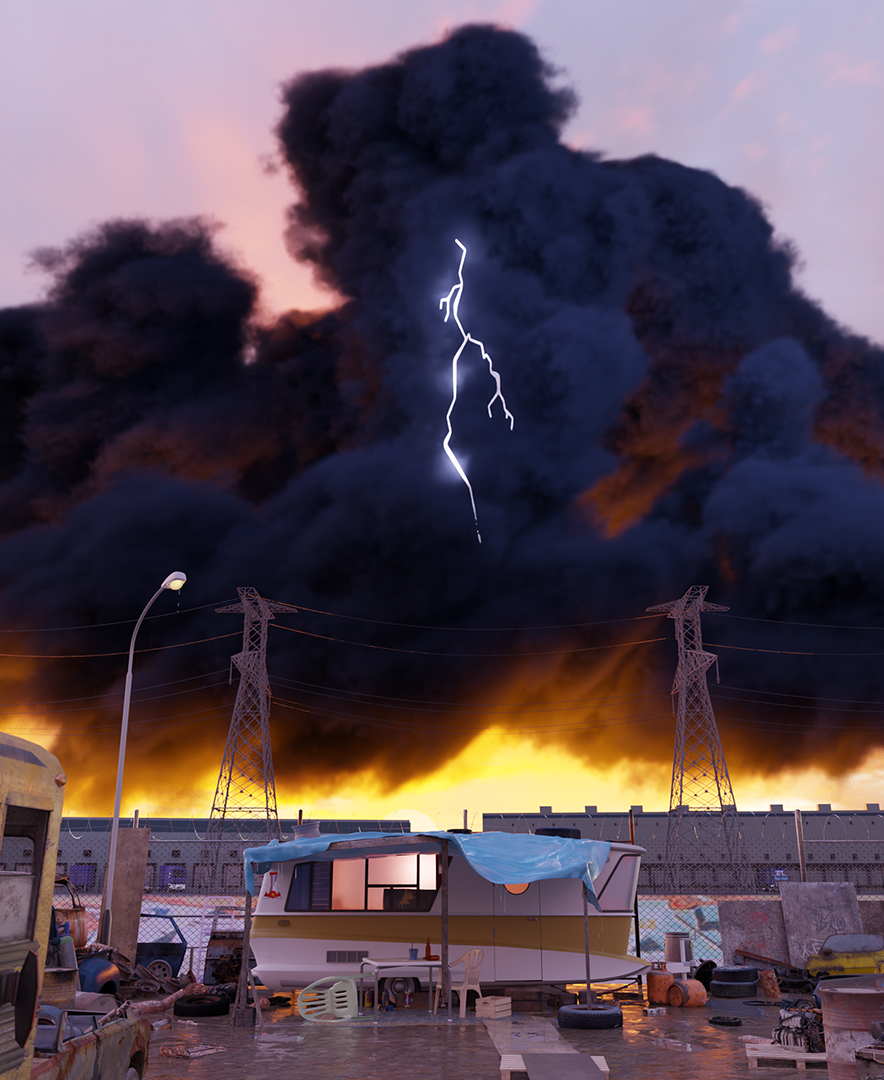
I don’t like the lightning I made, it was cheap and fast. I realized after trying a few things that I have to make it volumetric like the clouds. It is not only reaching down towards the ground as we optically see, but it is also netted through the cloud forward and back. Each attempt I made like the one you see here is flat to the camera and that is where the effect falls short of working well. As a side note, the biproduct or working in 3D is that it has helped me realize how many different things really work that I naively assumed differently, which has made them much easier to draw and paint.
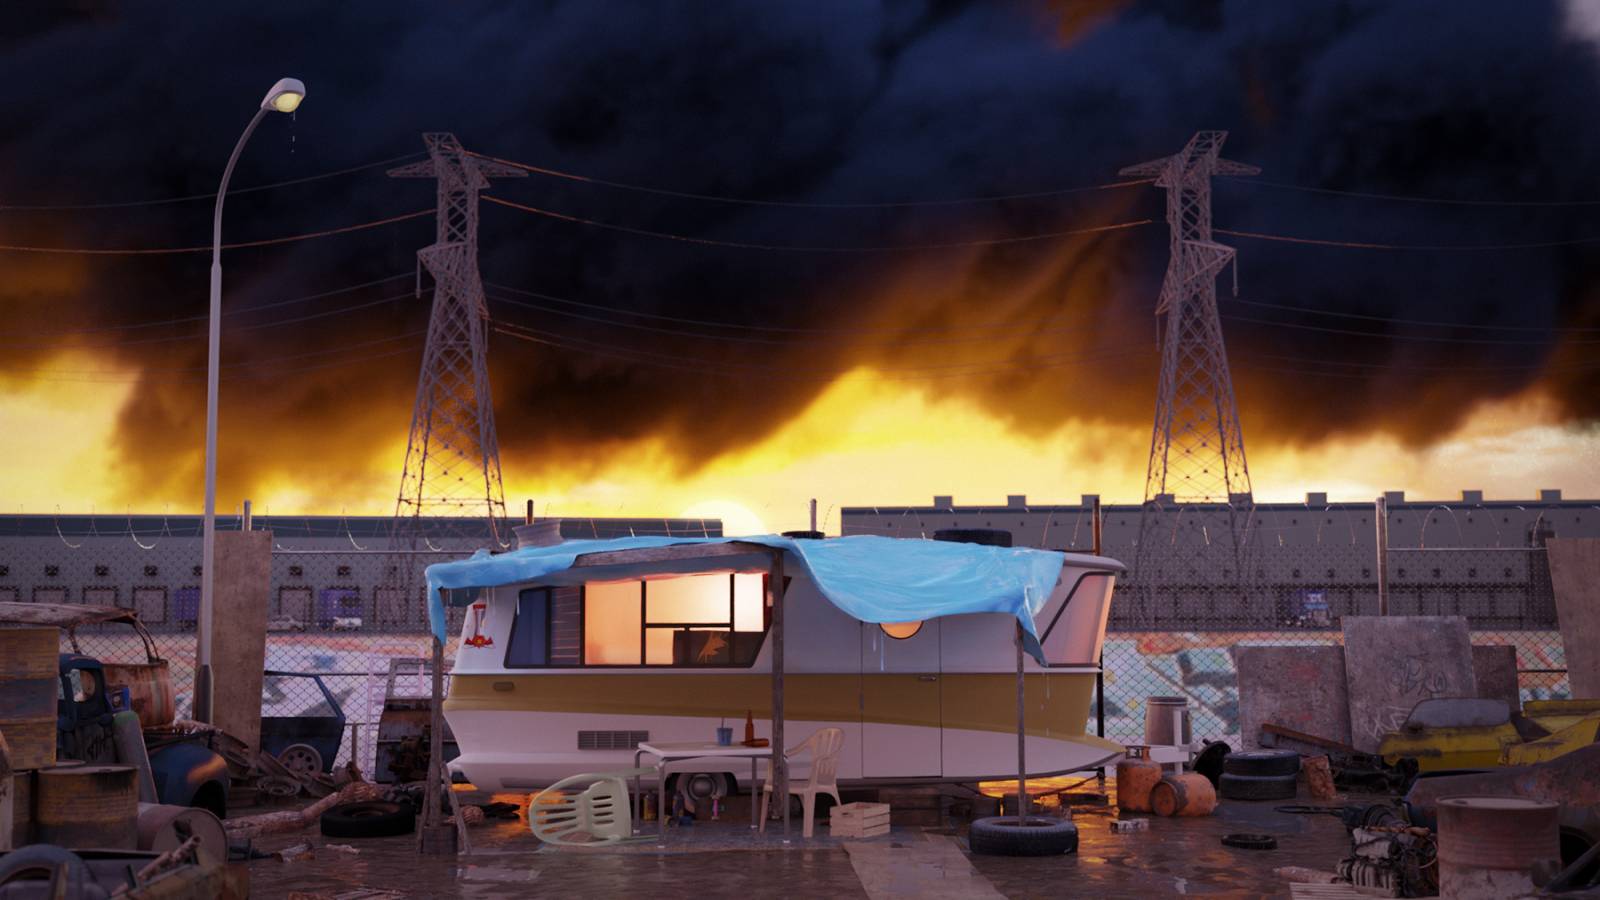
This scene is much larger than what’s seen through the lens. Stacks of crushed cars encircle the camera, and the building frontage with auto garages is modeled and prepped for filming. In one week, I was able to build a scene that will be used in at least 15 pages and 4 chapters of the book, saving me a lot of background drawing time in the overall workflow, giving me more creative time to flesh out stronger camera angles than the preliminary boards I’ve started with.
Learning 3D has been a massive relief on so many different levels, I cannot express enough how much I really think everyone should have this as a skill for you to use. Not only is it just a great tool to make art with, but it is a great “reference” tool, lighting tool, and educational tool for those of you learning color and light, perspective, form, and much more. There are stores online where you can get assets, textures, and tutorials to help you with whatever you need.
The biggest limitation to 3D is the machine used and how capable it is to render images of a high quality (denoising), large format, and as large a resolution as possible. I learned this the hard way, once again killing another machine trying to push the technology, not reading up on my hardware needs first. Aside from a necessary hardware upgrade, it has never been a better time to learn 3D and add it to the tool box for your future creative exploration.

wow, sir. outstanding illustration. 3d and 2d compositions working very well. Make a Video Tutorial Easy for me sir…
Ron, you’re one step ahead of me. I’ve been learning Blender for the same reason, to develop an effective workflow for a graphic novel. It’s insane how powerful a tool it is, and completely free. I was really reluctant to embrace 3D as a 2D art-making tool, but it’s become one of my favorite parts of the process now.