Last month I wrote about how I go about retouching digitized images of my paintings. In that article, I admitted that I do not own a camera that is high enough quality to photograph my work and so I am forced to use a flatbed scanner to to pull my work into a digital work space.
Initially, I thought that a discussion of that scanning process would be a waste of everyone’s time, it became clear in the weeks since that there actually was value in that discussion. And so I wrote this.
Now, there are some reading this that might rant and rave against the use of a scanner to digitize artwork, and admittedly it can be less than ideal. Still, in all the years I’ve been doing things this way, I’ve never heard a complaint from any of my clients about the quality of images that I’ve supplied them
With that out of the way, here’s how I go about doing things.
Surface Awareness
When scanning, there are two surfaces that one need pay attention to. The first is the scanner’s glass plate, the second is the surface of the artwork itself.
The scanner’s glass plate, I find, benefits from regular and thorough cleaning. It’s important not only to get as much dust and lint out of the way, but also any streaks such cleaning might leave behind. Sure, you can always retouch any hairs and random skin flakes sprinkled about the scanner’s surface, but why make more work for yourself? Cleaning is pretty quick and is pretty easily dealt with.
Before we move on, though, I want to point out that while the particulate that may find its way onto the scanner’s glass is easy to deal with in retouching, the streaks are a bit more difficult to take on. So even after I’ve finished cleaning, I always rub the surface down thoroughly with a dry, lint-free cloth or a super cheap brand of paper towel that doesn’t leave a lot of lint behind (seriously, your Bounty or Brawn paper towels are great and absorbent, but they leave SO MUCH paper dust behind—the cheapest paper towels on the market are FAR better for this kind of thing as they’re less likely to undo any previous lint removal you’ve already done).
If you want to be certain you’ve gotten it all, you can always put a black board or piece of paper down onto the scanner, scan it at a reasonably high resolution, and examine the result Photoshop to see all the spots you may have missed.
The art surface is a different story altogether. In this case, before I even begin scanning an image, I make sure that the surface of the painting is even. By this I mean, if the surface is glossy, I do what I can to make sure that it’s consistently glossy. If the painting’s surface is matte, it needs to be consistently matte. The reason this is an issue is because glossy and matte surfaces will appear very different in the scans and I’m trying to capture the image with as little surface awareness as possible.
To achieve this even surface with oils, the day before I scan a piece, I’ll coat the piece with retouching varnish. This tends to liven up the dull areas quite nicely.
If there are dull spots on an acrylic piece I’m working on, I tend to go over the entire piece with matte or gloss medium, depending on which makes more sense with the piece (though generally, I find that the matte medium ends up creating better results).
In the cases of watercolor and gouache, my experience has been that the surface of finished work is already even enough to proceed to the scanner without further action.
Point is, the more even the surface is, the easier it’s going to be to retouch the image later on.
The Equipment
My scanner is an old Epson Expression 10000XL. It’s a large scanner that is capable of scanning things as large as 12”x17”. This means that any work I do that’s 12”x16” or smaller can be scanned in a single pass, which is really nice. Unfortunately, about half the work I do is larger than that and requires multiple scans that then need to be assembled in Photoshop.
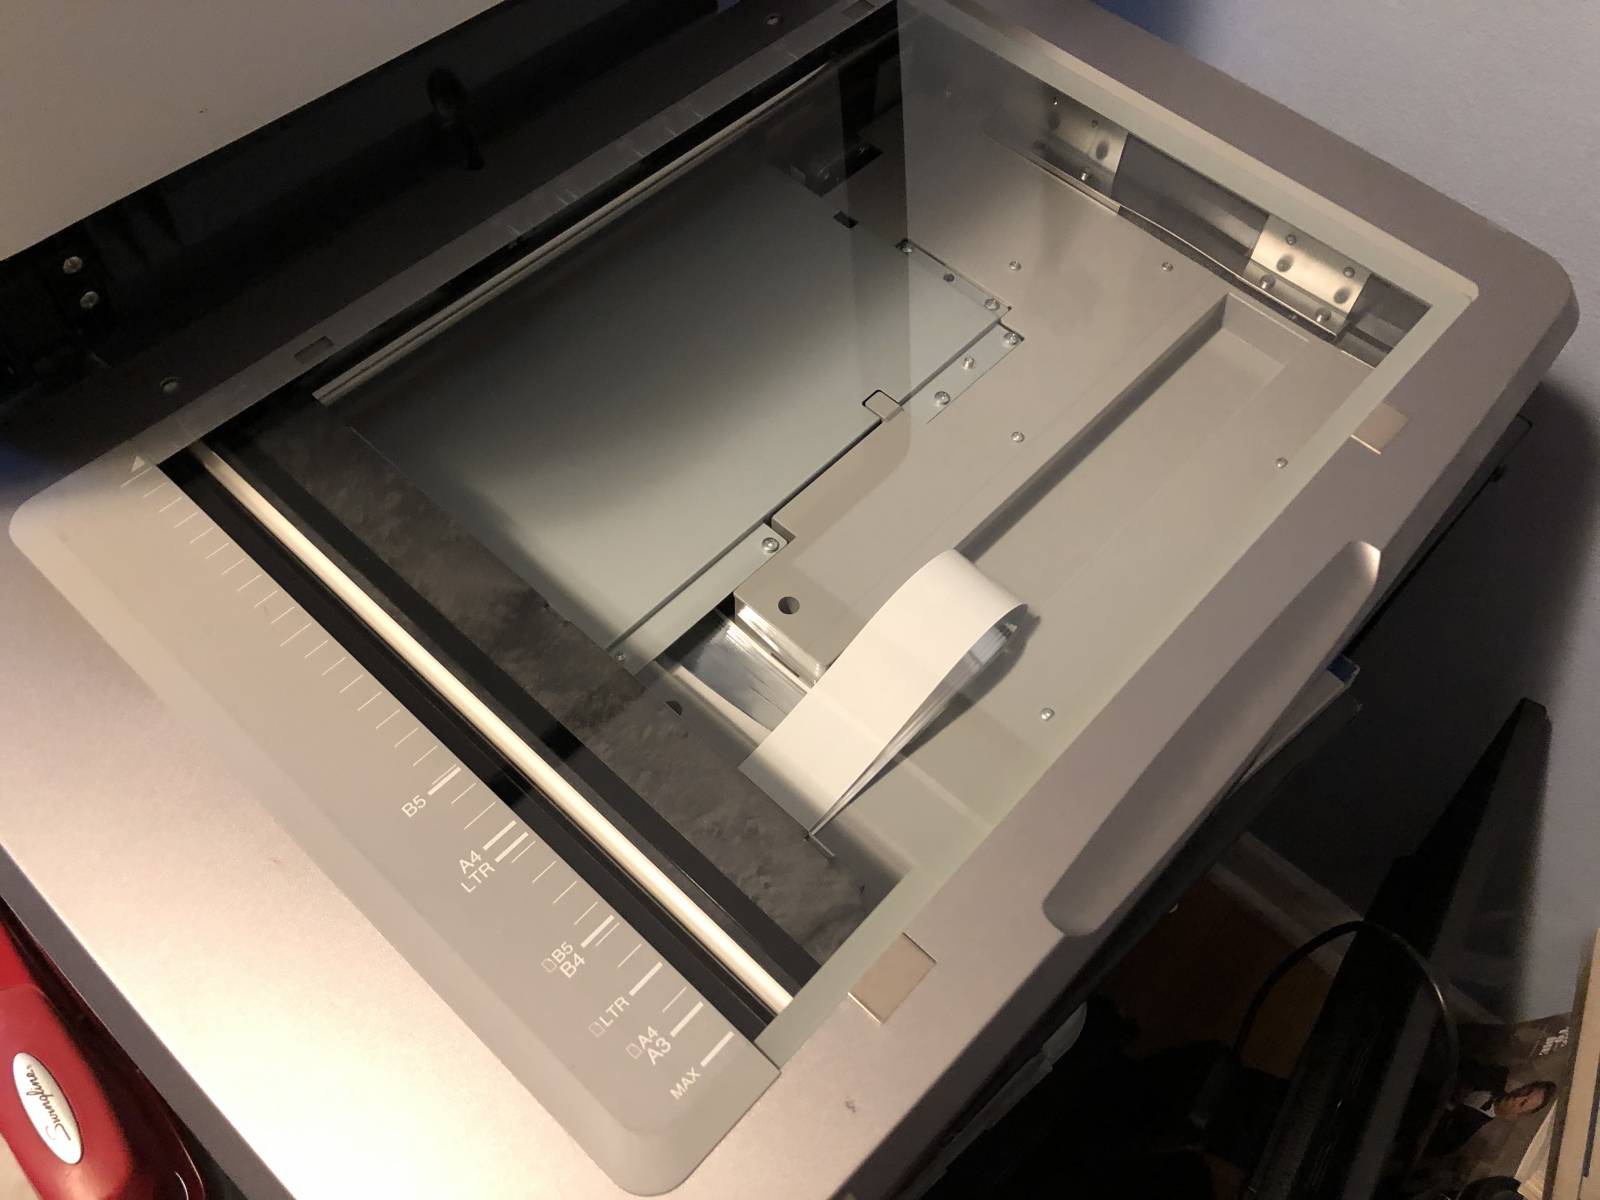
Here it is in all its glory. My scanner. Say…that glass looks like it might need some cleaning. Did I mention it’s a good idea to have clean glass?
Multiple scans would barely be an inconvenience were it not for an unfortunate aspect of this scanner: the scanner’s glass is not flush with the rest of scanner’s surface on three sides.
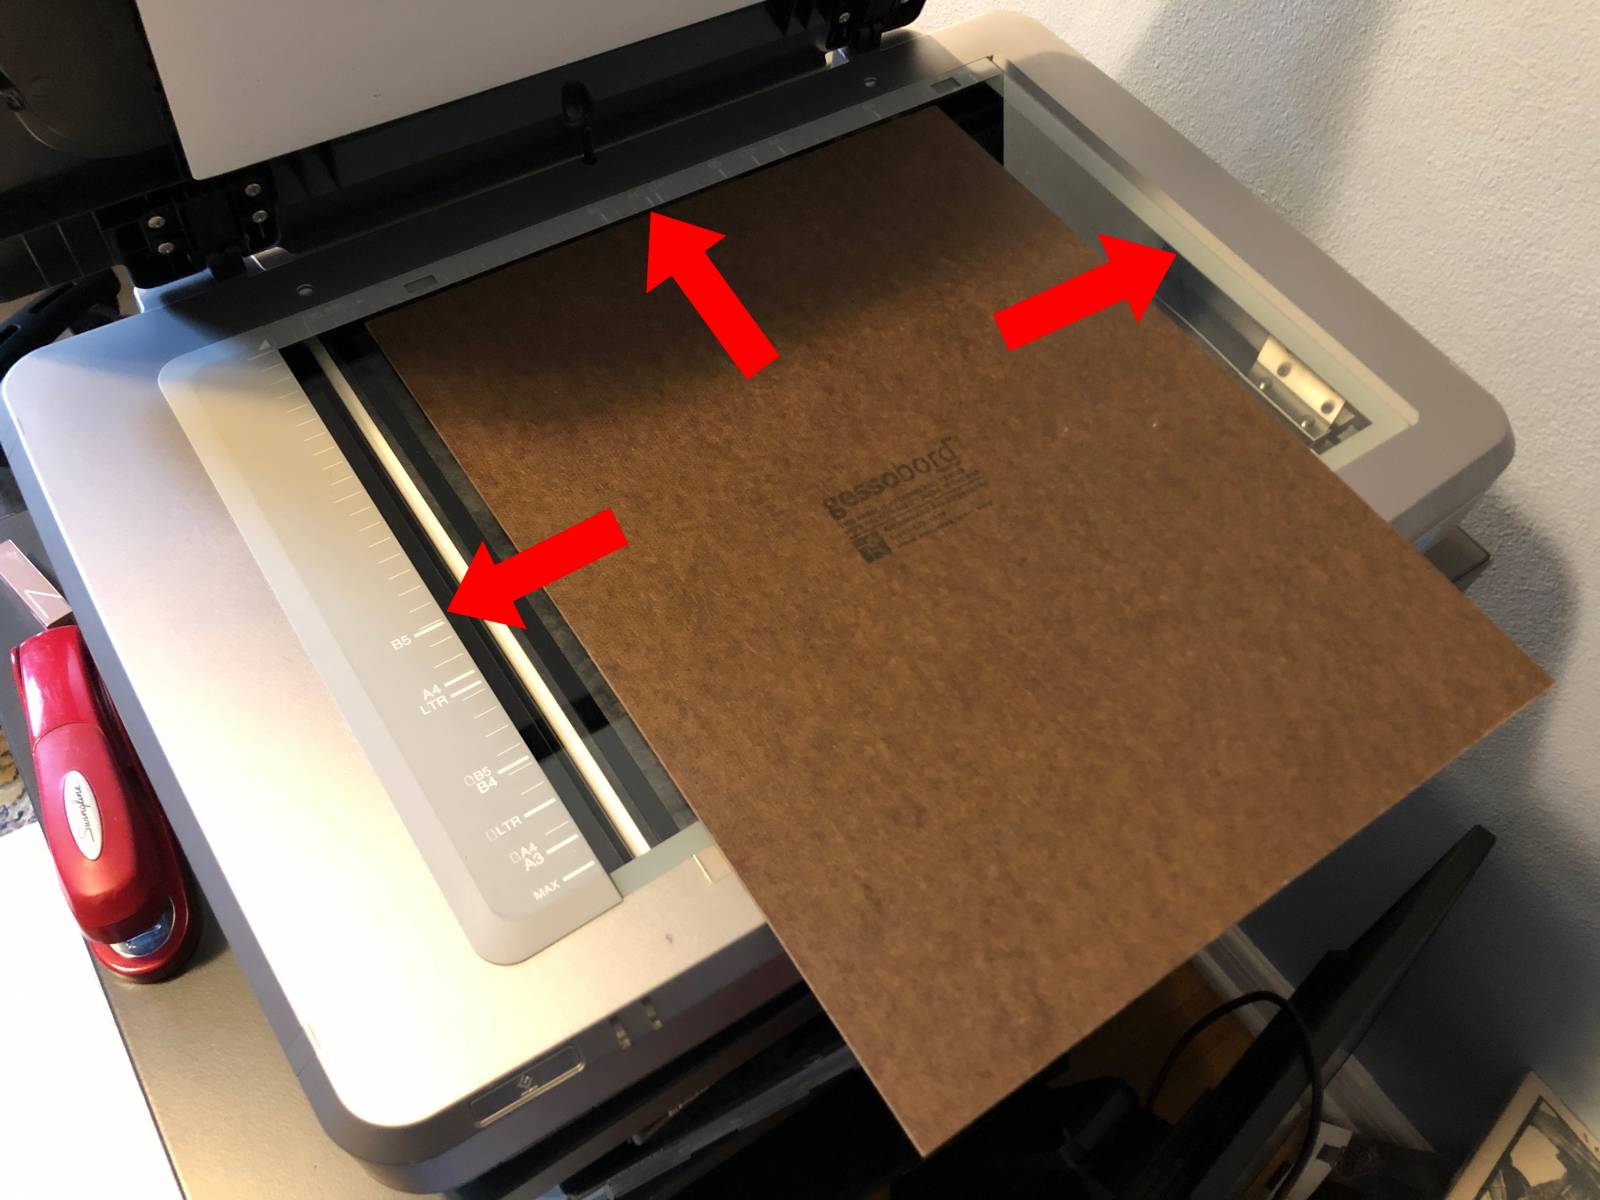
These three edges are raised just slightly enough that artwork larger than the scanner plate won’t lay flush with the surface. Fortunately, the fourth side is flush enough to get by, so paintings that require just two scans end up being a snap.
What this means is that depending on the placement of the piece when doing multiple scans, there’s a lip along the scanner glass that prevents the work from laying flush and so the scans can sometimes be slightly distorted within an inch or two of that lip. How much this needs to be accounted for and corrected down the road depends on the image and the number of scans involved. Frankly, I don’t always do much to account for this distortion because it tends to be very subtle and is something I can largely eliminate as I assemble the various scans.
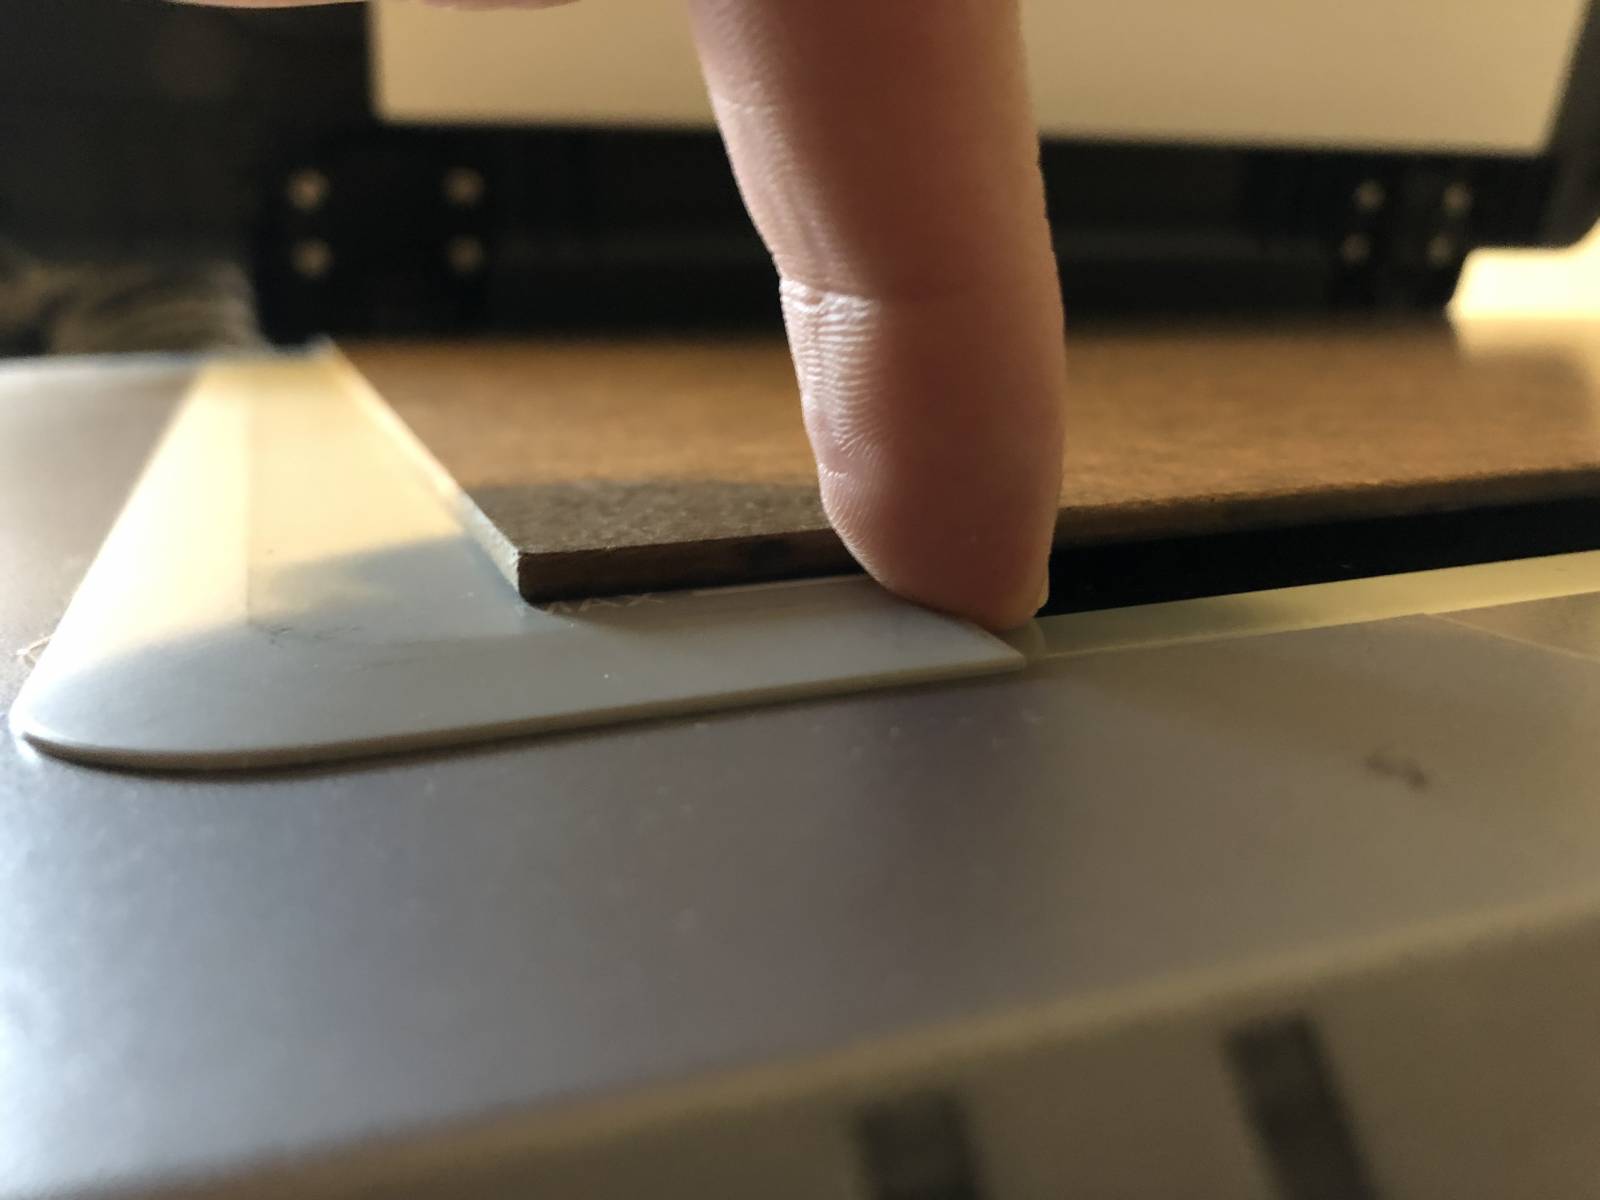
Not the best way to illustrate the scale of the lip, but it gets the point across. I’d estimate the lip to be around a sixteenth of an inch tall. Doesn’t sound like much, but trust me, it’s enough to mess with things. I’ve contemplated doing drastic things like prying that plastic off the surface, but these plastic brackets likely hold the actual glass plate down and their removal might allow for a lot of dust to get into the interior of the scanner, which would be difficult to deal with at best. Someday, it’d be great if Epson made a scanner with removable edge guides or a fully flush scanner bed. But as far as I’m aware, this is not that day as recent models have this issue (though I don’t know to what degree).
Side note: In order to eliminate the issue of the inset glass, I’ve contemplated having an additional piece of glass cut to the dimensions of the scanner glass and placing it on top. This would give me enough height to eliminate the problem altogether. However, I’ve never followed through with it, and it’s possible that this solution could instead cause additional problems as there’d now be three glass surfaces to clean, the possibility of additional glare, and the possibility of that extra bit of separation resulting in scans with a soft focus. All that’s conjecture, however. Regardless, if anyone’s ever tried something like this, I’d be very curious to hear about your experience.
Scan Happens
Anyway, I tend to scan my work at 100% and minimally at 300dpi—often going as high as 600dpi. This may sound excessive, but I find it’s better to have to downsize an image after the fact rather than wish I had a larger version of it later on. Plus, I find that the larger image makes for more precise retouching, which yields better, sharper results.
When placing the artwork, I do not abut the edges of the scanner plate. I have found that scanners will often cut off a small sliver of the image if fully abutted, and so I always leave a little breathing room. That way I can be sure I’ve gotten the full image, all the way up to the edge.

Gotta leave that room. If anything is going to get cropped, I want to be the one doing it. All of my processes in scanning and retouching are about allowing me to make as many of the decisions as possible, rather than surrendering those decisions to automated systems.
With multiple scans, an important goal is to scan as much overlap as I can. In essence, I’m looking to have coverage of as much of the middle area of the image in as many of the scans as possible. This helps both in aligning the various scans, as well as disguising the transition of one scan to another down the road.
A Note About Color Software
Many scanners come with color software built into the scanning software. And some operating systems have their own color software. I’m personally not a fan of any of them. Depending on the color software and settings, scanning results can end up being WAY off color-wise, and in some cases subtle details in light or dark areas can be lost. So, personally, I scan with all the color correction software turned off, preferring to do the color correction later using multiple color correction layers in Photoshop.
However, I confess to being old fashioned, and sticking to what’s always worked for me. It’s likely that some experimentation with the scanning and color softwares available to you might yield superior results. As with all techniques and processes, your mileage may vary and it’s important to experiment to find what works best for you.
Some (Automatic) Assembly Required
Once I have the necessary scans, I open them all up in Photoshop and drop them into a new file at the appropriate dimensions (with a little wiggle room that can always be cropped out later). There are two ways one can assemble multiple scans. The first is by using Photoshop’s Photomerge feature, which can be found under File>Automate>Photomerge.
I have personally found Photomerge to be extremely hit and miss in its quality. While it does tend to do a decent job overall, I find that I often end up needing to manipulate some of the layer masks it creates because invariably, there will be an awkward hard edge or two that remain visible. I’ve been told that Photomerge works better if you have a photograph of the full artwork included with the other layers as sort of a base for Photoshop to compare to. I’ve not personally seen a huge difference in doing this, but your results may differ. Also, if I had a good enough quality image of the whole painting, I probably wouldn’t bother scanning the darned thing.
For the most part, if I need four or more scans to capture an image, I utilize Photomerge and then fix any flaws as best I can using small sections of the various scans to cover or disguise any ugly bits.
If fixing the Photomerge results requires too much work, then I will roll up my sleeves and do it all manually.
Some (Manual) Assembly Required
When I assemble the scans myself, I decide which scanned section I want to base the others off of and then turn off all the other layers. My choice is sometimes arbitrary, but more often than not, I work from top left to bottom right. I square this base layer (which we’ll call “Layer 1”), move it into position, make sure it’s level, and then move Layer 1 to the bottom of the layer menu (if it’s not already there).

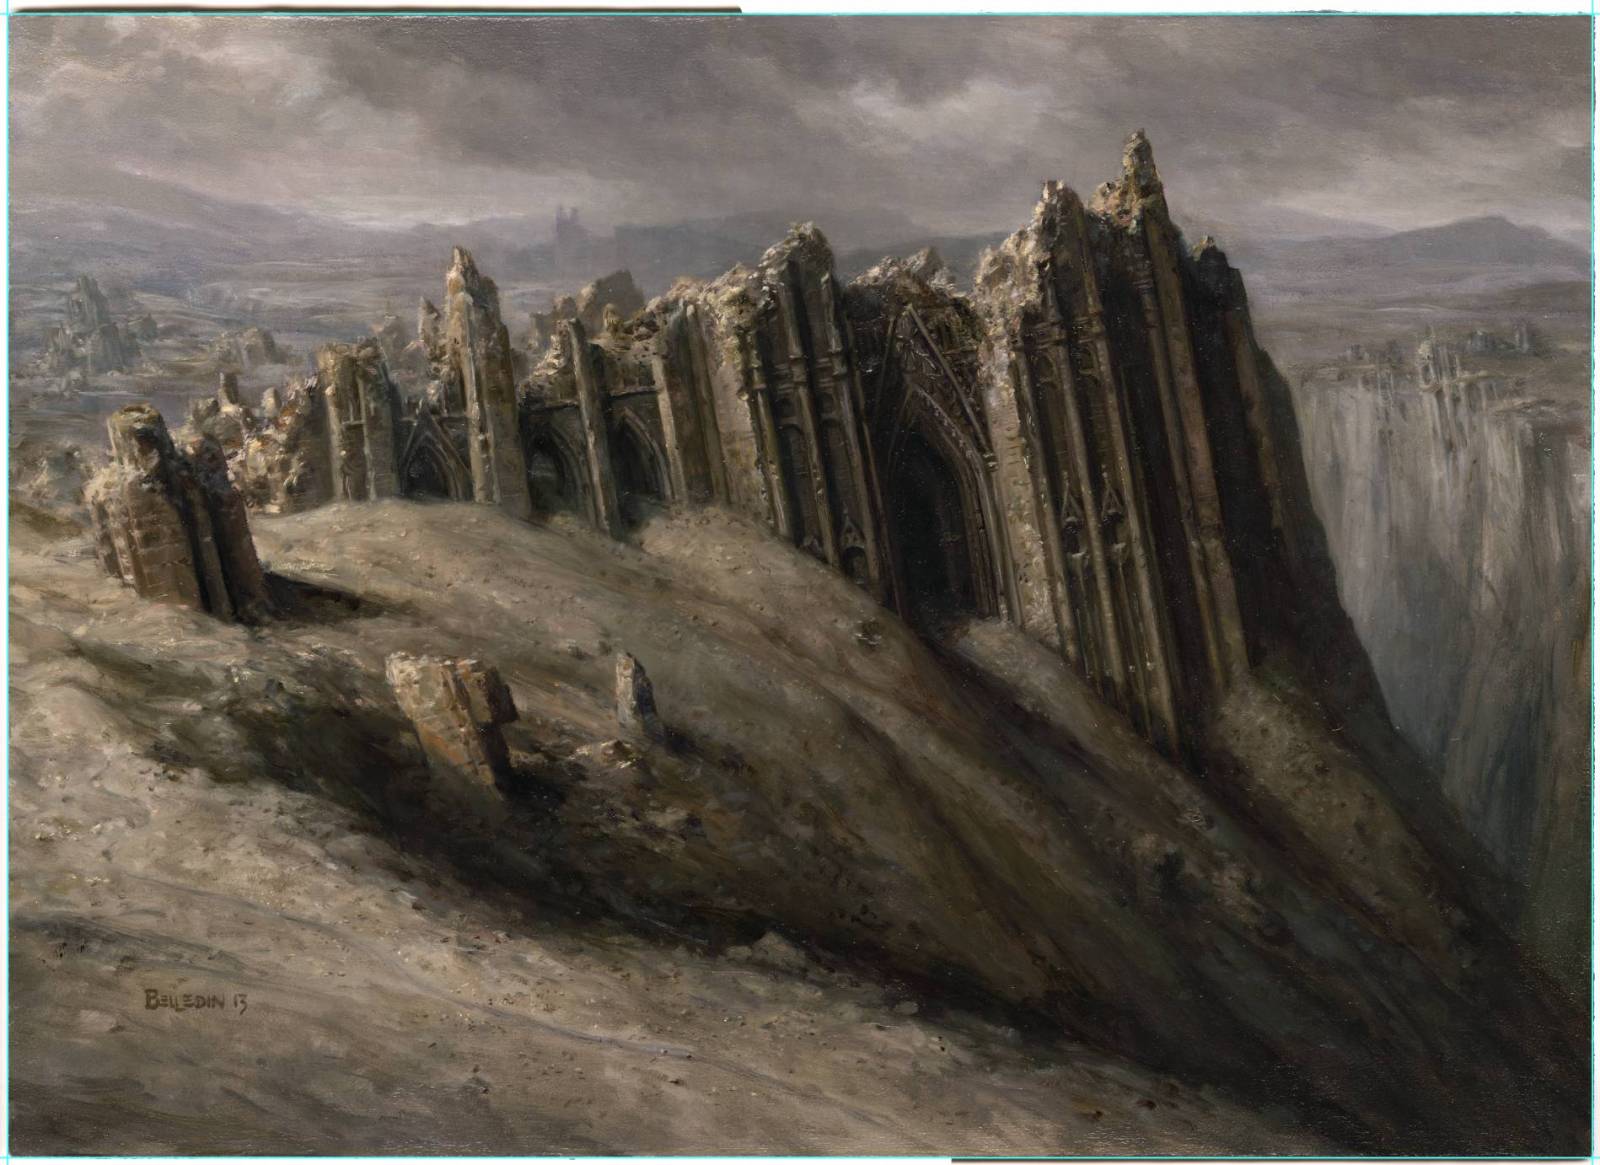
Here’s a closeup of Layer 1 for my painting, “Wasteland.” I find that a big help in aligning multiple scans is to first square them. In this case, I knew that the corners of the left edge were free of distortion and so I could easily use the guides in Photoshop to square the scan within the program. If all the individual scans are properly squared, they typically end up being easier to align.

This is Layer 1, fully squared and accurately placed so that the second scan will fill out the remainder of the image box.
Then I decide on the next scan (which we’ll call “Layer 2”), turn that layer back on, position the layer above the base layer in the layer menu, position it to what I think is approximately the right position, and reduce it’s opacity to 50-60%. The semi-transparent layer now becomes a lot easier to align with the layer below.

With Layer 2 turned on at partial opacity, I can now easily see how well the two layers are (or aren’t) aligned.
Looking at key features where the scans overlap, I use the move tool and the arrow keys to adjust the placement. Since there are often a lot of specular highlights and potential lint visible at this stage, those “features” can help fine tune the second layer’s placement.

Here’s what it looks like once the two layers are properly aligned. Lots of nudging may be required. Or not.
If rotation of layers ends up being necessary, I usually choose to type in the degrees of rotation (which tend to be minute—somewhere in the .02 degree range) at a time. It gives me a lot more control than for fine tuning.
Once I get the first two layers lined up, I then lock them both in place. If there’s are more than two scans, I repeat the process above until all scans are placed and aligned.
Once that’s complete, I create a layer mask for every scan layer that isn’t the base scan.
Using edges and features within the image, I then create new edges for each layer in order to better conceal where one scan ends and the next begins. Generally speaking, I utilize a fairly hard brush while doing this in order to keep the minute features (brush strokes and bristle marks) sharp and clear. The reason I use layer masks rather than an eraser to remove the parts of the image I don’t need on each layer is simply so I can easily push and pull the edges as necessary.

Very often, the hard edge of a scan layer remains visible and so I choose to disguise this utilizing a layer mask to create a new, better hidden edge. They tend to be jagged edges following visual features and edges within the image itself. This is Layer 2 in the “Wasteland” painting and when Layer 1 is turned back on…
With both layers turned on, the place where the two scans meet is disguised and pretty much invisible.
Once I have all the parts lined up and the edges masked, I select all the scan layers and create a group with those layers.
Here’s a look at a couple of other images:

Here’s Layer 1 of “Showdown of the Skalds.”
Here’s Layer 2 with the layer mask applied. Notice that I took the added step of eliminating small areas within the image to allow Layer 1 to show through. I did this because Layer 1 was a bit cleaner in those areas and it allowed me to do less retouching in the end.
Despite two scans covering the entire image, I wasn’t fully satisfied with aspects of Layer 1. So, I added an additional layer (Layer 3) to the top and created a new mask to hide the seams.

Here are all three layers assembled.
Here’s Layer 1 of “Gor Muldrak.” Squared up and ready to go.
Here’s Layer 2 of “Gor Muldrak.” I had issues with the scans and decided that another scan of the central figure might be necessary.

Here’s Layer 3. The additional scan helped with a few distortion issues I was having, and also helped get rid of some ugly spots in the darks. It also made the transitioning between the various scans a bit easier, as well. Once again, I also masked out areas that would have required additional retouching.
Finally, here Gor is with all three layers turned on.
After it’s all placed, aligned, blended, and grouped, I start my retouching process.
Hopefully that helps clarify my process and my reasoning. Probably not the most engaging reading, and certainly not particularly helpful to the digital crowd, but hopefully it helps someone out there.
The next couple of entries from me will likely be reruns. I’m starting a move from one coast to the other and my next couple of months and I’m not sure I’ll be able to keep up with the posts amid the transition. Hopefully I will be able to do it all, but if not I look forward returning with a vengeance and with new art to share. Until then, stay safe everybody, and keep at it.


Thanks for the article Steve.
As I was redaing it I remembered my old travel handheld scanner. I occasionally used it while travelling.
If you put a piece of glass on an oil painting, and gently slide the scanner over, it give amazing results. Far better than what my flatbed scanner will give me. This way there is no lips or edgeds to deal with, and I think it can scan up to 50 inch. Just thought I would share this discovery, which I probaberly wouldnt have thought of if I hadent read this article:)
I’m curious what kind of scanner you’re using. I’ve often contemplated this kind of thing as a solution, but I’ve found the quality of travel scanners to be lacking (based on the few I’ve messed with). To boot, most portable scanners are designed in such a way that they wouldn’t be helpful. So yeah, color me intrigued about the model you used since it gets around so many of the limitations of flatbed scanners.
The one I used , is from media tech, it is a few years old. I found that the quality is very dependant on an even speed when scanning, so it takes a few tries to get it right, also the painting need to well lit as the scanner has no light source itself. I would probaly go and by newer and more expensive one, just to make sure I have the best tech available.
I have an Epson V39 scanner. If the art work lifts off the glass at all it gets blurry, so I removed most of the plastic on the top half of the scanner leaving just the glass. I can now scan my art in pieces with it being completely flat on the glass. Then I use Photoshop’s “Load files into stack” script.
If you’re trying to align layers by hand I suggest changing the layer mode of the upper layer to “Difference”. I find that it works really well to show how much you’re off and then nudge accordingly.
Brave of you to remove the plastic guides. I’ve spent a lot of time contemplating it. If I was the only person in the house who uses the scanner, I might go for it. Regardless, it’d be great if Epson or some other company got rid of those things or made them removable.
Also, thanks for the notes on the Difference blending mode. It’s not something that feels natural to me, but I see why it would help others, and I appreciate the suggestion as I’m sure it’ll be helpful to someone out there!
I appreciate your thorough explanation of your process of scanning and adjusting the resulting scans. I’m a big fan of manipulating each layer in photoshop manually. The photomerge is too reckless for me.
I enjoy process articles like this. Clear and streamlined, and covering the pitfalls of a technique as well as the benefits.
A suggestion about alignment in Photoshop. Set the top layer you’re attempting to align to “Difference” in the Blending Modes for that layer. It will invert the colors of the layer and make the top layer’s pixels respond to the target Layer’s pixels. When they are perfectly squared and overlapped, the shared pixels between the top and bottom layers will turn solid black. They’re now perfectly aligned. Swap the Blending Mode for the top layer back to Normal and move to the new top layer to repeat.
It should make aligning the layers super easy, and if you see an overall perfect alignment but some stray pixel spots that stand out, you’ll see the locations of “dust” or differences between the scans that you might want to retouch.
Worth considering, if you haven’t already tried it and found it doesn’t work well with your flow.
Excellent suggestion. One of my favorite things about Photoshop is that it’s so robust and there are so many ways to do something, thus it appeals to a wide variety of processes and ways of thinking. This is a really valuable suggestion and if it doesn’t help me, I’m sure it’ll help someone else!
Hello, I suggest to use Vuescan and scan in raw format (no filter at all). I did not do scientific tests but I use Image Composer Editor (Windows-free) for comics work.
Thank you so much for this post, it is truly godsent!!! I’ve been avoiding digitizing my artwork for ages cause i haven’t been sure on how to go about doing it while achieving results as close to the original as possible. Will make sure to try this technique out next time i dive into scanning.
Great article! I have an HP Scanjet G3110 and I’ve been using an extra piece of glass for years scanning oil paintings, it works perfectly (with that scanner at least) with no softening of focus nor color distortion. There is a bit of glare along the edges of the painting but that can be fixed with a large sheet of black paper, by placing the paper against the back of the painting so that it completely covers both the painting’s borders and the scanning surface. The matte black surface of the paper cuts down the glare to the point it’s not noticeable except for a few pixels on each side which can usually be trimmed. I definitely recommend trying as a custom cut glass isn’t very expensive and the method is a life saver when scanning large paintings. It could even be glass salvaged from another scanner which would ensure it has an even crystal structure. Just make sure to have your glass sanded and the corners rounded a bit to make it safe to handle!
Ooooh I’m glad you posted this. I was definitely considering this as a solution after I move and get settled in my new house. I reasoned that even if it doesn’t work, glass is still pretty cheap, so there’s fairly little risk. Still, I hadn’t hear from anyone that had actually done it before, and now I have. Thanks a lot for the input. Totally going to try it now.
I have to rotate the art for one scan it’s lit differently, especially for canvas but any texture. The change is tiny but makes it trickier to align stuff.
For flexible works it helps to physically hold it down to stay in focus.
Thanks all for the Difference idea:)
And of course some genius will turn all these problems into their own style!
I also scan my artwork, and it is interesting to see how similar a lot of our steps are, and also where there are differences.
I spent a lot of effort to make sure I purchased a decent A3 scanner which has o raise lip around it. The platen being level with the plastic surround. That makes scanning those larger pieces so much easier. The largest I have scanned was over 5′ x 3′. The scanner is a Plustek Opticpro A320.
I prepare my oil paintings with Gamblin Gamvar Matte Varnish before scanning to make sure I get an even surface without that ‘jittering’ created by gloss reflection. It helps that my paintings are pretty flat, without much texture in the actual paint.
I line my layers up in sections as you do, with a degree of transparency to get the alignment, but then use a soft edged round eraser, with about 85% opacity to take out the ‘edge’ where they come together. Making sure I have plenty of overlap means I can work around areas that might show any slight misalignment, e.g a sword, which really doesn’t need any kink in it!
Thanks for an interesting read.
Hi Ralph, are you still happy with your A320? Ive been umming and awing between that and the Epson V600. I dont need the higher resolution of the V600, and its 15 years old now.. An A3 would simplify the workflow, but im having a real hard time finding any reviews for it, espceislaly art related. My plan is to use it with Vuescan software and scan in Raw. A few reviews are very harsh, but it could be down to user error. Your thoughts would be most welcome!
Great post! I used to scan a lot of drawings and the distortion issue has always been a problem. I discovered that scanning a lot of overlapping helps and using the blending mode “Difference” helps a lot with the alignment since when the two images overlap correctly the image turns black.
Thanks for the post again, awesome work!!!!
I’m so glad I found your post – I just purchased the same scanner you have, and I’m scanning large acrylic paintings on canvas. It’s taking about 6 scans to piece together. I love how the lid lifts right off of this scanner. My biggest issue is that the pieces are significantly off in color. Is that just the way it is? Perhaps because of the edge around the glass? I thought it could be ambient light, so I’ve even tried covering the scanner with a dark sheet while it scans. One scan is light, the next dark, the next has a blue cast… Have you run into this?
I probably just need to color correct each piece, but I’d prefer consistent scans.
Excellent article! Much of your approach to capturing the artwork and processing the images is familiar for me, as I went through several dozens of variations in work-flow/equipment/software to get to a place I felt ‘satisfied’. I feel that that your method is one of the more thought out/managed I’ve run across and wanted to know if you were still using the same capture techniques and highlight some of the things that resonated with me. I empathize entirely with your lament about the raised lips around the platen on the 1×000 line of scanners! I really appreciated your comments on scanning with all color adjustment/correction off at the scanner to start with, that is on point, sir!
I hope you don’t mind me providing my own workflow in abbreviated form, using the same equipment, with one additional piece of software. If it piques your interest or if this is a process that you are still actively performing and want to bounce ideas back and forth, I would be game!
Soldering Iron with razorblade attachment makes quick work of the right side lip.
Dremel with domed 150grit sanding attachment helps with creating a bevel on the left side (protect glass with multiple layers of bluetape!
color calibrating: (#RF# it-8.7/2 targets ordered from Wolf Faust (targets.coloraid.de) & scanned with vuescan to make an icc profile.
monitor calibrating: personally use a colormunki but there are many as I’m sure you are aware.
scanning software: vuescan, 24 or 48bit situation dependent, tiff, no compression, no color adjustments, icc profile created for scanner and monitor specified in applicable tab, output profile specified as “device RGB”, preview @300, ctrl+F to focus if I am not directly touching platen, scan/save.
Drag and drop into microsoft ICE, select planar motion on right (no skew), and go through the quick steps of processing, rotating entire projection, cropping if need be, export photoshop only.
Photoshop, assign Adobe RGB as it won’t have a specified profile, yet. A bit of levels adjustment usually required for me, but not much else!
Printing directly out of photoshop to my canon pro 6100 or 4100 yields a smile everytime! I didn’t want to create a huge reply so I tried to condense my steps down to only those that have proven to be essential (in ‘my’ workflow).