Today I am answering two emails with questions regarding my last post. The questions are directed towards the part where I described doing texture studies to become familiar with your subject. Last post also showed the below scene as a map or plan view, and as a roughed out 3D model.
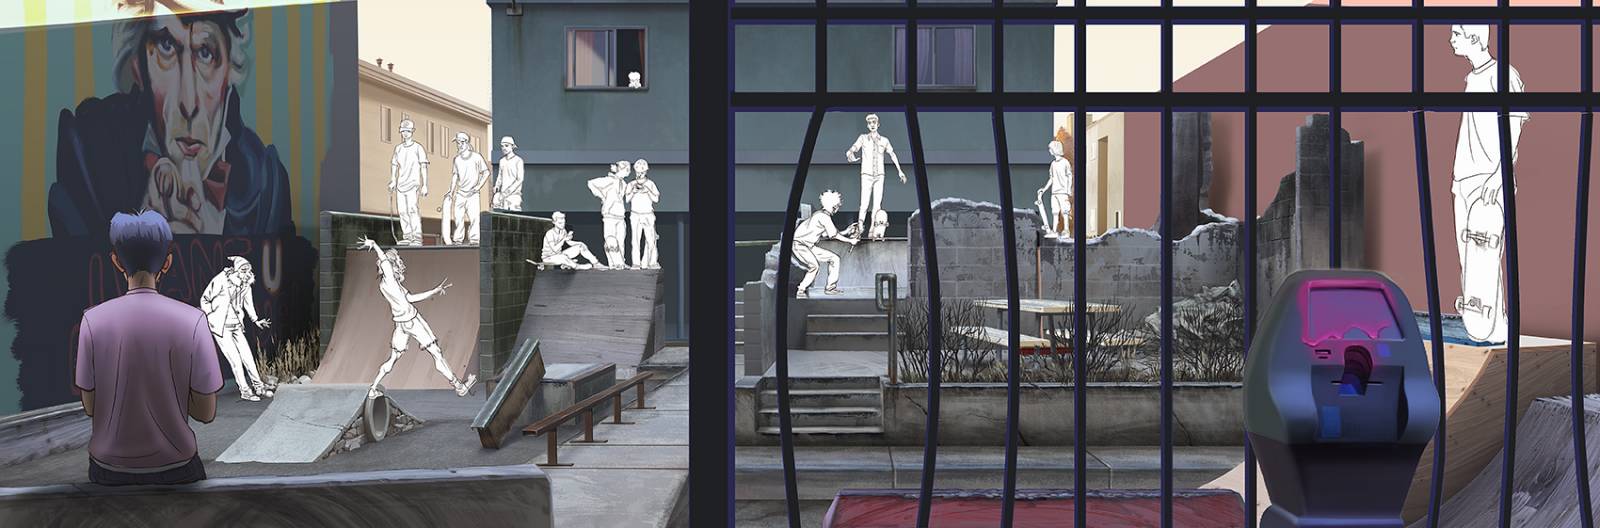
This is a panel for my graphic novel. I want a Japanese anime high render feel to the backgrounds, and it is important that texture and grit be a big part of one of the many layers of subtext throughout the story. This painting is 70% completed, and is entirely using the texture method I showed in my previous post. There are no photos used to generate any textures, labels, graffiti or any other detail looking item in the image.
Photobashing is best used for quick breakdowns like concept art and storyboarding, but when it comes to finished art, it might be wise to really figure out what you are painting so you can put 100% you into the work. When painting, you do not need to go to any photobash measures to complete a piece, and yet, all too many think that 1. texture is hard, and 2. the photo is a faster means to the finish.
About number 2, photo bashing might be faster, but it is clearly obvious that there is something more at work than just a painting, especially when the artist has chosen photos of different pixel sizes to work with within the same piece.
Studying a texture is not difficult, and just like anatomy, which is what we call the make up of any object, once you have studied that special something, you can invent it all day long, from any angle, with any lens depth, and any lighting scheme you desire.
Texture is nothing more than shapes on a much smaller scale; what sticks up, what sinks in, what is dull, and what is shiny or reflective.

The above cement has a warm temperature to it, and from the looks of it, the curb cement might be a different grade and type from the ground below it. Two types of cement are at play here producing two different temperatures within their surfaces.
The curb is waxed and has been heavily skated. The wax is a paraffin that has been dirtied from use and weathering. It beads up into clumps line tiny flattened spheres which a spatter type brush will be useful to produce this texture with.
The edge of the curb has been ground by the trucks of many skateboards, the alloys have marked the curb like a pencil to paper. Their metal properties have left behind a reflective residue that discolors the edge of the curb, most of what you see is the sky reflecting into it.
The skate trucks have also started to chunk up the cement, and the texture is exposed rock of varying sizes, more sphere like forms, and there are holes from where one of the rocks has loosened out of its housing, also semi-spherical in shape.
Technically we want to break these properties down into steps that can be easily reproduced. Expect that with any of these surfaces, for each step there may be more than one layer at work for the effect. Many of the steps might end up with up to say, 25 layers, it all depends upon the subtlety, the depth, and the scale that you are generating the art.
In the diagram above, I broke down both the layering on a grand scale, as well as layering for just the cement which would precede any of the other layers looking for light and shadow since the texturing that is used is adjusted for the lighting along the terminator accordingly.
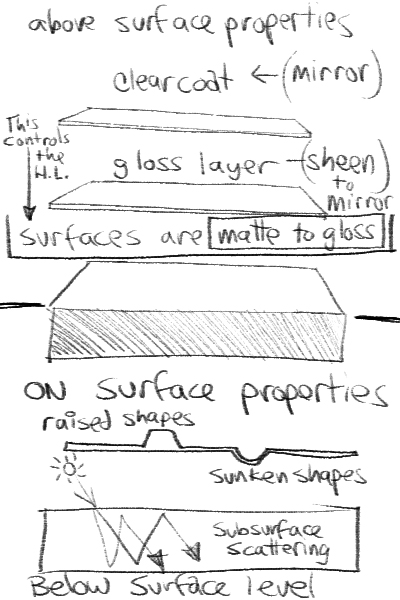
This might be a bit too technical for now, but above is a chart that helps break down the layering of a surface and what the properties of each layer means in terms of what you as an artist will need to think about when reproducing them. This chart helps me think about which colors belong to which layer and the order of importance to that layer, as well as it helps me decide upon the brushes I might use to pull off this effect.
When making something like the cement texture, I used two brushes and several different layers with different blending modes, and the same warm gray hue for all of them. I used two different types of spatter brushes and a typical round brush to pull off the texture of the cement which in this case directly influences the local color.
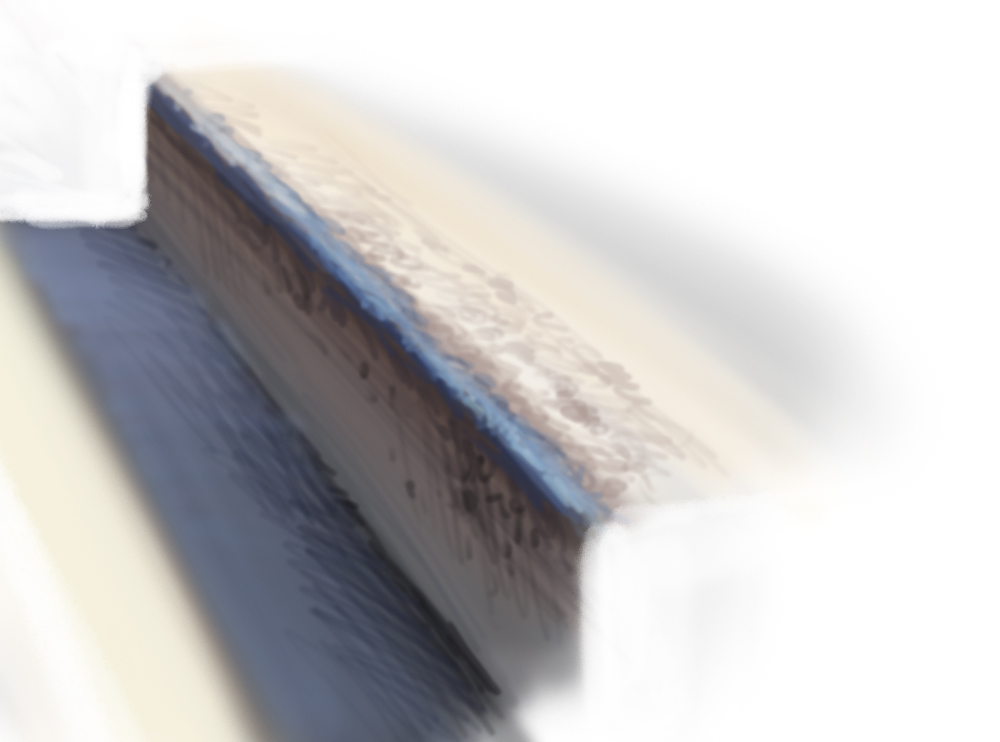
This curb painting was done with the same layer breakdowns applied and I used the simple vanilla brush Photoshop comes with when you first start it up. The painting took less than 5 minutes to do with each step broken down like I have mentioned above.
Items like decals, logos, labels, graffiti, tags, throw ups, murals, dead leaves, etc. can be painted separately and applied to the painting like a decal. In my comic panel I intend to litter the park with graffiti and trash, and will apply them as decals. I will use layer masks to adjust the pieces and “ruin” them just right to fit the worn out setting. This mural was done as a separate file, I painted it rough, copying another artists style to make it different from what I would normally do so it helps make the world feel more developed.

Texture does not have to be a difficult thing to add to your work, if you have a process for building art, it is nothing more than another step in that process, one that requires all the same thinking and all the same modeling and rendering except on a much smaller scale.
Breaking down an object into its anatomical components is also easy to do if you think about everything the same way and do not treat anything you paint any differently than anything else you paint. It is all the same thing, and all falls under the same step process regardless of whether it is copied or invented.
This process might seem tedious, and sound like it takes forever, but it is relatively fast, as fast as any other technique once you understand the goal. The way above painting was done in two working days, with a third necessary to finish the graffiti, the stickers, the tags, the trash, the characters and all their coloring. And with that said, it is time to get back to it and finish the art.
Cheers.


Hi Ron- Great article, I haven’t really thought about the layers and anatomy of textures before. The mural looks sweet in the painting. I love how it’s in shadow
Hi Peter, thank you. Anatomy is surface, it is shape, it is connection(s), it is movement, etc. How many components of something can you break it down into to make it easier to manage from any angle, from any POV, with any lighting or atmospheric condition. The more you go beyond just looking at something then giving it your best to copy is breaking it down characteristically, or anatomically in an artistic sense.
Ron thank you so much for answering my question and making it a post!
I really wish I had this information YEARS ago because up till now I’ve only seen texture as something that can only be done by putting in hours of laborious little details and copying exactly what you see or achieved by getting a “feeling” of it. I always treated texture as a huge step that had to preplaned and previous steps could possibly ruin it so for years I always thought I wasn’t good enough to do it or I was missing some vital information . But seeing how you did that study in 5 minutes gives me hope that I can study it too. I LOVE how you simplified a path of what to look for and gave a numbered break down of the cement study which is a revaluation to me. Not only do you give your own example but it gives a road map for us to do our own texture sleuthing.
Thank you again! Your comic panel looks great btw! I can’t wait to see the final!
Great article, I just want to add that the edge of your ledge would be altered by wax as well as alloy from the skateboard trucks. Skaters use wax to make it easier to grind or slide on the surface.
Hi, Ron.
I understand you have a head tutorial within your figure drawing course, but do you have any more in-depth?
I’m trying to learn how to draw your heads in 3/4, care to help, please?