I’ve compiled a few images of my painting The Seeker and thought I’d share a little bit about the making of this painting. These images show a progression of the stages as I’d painted this for a demonstration during an online class I teach called Imaginative Realism Portrait Painting for Los Angeles Academy of Figurative Art. This is just a brief overview of the painting, as I go over quite a bit more in class and actually build up several paintings within the same allotted time. I don’t always take a lot of progress shots, so I was happy to have taken some of this painting. I’m sharing those here along with some added information.
WIP1
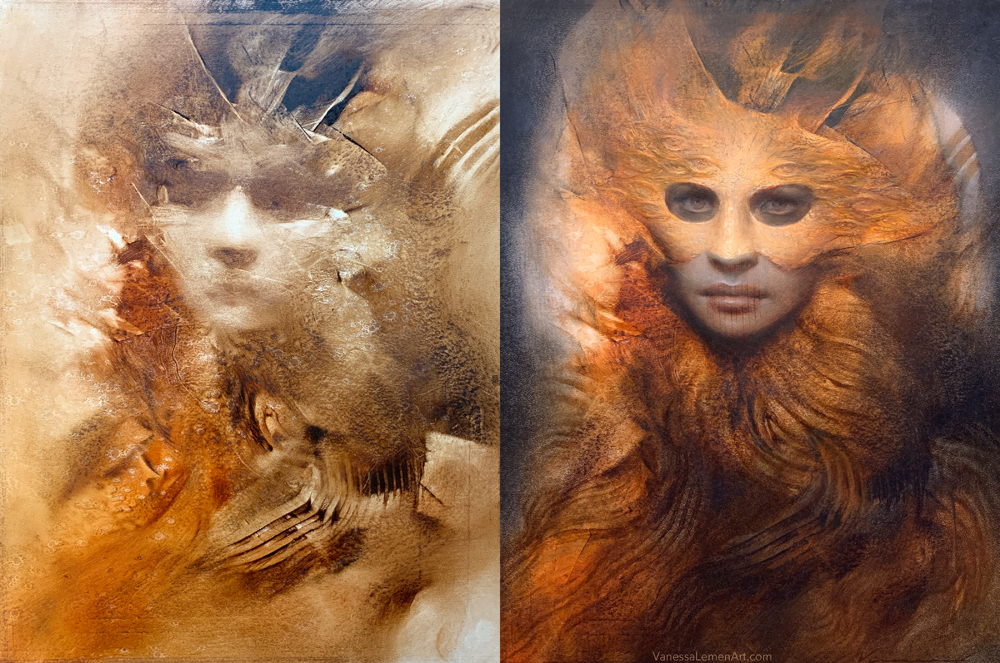
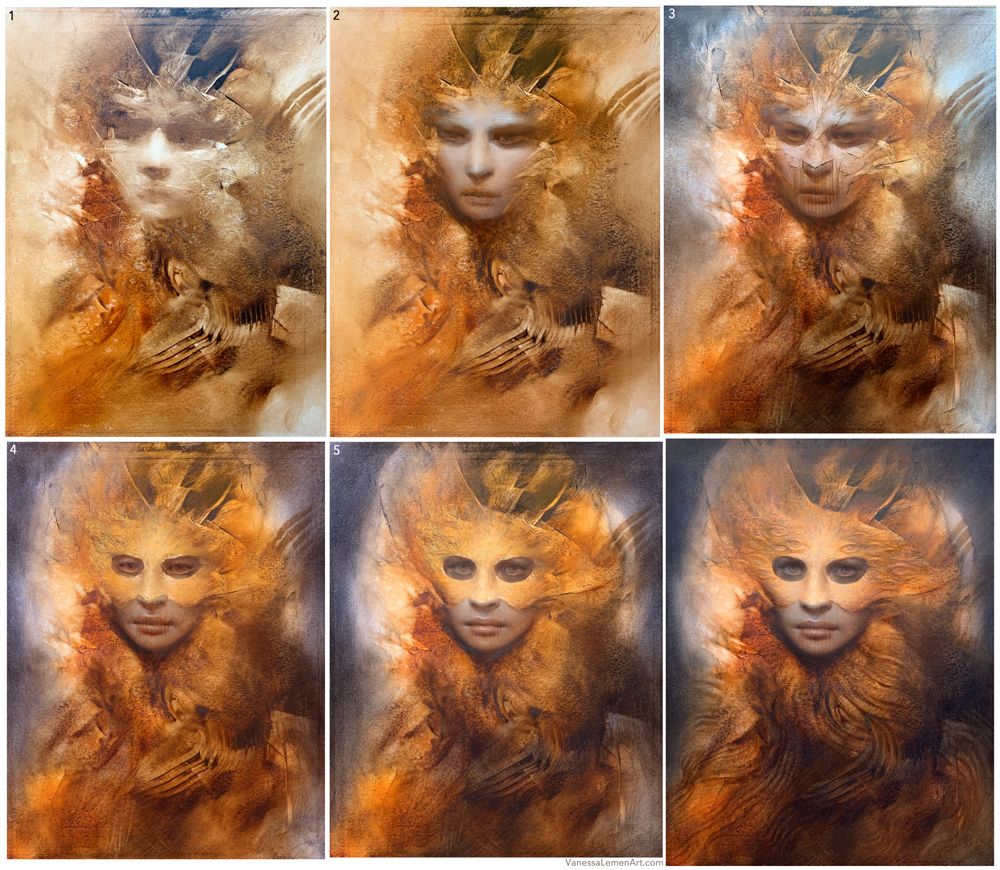
This first stage, as most of my paintings start, is basically a demonstration in experimentation and automatism, utilizing different tools in many different ways in order to search and discover. Since this painting demonstration was for a class and that class was focused on portrait, I did focus on portrait but with several starts in different ways. This one was not only showing the tools and materials and ways to use them, but how to pick-out the portrait before it dries. The point was not to have a detailed or rendered face with the pick-out area, but just a general area where a face will be, and to get it indicated before it dries. I did many other abstract starts and some did not have a face indicated in the initial marks – which is another way of building up. The point to these demonstrations when I teach, is to show a few different ways of working and not just one. In this case for this article, though, I’m sticking to focusing on one of those demonstrations.
WIP2
On this second layer, I added a thin veil of warm color practically all over the dry underpainting. In some places, such as the outer edges, the paint is thinner and more transparent and in some places, the paint is slightly thicker and have a bit more coverage, but none of the warm additions at this stage are opaque or thick in order to allow for the texture of the initial underpainting to show through. I used titanium white for the face in the same manner, as a thin veil over the top of the underpainting. This stage of building the area of the face was to flesh out the original lay-in and start to bring some volume into those forms just by the use of varying degrees of opacity using white.
WIP3
After the 2nd stage was dry, I wanted to demonstrate a few things about adding texture or marks back onto the face after it’s dry. I coated the face with a warm dark and then picked out with various tools. I carved out what looked like somewhat of a mask (unintentionally), which would later inform where I’d go next with the portrait in the following stage. In the background/outer edges of the painting, I added a cool dark. This helped to make the light warm halo around the head now appear to glow.
WIP4 and WIP5
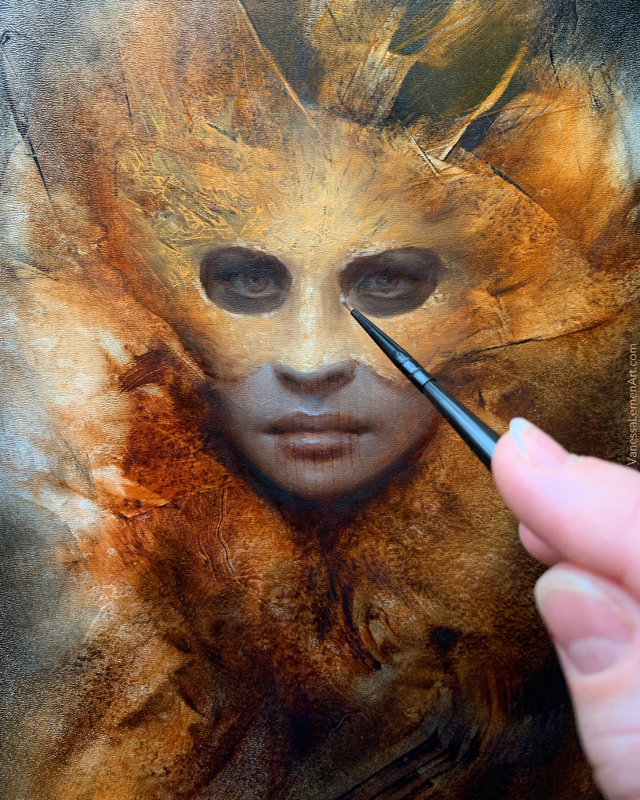
These were the finishing layer for the class in its fourth and final week. I added opaque paint to indicate a mask where the marks were, using colors that I mixed in order to match the golds and warms that were there from the underpainting and build it up in a way that appears as it both comes forward and seems to extend or blend from the thinner warms that were already there. Much of the underpainting is still showing through in each stage, and each added layer is painted in a way that feels cohesive with what already exists. There are still opportunities to pick out in each stage too, and you can see some of this in the texture of the mask (see the detail below). In WIP5, I refined the background edges around the shapes of light as well as darkened the costume area with a veil of warm darks across the general shape. I also refined the shapes of the cutouts in the mask around the eyes and refined the eyes themselves, adding subtle details in the features of the face and some softer lights on the face overall. That was where I left off for the class given that the duration of the class was at its end.
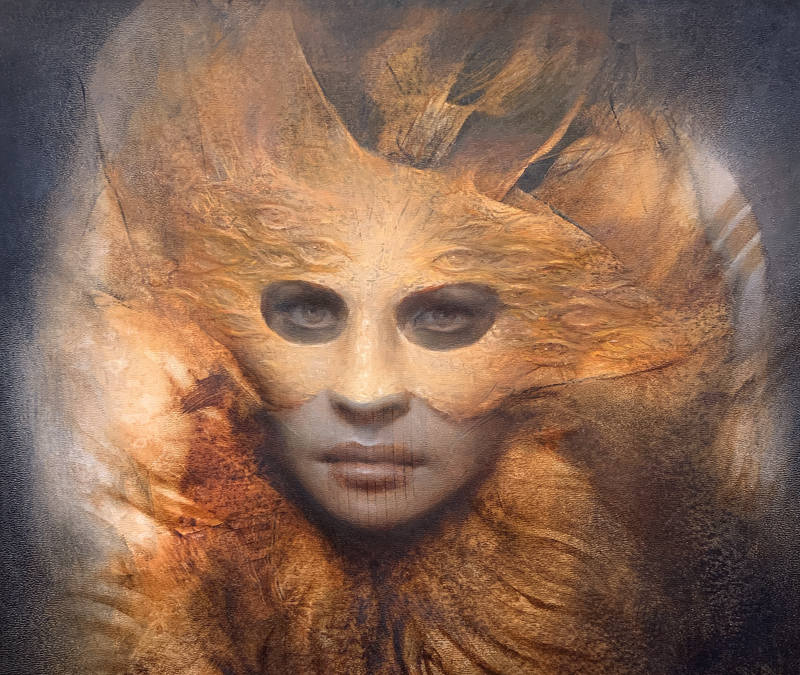
I decided to do a few extra things after the class ended. These additions were mainly finishing marks and softening some edges overall. I added the eyes in the texture of the mask towards the end with varying opacity of golden and orange tones, with some strokes being more opaque than others. The lower right corner was darkened a bit, and there are tiny areas of tweaks throughout in this stage – just small adjustments in order to help the entire composition feel solid and ultimately at a place I’d feel comfortable calling this a finish.
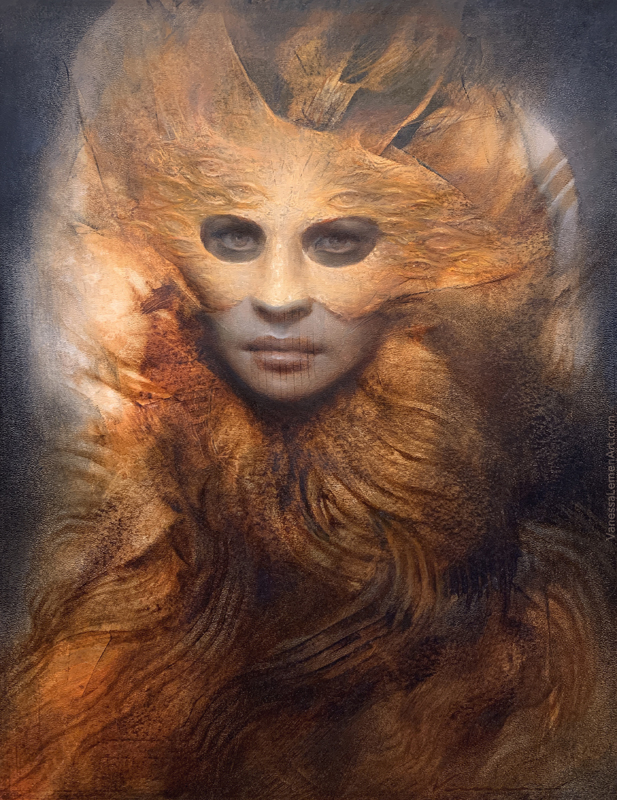
The Seeker, oil on panel, 12×9″
I hope you found this helpful. There are many other articles I’ve posted here on Muddy Colors that describe my process or progression of a painting. As I mentioned above, I often will develop the abstract without finding the portrait in the first stage of the painting, and there are several articles here in which I’ve shared that too. Check some of those out from this list by clicking here.
Thanks for reading, and I hope you all are doing well out there.


Thank you Vanessa for the insights into your painting. It seems that you let the painting talk to you and you negotiate a next step instead of demanding that the painting obey your preset ideas. Very enlightening. Again, thanks for the detailed post of your process.
hi Tom. Thank you. Yes, it’s very much like a spontaneous dialog in that way. Going in knowing in general how to have a conversation but not knowing entirely what will be said until in the moment, listening, responding, and so on. I’m glad to hear that you enjoyed the post. Thank you again. 🙂