-By Ron Lemen
I simplified this dialog to the drawings. This started off as a rant against the HUGE problem with every one of my anatomy students these days, the problem with drawing feet.
Somewhere out there is some misinformation, or alternative truths that seem to be popular to the newbie art student, but need to go missing forever please. I have created some pages of useful information that need to be put out there into the system. But first, let’s start off with some wonderful drawings from the Russian Academy. Who can resist the amazing studies from that school. So much character, so much charm.
Anyway, my diagrams are nothing in comparison to these beautiful drawings. But diagrams are not meant to be beautiful drawings. They are meant to help you learn and clarity is important. So I do apologize if the drawings are not totally clear. And if they are not, please help me by mentioning that in the comments.
These are more excerpts from my soon to be figure drawing book, but since that is taking as long as it is to complete I am putting these notes out there now. I also realize I have a lot of them so I am only going to post so many. If there is something that feels like it is lacking, the book will have taken care of that.
Here is what I am seeing quite a bit of lately, both the drawings and the bone structure. I have no idea where this is coming from, but the land of drunk socks and bigfoot must be steered clear of during your training. Go back to it if you must stylize your feet, but, these are not good quality representations of real feet.
There is also a trend of missing heels. Someone has gone around and removed the heel from the foot design and replaced it with a “Weeble Wobble” style foot design. I guess the world isn’t already dangerous enough as it is, let alone giving us unstable feet.
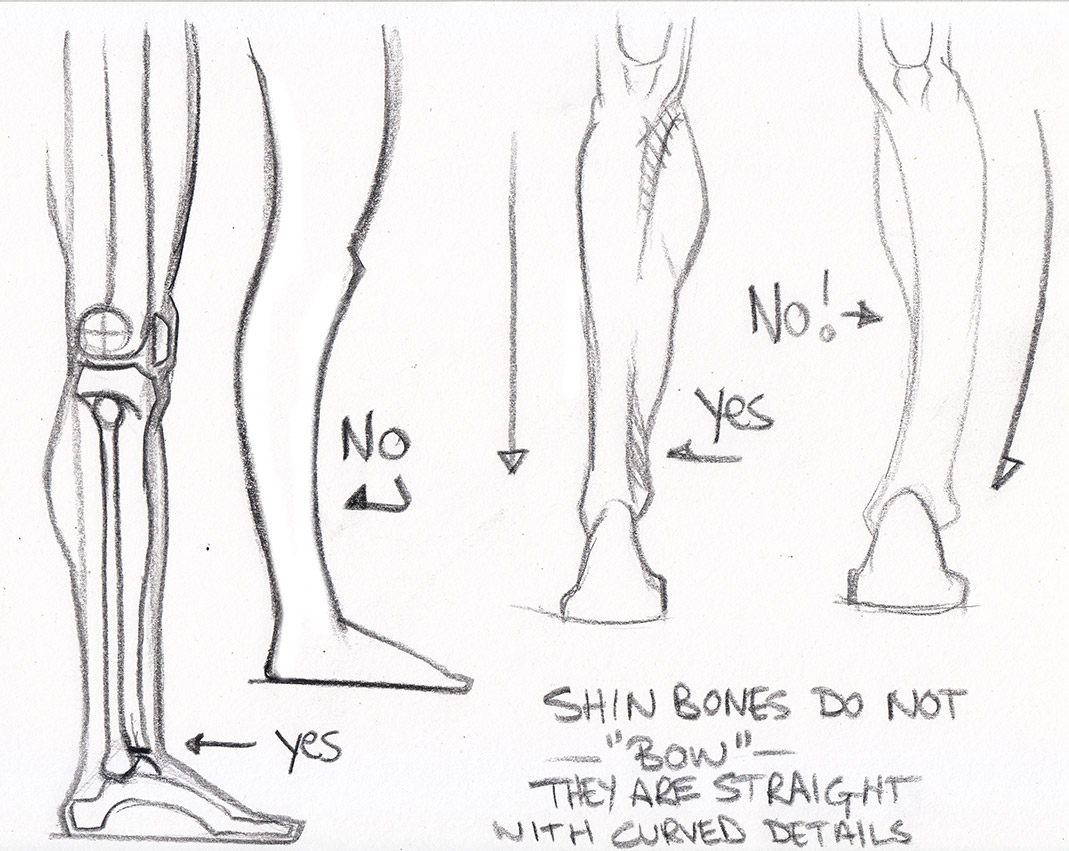
There is also this interesting trend of giving everyone bow legged qualities. Shin bones are straight with curved accents. They are not curved. Sorry.
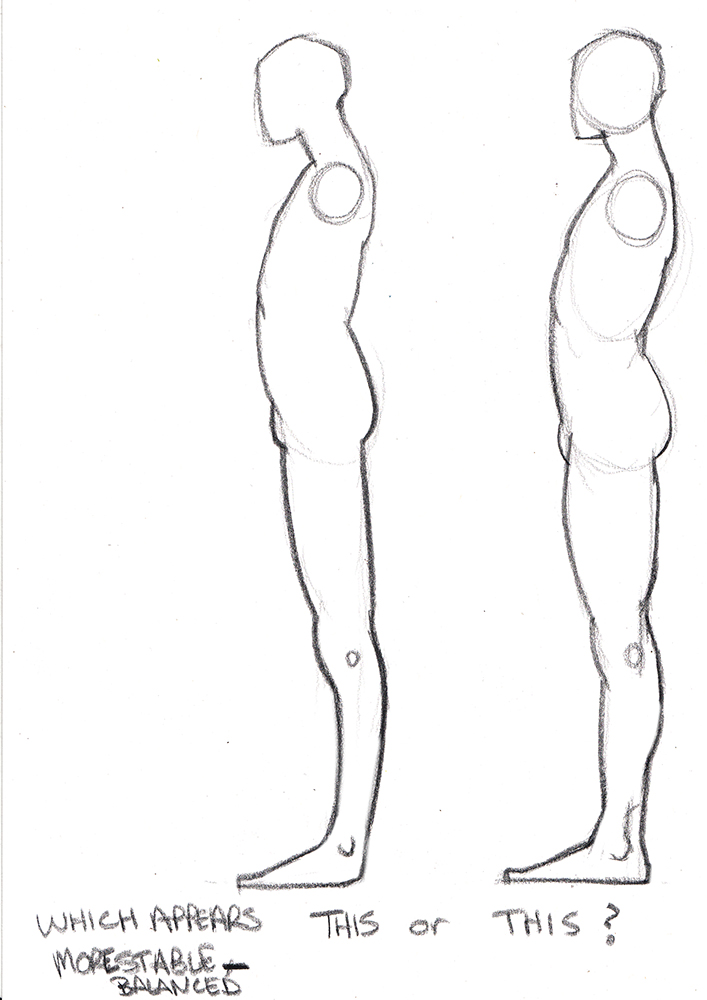
A descent starting point for the foot is the door wedge. It helps check the perspective of the leg and assures that the feet are grounded to whatever surface they might be attached to. This wedge is the ideal shape for the 3 points of the foot, ankles, toes, and heel.
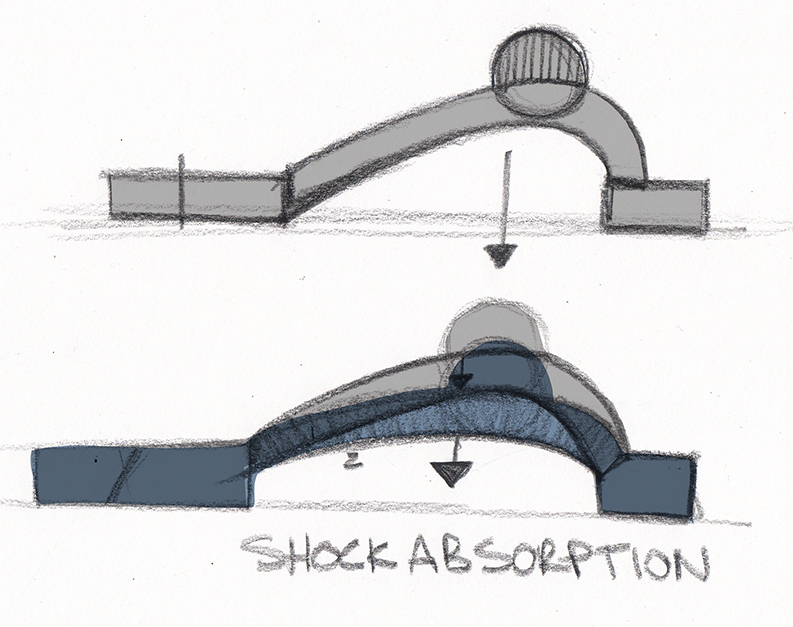
The foot is a shock absorber for the body, it makes sense that the ankles, and the leg are positioned over the arch of the foot to take that impact, from walking to running and jumping. Thank the feet for that arch, that we need to put the leg over and not behind.
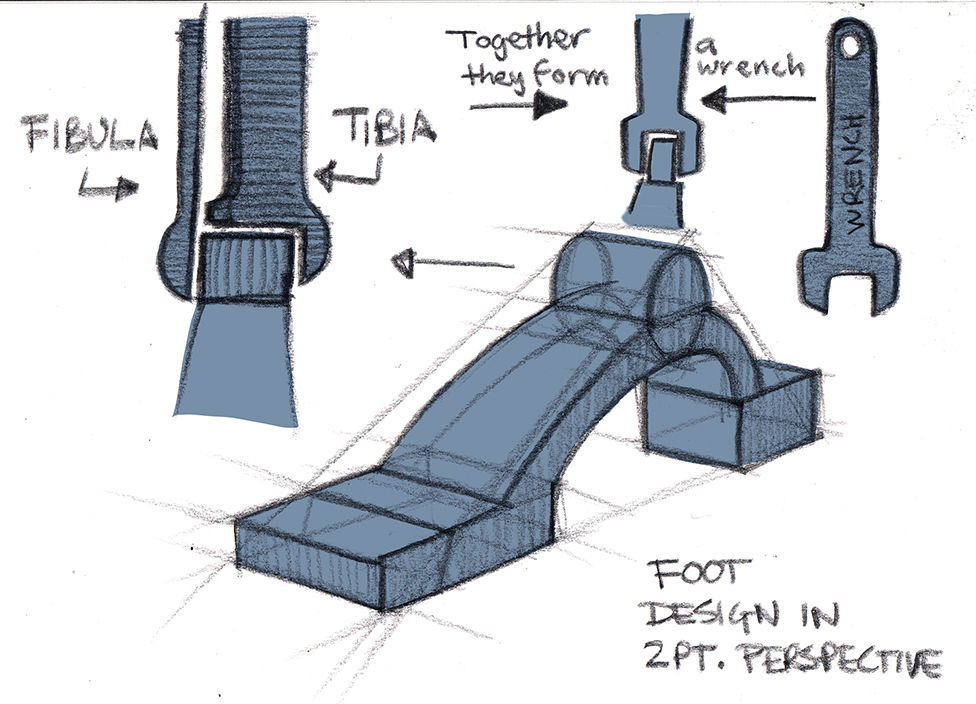
The ankle bones are the tibia and the fibula together, and combined they form a wrench like structure that holds the foot bones in place as the pivot point for the foot rotation. The bones are side by side medially and laterally, not in front and behind. And each leg mirrors each other, they are not the same orientation to each other.
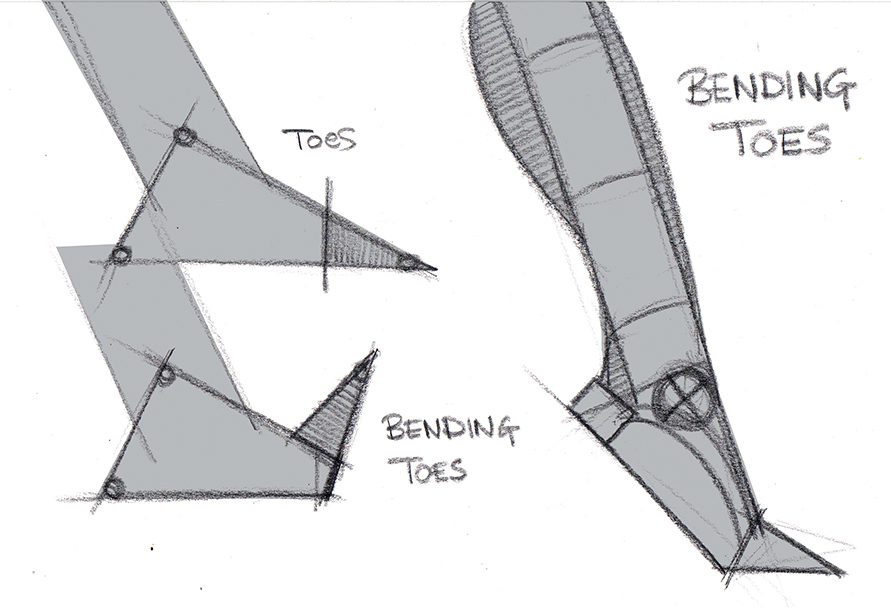
Here in profile view the door wedge is broken down into two shapes to help support the design of the foot when the toes are bent. The toe wedge is removed from the front of the bigger foot wedge and is rotated to its new orientation. This now becomes the new position for the toe details.
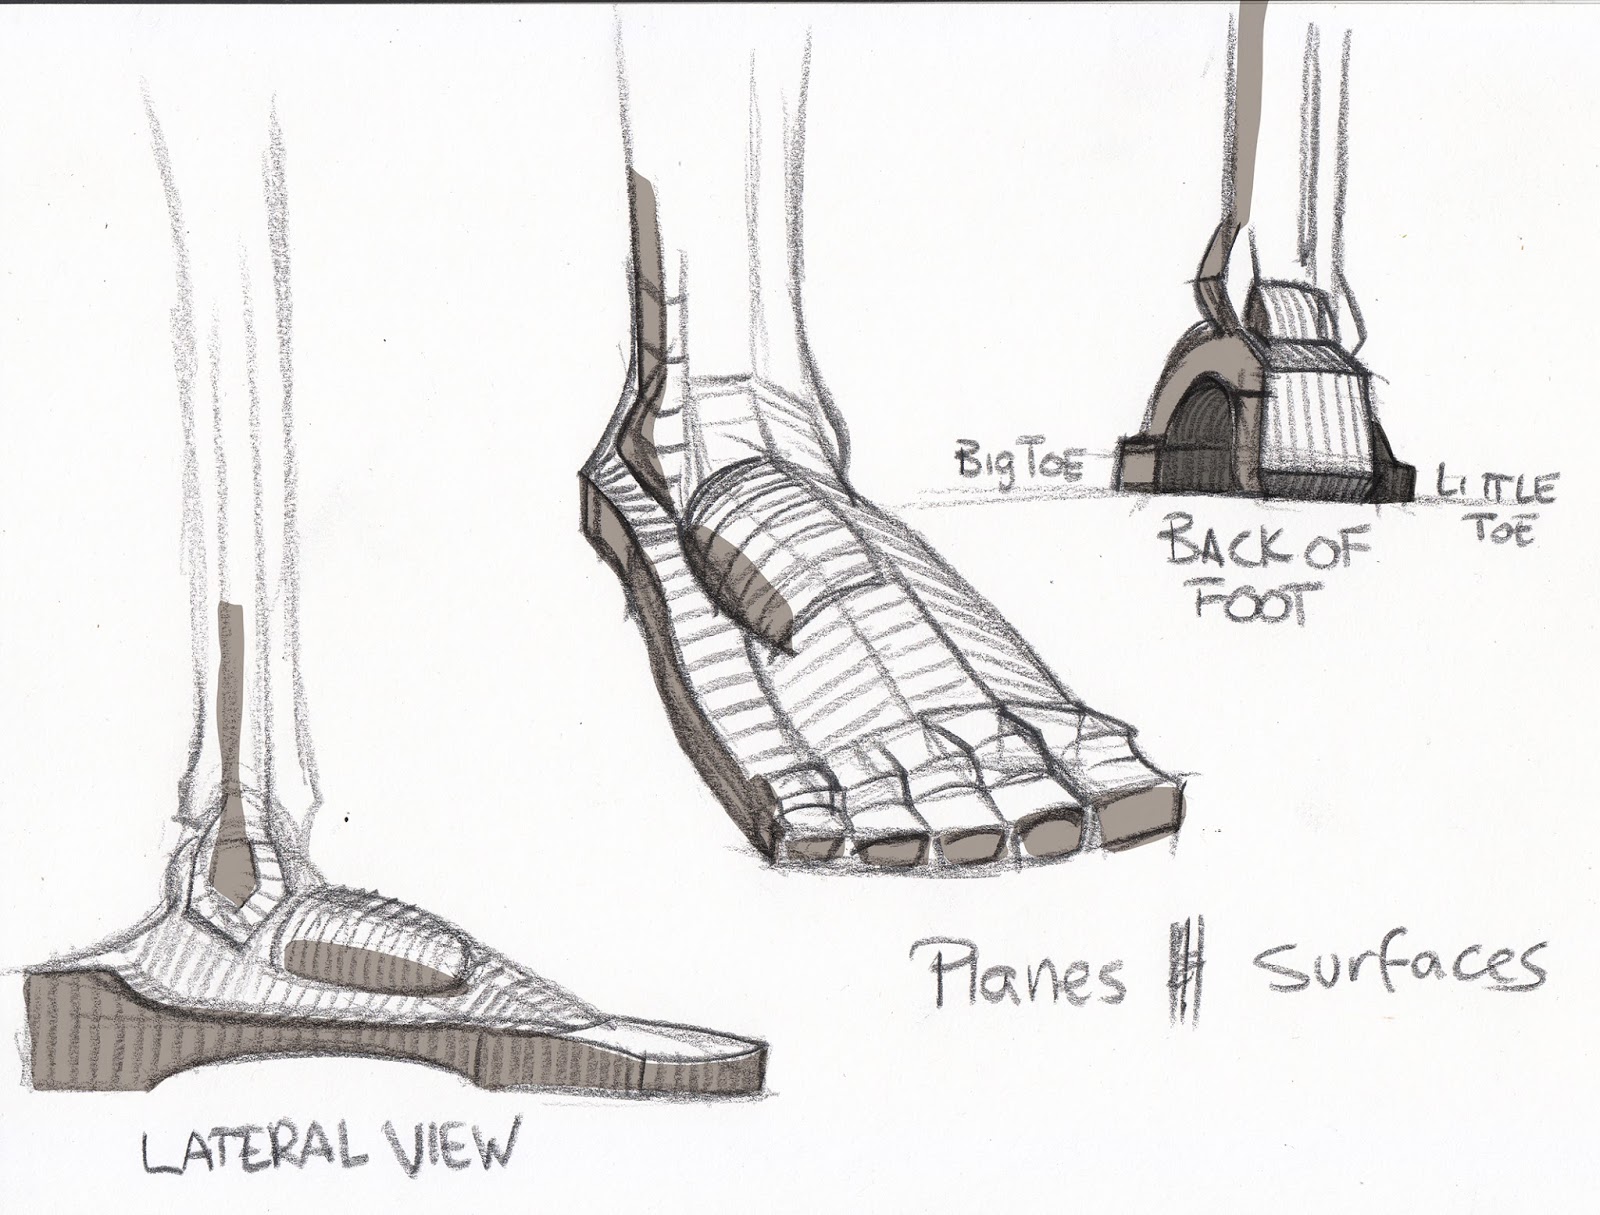
Here are the simple door wedges converted to planar structures to help design in the change of surface from one bone set to the next, over muscles and the orientation of the toes and their segments.
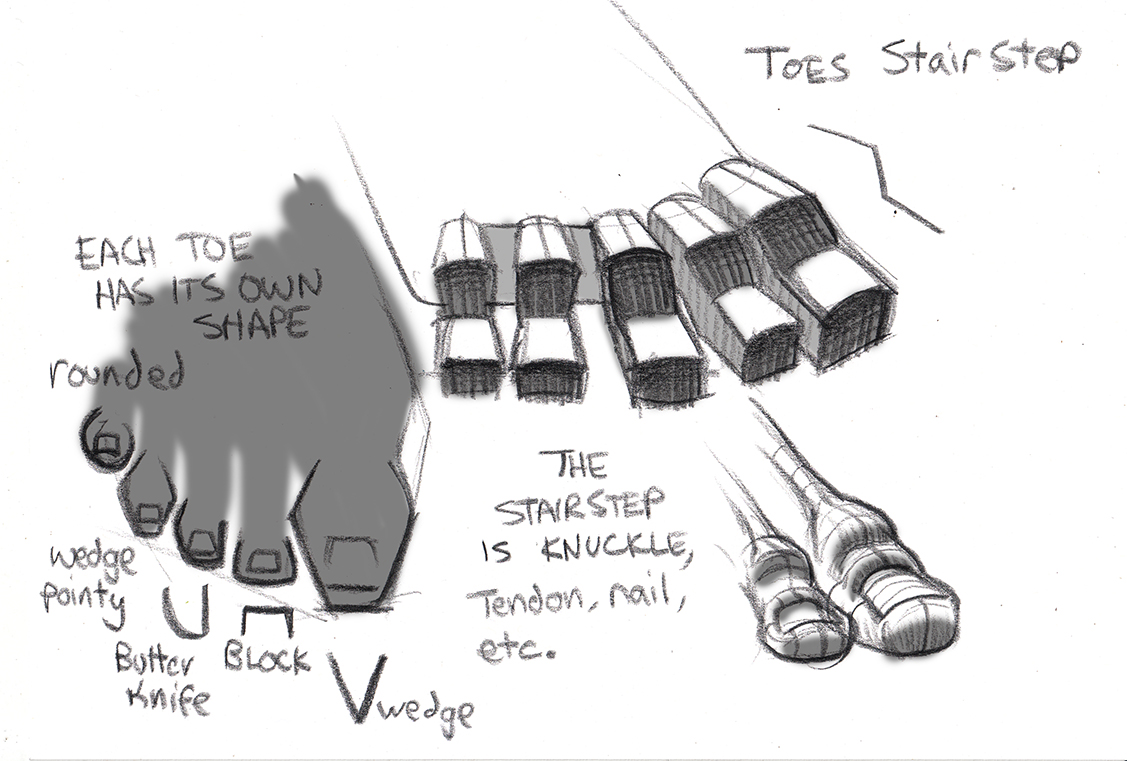
And while talking toes, here are the planar stair steps both in primitive form as well as fleshed out a bit more with the big toe and the second toe. In addition, because our toes are smooshed together in shoes a lot, and because our feet our well designed, the toes fit together nicely, but are over exploited into ugly distortions of the design because our shoes mold our feet to the constraints of their size and build. But, our toes are all uniquely shaped to fit together and the diagram on the left shows how they fit together.
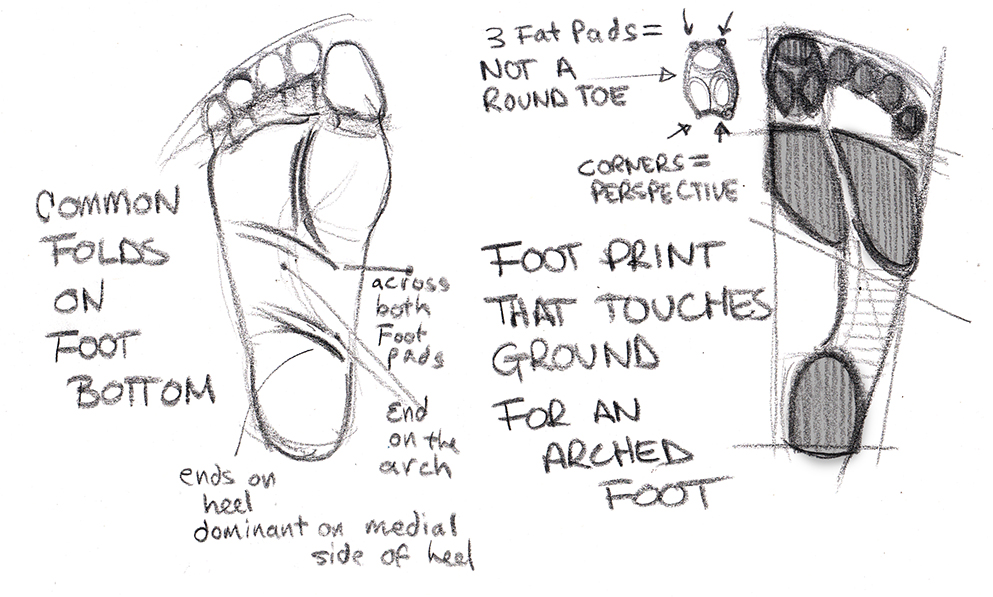
And here are the folds in the bottom of the foot common with all of us but not the same length and exact orientation between any of us. Note that the big toe actually has 3 fat pads in it within its wedge like shape.
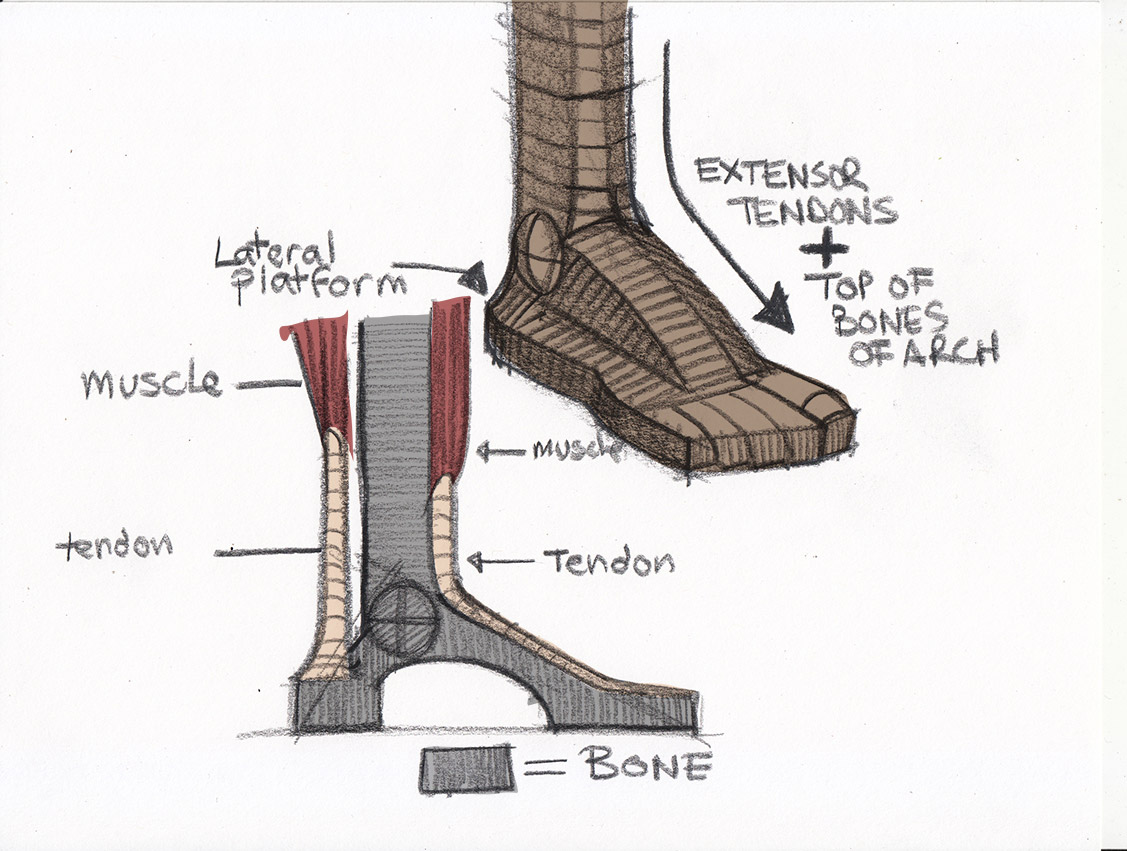
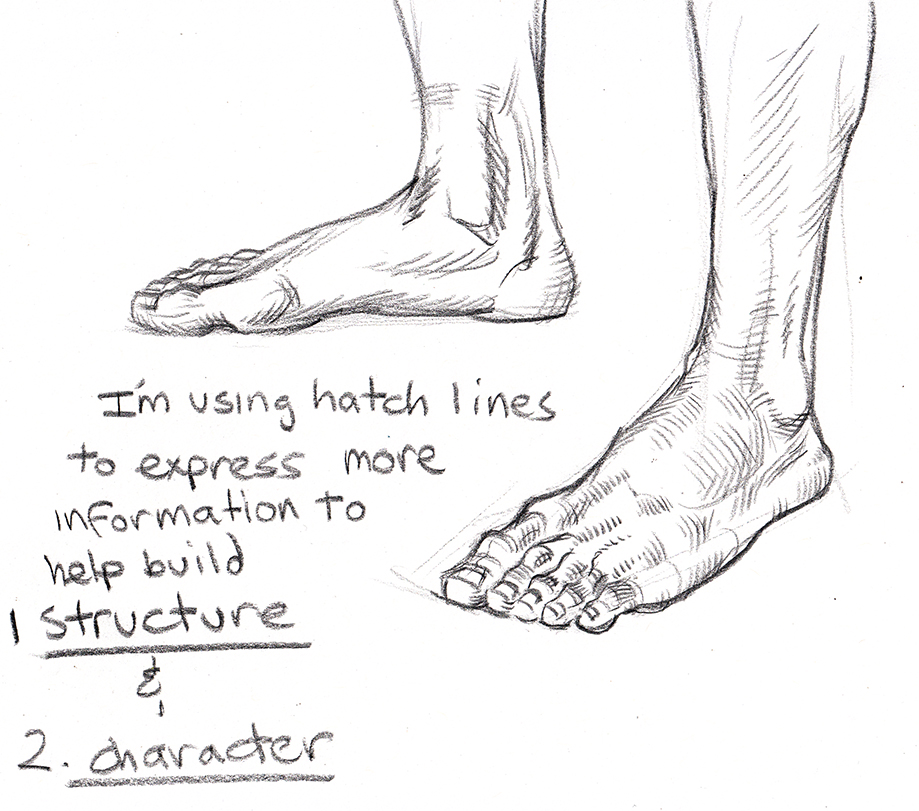
Add character to the body of the foot. There is a lot going on in that space, but the foot won’t often times show it, especially in photo reference. I used hatch lines here to explain direction of some of the sub planes (anatomically rooted). These would be represented in half tones being that these feet were directly lit.
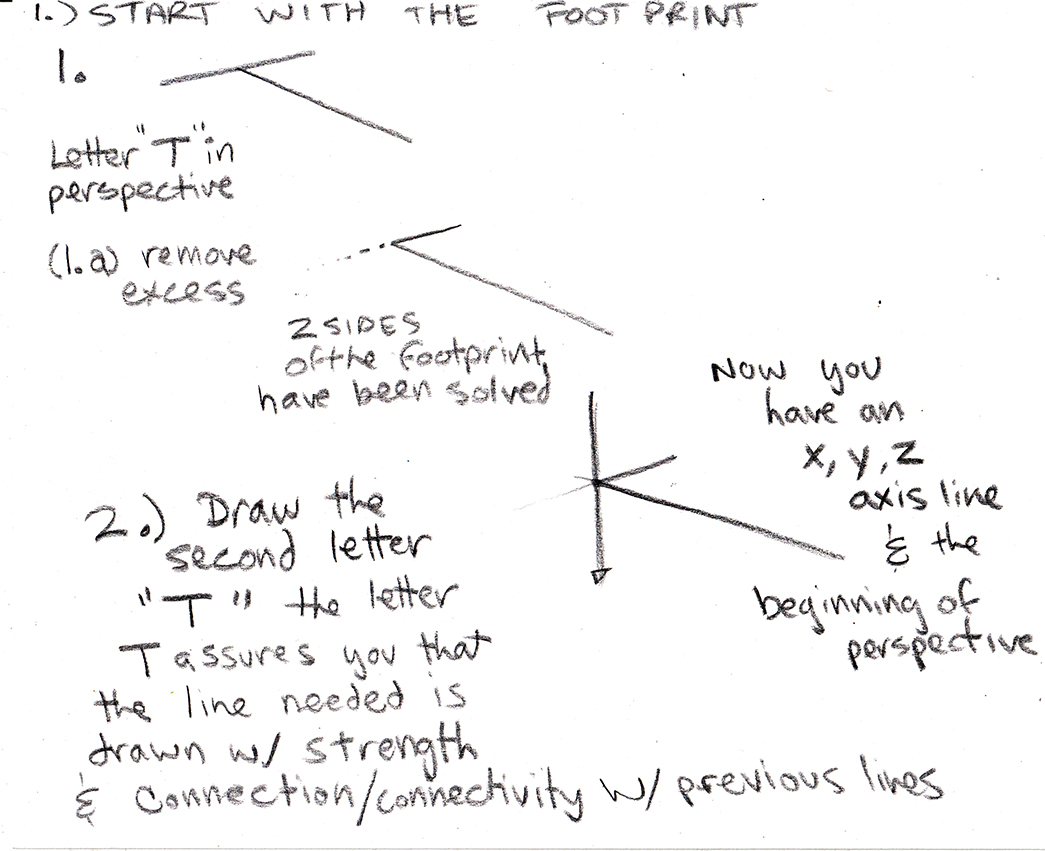
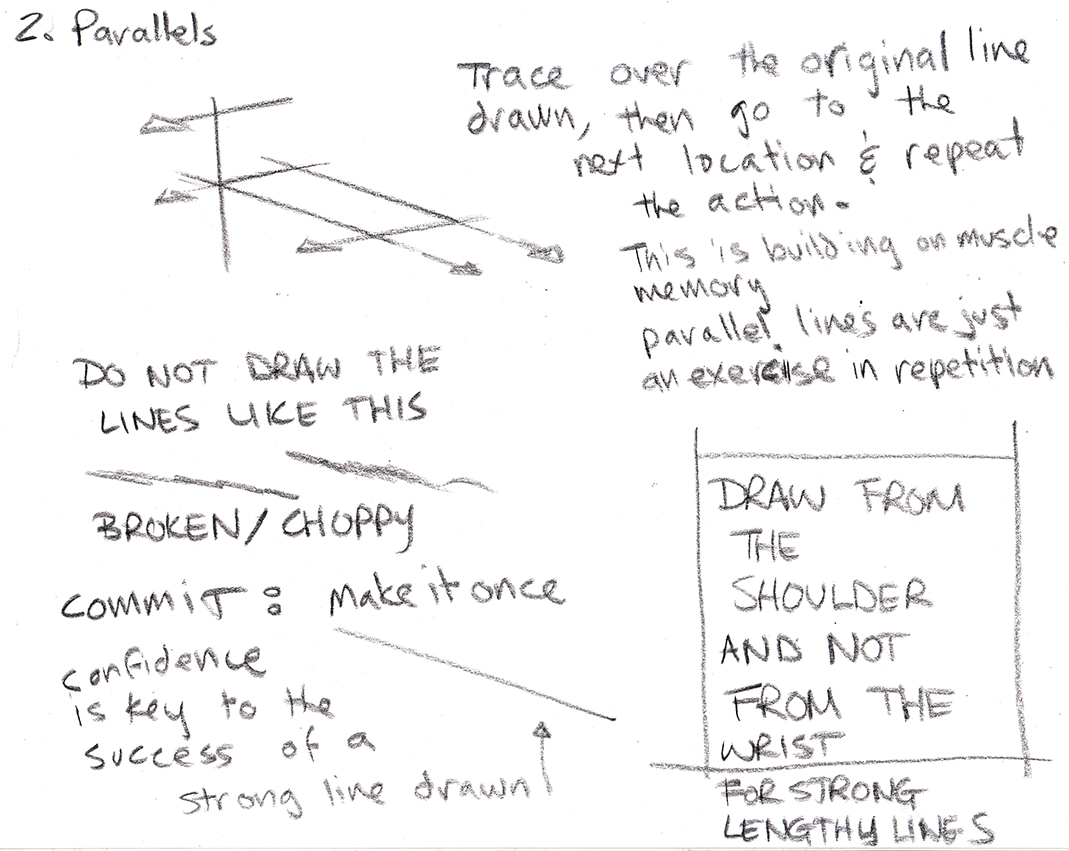
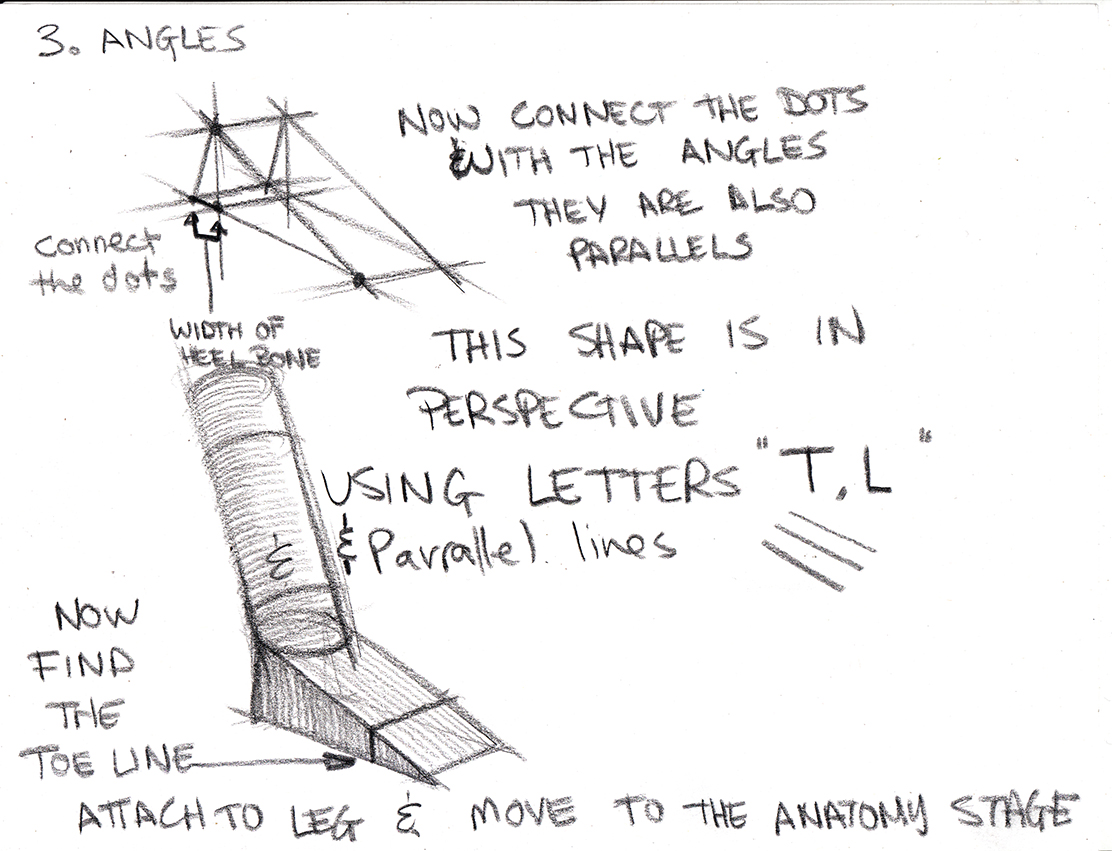
These last few pages are for those of you who do not know anything about perspective and are surprised when you find out that the body is loaded with it…because all forms are in perspective. I do not understand how students think that they can avoid perspective by just figure drawing. LOL…I mean that with kindness.

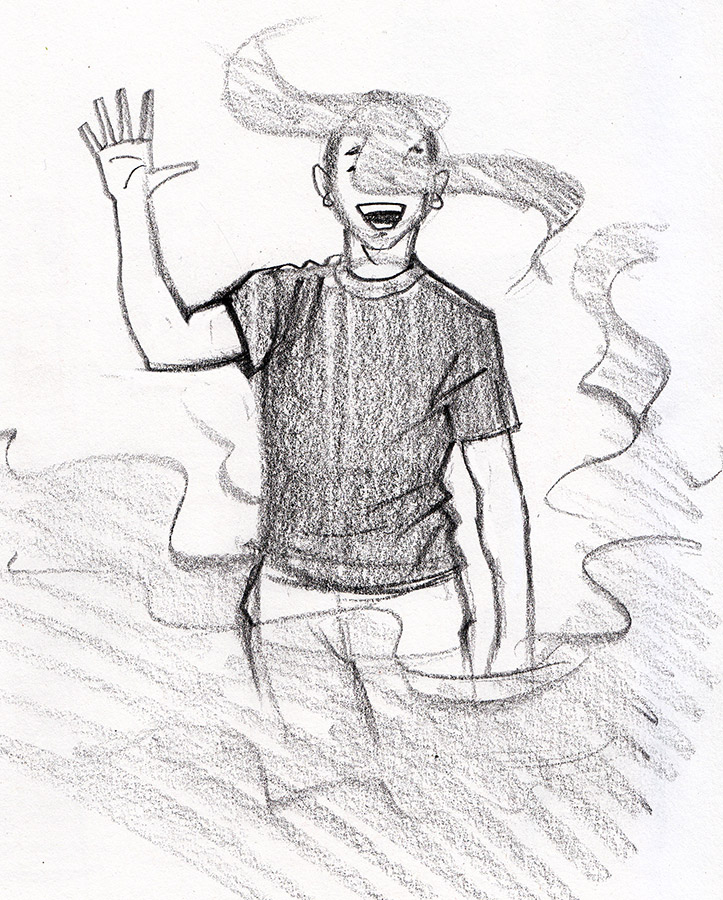
I know they are not pretty, but I hope they help. Now, please share these with all beginning students you know and hope to make careers with their art skills and to those who think they understand feet but we have had a hard time explaining to them that maybe they should practice them more often. Or do what I do and hide everyone in mist so you can avoid feet, lower legs, upper legs, pelvises, and more thanks to that wonderful fog stuff. Any time you have a hard time with something and you to meet that deadline, just fog it up a little. Gonna duck into that fog now and get back to the work load. Comments, please leave em, until next time, creative success to you and happy arting.


These notes are so cool! You explain the form and the function which most books don't touch on. Thank you. Looking forward to your book!
“Ron, your breakdown of common foot-drawing mistakes is so helpful! It reminds me how Deltarune also teaches patience with its detailed character designs. Your anatomy tips about simplifying forms would actually help someone sketch Kris or Susie’s unique feet in the game. Great insights for both artists and gamers!”
Excellent post Ron! Now my characters feet can finally see the light of day.
Hey! Really enjoyed reading your post. Welcome to our Pips solver! This free tool gives you daily pips hints and pips answers for the domino logic puzzle.
Ron Lemen…?
“Or do what I do and hide everyone in mist so you can avoid feet, lower legs, upper legs, pelvises, and more thanks to that wonderful fog stuff.”
Or… Rob Liefeld?
Hmmm…
When does this book come out? I need it in my life. I learned so much this morning on my way to work from your post!
Lol, I love this article. Those weird foot shapes at the beginning… Thanks for posting and for inadvertantly reminding me I need to get back to figure studies 🙂
This was super helpful! The T perspective “clicked” really well for me. Now I'm just curious how you could use the T's for hands, but I suppose I just need to keep an eye open for your book!
THIS! Thank you for this post. You've shown examples as to exactly why I'm studying anatomy.
I like how methodical/didactic your approch to any subject is. You are a great artist and a great teacher!
Man I love your articles! Always a pleasure!
Very useful article, thanks.
“Feet are the same length as your forearm” is how I remember not to make feet too small (learnt from my mother as a quick test as to whether socks would fit)
Lemen’s article is a helpful guide for artists struggling with drawing feet. The door wedge analogy is a great starting point for understanding the foot’s structure and perspective.
Cookingdom Game Walkthrough: All Levels Walkthrough & Solutions Guide
Step-by-step guides for all levels of Cookingdom, helping you chop, stir, and plate like a pro while soaking in the chill vibes.
Dreamy Room GAME Walkthrough
All Levels Walkthrough & Solutions Guide
Full game walkthroughs for all levels of Dreamy Room, guiding players through every puzzle and uncovering all hidden areas.
“Ron, your frustration with anatomy students struggling with feet is so relatable! Just like how Cookingdom breaks down complex recipes into manageable steps, your simplified approach to drawing feet makes the learning process less intimidating. Both show how breaking things down leads to better mastery – whether in art or virtual cooking!”
“Ron, your breakdown of common foot-drawing mistakes is so helpful! Just like anatomy students need to master fundamentals, I love how crazy cattle 3d players have to learn physics basics for those hilarious sheep explosions. Both require practice to turn chaos into something awesome – great parallel!”
“Ron, your frustration with students struggling to draw feet really resonates! Sometimes we all need to simplify complex concepts – just like how bouncy balls simplify classroom management. Your approach to breaking down anatomy reminds me that fundamentals matter, whether in art or teaching tools. Great perspective!”
This is super helpful. I always struggle with drawing feet, especially the ankles. These diagrams are a great starting point. Gonna save this for later! Thanks for sharing.
This is super helpful! I always struggle with drawing feet, especially getting the perspective right. The “door wedge” analogy is a great way to simplify things. Definitely sharing this with my art friends. Makes me wanna use YesOrNoo to decide if I should practice feet all day! LOL! Seriously though, this could really help someone who is confused about yes or no, how to draw feet.
hank you for this post. You’ve shown examples as to exactly why I’m studying anatomy.
his is super helpful! I always struggle with drawing feet, especially getting the perspective right. The “door wedge” analogy is a great way to simplify things. Definitely sharing this with my art friends. Pokemon Gamma Emerald
The Ultimate HD-2D Fan Remake | Experience Hoenn Like Never Before
Experience Pokémon Gamma Emerald, the ultimate HD-2D fan remake built in Unreal Engine. Download the demo now at and explore a mysterious island between Hoenn and Sinnoh!
This is SO helpful, thank you! I’m definitely one of those students who struggles massively with feet – they always end up looking like weird, lumpy potatoes or, yes, ‘drunk socks’ (lol, so true!). The door wedge analogy is a game-changer for perspective, and I never really thought about the planar structure of the toes fitting together like that. The diagrams are clear, and I appreciate you sharing these insights even before your book is out. That bit about ‘Weeble Wobble’ feet and missing heels? Guilty as charged sometimes. Definitely going to try these tips out!
Wow, this is super helpful! I’ve always struggled with drawing feet. These diagrams and tips are a game changer. Definitely gonna share this with my artist friends!
Fresh poppy pods are the seed pods that are harvested from the poppy flower. Poppies are known for their beautiful flowers, but it’s their seed pods that are of the most value. These pods contain the seeds for the next crop and, when dried, they are frequently used in floral arrangements and other decorative crafts. By using fresh poppy pods, you can take your art to the next level as it gives a natural and pleasant look to your creations.
Our journey began with a simple, irresistible love for Maine Coon kittens for sale. Today, we operate under the brand name “Adorable Claw”, proudly pitting ourselves as one of the credible and well-established breeders in the industry. At our core, we specialize in the sale of superior quality, pedigree Maine Coon kittens, distinguishing ourselves through our passion, commitment, and exceptional standards.
We live in a rapid world where the development of technology is faster than the creative development of mankind. This causes a rigid view of the world that leads to tunnel vision, a lot of misunderstanding, and problems. Buy magic mushrooms
Suchen Sie nicht weiter als unter , Ihre Go-to-Quelle für Premium-Fälschungen, Führerscheine Kosten und IDs.
Meanwhile, you still have questions. What is a black truffle? What is a white truffle? Are truffles the same thing as mushrooms or aren’t they? Is it true that truffles look like poop?
Our Mini Highland cows for sale are also highly adaptable to various climates and environments. Whether you’re located in a hot, humid region or a cold, mountainous area, these hardy cattle thrive in diverse conditions.
I can’t draw it like the original no matter what I try. It seems I need to keep working hard.
Our advanced humanization technology rewrites machine-generated text with natural writing patterns, making it undetectable while preserving the original meaning and academic quality.
This tutorial on Drawing Feet is extremely well-written and has been of great value to me.
This is super helpful! I always struggle with drawing feet, they either look like deformed sausages or flippers lol.
Sounds like you’re tackling a universal art student challenge head-on! Starting with those ‘amazing studies from the Russian Academy’ to inspire before diving into the ‘alternative truths’ about drawing feet is a smart approach.
Ron, this post about drawing feet is so relatable! It’s great you’re tackling the ‘huge problem’ with students struggling with them. I totally get the frustration with misinformation out there. Can’t wait to see the drawings and what insights you’ve simplified from your rant!
Learned so many tips for drawing feet, especially the “door wedge” analogy, that’s incredibly helpful.
Feel like I have a clearer grasp of foot structure and perspective; the basic shape analysis is spot-on.
Your tips are always spot on. Looking forward to more guides like this!
Wow, this is super helpful! I always struggle with drawing feet, they always look kinda weird. These diagrams and explanations are really clear, gonna try these tips next time I draw. Thanks Ron!
“Feet are tricky but so important! Love the breakdown here. Also low-key reminds me of Deltarune character designs—so much detail in every part!”
“Great tips on simplifying feet! Struggling with anatomy too, maybe I need a break to chill with some Sand Blast Block Puzzle games before practicing again.”
El buscador de estatus de la Beca Rita Cetina permite verificar si tu solicitud fue aceptada, está en revisión o fue rechazada. Solo necesitas ingresar tu CURP en el sitio oficial para obtener información actualizada sobre tu proceso.
Thank you for such an informative article! This was super helpful and easy to follow. Thanks for sharing!If you’re looking for tips to help yourself with today’s NYT Connections answers, you’ve come to the right place. Here’s a slow reveal of today’s answers to the different levels of Connections! You can collect it and open it every day.
Great breakdown! Simplifying complex anatomy challenges—especially tricky areas like feet—makes such a difference for learners. Your drawings really drive the point home.
Honestly, this post hits the nail on the head about foot drawing woes. So many folks just avoid the hard stuff, and it shows in their work. Get it right or don’t bother!
Great post, Ron! I’ve always struggled with feet, so I appreciate the simplified approach. The ‘misinformation’ point is spot on – there’s definitely a lot of it out there. Looking forward to seeing your drawings!
Great article! Your breakdown of foot anatomy is super helpful, especially for beginners who struggle with drawing realistic feet. I’ll definitely be sharing these tips with my fellow artists—by the way, I came across pips nyt recently and thought it was worth mentioning. Thanks for making this topic so much clearer!
“Great post! The ‘door wedge’ analogy really clarified how to anchor feet in perspective. That tip about avoiding ‘drunk-socks’ foot shapes is both hilarious and helpful—definitely made me rethink how I simplify forms.”
This article provides valuable tips and techniques for drawing feet, a challenging but crucial part of figure drawing. It’s a must-read for artists aiming to improve their skills. If you’re looking for a creative way to explore different styles, check out Runway Aleph for some unique AI tools.
Drawing feet can be tricky, but this guide breaks it down so well with helpful tips and insights. For those exploring creative possibilities in digital art, Beardless Filter offers a fun tool to experiment
Wow Amazing Article, I Like It…
Permaculture is a sustainable design system that mimics natural ecosystems to create self-sufficient, regenerative environments. It integrates agriculture, water, energy, and community practices, promoting biodiversity, resilience, ecological balance, and long-term human-nature harmony.
Wow Amazing Article, I Like It…
thanks author
Great post about Drawing Feet. I liked how you turned your rant into simple drawings. The point about students having a huge problem with feet and the spread of bad advice felt spot on. Clear and helpful for beginners.
I hear you! Drawing feet is definitely a huge problem for many artists, so I appreciate your “rant” about this common struggle. I’m especially curious about the ‘misinformation’ you mentioned for newbies. Can’t wait to see your simplified approach to mastering feet!!!
Such an insightful breakdown, Ron! 👏 The “door wedge” concept really clarified foot structure for me — it’s amazing how perspective and anatomy connect so seamlessly. I’ve been practicing similar studies lately and your explanations helped me correct so many mistakes