Cameras have become extremely intelligent. They calculate the brightness and color cast of a scene for you, they decide if a flash is needed, they focus for you, they even make intelligent decisions on what you’ll probably want to focus on using face detection software. They assess a wide range of information and make critical decisions in fractions of a second. When used in an automatic or Program mode, all you really do is frame your composition and decide when to push the button.
20mm lens, f11
And don’t get me wrong, framing and timing are what make or break the narrative of a photo. But there are other choices that an artist might make which are a bit more technical in nature, and these are especially important when your purpose for shooting is a technical application like reproducing artwork or recording reference. The modern camera is set up to give the best general purpose result automatically. Left alone, it makes great snapshots. An educated user, however, can prioritize or override certain functions. If desired, even take fully manual control in order to squeeze every ounce of image quality and artistic intent from each photo.
The Exposure Triangle
To understand the f-stop, it’s important to first recognize that a camera serves one purpose: to record light. We point the camera, push the button, and the camera records the light reflecting off and/or emitting from whatever it is pointed at. In order to do this, the camera must regulate exactly how much light it will record. There are three options available:
1. How long you allow light to enter the camera
2. How sensitive to light your recording medium is
3. How large an opening you make for the light to enter through
These three variables work together to create a proper exposure. The first two (shutter speed and ISO respectively) are fairly easy to understand in an intuitive way.

35mm Lens, f2.4
In brief, shutter speed is a very exact measurement of how long the shutter is open and allowing light to pass through. A shutter which is open for 1/250th of a second will allow in twice as much light as if it were open for half the time, or 1/500th of a second. Longer shutter speeds allow in more light because the door is open longer, but fast moving subjects will blur when the shutter is too slow.
ISO is a measurement of how sensitive your recording medium is. Every digital camera captures the image with a digital sensor. In dim light, you can amplify the sensitivity by turning up the ISO. The more you boost the signal (turning the ISO higher), the more noise and grain will begin to intrude.
The third component, the one where you decide how large of an opening to make for the light to pass through, that’s the aperture, or more commonly, the f-stop.
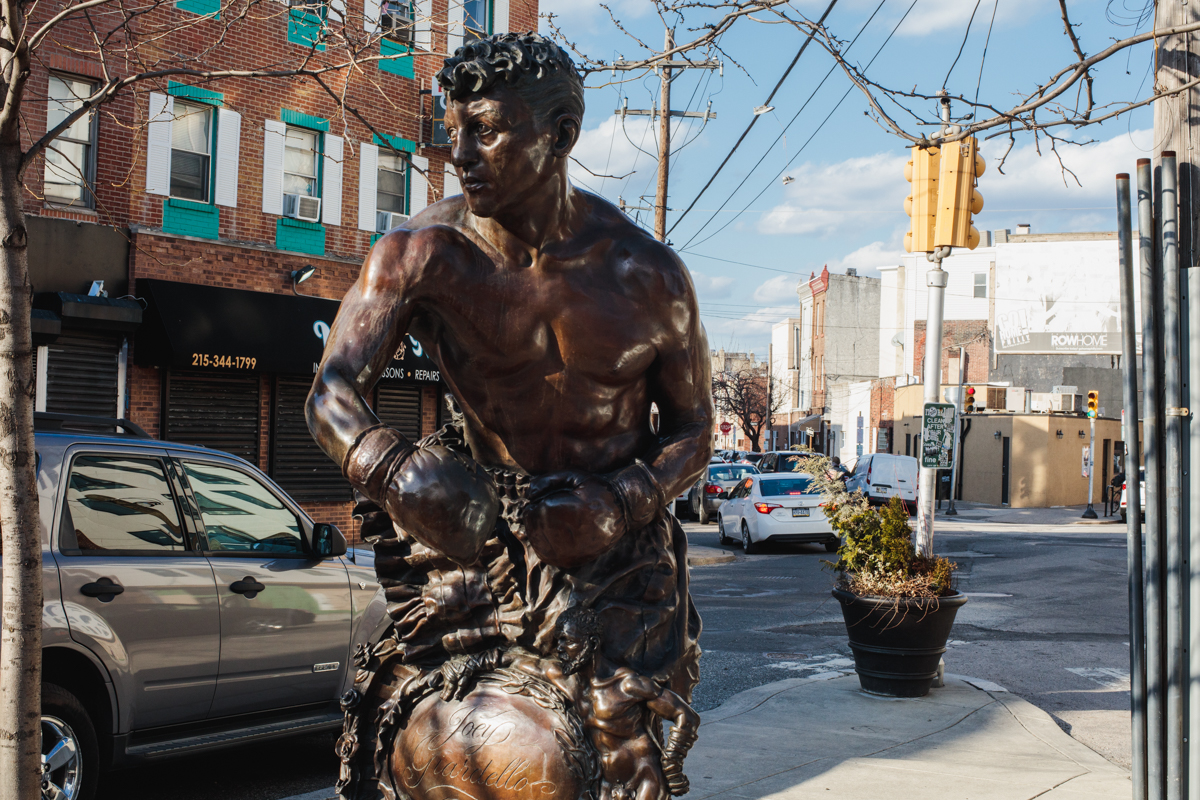
35mm lens, f16
The f-Stop As A Physical Object
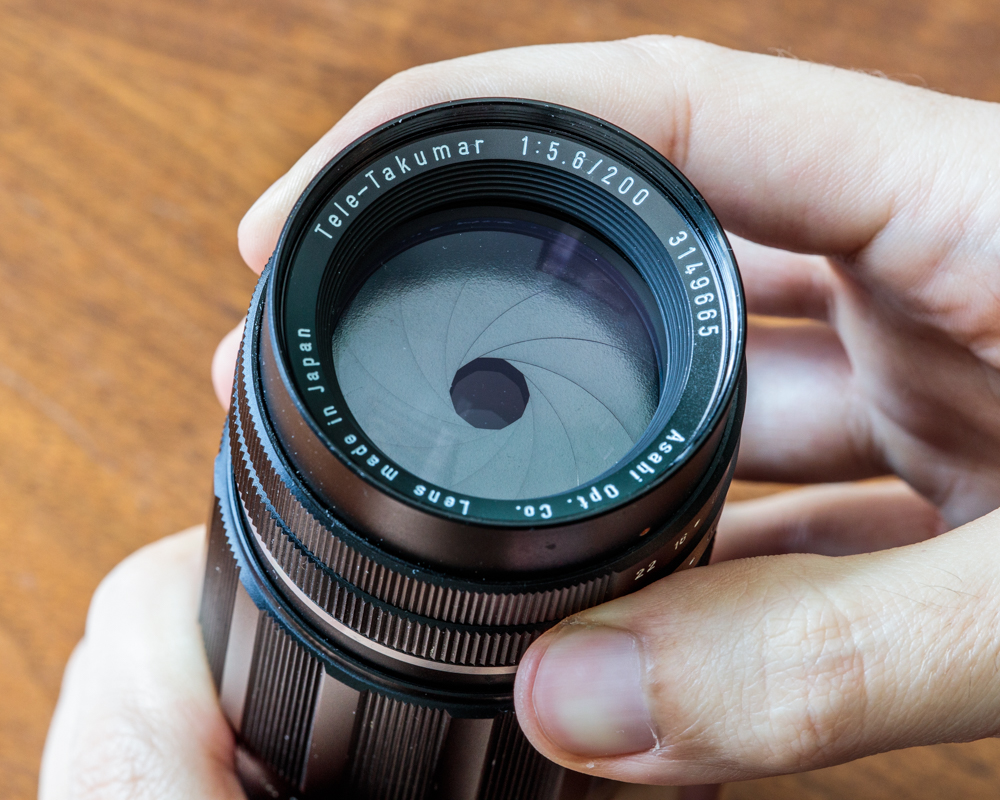
The first time I actually comprehended what an f-stop even is came from looking at an old manual aperture lens. You rarely see an aperture in a modern camera because it is nearly always fully open, even when you adjust the setting. This fully open default state allows the most light to pass through the lens so that your viewfinder is always nice and bright. If you look into the lens, it appears as an uninterrupted cylinder. But in the split second that you shoot a photo, the aperture will snap into place for exactly as much time as is needed and then snap open again. Even when this is happening, we might not see it if the camera is shooting with a wide f-stop. But at smaller apertures, you’ll see a very fast flicker if you’re looking straight down the lens.
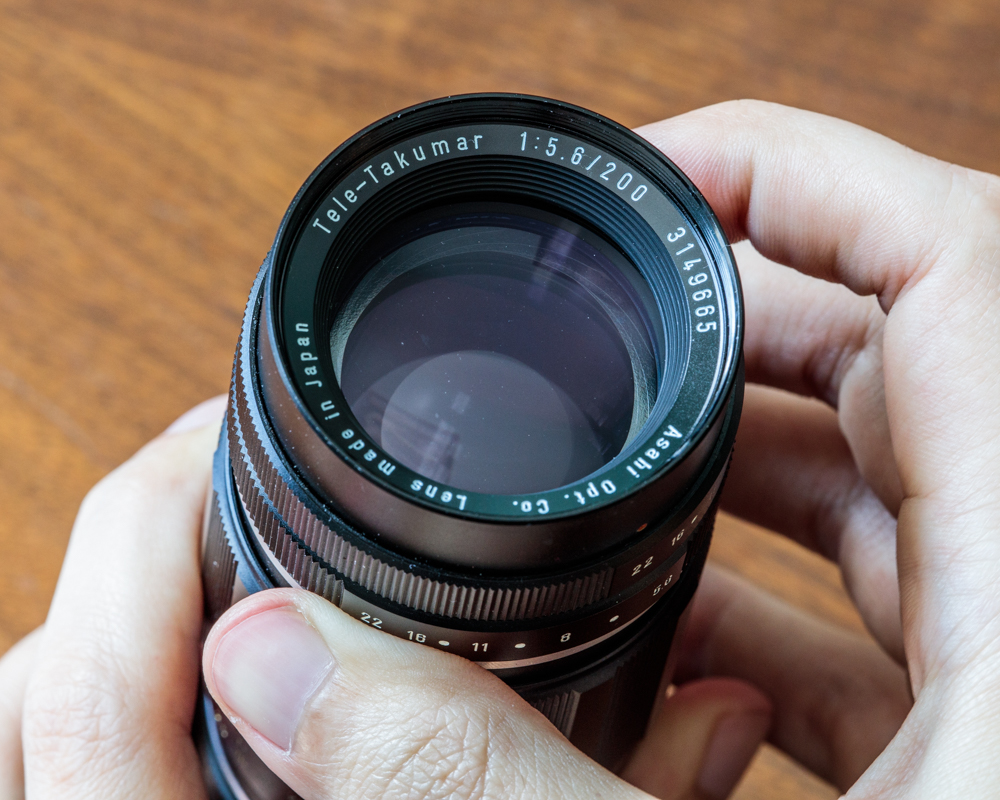
The lens is like a window which light passes through. When you change the f-stop, a circular group of metal blades are constricting to make the window smaller. This assembly of blades is called the diaphragm. When the diaphragm is smaller, the amount of light which passes through is reduced. Think of it as the difference between standing in a sunny living room with floor to ceiling windows and then drawing closed the shades so only a narrow opening remains. In addition to how long your exposure and how sensitive your sensor is, the final tool to manage light is how large the opening is.
One reason that the f-stop is confusing is because it is a relative measurement and not a constant one. The f-stop is the physical maximum diameter in relation to focal length. This is why f-numbers are kind of funky. And if you read my earlier post about focal length and sensor sizes, you will probably have a visceral reaction to not wanting to know any more about the math involved in how f-stops are measured*. That’s ok. That’s the whole reason that we use them: some very smart people already did the math so that we don’t have to. The result is a scale which looks like this:
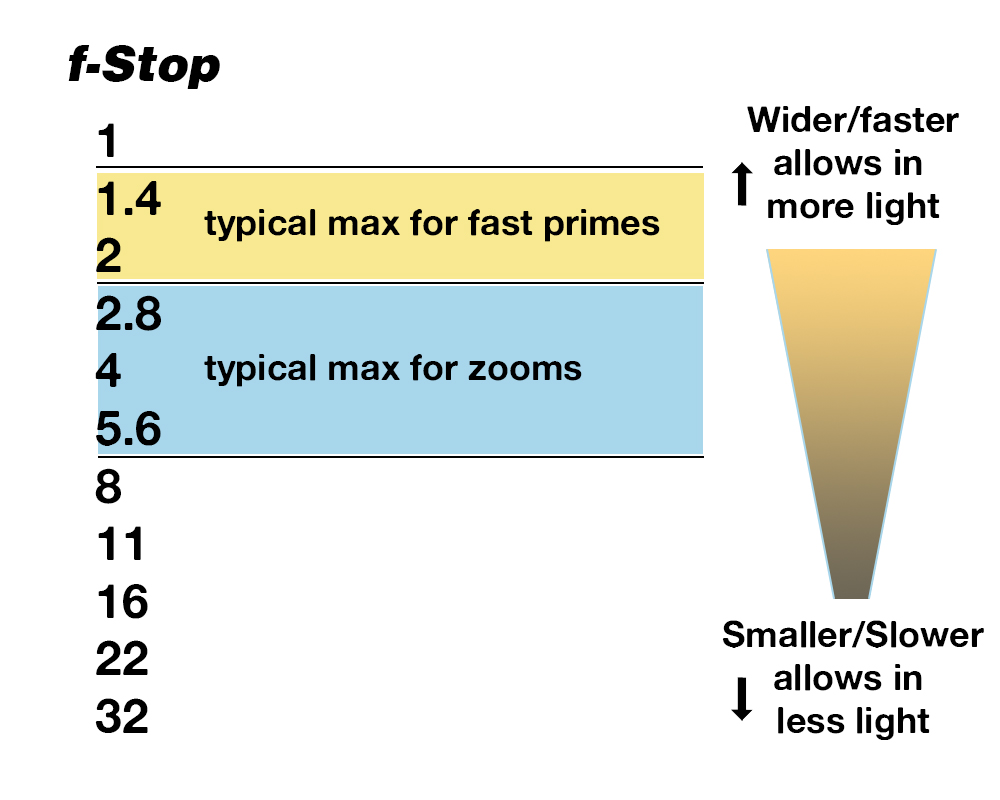
Each full f-stop represents a doubling or halving of light, and is reciprocal with doubled or halved changes to shutter speed and/or ISO. In other words, you can choose any particular f-stop you like as long as you adjust your shutter and ISO to make up the difference. If you shoot in the Aperture Priority mode, the camera will make those adjustments for you.
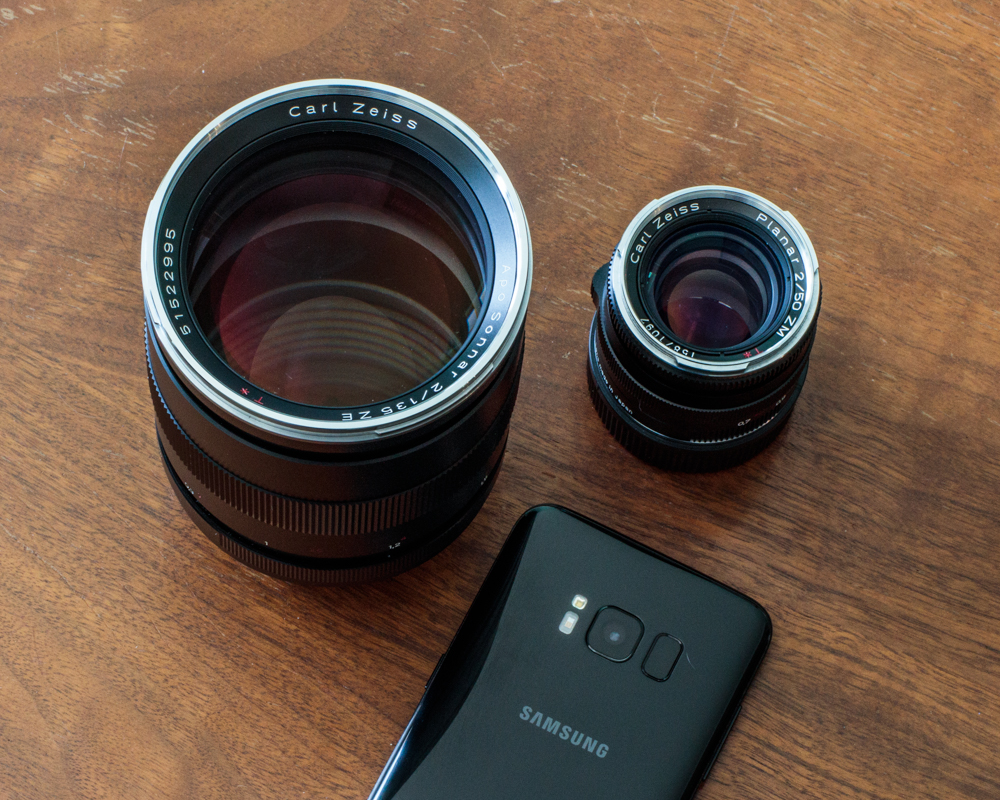
Despite their size difference, the two lenses shown here gather the same amount of light at maximum apertures of f2. That tiny little lens on my phone is actually a half stop faster
Effect: Depth of Field
What happens:
When a photo shows an in-focus subject standing in a dreamy, blurry environment, this is an example of a shallow depth of field. Conversely, a very broad depth of field will appear crisp and in focus from the foreground to the most distant object. To a large extent, the depth of field is going to relate to the focal length of a lens. Very wide angle lenses are deeper, very long telephoto lenses are shallower. That said, you still have a good bit of control over depth of field by changing the f-stop. When the aperture is very large, such as with a fast prime lens, you can get that shallow depth of field that helps isolate a subject. As the aperture is closed down, the depth of field increases.
If you’re having issues with keeping all of your subject in focus, the solution is to increase the f-stop. If, on the other hand, you are trying to isolate a subject from a busy background, you can open the aperture up.

Shot at f1.4
Shot at f16
Why it happens:
Honestly, it’s not actually important and kind of dense.
But if you really want to know…
When light travels through a lens and is projected onto a surface such as a camera sensor, it is not a perfect reproduction. Even the best lens ever built will transform points of light into sort of light blobs. These itty bitty spots of light are called (I swear I’m not making this shit up) Circles of Confusion. The size of a Circle of Confusion is generally the limit of what the human eye can perceive.
Normally if a subject is in front of or behind the focal plane, it appears blurry to us. The blur happens because light rays are not converging at the focal plane. Rays that converge at the focal plane are sharp, rays that converge in front of or behind it are soft. There is a gray area though, where the converging rays are missing the focal plane, but not missing it by enough that we can perceive any blur. If the intersection with the focal plane is smaller than a Circle of Confusion, the blur is imperceptible to us and it will appear in focus to our eyes.
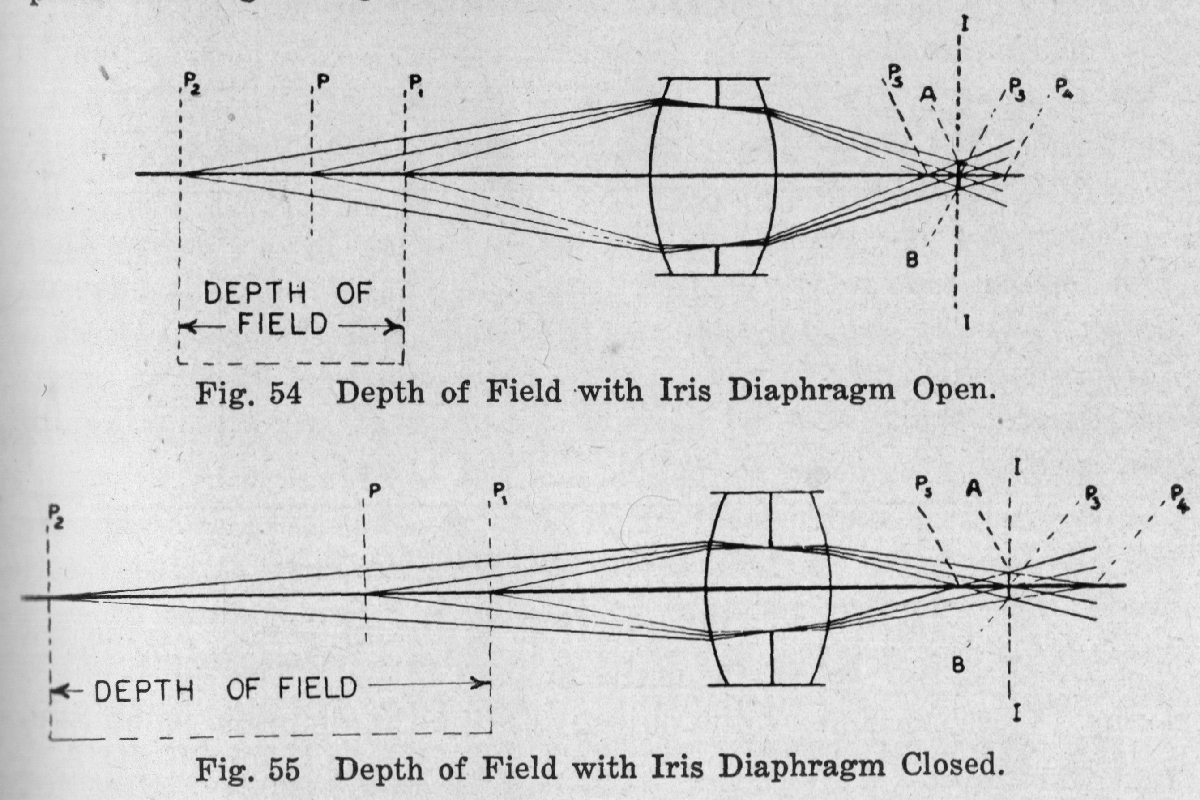
From the Leica Manual, 1947. The space between “A” and “B” is the Circle of Confusion
Because smaller apertures force light rays to converge on shallower paths, the depth which might fall within a Circle of Confusion is increased.
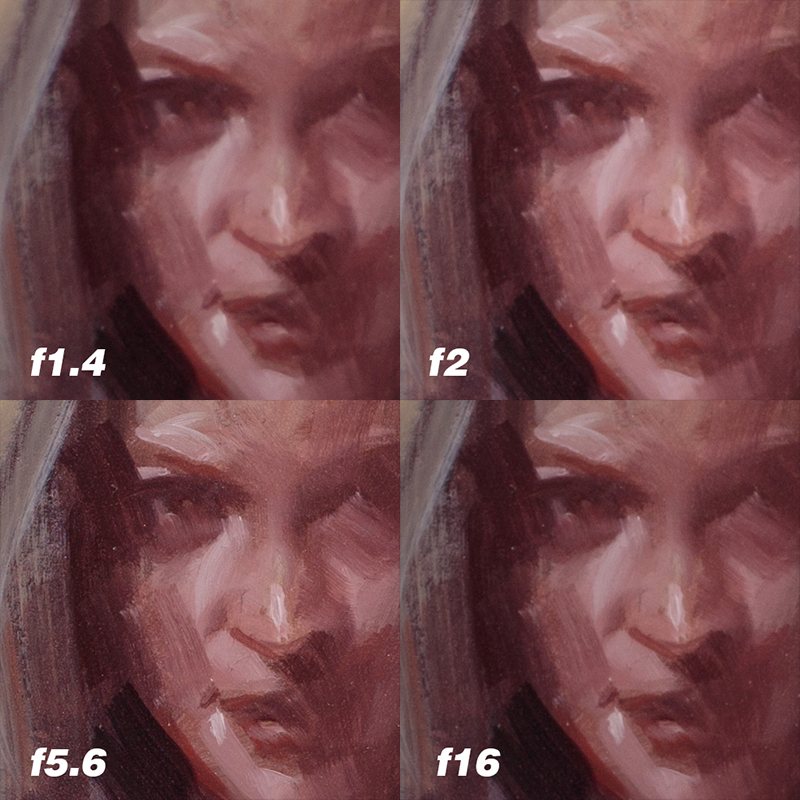
Effect: Sharpness
What happens:
Many people understand that when a photo is shot wide open, or with the largest possible aperture, the image will tend to be a little bit soft. As you increase the f-stop and the aperture gets smaller, the sharpness improves. What many people do not realize is that, beyond a certain point, image quality begins to degrade again. To get the sharpest image possible on the focal plane, you’ll need to find the ideal aperture of your lens. Most of the time, it’s in the middle of the range. Because every lens design is different, it’s a good idea to experiment and see where the ideal spot is, especially for shooting artwork.

Actual Pixel Crop
Besides sharpness, there are other flaws and aberrations that improve with smaller apertures. Generally, you can expect better resolution in edges and corners, less vignetting (where corners are darker than the center), and reduced chromatic aberrations and color fringing. Unlike the softness which is present at both minimum and maximum apertures, these flaws are typically only present in wide apertures and are mostly minimized after 2-3 stops.
Why it happens:
All lenses have flaws. Most lenses suffer from a number of different imperfections and design compromises that can reduce the clarity, resolution, color, light transmission, and overall image quality. Lenses are usually optimized for a middle aperture and therefore reasonable compromises will be evident wide open. If you’ve ever wondered why some lenses cost 5x-10x another comparable option, it often has to do with how well they resolve images at their largest aperture. Most lenses give solid images in the middle. Really high end stuff not only improves peak performance, they can often give incredible results even wide open. That kind of precision and quality is usually very very expensive.
As the lens is stopped down to middle apertures, aberrations are controlled and image quality improves.
Once you stop down far enough, however, you start to encounter a behavior called “diffraction.” As light passes through an aperture, it is bent slightly. The smaller the opening, the greater the effect. When light waves pass through too small an opening, the waves are disrupted enough that it begins to soften the image. So while the overall depth of field may make a small aperture image look sharper in total, the actual details will begin losing resolution. This is a very reasonable tradeoff for shooting landscape images, but unacceptable and unnecessary for reproducing flat art.
I know that’s a whole mess of info. Please shout out any questions in the comments and I’ll do my best to make it make sense!
.
.
.
.
.
*unlike shutter speed and ISO, f-stop numbers don’t halve and double with each stop, they do it every two stops. A 2 second exposure is one stop faster than a 4 second exposure, but an f2 is two stops faster than an f4. The reason behind this is that f-stops are based on the sequence of powers of the square root of 2, which is confusing as all get out. They also gather more light as the number gets smaller, while shutter speed and ISO gather more light as the numbers go up. It’s a royal pain in the ass and much easier to just memorize the scale from, say, f1.4 to f22. In the end, what matters most is that you understand how opening or closing the aperture affects your image and that you have a general sense of what would be a fast or slow lens.


I can’t find the f-stop thingy on my phone. Photo dorks are sexy Dave.
ha! It may not be changeable, but it does still exist. Like a very sophisticated update to the pinhole camera 🙂
This is a really helpful post. Thank you very much for sharing it for me and everyone to know.