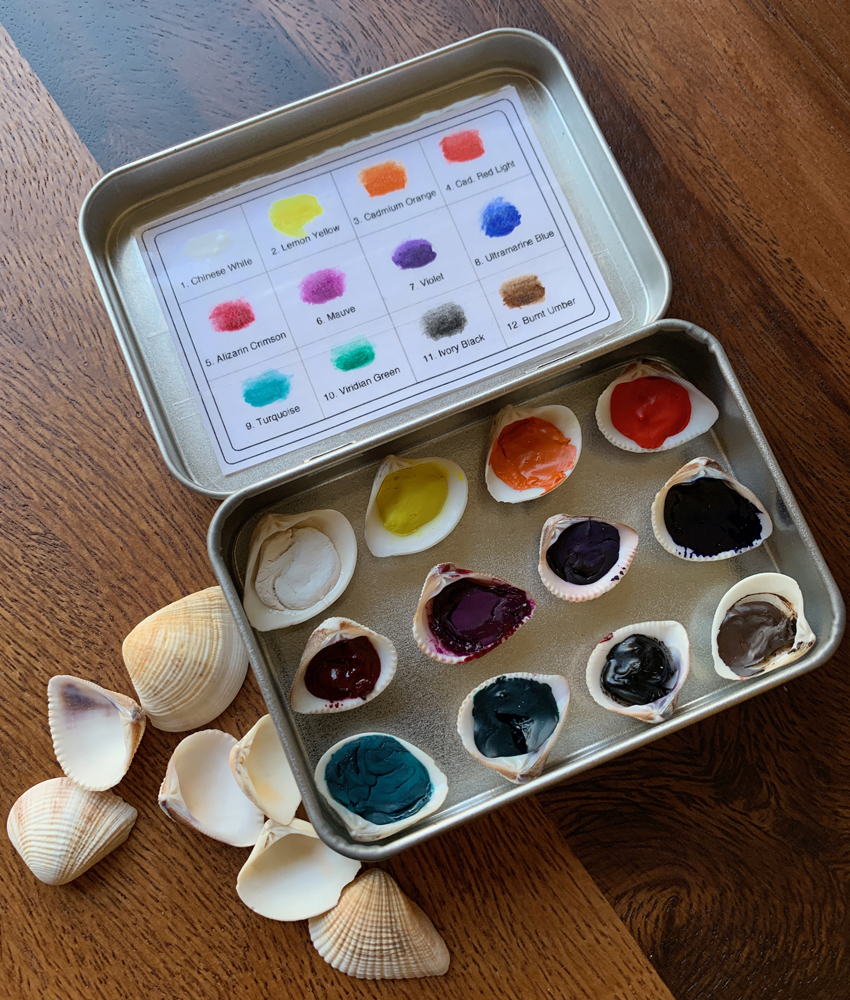
I made this little seashell watercolor palette box recently as a gift, and I thought I’d share it in case someone might want to make one for themselves or as a gift for someone else too.
Here is a list of components and how they were used:
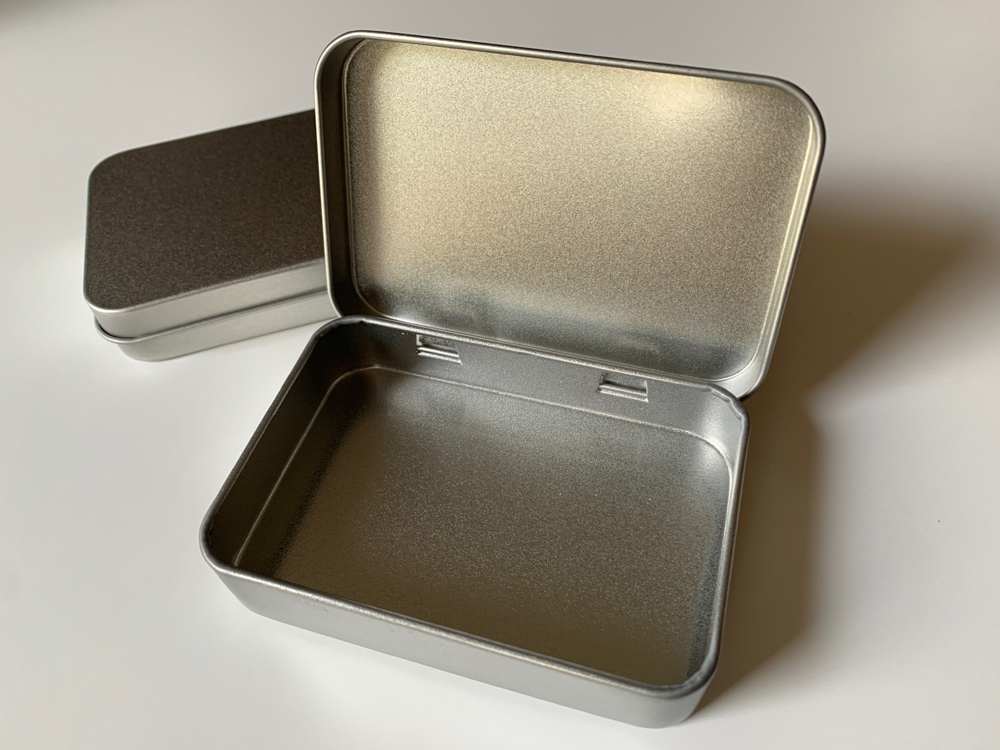
Tin
These tins are lightweight tin-plated steel and magnets can stick to them, which is important. (here is a link to the tins)
Seashells
I used some seashells I picked up from the beach, but also ordered a container of shells in case I made mistakes and needed more (which I did!) This package of seashells has a large assortment in it (here is a link), and I’ve used some of the shells to put on top of the soil in my potted succulents. They could be used for other crafts too. I also bought a small pack of slightly larger seashells but that meant less colors in the one tin. I think that’s a great option too for making a limited color palette, though, with slightly more paint per shell, but less variety of colors.
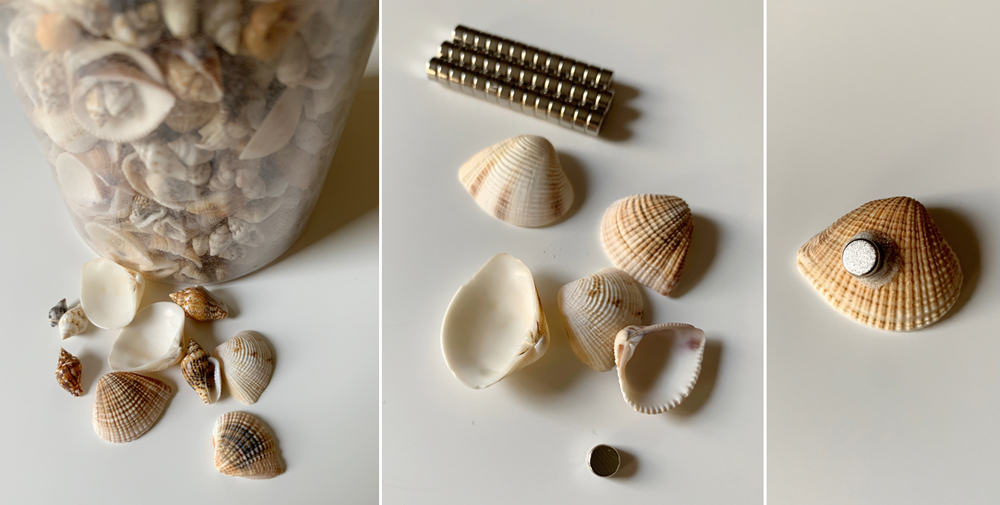
Magnets
These tiny magnets worked perfectly for this particular setup. They’re very small and quite powerful, and they fit the very small seashells nicely. (here is a link to the magnets)
Glue
The glue needs to be a strong glue. I used Gorilla Glue, but something like Krazy Glue would also work well. The magnets have a really strong bond to the tin, so the glue needs to be stronger so that once dry, the shells don’t pull off of the magnets if you try to move them. After applying the magnets with glue, I waited for them to dry magnet-side-up for a few hours. Something I learned from doing this is to make sure that as the glue is drying, they are not near the tin and not too close to each other to keep the magnets from being attracted to the tin or sticking to the other ones while drying.
Paints
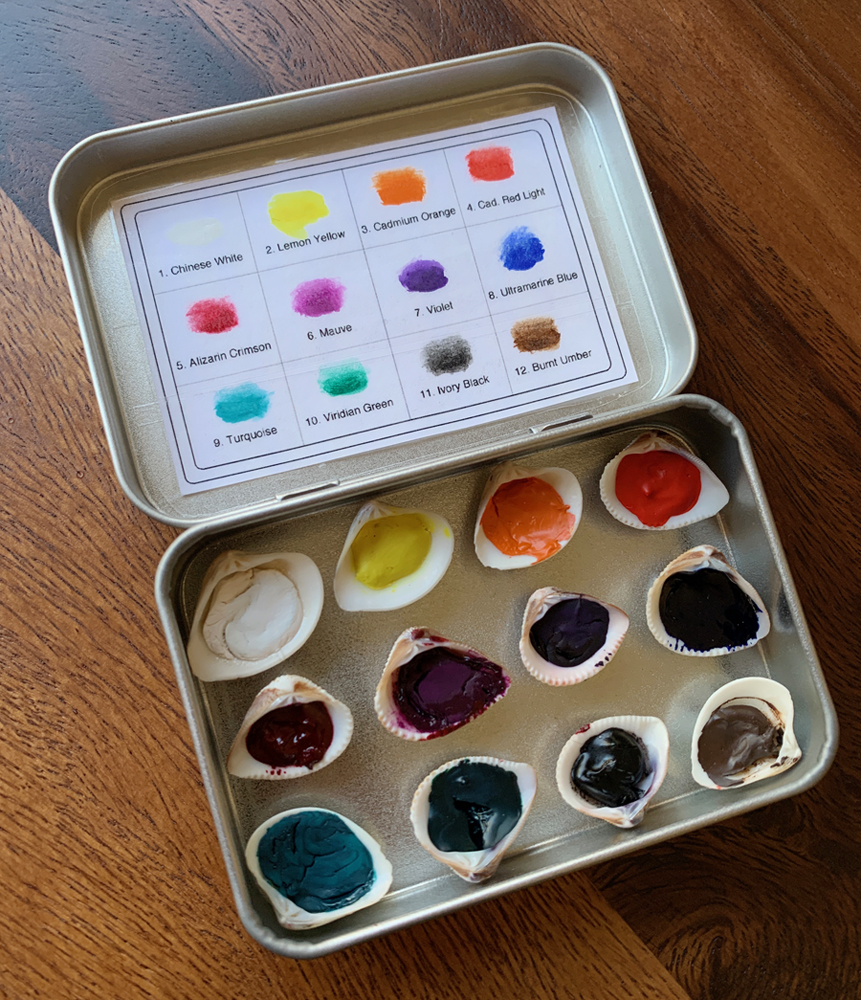
The watercolors I used are an assortment of colors in tubes that I have in my own collection of various watercolor paints. I put the paint in the shells after I attached the magnets to the shells and had let the glue dry. Another thing I learned while doing this is to space them apart enough while the paint is still wet to allow space for your fingers to pick them and put them down. All of these little components are pretty tiny and it’s a bit like the old-school game of Operation when the paint is still drying. Ha! You can use the inside cover of the tin for more space with the tin opened and laid flat. Just let the magnet stick to the tin (paint-side-up of course) and the paint will settle and dry in a nice little pile inside the shell. After squeezing the paints out into the seashells, I waited a week or so to ship it to allow for some drying time before packing. Some colors take a bit longer to dry than others. The kit could be packed and shipped with a little less drying time beforehand as long as the magnets are secure enough and the paint is dry enough that it wouldn’t be sliding around in the shell or dripping out if tipped in a different direction. I waited a week just to be safe.
Color Chart
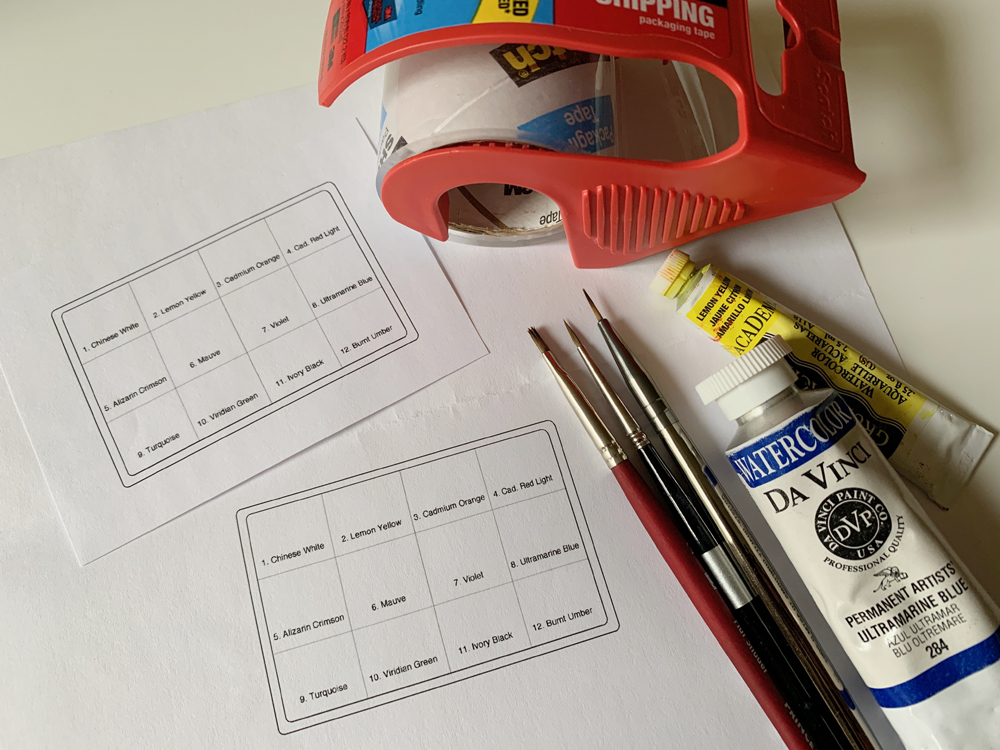
The color chart was made/typed out in photoshop at 200% and then flattened and reduced to the size of the interior of the tin for printing at 100% (50% of the 200% file). At first, I was thinking I might do something more extensive with the design or even have it be more colorful in the graphics, but I opted to keep it simple. Also, I was hoping to handwrite the color names, but these are pretty tiny spaces to write in, so I thought it was more legible this way. It’s pretty straightforward, but I saved the file so that if I make others, or if I change any colors, I can swap out the color names just by re-typing them and printing out again. I used a small bit of paint on each square of the printed chart to show how the color appears when painted since sometimes colors can look different in an opaque pile than when they’re painted on a surface. There is a slight transparent-to-opaque fade in the painted color swatch to show a bit of variation in each color option. After the swatches dried, I used shipping packaging tape covering both sides as a sort of laminate, and just loosely fixed the ‘laminated’ chart to the inside cover of the tin. It’s loosely fixed so the chart could essentially be removed and put onto the front-outside of the cover of the tin or elsewhere, so the inside of the cover could be used as a mixing surface if preferred. Also, the chart is not permanently fixed to allow for the possibility of switching or removing any colors.
This little watercolor palette can be used on-the-go quite nicely. And for a travel palette, I think refillable water pens work well with it for easy, hassle-free and lightweight transportable use, without having to bring along other brushes or a container for water. But all of those could also be added to this for an extended travel watercolor kit, along with a small watercolor pad. I made this as a gift for my niece, and I had a lot of fun making it. I hope this info helps anyone who might be interested in making this. I think it makes a nice little handmade gift. Or just make one for yourself – it’s fun, really handy, and not complicated to make. 🙂


That is so adorable and charming! I love when we get to apply our creativity to our tools and workspace as well as our work. Thank you for sharing such a clever idea.
Thanks Carly! I love this little adorable palette tin and it was so fun to make. I agree about what you said here too. It’s fun to do something creative like this that’s also functional. I also enjoy making sketchbooks out of different materials too. I’ve usually just made things like these as gifts for others and that’s part of the fun too. And when I’m finished I look at them like hey I would love to make this for myself too! 😃
So adorable! Thanks so much for sharing!
Oh thank you, Lisa! I’m glad you like it. 😊 I do think it’s adorable too! I’ve seen different variations of these little palette tins (often made with altoids tins) and thought I’d try it out with the shell idea and see what happens! It was fun! 😃
What a lovely gift to make and receive! I wonder if “museum glue” would work to hold the shells to the tin , or if it’ll have too much movement when you use the paint?
Love the idea. I made a small box some time ago using the plastic of tablets but this is much more charming.
This is ADORABEEZLES. Painters used to use shells for watercolor and gouache centuries ago, and it’s so fun to see someone using them again now–they are a prettier and greener option than empty plastic pans for the colors. Thanks for taking the time to share!
When the paint dries it falls out of the shells. So frustrating. I have redone some of them 3 times.
An Artist show his/her inner beauty in the form of colors! very adorable designs indeed.