Water… translucent, reflective, fluid—a painter’s nightmare! But it doesn’t have to be. If you take each of these properties separately, piece of cake! Watery cake… sounds delicious…
This understanding is especially helpful when working from imagination (as this painting was done), but even when looking at life or a photo this will help you understand what you are seeing, and therefore how to paint it more effectively. I’d encourage you to apply this kind of analysis to any subject that might seem overwhelming at first.
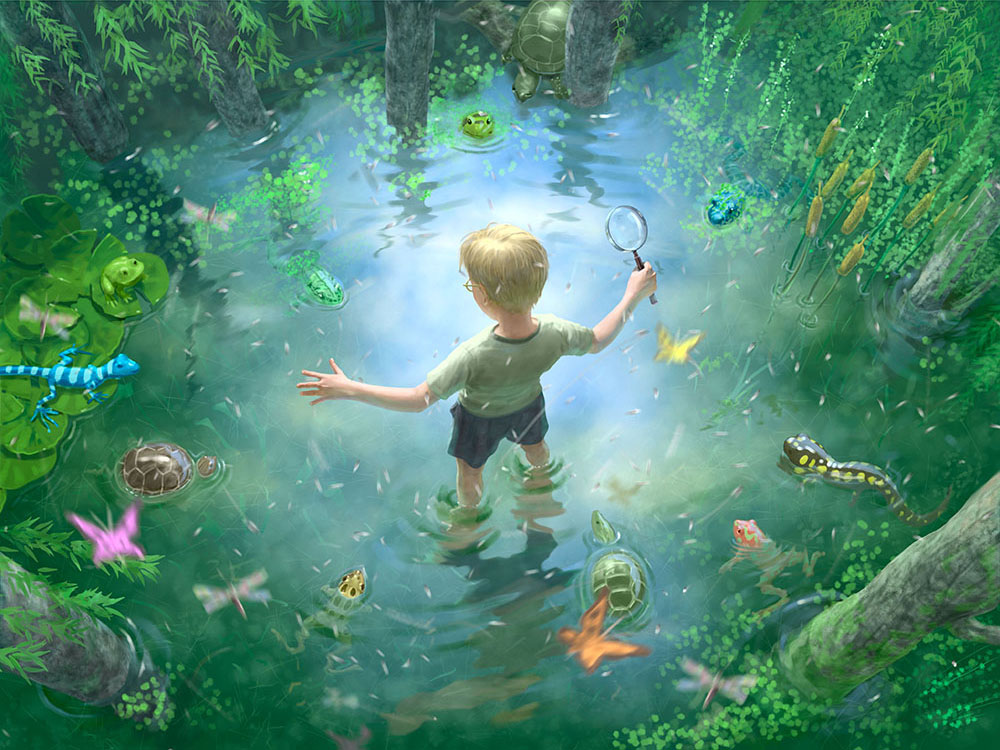
So much going on here. Breathe, then we’ll take it apart.
If you’re working digitally you can use layers to help organize the different factors or properties of water (including the stuff that is in or on it or under it).
Rock Bottom
First, the ground. That muddy mud on the bottom of the swamp. If this were shallow ocean water, this might be sand. I’m not painting what the bottom looks like when seen through the water, I’m painting it how it would look with the water gone.
The dark, muddy bottom.
I’m not being too precise because a) I can adjust it later and b) I know this is going to be obscured by so many things on top of it. So I am mostly just throwing down some dark greenish noise.
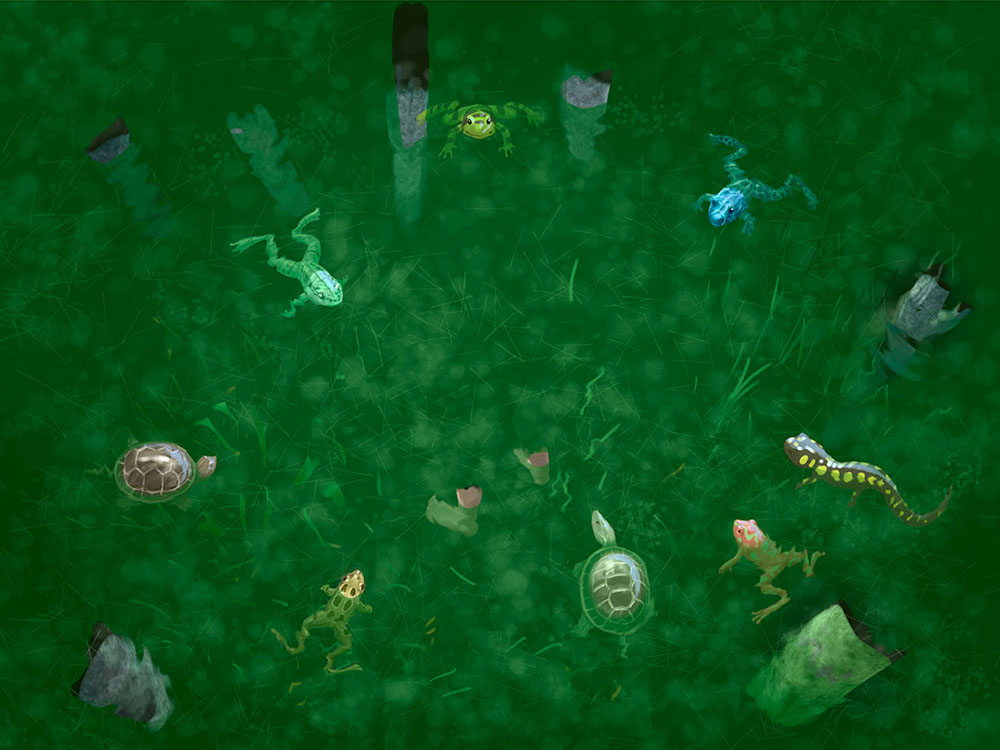
What Lies Beneath
Anything that is under the water (but above the ground) goes next. Things which are partially in the water and partially above it (the kid, the frogs, some plants) can either fully go here or be split into two parts for below and above the water. Here I chose to split tall things (the kid, the reeds), but put the frogs and turtles on this layer, because having them split can become a hassle down the road.

Flying frogs! Let’s give them something to float in.
The parts that are under water (for example, the frogs’ legs, the kid’s feet) are smudged to simulate refraction caused by ripples on the surface.
Mirkwater
Water is rarely perfectly clear. In nature water usually contains a lot of tiny particles of plant matter and other things, so small that we don’t perceive them individually—instead we perceive the water as being translucent, often green or brownish.
This is the only layer that is actually representing water. Though, it’s kind of not… because when we see water all we really see are things reflected in it, refracted or partially masked by it. Cool, huh?
I put this and all the water layers in their own group, so I can use a mask to control where I want the water to show, or not. This is helpful for things like the frogs that I kept on one layer. I masked out the water over their heads but not their legs. This is done by first adding the group mask, then selecting the frog pixels and using that selection to paint the heads out of the mask.
With this mask I can also control how deep something is in the water. I make the mirk more opaque the further down something is. So this one simple green layer, with a transparency mask, ends up simulating a three-dimensional mass of greenish water, like Jell-o, or a gelatinous cube, or something.
Frog soup, anyone? Anyone? No?
Note: People often wonder whether shadows are cast onto the water. Simple answer is, normally, no. Normally what we might think is a shadow is the reflection of the underside of something (like a boat) which is dark. But water can receive cast shadows if it is mirky enough (approaching being opaque), though it’s actually the particles in the water that are receiving the shadow.
The Upside Down
Next I consider what is reflected in the water. See how we’re first breaking down what we see when looking at a watery swamp, then building it back up out of separate elements? Well here we have another breakdown of separate elements within the reflection component of the water.
Let’s start by thinking of the surface of the water like a perfect mirror. In it we are going to see reflections of the kid, the plants, and behind all that, the sky—all upside down. We can make a reflections group within the water group and build up this upside down reflection world in that.
Sky Reflection
We’re going to see a lot of sky, because this is a high angle (overhead) view. So I actually paint a simple little cloudy sky. I’m deliberately putting a big white cloud in the middle for compositional reasons (to create a focal point “target” of contrast with the boy), but you can put whatever sky you want in there.
Note the little areas of green around some of the critters. Those are where I’ve erased part of the sky. Because the reflectivity of the surface changes depending on its angle to you and the thing being reflected. Imagine a piece of glass. If you look straight at it you mostly see through it, with a little reflection superimposed. But if you start to tip it so it’s becoming more flat (level) the glare builds up to the point where you are only seeing reflection.
This is what happens with water too. If it’s perfectly still and flat, you see a lot of reflection. If it’s rippled then you see a hard mixture of reflection and through the water. The surfaces that are perpendicular become non-reflective, so you see through to the mirk. The surfaces that are more horizontal reflect like a mirror.
Most water reflection follows this general pattern: light blue reflecting the sky, dark green where there is no reflection and you are seeing through the water and into the mirk. This happens on a larger scale as the reflection is stronger (more opaque) toward the top. At the bottom we are seeing through it a little.
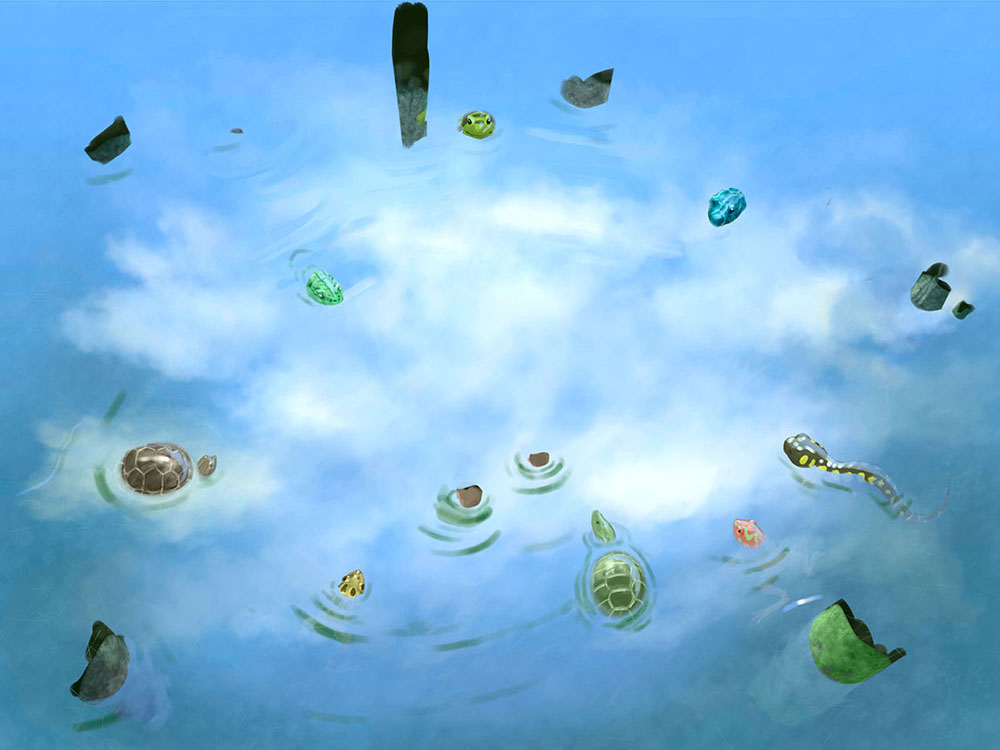
Frogs in the sky, with turtles (and a salamander)
Now I’m continuing to remove more of the sky reflection, partly for compositional reasons, but also because the reflection will be stronger in the middle (think of it like road glare from headlights).
I use a layer mask to remove the reflection, rather than erasing, so I can paint back and forth, adding, removing, adding, removing, without destroying the sky painting.
I’m doing this all by eye, obviously. I’m not calculating which areas are flat or tilted—I’m just painting ripples and removing sky so I can see some of the critter parts that are under water.

Starting to look like something. Ground + critters + mirk + sky reflection
Now we’re getting somewhere! Look how the legs of the frogs at the bottom appear. They are made up of base frog + greenish mirk + translucent sky reflection. Just by separating the mirk from the reflection we get some beautiful and realistic color blending.
Other Reflections
Next come reflections of other things, such as the trees near the top—even though I haven’t actually painted the trees yet?! No, in reality I rough all these components in, then develop them separately. I’m just showing you how they build up from top to bottom in a layered image. These reflections are added on a new layer above the sky, within the reflections group.

The invisible boy…
So here’s something that happens a lot when painting vertical things in water, like those trees: the dark part of the tree that’s under the water closely lines up with the reflection of the part that’s above. In fact, if it’s a perfect, vertical cylinder, they exactly line up. But refraction and reflection break them apart a little.
I distort the reflection using smudging and removing (with the mask). By aligning these ripples with the smudging of the things underwater (the frogs’ legs, the trees), the effect is very strong. They don’t need to line up exactly, they just need to be similar.
The Easy Stuff
On top, of course, goes everything that’s above the water.

Putting it all together.
Obviously I did not paint the kid’s feet without the rest of him being present. This is just how I separate the elements and stack them up. In reality I work everything back and forth from beginning to end.
Using layers, groups and masks to separate the different properties of water allows me to do this effectively and efficiently. I can really play with the reflection of the kid, for example, until I get a shape that is interesting and dynamic, and also convincing, when all I’m actually painting is a blurry smudged upside down kid on top of the sky.
When you put all this together (and really it’s not very many things):
5. Things above the water surface (normal)
4. Surface reflections (distorted)
3. Translucent water
2. Things below the water surface (distorted)
1. The bottom (dark and simple)
The combination can be breathtaking.
Epilogue
As a professional illustrator I get lots of opportunities to learn about new things, and have adventures! While studying swamp water… yes, that’s right, I happened to scoop up this little guy (who told me he goes by the name of Thaddeus Pole).
I set up a lovely swamp home for him on my patio, complete with swamp plants, swamp water and various other elements of swampiness.
Here’s him growing from a mere head with a tail into a frog. Fun fact: his front legs become fully developed under his skin, then pop through.
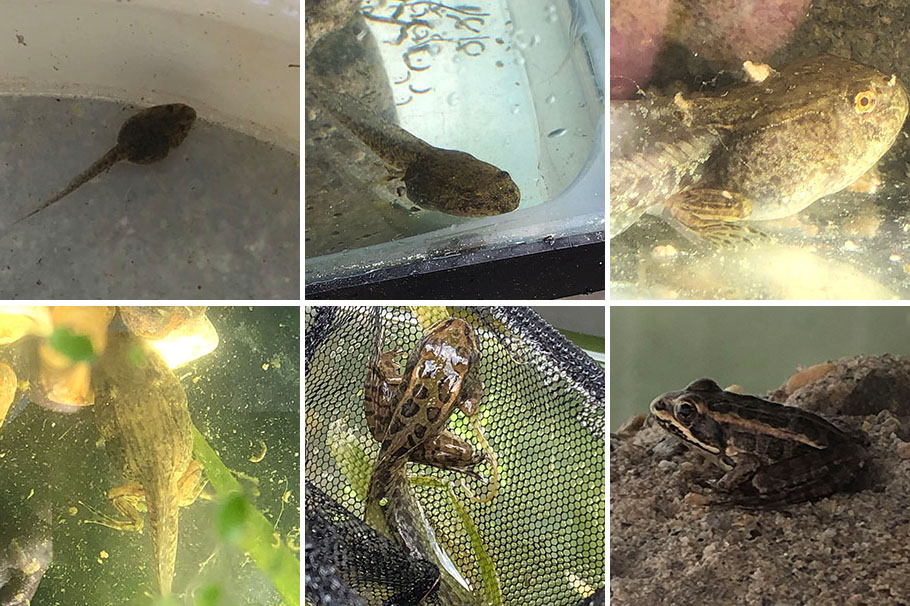
Unlike people, frogs get cuter (and more fun) as they grow up.
Soon Thaddeus will be moving to his permanent home in the studio (please don’t tell my wife). Also, now I like hanging out in swamps.


Recent Comments